Followers

Tuesday, May 31, 2022

Masculine Cards for Paper Funday's June Challenge

 Welcome to my design team project for Paper Funday's June Challenge - as always anything goes and this month's optional theme is Masculine Cards.  Like most of us, I struggle with these cards; most of the products I have are a bit too feminine.  So the trick is to use what you have to make a card that would appeal to men.  It's fairly easy to make a birthday card but I wanted to make an any day card.  Hope you like it! 


I used a white card base and covered the face of the card with this patterned paper from the Rugged 6"x 6" paper pad from Authentique {I think this is retired, but it is readily available}.  I really like plaid for masculine cards because it is so easy to pick a color in the pattern and use them to embellish the card.  I used pale blue/gray on the sentiment shadow and dark brown for the actual sentiment die.  I used this stamp set for the second half of the sentiment, stamping it on white card, with this ink.  I think the blue matches the shadow and the bit of blue in the plaid.  The sentiment was trimmed and I layered the sentiment on a dark brown stitched fishtail foundation die.  I glued everything to the card and I was done.

So this card may not be the most masculine card but I think it is a nice sort of thinking of you card.  I really like the difference between the two sentiments; one is sort of fancy and the other is plain.  What do you think? Regardless, we'd love to see your projects at Paper Funday; remember, you can enter an anything goes card, or follow our optional theme.  Thanks for checking out my card ~ I appreciate you so much! Fondly, Christi


Wednesday, May 25, 2022

You're My Kind of Peep

 My friend Tom absolutely loves Peeps.  He's never met a Peep he didn't like; in fact, the more sugary and weird the flavor was, the more he loves them.  One year we found fruit punch flavored Peeps but have not been able to find them again.  I hate it when that happens; you find something you love and they either discontinue it or stop carrying it.  That happens to me ALL the time.  Anyway, I thought this slimline card with some pastel Peeps might brighten his day a bit.


I used a homemade white slimline card and covered it in rainbow spotted paper.  I stamped the sentiment using my favorite black ink on watercolor paper and colored it in with Zigs and used a black marker for the shadow.  I then cut the sentiment out using a stitched nesting square die.  Cutting out all the bunnies in shades of pastels really isn't manly, but I wanted to keep the spring feel.  Their tails were just die cut out of white card.  Lastly, I then used dimensional dots to attach the rabbits to the card and glued the sentiment onto the top of the card.  Unfortunately, the stamps & dies {Simon Says Stamp, You're My Kind of Peep} are discontinued, but you might be able to find them online somewhere. I was lucky enough to find them in one of the Facebook Groups I belong to and it's the first time I am using them :)

I love these cute peeps and I feel the card is so charming! I hope this card brings Tom some joy and the very cool part is I am going to visit him {I am leaving on 5/29/22} so I will be hand delivering this card; I am SO excited! I thank you for visiting and appreciate you! Fondly, Christi

I am entering my card in the following challenges:
Simon Says Stamp Wednesday Challenge - Anything Goes
Shopping our Stash, #471 - Make Mine a Tall One {slimline or mini slimline}
Alphabet Challenge Blog - D is for Die Cuts
Crafty Hazelnut's Patterned Paper Challenge - Anything Goes/Use Patterned Paper
The Diva's That Cut - Anything Goes
NBUS, #38 - Anything NEW Goes


Wednesday, May 4, 2022

Mixed Media with The Robin's Nest Creative

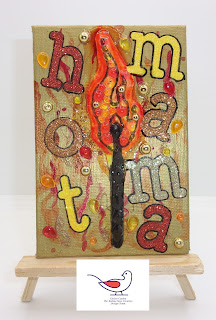
 Hello everyone! For my Design Team project at The Robin's Nest Creatives I decided to go all out and get really messy.  I used to make mixed media items all the time, but have since gotten busier and really haven't had time to play; I made up for lost time!  Let's get to it, here is the project; it's made on a Frederix 4" x 6" panel - this is a long post, I apologize, but I used a lot of different products (some not so successfully) while making this piece.


The first thing I did was use one of the really cool kits they have at The Robin's Nest called Creative Dew Drop Canvas and there are some amazing pictures to choose from, I used the Matchstick Creative Dew Drop Canvas for today's project.  These kits come with everything you need (except glue) to make a masterpiece worthy of framing - AND they come in different sizes! I used Dew Drops that I though would represent the flame best, orange, gold, red and yellow and filled it in completely with both Regular and Mini Sized Dew Drops. Black Diamond Dews were used on the wooden part of the match. I also colored around the flame to sort of give it that halo glow you sometimes get around fire using Copics right on the canvas.  I smothered it with Diamond Glaze and let it sit overnight to dry.  I wanted

Another Look
to use a panel as my substrate so I cut the match out.  I actually did this back in the beginning of being on the Design Team but I put the match somewhere and couldn't find it - shocking, I know - it popped out of where ever those items go when "they were right here" and then they are gone (another dimension with lost socks?? I don't know) but I found it.  Setting the match aside, on my desk so it couldn't escape again, I painted the 4" x 6" panel gold using Lumiere True Gold Paint. I have to swoon for a second because I love Lumiere Paints - if you like rich color, some of the coolest pearlescent colors (some of them are blended with 2 colors and the effects are amazing!) you need to check this paint out.  It is sold for use on fabric, but I have used it on everything and I have never been disappointed with it.  It's a quality product and it may seem pricey (if you shop around you can get a jar for around $6, a 2.25 fl. oz, jar, but they also come in sets with little squeeze bottles, called Exciter packs), but a little goes a long way. Sorry for that little detour! 

So once my panel was dry this is basically where I went crazy.  I used a flame stencil and some sprays to try and make a fire background, well the gold paint did not like the sprays (they are water based and just beaded up and dripped away) but some of the color did take.  At this point I just started to throw products at the panel; and I used so many different colors I couldn't begin to list them all. I used a few different embossing powders from Wow Embossing Powders, some diluted red paint from Golden, and some more embossing powers -which again were an issue because the embossing ink just beaded up on the paint.  No worries I just made the background really, really abstract.  I glued the Matchstick Creative Dew Drop Canvas that I had cut out onto the panel and attached the alphabet letters I had cut out of  6" x 6" DCWV glitter stacks and I then added more Dew Drops using the same colors I used to fill in the flame, but I used the Tear Drop style of Dew Drops instead.  I added a few Mini Dew Drops as well.  I wanted them to sort of look like sparks from the flame.  I glued the sentiment onto the panel and the letters just blended right in with everything else so I used a permanent black marker and traced them all so they'd be easier to read and pop a little.  The final step was to smother the match stick once again with Diamond Glaze and once that dried I was done.

I am actually happy how this panel ended up.  It is very interesting with all the colors, glitter, glaze and, of course, Dew Drops.  I hope you enjoyed my long story- I have been trying to make my posts shorter and I think I am succeeding, but sometimes I just have to tell the whole story!  Thanks for your support ~ Lots of love, Christi

I am entering my Mixed Media Panel in the following challenges:
Crafting Happiness, #123 - Anything Goes
Love to Craft Challenge Blog, #68 - Anything Goes
Mix it Up Challenge, #59 - Anything 3D Goes
Creative Artiste Mixed Media Challenge, #82 - Anything Mixed Media Goes
A Perfect Time to Craft, #5 - Anything Goes
Mixed Media Lovers, #13 - Anything Goes

Home Sweet Home Recycled Wall Hanging

 I had been perusing Pinterest to find something to do with all these friggin' buttons I had left over from when it was a big thing to put buttons on your cards {something I never really got into, but HAD to have all the stuff in case the moment grabbed me and I felt the urge to make hundreds of cards with buttons on them} and I found all these Christmas wall hangings with button trees on them So I actually made the Christmas wall hanging during the season this past year and decided I needed to make one that could be used all year long.  I came up with the Home Sweet Home wall hanging that I am using for this month's recycle challenge at River of Creativity {remember we are an Anything But a Card challenge!!}:

I started with an 8" x 10" wooden shadow box frame {no covering on this frame} that I had painted with white gesso and rubbed some gesso on the actual frame part to soften the darkness of the wood.  I took some Scrabble tiles I had {I have SO many of these tiles I am sure I could cover an entire wall
Making the Heart
with them} and spelled out Home Sweet Home to make sure the sentient would fit.  Then I cut out the largest heart using Tutti Nesting Stitched Hearts, #TUTTI-216, and covered it with the buttons.  I could NOT get the shape of a heart to work when trying to do it by hand, so I used the die cut as a template.  Since the background of the shadow box is white it is really difficult to see the white paper heart beneath the buttons.  Once I had finished the heart and glued it to the center of the shadow box, I glued down the Scrabble tiles.  I am really pleased how this came out! I think I could almost actually sell them if I could find a cheap source for the shadow frames; I have sourced a few and they are just too pricey right now - at least if I wanted to make a marginal profit and I can't see having to spend more money to use up the stash I already have.  But, I do have a project I made for my sister for Christmas that I was SURE I posted but can find no record of it, so more button projects on the way!

Getting back to the challenge on River of Creativity, this months theme is RECYCLE so if you'd like to use the theme make sure your entry has some sort of recycle, or upcycle in it.  We can't wait to see all the gorgeous entries! I am personally so pleased at how you all have embraced the changes we made to this challenge and it's a testament to how people are still creating other things besides cards! Thanks SO much and I hope to see you at the challenge ~ Fondly, Christi

I am entering my Home Sweet Home Wall Hanging in the following challenges:
Mix it Up Challenge, #59 - Anything 3D Goes
Creative Artiste Mixed Media Challenge, #82 - Anything Mixed Media Goes
A Perfect Time to Craft, #5 - Anything Goes
Mixed Media Lovers, #13 - Anything Goes
The Creative Crafters, #51 - Anything Goes
We Love to Create, #5 - Anything Goes

Tuesday, May 3, 2022

Family Challenge at Paper Funday!

Hello everyone! Today is the start of the May challenge at Paper Funday and our optional theme is FAMILY.  I had a few options in my mind for this challenge, but decided to go with a family of cats; if you follow me on any social media I am always posting pictures of my cats (I have eight which is why I found this sentiment to be particularly fitting)  and talking about their crazy antics! I hope you enjoy my card:

I started with a handmade slimline base in white and covered that with the brick paper (this paper is from a pack I got in a bundle from My Favorite Things & I couldn't find it on their website) for the wall and used dark blue cardstock for the floor; pretending it's carpet, to give the illusion of a room.  Then I used my favorite black ink on watercolor paper and stamped all of the cats as well as all of the other items I used in my scene.  The sentiment was stamped on white card scrap and cut out with a fishtail banner die.  I colored everything with my Zig markers, cut out all the items and glued them to the card.  I had found a wooden heart embellishment with a paw cut out (discontinued product)  which I covered with Foundry gilded wax and being it a flat piece, I added some Diamond Glaze to seal the heart otherwise the wax just flakes off - it needs dimension to stay on something.  I watched the Tim Holtz video on Foundry wax and I had to get ALL the colors after I tried out the gold.  The pictures don't do this product justice - it really is amazing!  The heart was the last thing I attached to the card and it was finished.

I hope you enjoyed my card and maybe it will help you think of different ways family can be interpreted.  And most of all, I hope to see you join in at the Paper Funday challenge for May! Thanks so much, Christi

I am entering my card in the following challenges:
Krafty Chicks, #610 - Stamp Act
DreamValley Challenges, #269 - 4 Legged Friends
Critter Crazy Challenges, #62 - Anything Goes w/ Critters
Crafty Friends, #155 - Animals
The Diva's That Cut - Anything Goes
Country View Challenges - Cats and/or Dogs