Followers

Showing posts with label Autumn. Show all posts

Tuesday, October 5, 2021

Hello Fall!

 Hi everyone! Well, fall is here, at least once the sun goes down.  The nights have actually gotten so chilly I have had to shut the window and put the heat on! I was inspired to make this card by the background paper that I got as a freebie from my most recent Lawn Fawn order {and where the leaves came from - a first time use from a new release!}; and then when I spied last week's Lawn Fawnatics challenge {it was #109 - Awesome Autumn} this cute card was born! While this isn't exactly a sky, I am entering my card in the most recent Lawn Fawnatics Challenge, #110 - Spectacular Skies - just pretend these leaves are swirling all about in the sky :)


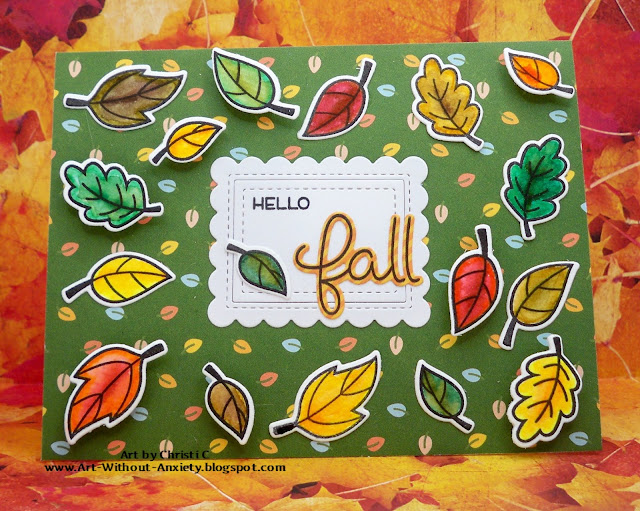
I started with a white card, covered it with Fall Fling paper, then stamped, colored and cut out the leaves and the word fall.  I used the new Scripty Autumn Sentiments stamps and dies for the leaves and sentiment, framing the sentiment with Mini Picture Frame dies.  The frame dies actually cut out in 2 separate pieces, the frame and the middle - I just kept the die cut together {used a bit of tape on the back}, stamped hello and layered on the word fall.    Then I used dimensional dots for some of the leaves and scattered them all around the card without much thought.  Fall colors are one of my favorite themes because I love mixing all the colors; you really can't make a mistake blending with that color palette.  The cute frames are one of my first Lawn Fawn purchases but I don't think I've ever used them before! Well, they are out on my desk now which means I am sure you will be seeing them again soon.  

I am not sure if I like this new format of my blog; it does save me time, but I don't think it flows like my original style did.  I'm sure it will work itself out!  Thanks for taking the time to stop by & I hope you and yours are healthy and safe ~ Christi 

I am entering my card in the following challenges:
Lawn Fawnatics, #110 -Spectacular Skies
Try it on Tuesday - Autumn Blessings
NBUS - Challenge #31 {must use never before used stuff}
Die Cut Diva's - Anything Goes
Dies R Us, #178 - Anything Goes
Country View Challenges - Autumnal Colors
Crafty Hazelnut's Patterned Paper Challenge - Anything Goes using Patterned Paper
The Four Seasons Challenge - Anything Goes Fall
Sunday Stamps #267- Autumn Boldness {graphic below}
Pammie's Inky Pinky Challenges, #2140 - Anything Goes


Monday, October 8, 2018

Autumn Shaker Card

It's October and at Die Cut Diva's the challenge this month is Halloween or Autumn; and to top it off, the lovely Dies R Us is sponsoring us and giving away a $10 voucher!

I've made quite a few shakers cards and I have to admit, this is one of my very favorites.  The entire card was easy, there were no mistakes or mess ups, and I am so happy with how the front of the card looks.  To me, this card has all the elements of a fabulous card; it's a long tutorial, so you may want to go to the bathroom and grab a drink, maybe even a snack. :)  Without further ado, here is my card and how I made it:


What I Used to Make my Card
White Card Base
Handmade Alcohol Ink Paper
Tutti Designs Maple Vine Frame, #TUTTI-139
Light Gold Paper
Craft Foam Board {Dollar Tree or local dollar store} Called Readi-Board
Tutti Designs Stitched Nested Rectangles, #TUTTI-217
Embossing Powder - Not So Rusted Penny by the Powder Keg (bought by PK                                    Glitz, then purchased by Stamp On It!)
Hero Arts My Monthly Hero Kit, September, 2018, sentiment
Simon Says Stamp Embossing/Watermark Pad
Sequins
Acetate {you can use packaging, projector sheets, or the stuff they sell especially for shaker cards}
Red Double Stick Tape

I began this card by making the alcohol ink paper first.  I used glossy paper and various alcohol inks, some from Ranger, some from Jacquard  {specifically the PiƱata Colors} and some very old Pantone inks, which are the refills for the Letraset Tria markers {which are now known as ProMarker, and has been
purchased by Winsor & Newton.}  I did not keep track of the colors I used; I just chose the ones that looked the most like fall and autumn colors to me.  I did, however, make the marks I made with the inks purposely small.  I didn't want the die to cut out a hunk of one color and none of the other.  Another item I used was the Gold Mixative by Tim Holtz and Ranger.  A little dab of that goes a long way and it gave the paper a golden sheen, if the light catches it correctly.  I made a bunch of backgrounds while playing with my inks, as I typically do, and I'm going to be trying the Alcohol Lift Ink soon to see if it works with glossy paper as well as it does when it's used with YUPO paper.  I do have a small bit of YUPO but I always forget about it when I'm playing with my alcohol inks.  OK, enough about the inks, let's carry on! 

Once the paper I'd made was fully dry, I used the Maple Vine Frame to cut out some of the paper.  I was SO tickled that it came out as beautifully as it did and I really feel the key was using small dabs of the ink.  Once I had the frame cut, I put it aside.  I adhered the light gold paper to my craft foam board, figured out which rectangle die fit it the best and, once the glue was dry, proceeded to cut a gold frame.  I had tried to make the frame by cutting the craft foam, then cutting the paper, and then tried to match it up.  Even though I taped my dies together, I could NOT get the two pieces to play nicely.  That's why I glued the paper onto the craft foam board.  The Maple Vine cut out is attached to this frame so I have the walls for the shaker.  I glued the acetate to the top of the gold frame and attached the Maple Vine to that.  I set that aside, under the tile on my desk, for overnight to ensure there was a good solid connection - I know acetate can be stubborn when you use a wet adhesive.
The Readi Board Label

The next day I took a white card base and added the sentiment, which I embossed with a fabulous powder called Not So Rusted Penny.  It's a perfect fall color; bits of brown, rust, and flecks of gold; the pictures do not do it justice!  Once the sentiment was done and cooled, I got the bright idea to use double stick red tape to put the frame onto the card.  I pinched a bunch of sequins and piled them on top of the sentiment; attached the red tape to my frame, managed to get it as straight as I could, and attached it.  It was all fine and dandy, but I had forgotten that some of the tape would be sticking out, where it didn't quite have the frame cover it all.  So, with my first shake a billion sequins got stuck on the tape.  Fortunately, there were {and are} still some loose sequins so the card can be shaken, but I can tell you I won't be making THAT mistake again.

All in all, I am very proud of the card.  When I look at the alcohol ink paper I
Here is a sparkly pictuer
made, and then at the frame, it's hard to believe that the paper made that frame!  This is one of the first times I've been happy with an alcohol ink background the first try.  I usually mess up the colors and they don't cut as nicely as I see it in my head, but this was successful!  Of course, having all the sequins bobbing about in the card would have been nice, but that's the charm of handmade, right?!?  Yes, I say that a lot.  It makes me feel better.  Well, I hope you enjoyed my tutorial.  You can see more examples of my shaker cards here and here.  I've used both craft foam and craft board and I can't see a difference in the final outcome of the card; the foam board is much cheaper, so I'll be sticking with that for a while.  I'd love to see your Halloween or Autumn makes in the challenge; just link up here at Die Cut Diva's! And don't forget, our sponsor, Dies R Us carries SO much more than just dies! Take good care and thank you for stopping by! Fondly, Christi


I am entering my card in the following challenges:
Die Cuttin' Divas - #390, 3D projects
Papercraft Challenges - M, #22, Dies and/or Punches
{PIN}spirational - #226, Photo Inspiration (see below)
Unicorn Challenge - M, #37, Autumn or Halloween
Addicted to Stamps - M, #167, Autumnal Colors
Creative Friday - #215, Shaker Card
Simply Create Too - M, #143, Make a Shaker Card
Moving Along with the Times - M, #81, Autumn/Fall
DL Art - Thankful Thursday - #236, Fall Colors


{PIN}spirational


Tuesday, September 25, 2018

Shout it Out!

So fall has officially begun.  It's about 70 degrees here, but the other day I was up at Estes Park again {I know, 2 times in five days!} and there were some Aspen trees turning colors - it was amazing!  As soon as my brother puts his pictures up, I'll share them with you.  We also saw a mama elk washing her baby and a few of the moose elks doing their rut stuff - the call they make can be heard through almost the entire park!  Anyway, sorry for all the nature stuff but I am finally able to get out and see what my beautiful adopted state has to offer and it is amazing.  I made this card to reflect the colors of fall as well as be able to give to someone regardless of the occasion.


What I Used to Make my Card:
Kraft Card Base
Authentique Harvest 6" x 6" pad, #HVT028 {retired but available}
The Ton Bold Amazing Word Plate Dies
Mama Elephant Little Dog Agenda Stamps
Mama Elephant Little Dog Agenda Dies
Zig Clean Color Markers
Vanilla Card
Watercolor Paper
Orange Card
Leaves {left over from this card}
Ranger Archival ink in Jet Black
Silhouette Cameo
Red Tape Adhesive
Removable Tape 

I already had the cute little dog with the megaphone colored and cut; since I first saw him, I knew I wanted to make a card that made him look as if he was using the megaphone to shout out something happy and the Bold Word Plate dies fit perfectly!  I used my Cameo to cut out some word bubbles; that took me the longest because I kept making them either too small or too big - I am horrible at measuring and if things aren't life sized I can't seen to figure out which way to go - up or down. One of my many dyslexic issues.  Directions and I have a love/hate relationship because I struggle with them so.  My mom says it isn't a car ride with me unless we turn around at least once! 

Once I fit the word bubble to the words I discovered a great way to make sure all the letters are even; once the letters are cut, carefully put them back into the die.  Use removable tape and tape them together the "wrong" way {as they are in the die, looking up at you}.  Pull the letters out of the die and tape them with removable tape on the "right" side, removing the tape you put on the wrong side.  Use a strong adhesive {I found red tape adhesive is worth the
Another Look
trouble of cutting out those itty bitty, teeny tiny, pieces} and attach them where you want them.  Once they are dry, or adhered, carefully remove the tape that is on top of the letters and viola! - you have straight letters!  I'm sure using a ruler would be faster, but it seems that every time I make a pencil mark on my projects I can't get it off completely.  And I have using the tape down pat so it's easy for me.  I used orange card for the word "you're" and patterned card for the "fabulous."


The words were attached to the bubble and I attached the bubble to another piece of patterned card, placed my little shouting dog, and adhered him and the leaves.  Lastly, the panel was put onto the Kraft card base and I was done.  This card came out exactly as I envisioned it! I just can't get enough of the Bold Word Plate dies and have a few other projects in the works using them.  I want to thank you SO much for visiting. I appreciate each and every visit and comment.  Without your encouragement, I'd never have tried blogging.  Thanks so very much! Christi

I am entering my Shout it Out! Card in the following challenges:
City Crafter - #431, Pet Company
Die Cuttin Divas - #388, Fall Colors
Cards in Envy - Feels Like Fall, Entry #2
Make My Monday - #80, Autumn/Fall Colors, Entry #2
Dragonfly Journeys - #127, Fall Colors, Entry #2
Sweet Stampin' - Dies and/or Punches
Crafty Friends Challenge - #93, Fall Colors
Sunny Day Crafting - Anything Goes w/ an Animal, Entry #2
2 Crafty Critter Crazies - #18, Anything Goes w/ an Animal
That's Crafty! - Forever Autumn 
Cardz for Galz - #80, Thoughts of Fall

Monday, September 17, 2018

Fall Colors


It's almost officially fall here {just a few more days} but I can feel the nip in the air; at night at least.  Denver has been breaking records for high temperatures during the day for a week or so!  While on a day trip up to the beautiful Estes Park, {where the Stanley Hotel is - Stephen King got the idea for The Shining while staying there during his college days} the trees were already changing.  And we were blessed to see a moose family - bull, cow, and baby {who was hiding in the brush - could only see him when his ears moved} and my brother, who has one of those amazing cameras that I haven't a clue how to work, got the lovely picture above.  We were very close to them and it took my breath away; I could have stayed there all day!

Now that you have read more than you wanted about my trip, let's get to the card.  I recently acquired the "waves" set of Birch Press dies and I've seen a lot of examples from people using them for summer cards.  Thought I'd do a twist and use them making a fall card.

What I Used to Make my Card:
White Card Base (I actually used a 5"x 7" card, cut it down to 4" x 6")
Rust, Brown and Green Cardstock
Vanilla Card
Wink of Stella in Clear
Wave Set of Dies from Birch Press Designs, #56067

Using these dies can be challenging; they have lots of little curly ques that aren't easy to glue.  At least, they weren't easy for me to glue!  I attached each layer and let the card dry overnight under the tile on my desk.  I definitely think the results were worth the effort.  

I started with a piece of vanilla card since white looked too stark to me, and glued each layer on that.  Then I attached the panel to a white card base, trimmed it down to fit, and there you have it! I am in love with the ease of using these dies.  I liked the look of the card so much I didn't even add a sentiment!  I added some sparkle around the edge of the card for a little more interest.

Before I close, I want to send my thoughts to those affected by Hurricane Florence.  Having lived on the East Coast most of my life, I've seen the devastation these storms can cause.  Now that I live out in the middle of the country, I get a whole new experience with the tornado sirens; still scares me to pieces, but we've been lucky so far this year!  Waiting to see what Old Man Winter has in store.  Thank you for stopping by and supporting my little blog.  I appreciate it more than you know! Christi

I would like to enter my Fall Colors card in the following challenges:
Always Fun Challenges - #76, Fall Colors
Cards in Envy - Feels Like Fall
Crafty Cardmakers - #218, Autumn Colors
Make my Monday - #80, Autumn/Fall Colors
Dragonfly Journeys - #127, Fall Festival of Colors
Sunsational Stamps - M, Fall
Studio 75 - M, #7, Colors of Fall {see color badge below}
Sparkles Monthly Challenge - M, #108, Dies or Punches {I used dies}
Cute Card Thursday - #547, Dies or Punches {I used Dies}
Ellibelle's Crafty Wednesday Challenge - M, Signs of Autumn
That's Crafty! - Forever Autumn
Happy Little Stampers - Anything Goes with Dies Challenge (Sept)
Mix It Up Challenge - M, Anything Goes with 3 or more Layers 


Tuesday, September 4, 2018

Jump for Joy!

It's almost fall and I can definitely feel the difference in temperature {my favorite part} and the days are getting shorter {my least favorite part}.  Which leads me to this month's challenge at Stinkin' Inkers.   We are celebrating fall.  Our theme is "Falling Leaves" and I hope you can grab a few stamps, dies, alcohol inks, whatever, and join in the fun!


What I Used to Make my Card:
Vanilla Card Base
Brown, White, Yellow, Orange, Red and Green Cardstock
Lawn Fawn Leafy Tree Backdrop - Landscape #LF1237
Lawn Fawn Jump for Joy Stamp Set, #LF1212
Ranger Archival Ink in Jet Black

I have to be honest - I completely forgot about my Design Team duties for this challenge.  Completely.  I've been trying to complete some of my DT duties ahead of schedule and I think I thought I'd already made a project for this challenge.  Nope.  The good news is this card was SO easy to make I threw it together in record time!

I first cut the Backdrop out of white card, then cut the tree out of brown
The Bare Tree

 card.  I attached the tree to the die cut, then attached the panel to a vanilla card just so there would be a slight color difference between the panel and the actual card.

Tons of Leaves

Cutting out the leaves was super easy.  The Backdrop set has a row of leaves that cuts out 6 at a time.  In no time I had a pile of leaves ready to be attached to my tree.  I glued the leaves around the tree, purposely leaving a bit of the branches sticking out.  

The falling leaves are meant to look like they are swirling off the tree; I suppose I could have used a stamp to drive that point home - some sort of movement stamp - but I didn't think of it until I was writing this post.

Lastly, I stamped the sentiment onto the card with the help of my stamp platform.  I absolutely adore this thing and I'm so happy I made the switch from my old stamping tool.  

I hope you've had a relaxing long weekend.  I've been making Halloween cards and decor like crazy; that shouldn't come as a shock because you know Halloween is my favorite holiday and it is never too early to get your Halloween on!  I hope you get your fall stamps and colors out and join us at Stinkin' Inkers; you have NO excuse, the challenge runs the entire month. Thanks for stopping by!  Christi

PS: It's almost that time for the Cat Lovers 2018 Blog Hop - start getting your kitty makes together now so you'll be ready!


I am entering my card in the following challenges: {where did I find all these awesome challenges to enter?? At Challenges for Days!)
The Cat's Pajamas PaperArts - M, #350, Fall
Paper Smooches - M,  CAS
Scrap From Your Heart -M, Autumn Colors {see below}
Dream Valley Challenges - M, Autumn Colors
Lawn Fawnatics - 2W, #36, Mood Board {see below}
Alphabet Challenge Blog - L is for Leaves
a to z Scrapbooking - M, Clean & Simple {see below}


Saturday, November 11, 2017

Happy Autumn!

Living in Colorado, I am blessed to be able to see the leaves change from my own yard to the top of the mountain range.  This is my absolute favorite time of year; the brutal heat is gone, the crisp air is invigorating, and the sleeping is the best! 


What I Used to Make my Card:
Kraft Card Base
Authentique Paper, Harvest, 6 x 6 pad, #HVT008 {retired but available}
Die-Versions Holiday 1 "Complements", #DVC-4x6-206
Die-Versions Whispers Leafy Frame Panel, #DV-667
Frantic Stamper Fall Words, # FRA-DIE-10271
Impression Obsession Dies, Small Leaf Set, #DIE095
Fall Colors Cardstock 

I die cut the frame from the Authentique paper and attached it to my card base.  Then, for the words, I used Fall Words for "autumn" and Holiday for "happy" - cutting happy out of red card and autumn out of dark brown card.  The leaves are cut from various autumnal colors and scattered about. The leaves actually have life-like patterns on them that are spectacular but I used 
Another Look
card with texture, so you can't see the patterns that well. 

The leaf colors bring out the colors in the panel wonderfully!  I hope you enjoyed my card and will consider entering the Dies R Us Challenge.  And don't forget, if you need inspiration, you can find it daily at the Dies R Us Inspiration Blog.  Have a great day! Christi


Don't forget to play along at the Dies R Us Challenge Blog for your chance to win a gift voucher to the Dies R Us Store.  A new challenge begins on the first and fifteenth of every month.  
Be sure to Follow Us on FACEBOOK too. 

click below for:
FRIENDS OF DIES R US PINTEREST PAGE

I am entering my Happy Autumn card in the following challenges:
Allsorts - #441, Colors of Autumn
Quick Quotes - #81, Fall Colors
Double D Challenges - Feeling "Fallish"/Mood Board

Saturday, December 17, 2016

Happy Fall ~ Always Use Rubber, Challenge #6

Hello friends! I'm presenting a card for the Always Use Rubber Design team, challenge #6, in the theme of summer or autumn.  We would be THRILLED if you joined us! In fact, if you'd like to check out my teamies creations, Jane & Zoe, I'll wait here. 

And, as always, once the challenge ends (two whole weeks from today) we will choose a top 3.  Then, at the end of the month all of our top 3 winners have the chance to win a gift certificate from our fabulous sponsor, Alleystamp

Unfortunately this is our last challenge.  A few of our members will be pursuing other adventures and I hope to be able to keep in touch with them.  I wish them both the best of luck!  I want to thank all of our guest designers and participants XO

Our faithful & generous sponsor:


If you are looking for something, be it the newest goodies, or perhaps something that hasn't been around for a while, I urge you to go to Alleystamp.  If what you need isn't in stock they can get it for you SO fast - and the prices can't be beat! 

If you are familiar with me you know I love cats (truthfully, I love all animals, but I have a special place in my heart for cats) and I am amassing quite the collection of cat stamps.  The stamp company Newton's Nook makes some of the cutest cat stamps, well, adorable stamp sets in general, but I totally fell in LOVE with Newton when I saw him.  Plus, the stamps are easy to color!

What I Used to Make my Card:
Brown Card Base
Newton's Nook Newton's Antics Stamp Set
Newton's Nook Newton's Antics Die Set
Watercolor Paper
Derwent Inktense Watercolor Pencils
Tim Holtz/Sizzix Alphanumerics, #660056
Spellbinders Nestabilities Labels 17
Glitter Cardstock
Vanilla Cardstock
Adirondack Archival Ink by Ranger, in Jet Black
Bag of Fall Leaves 

The very first step I took in making this card was to stamp & color the kitty. You can see how I altered him a bit so he'd sit in the leaves:

I basically just cut him out of his box. I used the matching die cut to cut him out and then just snipped off the box.  I can SO relate to this stamp because Bud (one of my four current fabulous felines) is a total box kitty.  He will try to get into any box, no matter the size.  And it's your typical "buy them $1,000 worth of toys and all they want to do is play in the box" situation.  He does favor the square USPS Priority boxes the best.  Anyway, I could seriously talk about my cats all day and I will blather on if I am not careful.

So I stamped, colored and cut my kitty.  Then I set him aside and began to glue each leaf on the card to build the pile of leaves.  For some reason I have a hell of a time getting these to stick to the card base - it's almost as if they resist the glue, so I have to go very slowly and let each leaf that is glued on dry before I pile more leaves on or they will just stick to each other and all come off (ask me how I know this!).  I've had this bag forever and there are plenty left.  I wish I could recall where I purchased them from, but, nope.  I re-bagged them ages ago so I can't even recall what company they came from, but I do know they were made to make model train landscaping and they are made from fabric, but are a stiff fabric and a bit shiny.  

While I was in between leaf gluing, I cut out my letters for the sentiment.  I am really lacking in sentiment stamps so if anyone has a good set that they use over and over, please let me know!  I used glitter card in a copperish brown color for the letters and glued them onto a label from Spellbinders cut out of the vanilla cardstock.  I went back and forth between leaf gluing and trying to get
those letters straight for a good while.  I finally decided to use removable tape on the letters (with the letters on the sticky side, backwards, so I could glue them down while keeping them straight - I hope that makes sense) and then when the glue was dry, I carefully peeled the tape off.  I actually use a lot of removable tape, I've been using it long before washi tape became a thing and the removable tape is much cheaper (and I didn't get the "fall" as straight as I would have liked, but, like I always say, that's the charm of handmade!).

Finally, the card was finished.  I am very pleased with how it came out, even if the letters are a bit wonky.  Thank you so much for reading my very long, full of information that I told you about even if you didn't ask, blog post.  Please consider joining us at Always Use Rubber but PLEASE check out our very reasonable rules first! I hope you all have a very happy holiday, however you choose to celebrate! Hugs, Christi

I would like to enter my Happy Fall Card in the following challenges: 
Crafty Catz - #351, Anything Goes
Through The Purple Haze - #115, Anything Goes
Crafty Gals Challenge - #101, Anything Goes
Simon Says Stamp Work it Wednesday - December - Use Dies
Tuesday Throwdown - #323, Anything Goes
Try it on Tuesday - Celebrate!

Tuesday, December 1, 2015

Thankful ~ November Reveal at Card Chain Challenge

**If you are looking for the Through the Craft Room Door post, click here. Thanks!

Hi everyone! This is the last reveal for the year as Deborah has decided to give us a break for the holidays and the link to enter for January will be up and ready to enter on December 7, 2015. Why not join us for the New Year? For this reveal I got to send my card to Mrs. A, all the way across the pond to England! She honestly makes some of the most beautiful cards so I hope this one meets with her approval.  I received the card from Asha, who shares my love of cats.  I loved it SO much I hunted down the retired Clearly Besotted stamp & die set and I hope to get it soon.  Here is her spectacular card:
Asha's lovely card
It's it fabulous!?! And now here is my card, I used the theme of Friendship - I think the card can be used to show someone how grateful you are for their friendship.

How I Made my Card:
Alcohol Inks (various brands)
Glossy Paper
Kraft card base
Soft Swirls Background SU! (discontinued) there are many available
VersaMark Ink
Silhouette Cameo & Cut File
Darice Die Symmetrical Swirl 2014-65 - not sure status, but can be found in many places
Red Cardstock

it's a bit hard to see on the card
I had made the alcohol ink sheet before I made this card with the thought of using the sheet with the Silhouette and some cut files of words.  I found the thankful cut file and loved how it cut so I set it aside to use as the focal point for my card (I realize it is a bit difficult to read on the card, so if you look to the right side you'll see the same cutout in white).

Since my planned card needed something a little bit "more", I decided to look through my stash and I pulled out an old background stamp from Stampin' Up! that has got to be 15 or 20 years old.  I inked up the Soft Swirls background with VersaMark ink (I didn't want the background to overwhelm the already busy sentiment) and stamped.  I think the subtle design helps to bring the entire card together.

The last step was die cutting the swirls - I chose some nice red paper that matched the alcohol ink in the sentiment and cut two of them.  I placed them on the card, along with the sentiment, spaced them out and attached.  I really like this card (and so did Mrs. A!) and I hope you are all having a holiday season of gratitude! I would be grateful if you'd consider becoming a follower of mine as I am trying to meet a goal of 100 new followers in 2015 and I am only about 20 shy - Have a great day ~ Christi
Another look
I would like to enter my Thankful card in the following challenges:
Scrapbook Stamp Society - #80, Anything Goes w/ the Option of Thanksgiving/Fall
Creative Ladybirds Creations - M, #10, Anything Goes
Silhouette Challenge - M, #32, Anything Goes
AAA Cards - #52, Thanks/Thanksgiving
Addicted to Stamps Challenge - #114, Anything Goes
Whimsy Stamp Challenge - #88, Anything Goes - Holidays
Simon Says Stamp Wednesday Challenge - Anything Goes (entry 2)


Friday, November 13, 2015

I wouldn't have missed being your friend. . .

I am SO excited to have been chosen as a Guest Designer for Quietfire Designs! I have been buying Suzanne's beautiful calligraphy stamps for years and now they offer dies and cutting files - could they get ANY better?

Fall is so colorful and I thought the colors would work well with the Silhouette cut file I used.  What do you think?  While this card is larger than I normally make, the 5" x 7" format is needed so all the crafty qualities can be properly embodied.


Please click here to see how I made my creation and visit the inspiring blog of Quietfire Designs. Thank you for stopping by and I hope you get some fall inspiration ~ Fondly, Christi

I would like to enter my "I wouldn't have missed being your friend" card in the following challenges:
Path of Positivity - #32, Gratefulness
Not Just Cards (M) - Anything Goes
The Cat's Pajama's - #303, Anything Goes
The House That Stamps Built - #1111, Focus on Sentiment
Create & Inspire - #33, Anything Goes
Paper Sweeties (M) - #37 Picture Inspiration
Stamping Sensations (M) - Festive Flowers & Foliage
Simply Papercraft - Anything Goes


Wednesday, November 11, 2015

Thinking of you

~*~ Before I get into this next post, why not take some time and enter a creation for the current Twofers challenge, Things with Wings? You could win a $20 gift certificate to Alleystamps!~*~

I was playing with some older Tim Holtz stamps when this card came to life.  Nothing makes me happier than using the stuff I already have, well, except buying more stuff.  Anyway, I've had this set for quite a while now and this is the card I made with it:

What I Used to Make my Card:
Vanilla Card Base
Vanilla Cardstock
Tim Holtz Stampers Anonymous "Flights of Fancy" set, #CSS25856*
Tim Holtz Stampers Anonymous "Crazy Talk" set, #CMS236
Kaleidacolor Pad in Cappuccino Delight, #KA-000-019 
Die-Namics Pierced Oval Stax, #MFT-521
Memories Ink in Artprint Brown
Pop Dots

The first step to making this card was stamping the floral sprays in the corners of a vanilla cardstock panel. I inked the stamp using the Cappuccino ink, using a different portion of the ink pad each time to get different colors for each image.  After I stamped the panel I trimmed it down to fit on the card base.

Then, using the Artprint Brown (which is a very cool color and was popular back in the heyday of stamping) I stamped Thinking of You from the Crazy Talk set.  I centered the Oval Stax over the sentiment and cut it out.  I pop dotted the stamped panel onto the card base and then pop dotted the sentiment in the center of the card.

I like the simplicity of this card and how easily it came together.  I love working with the colors of fall! I hope my little tutorial inspired you to dig out some older stamps and inks - some things never go out of style ~ Fondly, Christi

* You can still get the original Flight of Fancy set from many places online,  I also found that the flowers flourish I used is available in a set called Nature's Discovery (Stampers Anonymous #CMS049)

Another look at the card.


 I also want to enter my Thinking of You card in the following challenges:
Simon Says Stamp Wednesday Challenge - Thinking of You
Fab 'n Funky Challenges - Clean & Simple
Everybody Art Challenge - Shades of Brown
Retro Rubber - #27, Fall Colors
Eureka Stamps - #166, The Colors of Fall
The Paper Girls Challenge (M) - #91, Stamps (2nd Entry)
Stampinback Challenge (M) - Autumn

Sunday, October 11, 2015

Clean and Simple Fall Card

Fall is my favorite season - it's finally cool enough to sleep at night but warm enough you can leave the windows open, it was a beautiful 75 degree day here in my part of Colorado. And I love the colors of this time of year.  I was inspired to make this card while rummaging through my inks and I came across this Kaleidacolor ink pad that I have had since I was a Stampin' Up! demonstrator (at least 15 years ago!) - it's amazing to me that the pad is still juicy! Anyway, here is my most recent card creation:
How I Made my Card:
Brown Card Base 
Glossy Cardstock
Kaleidacolor SU! Ink Pad - Pumpkin Spice (discontinued)
Brayer

I found the Kaleidacolor ink pad when I was looking for the ink pad to make this Thank You card for my hair stylist - I had forgotten I even owned this pad! Anyway, when I saw it I knew I wanted to make a fall themed card - the colors are so rich!

I love how the color pops off the glossy cardstock when using the Kaleidacolor ink pads. I thought these particular colors would look fabulous used as a background, so I loaded up my brayer and inked the glossy panel by going over and over with the brayer until I achieved the coverage I wanted.  It really only takes about 4 or 5 "brayerings" for the color to be saturated.  

I then stamped my glossy panel with the stamp from Wendy Vecchi's Art Comforts set using Jet Black Archival ink.  Trimmed the panel and adhered to my card base.  I wish I could master photographing glossy cardstock because you really can't see how beautiful these inks are; you'll just have to try the technique yourself!

I hope my little card will inspire you to create some fall projects! Today is football day and I have got to go and get ready to watch my Broncos play - GO PAYTON! Have a wonderful day! Christi

Another look at the card

I would like to enter my CAS Fall card in the following challenges
Less is More - #245, One Layer Autumn Cards
Simon Says Stamp Monday Challenge - Autumn is in the Air
Fashionable Stamping Challenges - #104, Changing Seasons
Penny Black & More (October) - Warm Autumn Colors
Stamping Sensations (October) - Colors of Autumn