Followers

Showing posts with label Unity Stamps. Show all posts

Tuesday, August 3, 2021

Clean & Simple Birthday Card

I needed to make a more masculine birthday card than usual and I had just gotten this stamp from Unity Stamps so I thought I'd use it and see what I could come up with.  I hope you like it!

What I Used to make My Card:
White Card Base
Unity Stamps . . . say it big May 2019 Sentiment Kit
Picket Fence Studios Gem Mixers, Reflections, #GM-104
Imagine Crafts Kaleidacolor Pad - Spectrum
Gina K Amalgam Ink Pad in Obsidian Ink

Before I get into the making of this card, I need to toot some product horns. First, it's a shame that the Kaleidacolor pads have fallen out of favor as the one I used to make this card I've had for the last 20 years {!} and I've never had to reink it and it has never let me down. If ombre or rainbows find themselves in your art on a regular basis I can't recommend these pads enough. Second, I typically don't write about gems or sequins; there are so many out there and they all serve to brighten our cards. But, on a whim, I ordered the Reflections Gems from Picket Fence Studios and they are stunning!! I can't even describe the colors you get in this mix, but it is literally breathtaking. Honestly, I had balked at the price as it is a bit more than I typically spend for bling, but I am SO glad I took a chance. I am finding myself looking for ideas to make cards so I can use these gems! Fantastic quality! Now, on to the card, it was super easy! I inked up the stamp with the spectrum pad and stamped it directly on the card, then stamped the sentiment, trimmed it and adhered it.  After placing the gems, the card was done.  Whilst maybe not your typical masculine card, I like it.  Most of the men in my life don't do "men" things like hunt and fish so I can tell you I will be using this design to celebrate their birthdays! And who doesn't like rainbows? I was inspired by the challenge at Inspiration Station to use my Kaleidacolor pad to make this easy card!

I hope you don't mind my little sales pitch at the beginning of the post. I know I appreciate it when a fellow crafter recommends something, and I hope you do too. Thanks so much for popping in and I hope you have a wonderful day! Fondly, Christi

I am entering my card in the following challenges:
Simon Says Stamp Monday Challenge - Birthday {Happy 11th Birthday!!}
Inspiration Station, #11 - Color my World
NBUS Challenge, #29 - The stamps & gems are new :)
Sisterhood of Snarky Stamps, #190 - C is for Colorful
Try it on Tuesday - Keep it Simple


Wednesday, October 25, 2017

All You Need is Love & a Cat

and a cat. Or six.  I think this stamp is SO cut with the the kitty's glasses and bow tie! I've had it for a
while but {gulp} I actually forgot about it! I'm ashamed! So when I did recall I had him, I had to make it up to him! In order to do that, I put him on a card just in time for the Cat Lovers' Hop!   

What I Used to Make my Card:
White Card Base
KasierCraft Pawfect Cat Collection, PK555 
Meow, Meow, Meow Stamp Set from Unity Stamps, #UK-926A
Watercolor Paper
Derwent  Inktense Pencils
Heart Punch
Red Glitter Paper
Darice Nested Craft Dies, Classic Circles, 2014-74
Ranger Archival Ink in Jet Black

I started by stamping the kitty on water color paper, then coloring him in with Derwent Inktense Pencils.  I didn't like the heart in the language bubble, so I took a very. very old heart shaped punch and made a new heart out of red glitter paper.  I then stamped the sentiment onto white card and cut it out with circle dies.  I fussy cut {argh, I hate it - wish I could sent it all off to someone
who finds joy in fussy cutting!} the main image out and adhered that as well as the sentiment to the background paper.  Lastly, the background paper was glued to the card base, left overnight under my drying tile and we have a card!

Thanks so much for supporting me and the Cat Lovers' Blog Hop!  I have one more tidbit to share with you - I am having a small giveaway on my blog and I would love for you to enter and share:


presents
HAPPY HALLOWEEN!
I’m having a small drawing on my blog.  All you need to do is click onto this post, chose the costume you like best & when I get 75 costume comments, I’ll draw a random winner.  Open Internationally! Please feel free to share!
EXPIRES Nov, 1. 2017

Thanks for stopping by! Hugs, Christi
In addition to the Cat Lovers' Hop, I am entering my card in the following challenges:
2 Crafty Critter Crazies - M, Anything Goes w/ a Critter
Inky Chicks - #90, Animals

Tuesday, October 10, 2017

Sympathy Calligraphy Bird & Giveaway Information!

My dear neighbor has a daughter and son-in-law who are bird crazy.  I know they have a cockatiel and a few smaller ones, but they absolutely LOVE their birds; I imagine as much as I adore my fabulous feline four.  Unfortunately, one of their little flying angels flew off to the Rainbow Bridge to wait for the others to join them.  Helen asked me to make a card for her to send them and I knew exactly what stamp I was going to use.  Finding that stamp was another matter entirely, but I digress.  I made two cards for her so she could choose the one she preferred.

Before I get into how I made these cards, I want to share this little giveaway I'm having:

presents
HAPPY HALLOWEEN!
I’m having a small drawing on my blog.  All you need to do is click onto this post, chose the costume you like best & when I get 75 costume comments, I’ll draw a random winner.  Open Internationally! Please feel free to share!
EXPIRES Nov, 1. 2017

What I Used to Make my Cards:
2 White Card Bases
White, Navy Blue and Black Card
Calligraphy Bird Stamp (I have no idea where I got this stamp)
Kaleidacolor Pad in Spectrum #KA-000-001
Ranger Archival Ink in Jet Black
Wink of Stella in Clear
Black Enamel Dot 
Pop Dot

Both of these cards were very easy; I just stamped one image using the

Kaleidacolor ink pad and another with the Jet Black ink, both on white card.  I then trimmed both images.  I placed the color card onto the navy card and then attached the card onto the white card base. Lastly, I stamped the sentiment using the color pad, onto the bird image.  I then swiped the Wink of Stella, in clear, all over the colors, line by line.  I tried to get a picture of the sparkle, but I couldn't.


Then I assembled the black and white card.  I adhered the black and white image onto the black card with Pop Dots.  I also adhered the sentiment with Pop Dots.  I then placed the enamel dot on the card.  You can see the dimension and the texture on the black card.  


Here is the black and white card.  I am not sure which card Helen chose to send to her daughter, but the beauty of these cards is you can send them for any reason.  I hope you enjoyed my short tutorial and I do hope to see you join my Happy Halloween giveaway - I can't wait to see which costume wins the vote!  Thank you so much for visiting! Christi 


I am entering my Sympathy cards in the following challenges:
CASology - #270, Odd (It's odd I made 2 cards)
2 Crafty Critters - Anything Goes w/ a Critter
A Bit More Time to Craft - #53, Anything Goes
My Time to Craft - #356, Sympathy
Crazy for Challenges - #406, Make a Card

Tuesday, May 2, 2017

Sympathy Card & The April CCC Reveal


** two posts today - if you are looking for Stinkin' Inkers, click here**

This April's Card Chain Challenge is a sad one.  My receiving partner had a loss in her family, so I wanted to make her a sweet and simple condolence card.  To do that, this month I followed the sketch:
The CCC Sketch I Used
And here is the card I created for her:


I hope my card brings her some comfort. At the very least, she knows I am thinking of her.  


What I Used to Make my Card:
White Card Base
Black Card Panel
White Cardstock
Unity Stamp Peace, Courage & Memories sentiment, GKD-004A
Darice Embossing Folder, Vine Pattern, #1219-136
Spellbinders Nestabilities Labels Forty-One (on sale for $4.49!!)
Simon Says Stamp Detail White Embossing Powder
Embossing Fluid
Die-Versions Whispers Stitched Nesting Squares, #DV-572 (for fishtail)
White Resin Flowers (from stash)
Pop Dots

First thing I did was find a nice embossing folder.  I think the Vine Pattern embossing folder can be used for many occasions.  I cut a panel (which, in my case is typically 1/4" smaller than the card base) out of black card and ran it through my Big Shot to emboss it.  I also ran some scrap white card through,
Some Dimension
matching the pattern, but you can barely see it (tip: die cut your cardstock before you dry emboss it!)  Once the cardstock was embossed, I set the black panel aside to figure out how I was going to make the fishtail I needed to coordinate with the sketch.  I envy the people who can cut evenly using hand held scissors, or who can figure out how to turn cardstock the correct way and then use their cutter; I can do neither.  But, a light bulb went off in my head; if I could find a square that matched up with the width of the piece of paper I wished to fishtail, I could do it with the die cut.  Lucky for me I had just purchased the Stitched Nesting Squares, so I set about lining the card and the square up and it worked! I have taken pictures of the process:


Step One: Align the square with the ends of your paper.  The ends of the die should go over the ends just a little bit to accommodate the space around the die cut.  I use temporary tape to keep my dies in place; I did this long before washi tape came out and it's cheaper.  If you look closely you can still see a bit of the dry embossing.


And there you go! A perfect fishtail! Also, note that the stitches in the die aren't a problem; they appear on the cut out, not the base. Now, just peel off the tape and put your die away.  I hope, between my explanation and the pictures, the process makes sense.


After I handled the fishtail (I am SO proud, can you tell?) I moved on to the sentiment of the card.  I embossed "So Sorry" using detail white embossing powder.  I die cut it, attached the 2 white resin flowers, and pop dotted it onto the banner.  I then attached the banner onto the embossed panel of black cardstock.  There you have it.  A simple sympathy card.  Before I go I wanted to share the card I received from Lucille: 

How cute is that! She had known of my love of cats and I adore the card! Just click her name and it will take you to her blog.  Also, today is Reveal Day - don't forget to go to the Card Chain Challenge website to see all the glorious cards
Another Peek
that were sent all around the world!


I hope you have a great day and will come back to see me soon ~ Fondly, Christi 


I am entering my Sympathy Cards in the following challenges:
Word Art Wednesday - Anything Goes
Crafting When we Can - #43, C A S
Brown Sugar - #248, No Image, Just a Sentiment
Crafty Catz - #368, Anything Goes
Deep Ocean - #154, Anything Goes

Friday, April 14, 2017

Kitty Love

Hi all! I fall in love with a new (to me) stamp company about once a week and one of my newest obsessions is the Unity Stamp Company.  I adore their sentiments, beautiful flowers and, of course, their kitty stamp sets!  Plus, they really know how to throw a great sale. They have a few adorable cat sets, one of which I used to make this card.


What I Used to Make my Card:
White Card Base
Unity Stamp Set . . .Really Kitty, UK-1009A
Embossing Ink
Detail Black Embossing Powder
Watercolor Paper
Distress Markers in Mermaid Lagoon, Pumice Stone, Hickory Smoke, Festive Berries
DCWV Luxury Stack, 4.5" x 6.5" (available online)
Hero Arts Stamp & Cut, Love, DC175
Die-Namics (MFT) Stitched Oval Stax
Pop Dots

First thing I did was I stamped the kitty with embossing ink onto the watercolor paper and embossed the image with detail black embossing powder.  I water colored the kitty, and the hearts, using Distress Markers and then the image sat on my desk for weeks.  I really love how it came out and I just wasn't sure what I wanted to do with it yet.  Another thing that had been hanging out on my desk was the decorative paper from DCWV Luxury Stack.  I had picked the pink paper to go with another project and it languished on my desk, getting moved to one spot or another.  Finally, I HAD to do something with the kitty (I was getting nervous that I'd ruin it somehow; drop some ink on it, get some marker on it or drown it in coffee, so I cut out the cat using the Stitched Oval Dies and used a die two sizes larger to cut the patterned paper.  Using the small scrap left over from the oval cut, I die cut the word "love".  I attached the cat panel onto the decorative paper panel and positioned the "love" cut out so that, hopefully, it appeared that it was attached to the patterned paper.  Finally, the panel was pop dotted onto the card base and my card was born.  

As simple as this design is, I am really pleased with how the card came together.  I have only used a few pages of the DCWV Luxury Stack and I am trying to use it more - the paper is very thick and looks like the coating is pearlized.   Perhaps my post will inspire you to use a long neglected paper in your next creation.  Have a great day! Christi

I would like to enter my Kitty Love card in the following challenges:
Dream Valley Challenges - #153, Our Four Legged Friends
Simon Says Stamp Wednesday Challenge - Spring Inspiration Board (I used the kitty)

SUYP Challenge - M #17, Furrything Goes or Easter
2 Crafty Critter Crazies - M #1, Must Feature a Critter
Crafting When We Can - #141, Animals
Crafty Catz - #366, Anything Goes w/ Option of an Animal
The Sisterhood of Crafters - Stamp it!

Sunday, April 2, 2017

A Flowery Hello for the Card Chain Challenge

Hi everyone! I am finally feeling rested after the Valentine's Day frenzy.  Every year I do the same thing; I tell myself I am not going to make any more Valentine cards and I end up making one, teeny, little card and the next thing I know it's five days later, I have glitter glue in my hair,  my hand is glued to my desk, and I can't see anything among the scraps, stamps and embellishments that are all over the place.  I envision it like a crafter's "hangover" and it takes a while to recover!

Anyway, I made this card, which is totally out of my comfort zone (at least I think so) just because, but then I signed up for the Card Chain Challenge and discovered it fit the challenge!  I was really inspired by the new (to me) Spellbinders die set and I had some colorful scrap paper so off I went!  Here are the themes from which we were able to choose for March at the CCC:

Color Palette:

These colors are your guideline - exact matching is not necessary.

OR
Sketch


You can orient this sketch in any direction and/or flip it.
OR
One of the following themes: – Flowers  or  Fish  or  Friendship
OR
One of the following products: Stampers Anonymous stamps, Sequins, Fussy Cutting


My card, which was sent to Lizzy all the way in Australia, follows the theme of flowers and friendship. I hope you like it!


What I Used to Make my Card:
Square Card Base in Mint Green (5 1/4" x 5 1/4")
Blue Sky Paper (from stash)
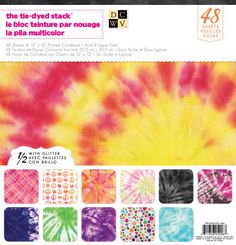
DCWV Tie Dye Stack (discontinued but available)*
Unity Stamps "Hello" from He's a Wordy Buck, UK-705A
Spellbinders Die D-Lites Flower Field
Distress Ink in Wilted Violet
Martha Stewart Mini Pastel Pearls
Gems from my Stash
Pop Dots

*First, once again Die Cut With a View (DCWV) has released another stack with 
Original Tie Dye Stack
the same name as the stack I used in this project. Just in case you absolutely need the Tie Dye stack I used, this is a picture of the cover. I love DCWV stacks but they can be pretty pricey so I often end up buying them when they have been discontinued.  

All of the papers except the card base come from this DCWV Tie Dye Stack.  I cut out the dies a bazillion times and a bunch of extra flowers. If you aren't familiar with DCWV stacks they often include specialty papers and this one includes both glitter and gloss (a coating similar to the many commercial glazes out there).  All I used on this card were parts of the paper that had glitter, gloss or both, so I got some really pretty flowers.  And for once the gloss isn't leftover glue on the card. 
Another Look
Once felt I had enough of the die cuts, I figured out the placement on the mint green card base and started gluing the cuts down.  I ended up pop dotting some of the flowers but you can't really see that in the photos. There is plenty of texture with all the glitter and gloss; I added even more by using gems and pearls for the middle of some of the flowers.  You should be able to make any of the photos on my blog bigger by just clicking on them; let me know if you have trouble with this. 

Please take a moment to see the Card Chain Challenge Reveal that is posted on the main blog today.  
You get to see who sent who what and where everyone lives.  I am thrilled to be back playing in this "challenge;" it is SO cool to get a card in the mail - it sure beats junk mail! This month I was the lucky recipient of LesLee's card, isn't it fabulous!?! She had to take a short break from crafting, but do pop over to her blog and take a look at the work she has done - it really is marvelous and after that stop over to the Card Chain Challenge and check out the reveal!  Some of us may even include a goody or 2!
Thank you for stopping by and reading this rather long post.  I encourage everyone who makes cards to participate in the Card Chain Challenge.  It's so much fun to see a card online and actually have it in your hands! Please consider signing up, and if you have any questions not answered in the FAQs, feel free to email me and I will see what I can do to help you out. The rewards out weigh the effort!  Fondly, Christi

I am entering my Flowery Hello card in the following challenges:
Pixie's Crafty Workshop - week 275/276 - Anything Goes
Southern Girls Challenge - #156, Dyeing to See You (use a die)
Simon Says Stamp Wednesday Challenge - Anything Goes (entry #2)
Deep Ocean Challenge - #151, Flowers Everywhere
Simon Says Stamp Work It Wednesday - Spring has Sprung