Followers

Showing posts with label Globecraft & Piccolo. Show all posts

Saturday, August 19, 2017

I Love You to The Moon and Back

I've been missing from social media lately - it's just been too nice out to stay cooped up inside! But, I had a blast making this card and trying something new!

I've seen so many "galaxy" cards on Pinterest lately, I thought that this would be a perfect time to try one.

What I Used to Make my Card:
Black Square Card Base, 5" x 5"
Distress Ink in Tumbled Glass, Mermaid Lagoon, Wilted Violet, Black Soot and Blueprint Sketch
Die-Versions Whispers Stitched Nesting Squares, DV-573 (similar squares here)
Die-Versions Whispers Mrs. Moon, DV-627
Tim Holtz Mini Blend Tool
ColorArte, Twinkling H20's in Metallic Mica Pewter, Heavenly White and Icicles
My Sentiments Exactly Quick Coloring Frame, Y602
Piccolo Silver Siam Embossing Powder
Embossing Ink
Watercolor Paper
Silver Mirror Card
Navy Blue Card

The first thing I did was make the background.  In order to make the inks look "galaxy" like you start off with the lightest ink, pounce it a few times around your paper and follow with your next darkest ink and so on.  There are many, many videos out there to help you - I actually used 3 different videos, and used what I had on hand.  I didn't take pictures of the very beginning of the galaxy (sorry!), I was so preoccupied I completely forgot.  But, here is where my watercolor paper was looking at about step 3.

And here is the galaxy at step 4.  You can see some of the inks are pounced to
make them darker.  The more variation of color the better your galaxy is going to look.  As I said, I used the ink colors I had on hand (I still don't have every single Distress Ink) and improvised.  

Instead of watered down white acrylic paint, I decided to use my Twinkling H2O's.  These paints are amazing watercolor paints; they shimmer so much! I used a toothbrush dipped in the H2O paint, and splattered the galaxy with a few different colors.
And here is my galaxy.  I also threw some water on it at random times.  I love how it came out, except (isn't there always an exception?) on the right hand side, but, that's no big deal because my die cut will cover that up.  

Setting aside the galaxy to dry, I grabbed some navy blue card and embossed my sentiment on it.  I then used my stitched square dies to cut the sentiment out.  Then it came time to cut out my moon die.  The moon die was the whole inspiration behind this card and I wanted to make sure it wasn't lost in the galaxy.  I debated a bit, cutting the moon out of silver card as well as the mirror card, but ultimately decided the mirror card looked the best.  I trimmed the galaxy down a bit, adhered it to the black square card base, glued the embossed sentiment up in the left hand corner and lastly glued on my beautiful mirror card moon.  Here is the final product.  What do you think? Here's another look:

Thanks so much for reading my post and I hope I've inspired you to try something new! Hugs, Christi 

Don't forget to play along at the Dies R Us Challenge Blog for your chance to win a gift voucher to the Dies R Us Store.  A new challenge begins on the first and fifteenth of every month.  
Be sure to Follow Us on FACEBOOK too. 

click below for:


I am pleased to enter my Love You to the Moon and Back card in the following challenges. Looking for challenges? Check out Challenges for Days!
Creative Fingers Challenges - Anything Goes
Simon Says Stamp - Wednesday Challenge - Add a Sentiment
Paperminutes - 500 Jubilee Challenge, Anything Goes
Die Cut Diva's - M, Anything Goes, August
Tuesday Throwdown - #356, Anything Goes
Scrapbook Stamp Society - #123, Anything Goes, Option of punches and/or dies
Crafting with Dragonflies - #87, M, Embossing Wet and/or Dry


Saturday, August 15, 2015

Weddings at TWOFERS!!

For challenge #2 at Twofers, Jane has chosen the theme of WEDDINGS.  Now, at my age, most people are done getting married so I honestly don't have much occasion for wedding cards.  I made these sort of generic, so I could use them for other possibilities.

As I did with the first challenge I am going to name the two cards to make it easier to tell which card I am talking about.  Introducing my Roses and Best Wishes cards:

ROSES
What I Used to Make my Card:
Pastel Pink Card Base from Core'dinations 
Memory Box Pennington Rose Die #99143
KaiserCraft 6x6 All that Glitters Paper Pad
ColorBox Petal Point Ink Pad Enchantment
Clear Embossing Ink
Globecraft & Piccolo Embossing Enamel in Cranberry Wine
Wink of Stella Clear
Stampin' Up A Greeting for All Seasons set #100999 (discontinued)
Pre-Made White Bow 
Scrap White Card for Congratulations
If you enlarge this picture you can see the sparkle on the roses

The Roses
I actually conceived this card when I was looking at the KasierCraft paper pad. Now, those of you who know me know I am not fond of the color pink AT ALL and the fact that I made a card with lots of pink is absolutely amazing.  But these papers spoke to me, so I used them.  I first located a pink ombre paper and die cut all the roses - the die cut is just the outline of the flower.  I then used paper that had nothing on it but roses and die cut the bottom piece of the die.  Then I attached all the bottom roses to the outline roses.  I noticed I got some glue outside the lines, so I colored all the insides of all the roses with a Wink of Stella in clear.  After gluing all the flowers to the card, I embossed the greeting with Cranberry Ice Embossing Enamel, trimmed it, and attached it to the card.  

I would like to enter my ROSES card in the following challenges:
Through the Craft Room Door (Aug 11-17) - Anything Goes
In the Pink - Anything Goes. . .with Pink
Wednesday's Creative Inspirations - (ends August 25) Flowers! 
Creative Card Crew - Sparkle!
Paper Creator's Crafts - (August) Dies and/or Punches

BEST WISHES
What I Used to Make my Card:
Vanilla Card Base
Printed Designer Paper Gold Leaves (have NO idea where this came from)
Gold Paper
Best Wishes from SU! Sincere Salutations Set (discontinued but plenty to be had)
Embossing Powder in Gold
Clear Embossing Fluid
Spellbinders Nestabilities Labels 14, #S4-290 (not sure if this is discontinued, but there are lots available)
Memory Box Dianna Border, #1029
Scrap Vanilla Card for die cut & sentiment

First I stamped the Best Wishes on vanilla card and embossed it with gold embossing. Once that was cool, I die cut the sentiment, the designer paper with the gold leaves and the Dianna border.  Then all I did was attached the gold paper (after I trimmed it) to the card base and layered everything else on the card.  Super easy, but I think it looks a bit elegant.  

I would like to enter my BEST WISHES card in the following challenges:
Use Your Stuff - (runs until Sept 7) Anything Goes
Everybody Art Challenge - Emboss
Sweet Stamps - Anything Goes
The Artistic Stamper - (August Challenge) Anything Goes
Creative Ladybug Creations - (August Challenge) Anything Goes

Another look
I do hope you will pop by the Twofers blog and consider making and entering   your own wedding projects ~ just remember, you need to show us TWO pieces of art. While you are there please take a peek at what my wonderful teamies Jane & Zoe made for this challenge.  Also, I would appreciate it if you'd following me, I am trying to get 100 new subscribers in 2015 and I am really close!  Thanks SO much ~ Christi

Monday, September 1, 2014

Something Old and Something New at Craft-Room Challenges


For this fortnight’s challenge at Craft-Room Challenges, Annie has chosen the theme of “something old and something new”.  Well, I had just gotten some stamps and I actually made another card for this challenge, but, I didn’t like it.  So, I made another one – my something old is the Dresden frame (which I have had for over 10 years) and my something new is the card? Or, the DCWV paper stack which I never used before (ok, not exactly new, but. . .)? Take your pick.

The days are getting cooler and shorter and that means my very favorite holiday is right around the corner ~ Halloween!!
 What I used to make my card:
A2 White Card Base
Skull Cut File & Silhouette Cameo
Dresden Frame
DCWV "The Halloween Stack"
Ranger Archival Ink in Jet Black
Stampers Anonymous Tim Holtz Simple Sayings set, CMS155
Crafters Pick The Ultimate Glue 

I don’t have a lot of pictures for this one as it’s pretty self-explanatory – I began with an A2 white card base and went from there.  I measured the inside of my Dresden frame and started up my Silhouette Cameo. I found a skull cut file & sized it so I could fit it in my frame and cut it out of plain white cardstock.  The orange and purple papers are from the DCWV The Halloween Stack – the orange paper has a bit of texture to it, with some very fine dots and the purple is slightly metallic.  This is the first time I have used this stack and I know you’ll be seeing much more from it – it has sparkle paper in white! I can see the Holiday cards already!

I cut the orange paper to fit inside the frame and the purple paper ¼” smaller than the card base.  Then I stamped the Happy Halloween sentiment from the Simple Sayings set and trimmed that down.  My skull looked really plain so I jazzed it up with the Silver Siam embossing powder and I think it makes that skull much spookier.
Another View
That’s really about it.  The card is simple but very effective.  I hope you are enjoying the long holiday weekend we are having in the US and that you find some time to “labor” in your craft room - and, don't forget, you have 2 entire weeks to enter the newest challenge at Craft-Room Challenges!!  ~ Christi
PS: Anything But a Card is having a Design Team Call - it's SO much fun and you'd be working with an awesome team!  

I would like to enter my Something Old & Something New Halloween Card in the following challenges:
Crafting from The Heart - #34, Anything Goes
Sparkle N Sprinkle Creative Challenge Blog - September Challenge, Anything Goes
Crafts Galore Encore Challenge Blog - #9, September Challenge, Make a Card
One Crazy Stamper - September Challenge, Halloween or Christmas
Sister Act Card Challenge - #72, Anything Goes
DRS Designs - It Gives me the Creeps!
Simon Says Stamp Wednesday Challenge - Anything Goes

Sunday, May 18, 2014

My Art Part Heart

I love being on the Design Team for Anything But a Card - it has truly been one of the BEST things ever for me. Don’t get me wrong, I love making cards and such, but I find a great satisfaction when I make something that can sit on a shelf or be hung on a wall.  I remember the joy I felt when I discovered Wendy Vecchi and her Art Parts – how cool was this!?! All the hard stuff was done for me!  And her stamp line? Well, don’t go looking at it unless you have some extra cash – I love the entire line.  And I buy as much of her stuff as I can.  I’d like to think if we ever meet we’d be friends (and not in a crazy stalker way).  Anyway. . . this month's challenge at Anything But a Card is this beautiful color palette.  All I see when I look at this is serenity ~ so I pulled out my Wendy Vecchi Art Parts, my Distress Paints, some other goodies and went to town!
I love this and I look forward to seeing what all of YOU create.  But, in the meantime, here is my creation; maybe you'll get some inspiration and join us?


This project is made almost entirely of Art Parts (you can check out the entire line of Wendy’s Art Parts here, her stamps sets here  and you can find both at many retailers both online and in the stores).  What I used was:


1 Large Circle and Circle Frame

1 Large Heart

Sentiment Stamp from “Art Comforts” set, SCS110

Distress Paint in Fired Brick and Seedless Preserves

Wendy Vecchi Ranger Archival Ink in Red Geranium

Ranger Archival Ink in Jet Black

Distress Crackle Paint in Rock Candy

Prima Micron Pen in Black (I think I used #2)

Brads with clear gem middles, 2

Wooden Flower & Leaves from craft store

Embossing Enamel,from Globecraft & Piccolo in Mossy Glen & Enchanted Aubergine

Embossing Fluid from Globecraft & Piccolo 

Previously gessoed old book page


My book page
First I gessoed the circle, the frame and the heart.  Once they were dry I used the circle to cut a piece of old book page that I had already gessoed and glued that on.  You don’t have to be perfect with this since the frame is going to cover the edges – thank goodness because my page was a wee short.  I painted the circle frame with the Seedless Preserves paint (straight from the bottle) & set it aside to dry.


I took a scrap piece of cardboard (thin cardboard, like the back of a paper pad), gessoed it and then stamped the sentiment on that.  Due to the roughness of the gesso, I used the Micron Pen to fill in where the ink didn’t quite hit the cardboard.  Then I took another scrap piece of cardboard and painted it with Fired Brick paint (again, straight from the bottle). Once that was dry, I glued the sentiment to the Fired Brick background, broke the arms off two silver brads with gems in the middle and glued them on. 
Almost all the parts


My heart
I took my heart, inked it with the Red Geranium, let it dry and spread the Rock Candy Crackle Paint on it – set it aside.  Got the flower and the leaves and embossed them.  Attached the circle frame to the circle, put the heart in the center, attached the sentiment to the center of the heart & finally glued the wooden flower & leaves to the top. 


I had actually thought this was done before I added the flower & the leaves – when I saw how well the Enchanted Aubergine Embossing Enamel complimented the Seedless Preserves Distress Paint, I had to figure out a way to add it.  Luckily, I came across the flower & leaves.  I think that the last touch completes the piece.  I hope you enjoyed my tutorial and had as much fun as I did making this! Blessings! Christi


I would like to enter my Art Part Heart in the following challenges:
Allsorts Challenge - #259, Purple Passion 
Crafting at the Weekend - #1, Anything Goes
Challenges for Everybody - #41, Anything Goes
Divas by Design - Anything But a Card 
Stamping Sensations - May, Anything Goes


Friday, May 16, 2014

A Thank You Card


I am finally feeling better and my creative muse is returning. I wish I knew where my muse goes when it disappears. I’m thinking one of my cats got to it and it took off for parts unknown.  I don’t know, and it’s not talking.  Anyway, I have some thank you cards overdue, so today is a break from the birthday card rush.  Here is my card:

 
No matter HOW many times I tried, I couldn't get the THANK YOU to show up in the pics!

And here is what I used to make it:


Cranberry Wine and Girls Night Out Embossing Enamel

Embossing Fluid
Pink Cardstock Base

Decorative Paper (mine came from Somerset Studio)

Thank You, Thank You, Thank You Stamp from Catslife Press

It’s a simple card – I wanted the “Thank You” and the flowers to be the focus. 
The Flowers
I used 3 of Stacey’s Flowers, sized so they could be stacked.  I embossed the largest and the smallest with Cranberry Wine Embossing Enamel (I am in LOVE with this color! It has little teeny mirror-like bits in it!) and the middle one with Girls Night Out.  I stacked them and glued them together.  I then took a piece of the decorative paper and embossed the sentiment, using the Cranberry Wine Embossing Enamel as well. 
The Thank You
Cut another square out of the decorative paper, adhered the sentiment to that just to give it a little “pop”.  The hardest part of this card for me was trying to figure out where I wanted to place my flowers.  Once that was sorted, I glued them on and I am good to go!


Please, take a look at the Blog at Globecraft & Piccolo – my wonderful teammates post cool stuff every day! 
And another view
Thanks SO much for stopping by! Be sure to stop back on Sunday to see my newest Anything But A Card creation (in fact, why not pop over to Anything But A Card and get inspired!!) ~ Christi 

I am entering my card in the following challenges:
Red Rubber Designs - #120, May Flowers
Crafting by Designs - May Thank You Challenge
Inky Impressions - #159, Flower Power 
Cards in Envy - Flowers (on an A2 card ~ all my cards are A2 unless specified)

Wednesday, April 23, 2014

I won at Rhedd & Rosie Challenge Blog!!

This means the world to me as the challenge winner at Rhedd & Rosie is chosen rather than randomly selected (not that I have anything against randomly selected winners as I have been one on a few occasions), but it is nice to be picked specifically for your design!! Doing a HUGE happy dance :)


I won with my "Fly Pendant" - you can get all the details on how I made this HERE - it was really easier than it looks :)


Thank you Moira for choosing my work! And thank YOU Zoe for the heads up :)

Sunday, April 20, 2014

Spring Forward and Fly!

My post today is for the NEW challenge at Anything But a Card Challenge #34 - "SPRING Forward"!! We know Spring is dragging it's feet in arriving as ol' man winter keeps his heels dug in the snow and ice... so we are celebrating the new season with an OPEN THEME!!! Feel free to break out the bright colors and create along with Spring and Easter, or create whatever your muse desires... as long as it's anything but a card!

I love "anything goes" challenges, especially when they are for Anything But a Card - this challenge inspired me and my muse to make use of some extra parts that were just laying around. With gears being all the rage I was lucky enough to find a watch repair place that gave me tons of watch parts that he could no longer use.  After stripping all the parts down I ended up with a bunch of watch cases (I think that is what you call them), some of which were brand new.  As I was thinking about what to do with all these cases I got a fabulous idea – and that is how this pendant was born. How appropriate to use a watch case for "springing forward"!
 
Surprisingly this pendant isn't heavy. . .
Items I used in my creation:
Not the real one, but close
I cleaned one of the watchcases and unscrewed the back and the top. First thing I did was emboss the top case (where the watch face would be seen) with Vintage Silver and Mermaid Tears Embossing Enamel.  I coated and embossed the frame many times (if you chose to emboss any metal part PLEASE be careful, as the metal gets VERY hot, as
Embossed and coated - ready to go!
does the embossing product! Don’t touch anything until it has cooled!) When I was finally happy with the frame I added a coat of Glasstique Gloss to protect the enamel and, hopefully, make the pendant less prone to chipping.

Taking the bottom of the case (where the watch guts are), I found some decorative
paper that showcased the colors in the Mermaid Tears Embossing Enamel and punched out a 1” circle.  I centered the circle and glued it into the bottom.  I decided on a using a small butterfly for the pendant focal point from A148 Butterfly Accents.  I embossed the butterfly with a mix of Mermaid Tears, a pinch of Micro White and a pinch of Vintage Silver.  Once it had cooled I glued it to the center of the bottom case.  I searched through a bunch of old book pages to find the word “fly”, cut it out and attached that above the butterfly. 


Now my watchcase had 2 “handles” on it to hold the watchstrap.  On the top handle I glued a jump ring for the necklace to go though.  I honestly don’t think that is going to hold for very long and I will eventually solder it – once I learn how (hehehe). On the bottom handle I dangled a few charms.  Oh, and since I got Embossing Enamel in the groves of where the two pieces meet, I used glue again to hold the back & front together.
 
You can see the charms better with in the first pic, but I LOVE the colors in this one
Now, go fly and play (and don't forget to enter ANYTHING GOES at Anything But a Card!) Keep an eye out on my blog for my BLOGAVERSARY giveaways - coming soon! In fact, why not start following now so you won't miss it??
Thanks for stopping by ~ Blessings! Christi

I want to enter my pendant in the following challenges:
Crafty Calendar Challenge - Things with Wings
Rhedd and Rosie Challenge Blog - #30, Anything Goes 
Through the Craft Room Door - Anything Goes
Fairy Tale Challenge Blog - Butterflies

Friday, March 14, 2014

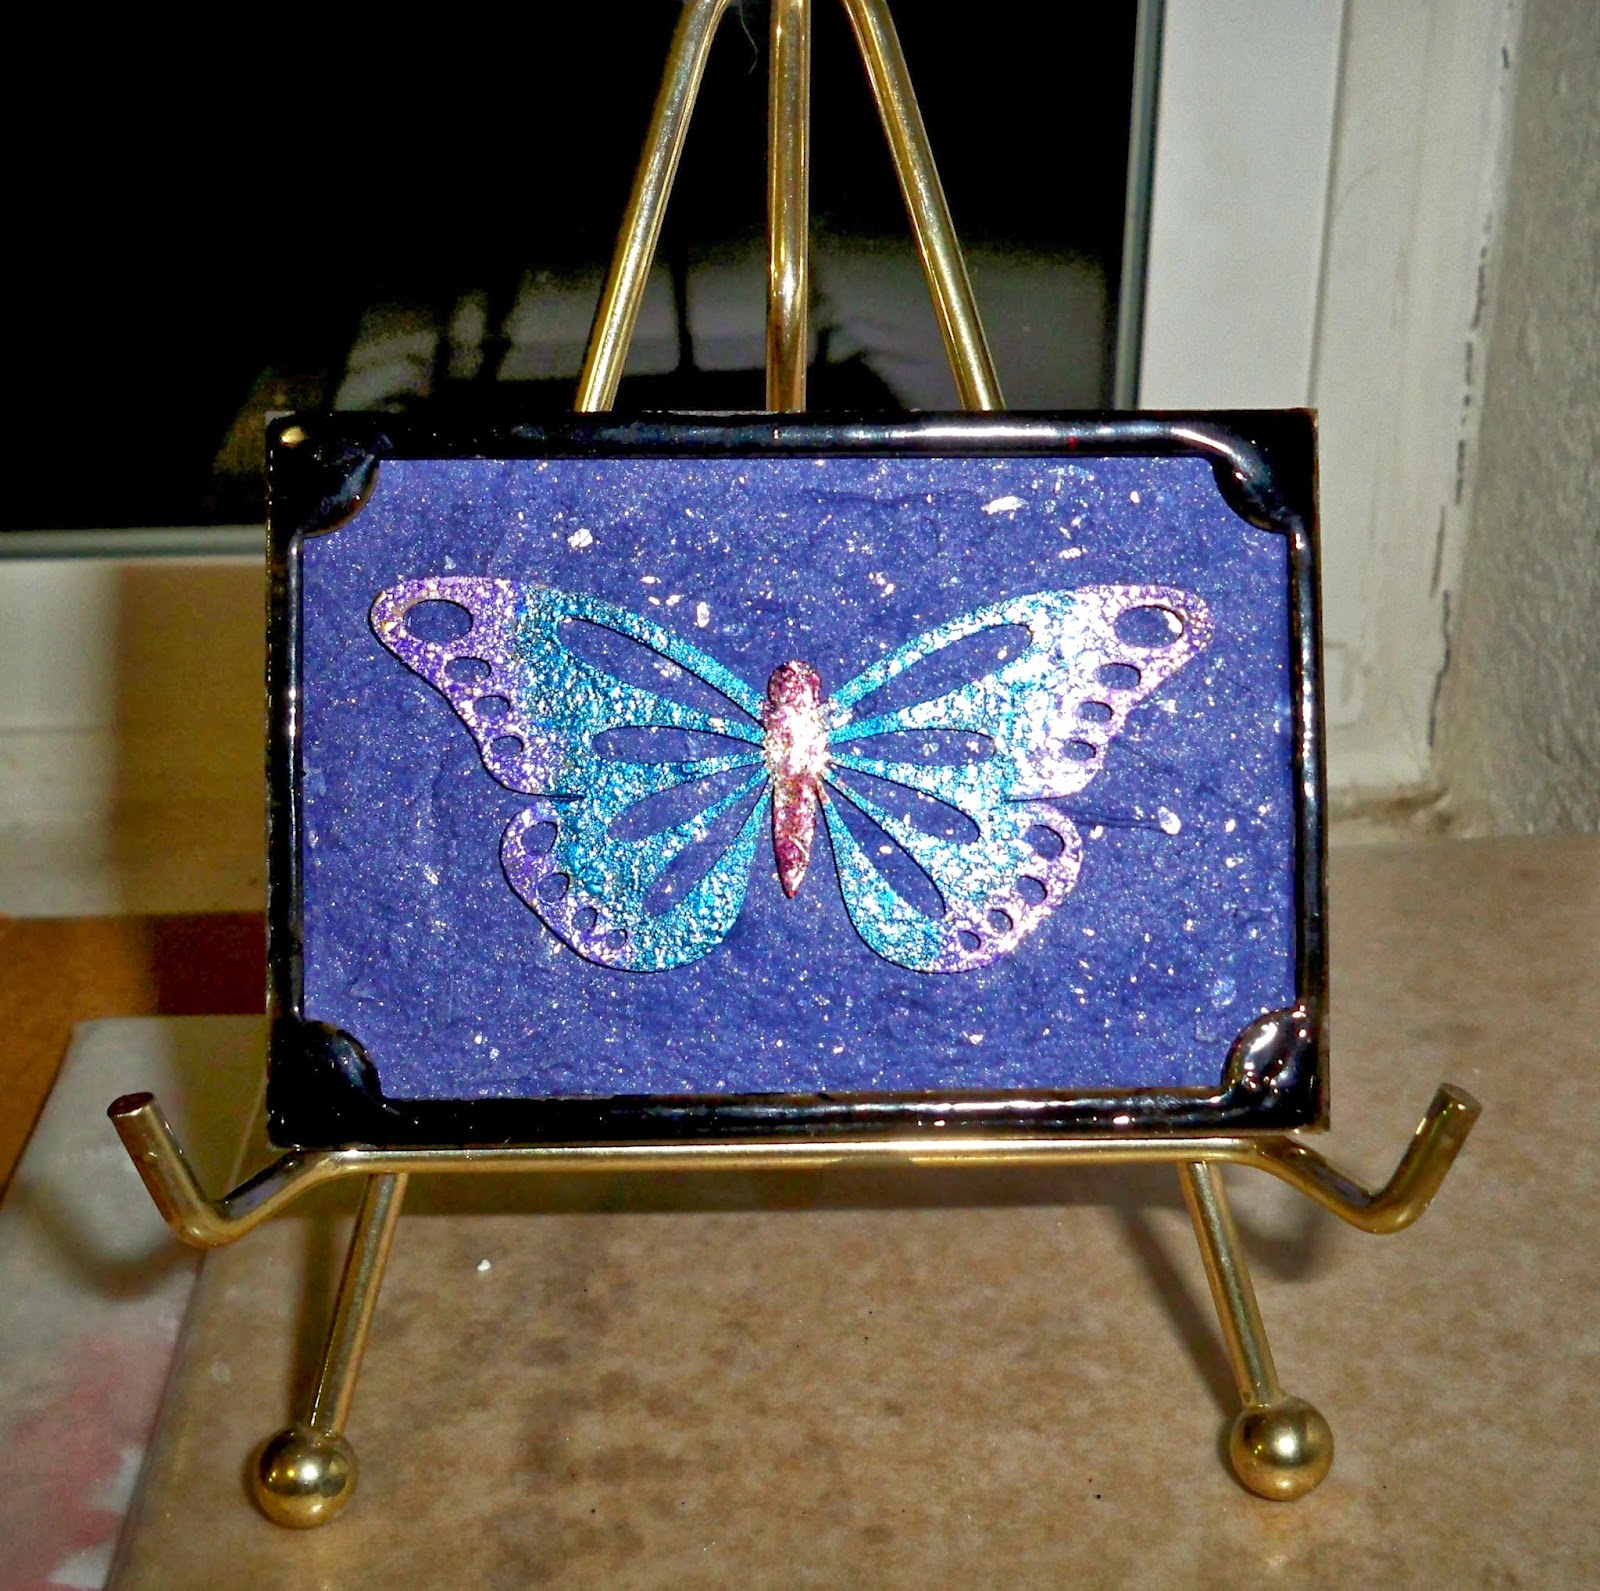
Colorful Butterfly ATC


I am in love with Globecraft & Piccolo’s Embossing Enamel.  The colors are amazingly vibrant, colorful and each one is blended by hand in the USA.  The color combinations are incredible! Trust me when I tell you the pictures cannot capture the true beauty of this powder.  
Plus, you get a huge amount of powder for your money!  In the photo below I used a bottle of Distress Paint to illustrate how large the containers of the Embossing Enamel are:
Lots of yummy color!
I recently got some new colors and I always want to use my new goodies as soon as I get them, so I decided to make an ATC (artist trading card).
What I used to make my Butterfly ATC:
Decorative Paper
ATC blank

The first thing I did was use the Mars Black 3D Enamel Gel on the frame.  I just used it right out of the bottle.  The funny thing is the black comes out looking like a dark gray.
But it turns to a shiny deep black once it dries.  I set my frame out overnight covered with an extra bubble I had so no cats, or cat hair would get into it. I love how these frames are the perfect size for ATC's!

Then I took my butterfly blank and used a paintbrush to paint where I wanted the Embossing Enamel to adhere.  I use a paint brush so often that I actually poured some of the Embossing Fluid out of the bottle into a small, air tight container so I wouldn’t have to keep popping the top off of the applicator.  I brushed the fluid onto the butterfly blank and shook some Deep Blue Sky enamel onto the blank and heated until done.  I only used one layer of Enamel and I still got this awesome result:
Then I edged the butterfly in Royal Sterling Enamel, again using my paintbrush and embossing fluid.  When you use the fluid with a paintbrush you don’t have to re-dip the brush each time you use it- the brush retains a good amount of the fluid.  For the body I used Ruby Red Slippers – the butterfly is SO sparkly, I tried to capture it but it is very difficult.
See that bubble on the body? Popped it with a toothpick - POOF!
For my ATC I used a piece of cardboard from a mailing box.  You can get a lot of ATC’s from one box and they are sturdier than using just paper.  After I covered my cardboard with the decorative paper (I used a handmade paper in navy blue with little silver sparkles in it) I glued my frame and then my butterfly in the center.

I love the look of the multiple embossing enamels and I think the frame sort of holds it all together.  I hope you are getting some warmer weather where you are; I’m keeping an eye out for the real butterflies!
I am entering my butterfly ATC in the following challenges – please stop by and check out all the hard work these folks do to make the challenges possible!
Aloha Fridays (Kitty Bee Designs) - #19, Things with Wings
Love to Create - #106, Anything Goes
Make my Monday - Spring
Created With Love Challenges - #77, Think Spring
Unruly PaperArts - RAQ1, Natures Gift

Thank you for stopping by ~
Blessings!
Christi