Followers

Friday, March 28, 2014

Imagine Peace Pendant


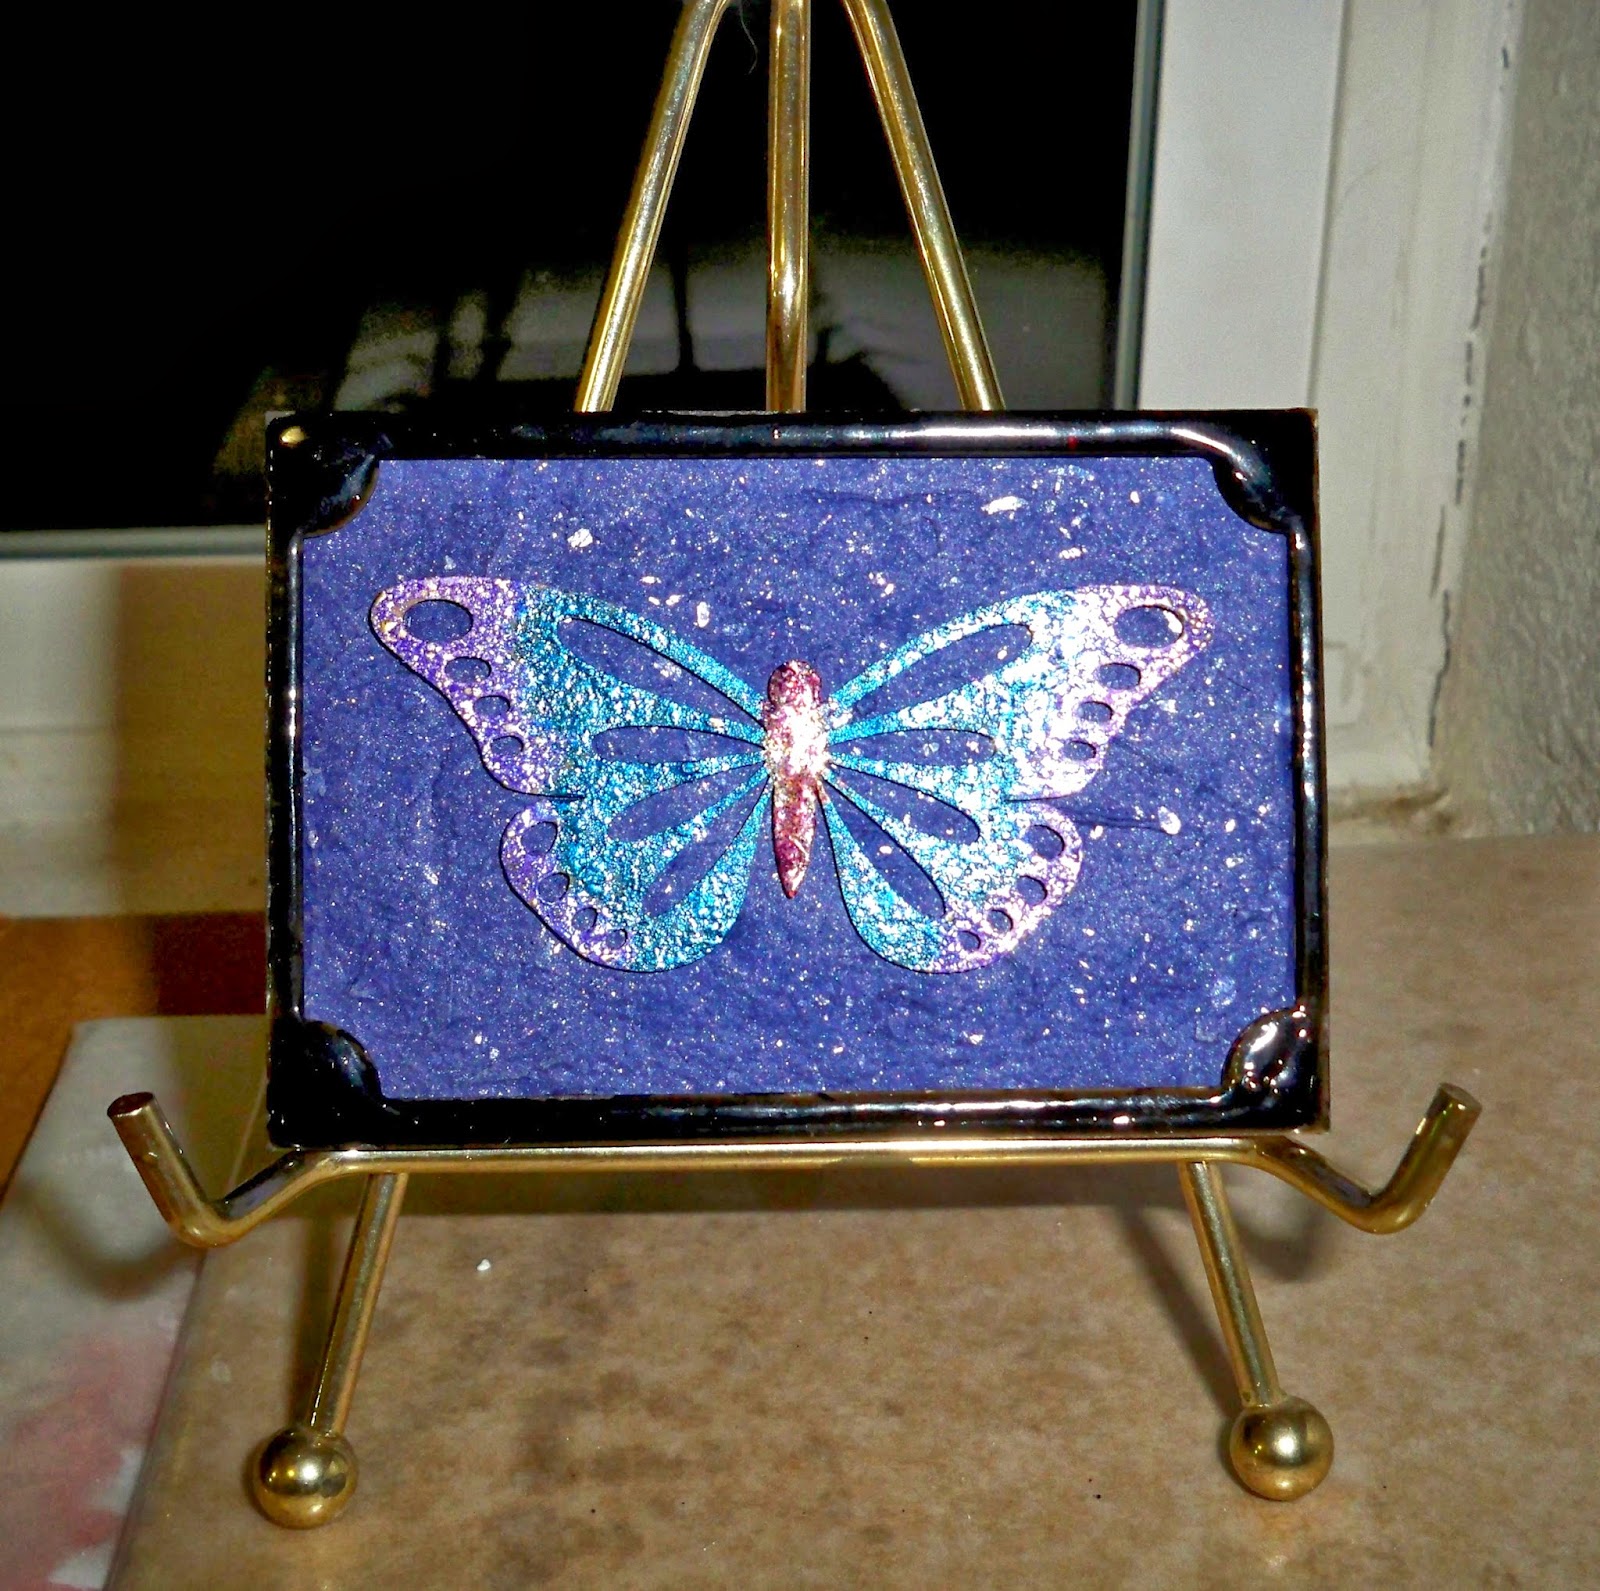
For my Globecraft & Piccolo post today I made this pretty pendant. I think visualization can be a powerful tool in your arsenal and I wanted to create something that would make people stop and look. Hopefully, the bright colors  will catch some attention!

The pendant was simple to make and all you need to make one is:
All ready to go!
First you want to emboss your pendant with the Vintage Silver Embossing Enamel 2 or 3 times – take care to roll your bottle of embossing enamel before using as this mixes up the little pieces of powder – and use Embossing Fluid between each emboss.  Before you emboss the pendant the final time, select your rubber stamp (I honestly don’t know if polymer stamps are ok doing this technique) and cover it liberally with the embossing fluid so your stamp won’t stick to the pendant.  You have to be quick doing this step - emboss your pendant the final time, them push your stamp into the still warm Embossing Enamel. Leave the stamp there for a bit; it will pop off when the Embossing Enamel gets cool. 
Texture!!
This creates such a cool effect and texture! 
Then pick out your embellishments for the pendant.  I chose a small butterfly from Butterfly Accents, and embossed that with Royal Sterling.  I wanted to put a heart somewhere but I didn’t have one that I felt was the right size, so I used my small heart punch on some sturdy silver paper.  I then edged the heart with Girls Night Out Embossing Enamel.  I also chose a key from 1” Mini Key Charms and embossed that with Mermaid Tears.  Mermaid Tears is such an unusual color – it reminds me of abalone shells as it is almost holographic.  You really need to see it in person to appreciate the beautiful, subtle purples & pinks that it creates.  When I put the key next to the Vintage Silver, the key took on the color of silver and I wanted it to stand out a bit more so I sprinkled just a bit of the Deep Blue Sky Embossing Enamel onto the key.  It really looks stunning in person but Mermaid Tears is a very difficult powder to catch on film (or whatever you call digital film).

I chose the words Imagine Peace from the Remnant Rubs and applied that directly onto the pendant first. 
Once it was applied, I used a tiny bit of Glastique Gloss to cover the sentiment; I just brushed on with a paintbrush.  I fiddled with the embellishments until I pleased with the placement and glued all of them to the pendant.  I dipped my paintbrush into the Glastique Gloss again and brushed a quick coat over the entire pendant.  Let it dry, added a jump ring and I was done.
If you look closely at the key, you can see the Mermaids Tears color on the tip of it.
Please take a look at the Globecraft & Piccolo Blog - there is a brand new project posted every day and my teammates are so very creative!

I love this pendant and what it stands for! I hope you enjoyed your visit to my blog and since Blogger’s Friend Connect isn’t working for anyone, please consider following me using email or Bloglovin’ - they are on the sidebar.   Thanks & have a peaceful day! ~ Christi

I am entering my pendant in the following challenges:
Creative Knockouts - Texturize It!
DL.ART - March Linky Party
Artistic Inspirations - #84, Anything Goes
Craft Hoarders Anonymous - #4, Show some Sparkle, Glitz or Glam
All Crafts Challenge - Feb/March Anything Goes

I appreciate the comments people leave and I will comment you back!

Friday, March 21, 2014

Spring Flowers. . .


I had so much fun using the French Oval Bubble Frame Kit to make my Spring Scene that I made this Spring Flowers ornament using another kit that Globecraft & Piccolo manufactures.  There are actually four different Ornament Kits so you can find one to perfectly suit your needs.  


Spring is in the air and I can't wait for the flowers to start blooming!
Side 1


Side 2
That is one of my four cats, Junior, in the background.  He is enjoying the window!

What I used:


As you can see, I decorated both sides of this ornament; one side is so full of flowers you can’t see the background and the other side I used Distress Markers in Peeled Paint & Mowed Lawn, on the craft sheet, spritzed them, and placed the ornament “back” on it so the background was a nice springy green.  I am calling the green side of the ornament side 2 just so I can be clear on how I decorated each side.

TONS of Flowers!!

When I was looking at all the flowers I had I decided to see if I could emboss one of them to match my project.  I took a pink mulberry flower and used both Enchanted Auberguine & Girls Night Out Embossing Enamel on it and it came out fabulous! I let that cool while I worked on some other flowers.  I also colored one with a Distress Marker in Dusty Concord.  I took my flowers that I was going to use on side one and dotted the centers with White 3D Gel Enamel.  Once they dried (I let them sit overnight just to be sure the dots dried thoroughly) I put some jewels on some of the centers of the flowers and I left some just white.  I placed the flowers where I wanted them and adhered them to the side 1 of the ornament middle.  


Since I used so many flowers on side 1, I decided to go easier on side 2.  I picked out a few more flowers and leaves, attached gems to the centers of the flowers and glued them to the green background. 

The two outer frames

I used the rim as a guide and cut out paper to cover it using the KaiserCraft Violet Crush paper.  I embossed the outer ring (the one that has the hole for hanging), on both sides, with Enchanted Aubergine Embossing Enamel, pieced the ornament together and let it dry (with the help of some binder clips). It is very simple to put the ornament together; it looks harder than it is!


I think it came out really sweet (but I honestly should of used less flowers on side 1) and I hope you enjoyed my little tutorial.  The Bubble Ornaments are SO fun to make and they come in so many sizes; I am already planning my next one!
Another view of side 1
Another view, side 2, no bubble


I'm not sure why the Aubergine Embossing Enamel came out looking so dark in some of the pictures.  It really is a beautiful color, much more purple than what shows (could just be my monitor. . .).

I would like to enter my Spring Flowers Ornament in the following challenges:
Crafts 4 Eternity - #168, Anything Goes
Alphabet Challenge Blog - C is for Country Flowers
Crafty Girls Challenges - #14, Anything Goes
Craftitude - #61, Anything Goes or add a Brad/Eyelet (anything goes for me)
Emergency Crafters - March challenge, Flowers

Thanks for stopping by everyone! I appreciate your comments & thoughts ~
Fondly, Christi

Sunday, March 16, 2014

Never Dull Your Sparkle ~ Anything But a Card Challege 33


The past two weeks were a huge upheaval in my life  – my studio was getting a shelf (finally trying again after the first one literally fell out of the wall) so that entailed cleaning off one of my tables and helping design where things were going to get moved to.  On top of that, my desktop computer was dying a slow death, and of course, that is the computer I have all my art stuff on.  So I spent entirely too much time backing up what I needed to save on my old computer and trying to get another old (but not as old) computer up to date to accept all my saved stuff.  And then get the printer to print and all the files & folders in the correct spots so I had a chance to find them again.  Funny, during all this upset I was thinking about the challenge at Anything But a Card. This month the challenge is SPARKLE and it led me to so many possibilities that I had ideas flowing like crazy.  But given the situation I decided to keep it simple and that helped me narrow it down.   After much deliberation I decided to make a sign that I can hang up in my studio and since I adore quotes it seemed to be a perfect idea to use one for this challenge. That is how this sign was born.
 
My plain board
Since the sign is fairly self-explanatory I didn’t think I needed a list of the items I used.  This is truly a project where you use what you have on hand. It began as an extra piece of foam board, about 8” x 5”.  Then the ideas began percolating.  Looking through all the decorative papers I have acquired I came across this perfect navy-ish blue with embossed silver stars; blue and silver are one of my favorite color combinations as you may have noticed. 
 
Beautiful paper!!
I wanted to keep the quote the focus of the sign so I kept it simple.  After using my Silhouette CAMEO to cut out the word sparkle (I used Core’dinations Glitter Paper) I searched for an alphabet.  I have a huge assortment of sticker alphabets and I knew I’d be able to find one I liked in my stash. Since I wouldn’t be able to use a sticker alphabet directly on the decorative paper because of the bumps caused by the stars, I found a piece of blue cardstock that I felt complimented the color scheme.  As I was rummaging through my alphabets I came across one that I had completely forgotten I even had; it wasn’t my first choice, but I really like how the cork circles look (from a very old set of cork stickers manufactured by Creative Imaginations).  I felt pop-dots were in order for the words on the cardstock.  Lastly I glued the word sparkle in a whimsical way and now I have this adorable sign. Granted, it isn’t hung up yet as another shelf is in the works, but I have it ready to go!
 
The finished product
Thank you for stopping by for my interpretation of Anything But a Cards monthly challenge! There is still time for you to enter YOUR interpretation and we’d love to see it!  Remember, NEVER DULL YOUR SPARKLE!   

I am entering my "Never Dull Your Sparkle" sign in the following challenges:
Pumpkin Spice - #63 Anything Goes
That's Crafty! - Anything Goes
Addicted to Stamps and More - #86, Anything Goes
Creative Inspirations - #256, Favorite Colour Combination (Silver & Blue)
Altered Eclectics - March Anything Goes
Rhedd's Creative Spirit - March Anything Goes

Blessings!
Christi

Friday, March 14, 2014

Colorful Butterfly ATC


I am in love with Globecraft & Piccolo’s Embossing Enamel.  The colors are amazingly vibrant, colorful and each one is blended by hand in the USA.  The color combinations are incredible! Trust me when I tell you the pictures cannot capture the true beauty of this powder.  
Plus, you get a huge amount of powder for your money!  In the photo below I used a bottle of Distress Paint to illustrate how large the containers of the Embossing Enamel are:
Lots of yummy color!
I recently got some new colors and I always want to use my new goodies as soon as I get them, so I decided to make an ATC (artist trading card).
What I used to make my Butterfly ATC:
Decorative Paper
ATC blank

The first thing I did was use the Mars Black 3D Enamel Gel on the frame.  I just used it right out of the bottle.  The funny thing is the black comes out looking like a dark gray.
But it turns to a shiny deep black once it dries.  I set my frame out overnight covered with an extra bubble I had so no cats, or cat hair would get into it. I love how these frames are the perfect size for ATC's!

Then I took my butterfly blank and used a paintbrush to paint where I wanted the Embossing Enamel to adhere.  I use a paint brush so often that I actually poured some of the Embossing Fluid out of the bottle into a small, air tight container so I wouldn’t have to keep popping the top off of the applicator.  I brushed the fluid onto the butterfly blank and shook some Deep Blue Sky enamel onto the blank and heated until done.  I only used one layer of Enamel and I still got this awesome result:
Then I edged the butterfly in Royal Sterling Enamel, again using my paintbrush and embossing fluid.  When you use the fluid with a paintbrush you don’t have to re-dip the brush each time you use it- the brush retains a good amount of the fluid.  For the body I used Ruby Red Slippers – the butterfly is SO sparkly, I tried to capture it but it is very difficult.
See that bubble on the body? Popped it with a toothpick - POOF!
For my ATC I used a piece of cardboard from a mailing box.  You can get a lot of ATC’s from one box and they are sturdier than using just paper.  After I covered my cardboard with the decorative paper (I used a handmade paper in navy blue with little silver sparkles in it) I glued my frame and then my butterfly in the center.

I love the look of the multiple embossing enamels and I think the frame sort of holds it all together.  I hope you are getting some warmer weather where you are; I’m keeping an eye out for the real butterflies!
I am entering my butterfly ATC in the following challenges – please stop by and check out all the hard work these folks do to make the challenges possible!
Aloha Fridays (Kitty Bee Designs) - #19, Things with Wings
Love to Create - #106, Anything Goes
Make my Monday - Spring
Created With Love Challenges - #77, Think Spring
Unruly PaperArts - RAQ1, Natures Gift

Thank you for stopping by ~
Blessings!
Christi

Getting that annoying error when trying to follow a Blogger blog??

I follow many blogs, as I am sure you do.  And, I love nothing more than finding a cool new blog to follow but I have gotten nothing but an error message lately when I try to follow Blogger blogs.  Well, one of the blogs I follow "Creative Smiles" has figured out a solution! Instead of me explaining the fix, I suggest you just go to Creative Smiles and check out Donna's tutorial.

Have a great day & I hope this helps!
Blessings ~
Christi

Tuesday, March 11, 2014

Happy Birthday Card ~ DCWV March Stackaholic Challenge

I have to confess, Die Cuts With a View (DCWV) is one of my very favorite brands of paper.  Their paper stacks contain some of the best quality paper I have ever seen sold in sets.  So this month I decided to enter the DCWV March Stackaholic Challenge for Cards (they have one for scrapbook pages, too, and I plan on entering that one, too, as soon as I can print off some photos!).  The rules are simple – as long as you use some paper from DCWV, and follow one or both of the sketches you can enter.  Here is the sketch I followed:


For those of you who aren’t familiar with DCWV papers I urge you to go to their website and take a look - just click here


What I did was I took 3 different stacks that I had and made three different cards using only the papers in the Stack.  I followed the same principal with each card; I chose a coordinating paper as a background mounted onto a plain card. Then I cut the strips out of matching paper, played with the strips until I was happy with the composition and glued them onto the card.  Each card is using different Stacks and has different embellishments on it so for simplicity’s sake I am only going to list what is special about each card.  You can go see the first card I made by clicking HERE and the second one HERE.

My final card was made using the Timeless Type Stack.  I had a few ideas for this card, and as usual I wasn’t sure which way I was going to go until I was finished (hehehhe) Since I wasn’t sure exactly how I was going to assemble this card I decided to make this card with a white cardstock square base, which measures 5 ½” x 5 ½”.  Here is how to make my “Happy Birthday” card (which I think would be perfect for a guy!):

You can see some of the gloss on this card
  • Square card base, white
  • Kraft cardstock cut to 5 ¼” x 5 ¼”
  • Timeless Type Stack
  • Small alphabet (I used EK Success Antique Typewriter, lower ABC)
  • Distress Ink & Distress Marker in Brushed Corduroy
  • 1” Circle Punch
  • Scrap vanilla cardstock for sentiment


I adhered the Kraft cardstock to the square base and choose my papers for my strips.  One of the coolest papers in this stack has typewriter keys all jumbled on it and the keys are glossed over so you can feel them! Here is the paper:

You can't see the dimension, but it is there

How cool! I cut my strips and punched out the “Floating Shift” key with a 1” circle punch.  I also found those neat flag type shapes in the stack and cut them out to use as my sentiment focus.  I cut out all my strips and noticed that due to the dimension the gloss gave some of the cardstock, there were white edges were really prominent to me, so I ran the Distress Marker around some of the strips (one of those things that no one would notice, but *I* know it’s there <grin>).  Attached my strips and stamped Happy Birthday using the Brushed Corduroy Distress Ink, then I edged the sentiment with the marker.  I adhered the shift button to the left top of the card and put my sentiment in the middle right. 

Another view of the card

Challenges I am entering my Happy Birthday card in:
Fussy and Fancy Friday Challenge - #109, Birthdays   
Frosted Designs Friday Challenge – Punctuation or Keyboard Symbol
Crafty Creations Challenge – #258 Happy Birthday 
Just Inspirational Challenges  - Anything Goes
Shopping Our Stash - #142, Sentiments Only
Fat-tastic Tuesday - Anything Goes

I appreciate your visitng my blog  I hope you enjoyed seeing my three cards!
Blessings to you & yours, Christi


Monday, March 10, 2014

Don't Look Back Card ~ DCWV March Stackaholic Challenge


I have to confess, Die Cuts With a View (DCWV) is one of my very favorite brands of paper.  Their paper stacks contain some of the best quality paper I have ever seen sold in sets.  So this month I decided to enter the DCWV March Stackaholic Challenge for Cards (they have one for scrapbook pages, too, and I plan on entering that one, too, as soon as I can print off some photos!).  The rules are simple – as long as you use some paper from DCWV, and follow one or both of the sketches you can enter.  Here is the sketch I followed:

DCWV March Stackaholic Challenge

For those of you who aren’t familiar with DCWV papers I urge you to go to their website and take a look - just click here

What I did was I took 3 different stacks that I had and made three different cards using only the papers in the Stack.  I followed the same principal with each card; I chose a coordinating paper as a background mounted onto a plain card. Then I cut the strips out of matching paper, played with the strips until I was happy with the composition and glued them onto the card.  Each card is using different Stacks and has different embellishments on it so for simplicity’s sake I am only going to list what is special about each card.  You can go see the first card I made by clicking HERE.

The second card uses the Stack called Le Crème. This stack has colors I am much more familiar with so it was a bit easier than the first card.

To make my “Don’t Look Back” card you need:
  • Vanilla cardstock for the card base
  • Le Crème Premium Stack
  • Decorative Edge Scissors
  • Ranger Archival Ink in Jet Black
  • Sentiment is from Unity Stamps
Again, I chose one of the papers for my background, cut it out and attached it to the vanilla base.  Cut my ½” strips from various papers, including some that have flocked designs.  Stamped my sentiment onto cardstock that was in the stack, trimmed the edges with the decorative scissors.  Then I glued two black gemstones on, one at the top of the sentiment and one at the bottom, and attached that to the card.
Another view of the card
Challenges I am entering my Don’t Look Back card in:
Crazy 4 Challenges - #226 Be Sentimental
Aud Sentiments Challenge – Sentiment for a Girl (even though this could be used for anyone, I would send it to a girl friend) 
Jo’s Scrap Shack – Anything Goes
Simply Create Too - #56 Shop Your Stash

Pop back in tomorrow to see my last card I made for the DCWV Monthly Challenge.Thank you so much for your continued support ~ Christi

Sunday, March 9, 2014

Create Without Limits Card ~ DCWV March Stackaholic Challenge


If you are a regular reader of my blog, you will know I have a love affair with paper. All kinds of paper; handmade, printed, metallic, the new glitter paper, every kind you can think of.  I have bought many papers sold in the coordinating packets but I have to say that Die Cuts With a View (DCWV) is one of my very favorite brands of paper.  Their paper stacks contain some of the best quality paper I have ever seen sold in sets.  So this month I decided to enter the DCWV March Stackaholic Challenge for Cards (they have one for scrapbook pages, too, and I plan on entering that one, too, as soon as I can print off some photos!).  The rules are simple – as long as you use some paper from DCWV, and follow one or both of the sketches you can enter.  Here is the sketch I followed:


For those of you who aren’t familiar with DCWV papers I urge you to go to their website and take a look - just click here

What I did was I took 3 different 12" x 12" Stacks that I had and made three different cards using only the papers in the Stack.  I followed the same principal with each card; I chose a coordinating paper as a background mounted onto a plain card. Then I cut the strips out of matching paper, played with the strips until I was happy with the composition and glued them onto the card.  Each card is using different Stacks and has different embellishments on it so for simplicity’s sake I am only going to list what is special about each card. 

The first card I made using the Tie Die Stack.  Bright colors are not my typical style and this stack has some bright colors!  For me, the perfect time to enter a challenge is when you are literally challenging yourself, so here I am, challenged!

To make my “Create Without Limits” card you need the following:

  • Card base of white cardstock
  • The Tie Die Stack
  • Corner rounder punch
  • Colorbox Petal Point Ink in Pinwheel (red, yellow & orange inks)
  • Sentiment (the one I used is from Quietfire Designs)
  • Pop Dots
  • Scrap of white cardstock for the sentiment

I chose one paper to use as a background, cut it, and attached that to my white cardstock base.  When cutting the strips, I chose to use both plain and glittered parts of the paper. I originally made my strips ¾” wide, then rounded the corners, and when I started to design the card, I realized the strips were a bit too wide, so I cut them down to ½”. Since the corners were already rounded this gave the strips an interesting shape. 

I stamped my sentiment, trimmed it and attached some small scrap pieces I had to the bottom.  I used pop dots to attach the sentient and I was done.
 
This shows the dimension of the pop dotted sentiment
 
And one last view of the card
Challenges I am entering for my Create Without Limits card:
Keep It Simple - #35, Stripes 
Crafting By Designs – Anything Goes in March 
Sister Act Card Challenge - #47 Anything Goes  

Thank you so much for stopping by and I hope to see you tomorrow!  You don’t want to miss my “Don’t Look Back” card ~ Blessings! Christi