Followers

Showing posts with label Ornament. Show all posts

Thursday, November 11, 2021

Shake some Joy

 I saw the November challenge at Hero Arts {Stay Crafty with Hero Arts, #29} is Holiday Tags. I had just gotten the Snowflake Medallion so I was eager to use it.  I hope you like my Shake some Joy take on the challenge. 


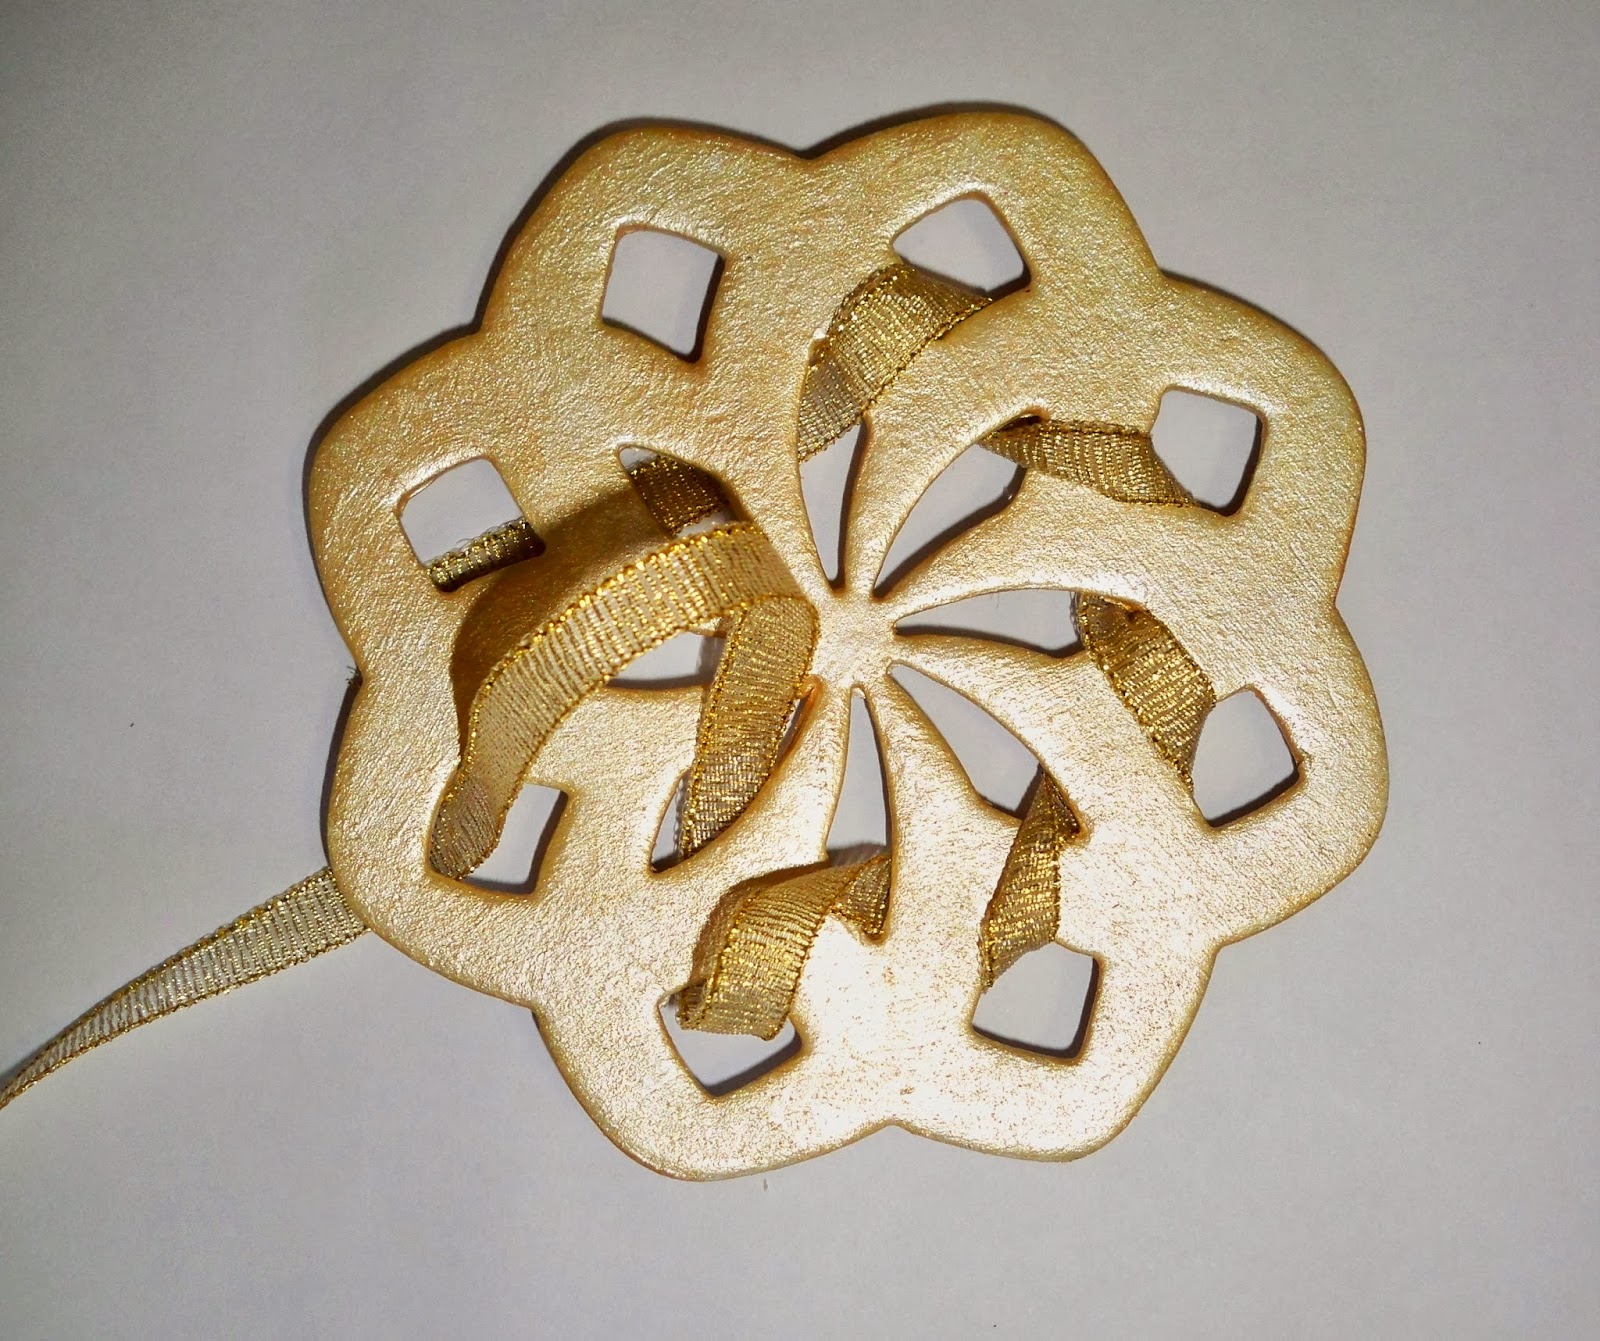
I started by cutting out the snowflake medallion from this lovely dark blue shimmer paper {that is really difficult to see in the photos} and set it aside.  I used the Infinity Circle dies to cut out about 8 frames that I made by taping 2 of the circles together, glued those on top of each other.  I used the largest circle to cut out some acetate and the bottom.  I filled my tag with shaker mix Winter Lady from Picket Fence, glued the snowflake medallion onto the acetate, then that onto the little well I had made with the frame. Lastly, I used the word Joy from the Joy Stamp & Cut set and cut that out of silver glitter card.  I inserted some ribbon in between the layers so the tag could be put onto a gift and/or used as an ornament.  Oh and I used a gem from the Picket Fence gem mix Moon Shadow over the dot of the J in Joy. 

It really didn't take that long to make; the hardest part was doing all the figuring so everything would work together, I'm not the best at that sort of stuff. It's very sparkly and I'm very pleased with the final product. Thanks so much for stopping by! Christi

I am entering my tag/ornament into the following challenges:
Stay Crafty with Hero Arts, #29 - Holiday Tags
A Blog Named Hero {On Instagram Only} - Glitz
#abnhnovemberchallenge
Creative Craft Cottage Challenge, #146 - Add Some Sparkle
The Holly & Ivy Christmas Challenge, #105 - Anything Goes
Peace on Earth Christmas Challenge, #3 - Anything Goes
Merry Little Christmas Challenge Blog, #40 - Anything Goes
Craft Rocket Challenges, #87 - Winter/Snow
Sparkles Monthly, #145 - Shaker Card {not a card, but it is a shaker!}


Monday, February 15, 2021

Shaker Magnet & Owl Ornament

Every year I make my sister some small trinket she can put on her little Christmas tree or hang on something else.  Since it is well past Christmas - yes, I am late {I honestly forgot I even had this post waiting to be published!} - I wanted to share this year's goodies.  :) 


I had made the little owl ornament a while back with stuff from my stash and some Stickles Glitter Glue as the snow {if you want to know any of the items I used in the owl ornament just let me know}.  What I want to focus on is the beach scene globe, which is a shaker magnet.

What I Used to Make my Shaker Globe
Sizzix/Tim Holtz Tiny Travel Snow Globe Dies Set, #664182
Dimensional Domes, #663559
Various Cardstock {including heavy duty white}
Simon Says Stamp Nested Circle Wafer Dies, #SSSD111466
Wooden Circle from Stash
Magnet from Stash
Shaker Stuff from Stash {I don't know what to call this - it is similar to little rocks}


I got the idea to make her a beach scene magnet since she moved from Florida to Colorado and often will say she misses the beach.  Well, now she has a little piece of it that she can look at when she feels the need!  I started the magnet by cutting out all of the pieces, then assembling them on the circle I had cut out prior {the circle is included with the dies}.  Once that was done and dried, I cut out another circle, using heavy white card and the Simon Says Stamp die, and placed the scene on that.  I used E6000 to glue a wooden circle to the assemblage; I didn't want to glue the magnet to just paper and have it possibly rip, so I used the wooden circle as the stage for the magnet.  Lastly, I put a small bit of shaker material on the scene and glued the plastic globe onto that.  It was really very simple to make as long as you have the ability to work with tiny pieces of cardstock.  I have never
Side View
been able to use tweezers so I just use my fingers, toothpicks, and luck. 

I hope you like my magnet and owl ornament - she was thrilled.  I have since acquired the Tiny Snow Globes set so expect to see some holiday magnets coming your way!   Very soon I will be having a giveaway on my Instagram account so if you are part of that social media, I urge you to begin following me.  Don't worry, I will happily follow you back!  If you aren't yet on Instagram, well, you don't know what you are missing!  There is more content, crafters, ideas, and things to inspire you than anywhere else I have seen.  And you can use your computer!  Just go to Instagram.com and make an account. Thanks for stopping by!   Fondly, Christi

I am entering my Beach Shaker Magnet in the following challenges:
Happy Little Stampers Anything Goes with Dies, February Challenge
NBUS February Challenge, #23 - Never before Used Stuff {the Tim Holtz products are NBUS}
Simon Says Stamp Monday Challenge - Add Some Texture {my shaker element!}
UnstampaBelles, #108 - Anything Goes
We Love 2 Create, #2 - Anything Goes Mixed Media
CRAFT Challenge, #586 - Anything But a Card
More Mixed Media Challenge - Anything Goes
Creative Artiste Mixed Media Challenge, #68 - Anything Goes


Sunday, December 16, 2018

Angel Ornaments

Each year I try to make a special little ornament for my sister who has a table top Christmas tree that she sets up.  This year I made a bunch so she could choose the one she likes best.  These were relatively simple to make and I hope I inspire you to step out of the box and make some decorations or gifts yourself!
This is a long post, so settle in with a cup and relax!


What I Used to Make my Angel Ornaments:
Ranger Glossy Accents
Retro Art Cafe' Coffee Break Designs BASIC Fairy Shrine
Retro Art Cafe' Coffee Break Designs ANGEL Shrine
Retro Art Cafe' Coffee Break Design SWEETHEART Style 4
Retro Art Cafe' Tiny Fairy Doll Head Paper Cuts - 1 pk
Dresden Wings, Small Gold
From my Stash: Tiny Red Fabric Heart, Pink Heart Shaped Stone, Iridescent Star, Tiny Gems, Die Cut Waste, Scrap Paper
Stickles in Gold, Iridescent and Platinum
Jump Rings, 4 Medium
Lindy's Gang Embossing Powder in Raspberry Lemonade, Imperial Crown Purple Gold, Midnight Teal and Bougainvillea Red Teal
Ranger Embossing Powder in Rich Red {unavailable but any dark red will do!}
E6000 adhesive {you probably have some}
Krylon Leafing Pens in Silver and Gold

I love Retro Art Cafe' and the cool products they carry; seriously I could spend an absolute fortune there! When I was a brand new crafter making shrines was THE thing {besides cards and scrapbooks - I don't think there was ever a time when those 2 paper crafts weren't popular}to make.  Mixed media was just born, Suze Weinberg was the Embossing Powder Queen {do a google search or check out You Tube} and Ranger Ink was still in it's infancy.  Collages, canvases, altered books and so much more were being made at breakneck speed.  That's when I found Retro Art Cafe' and I still shop there; most likely I will until one of us is done!  When I was brainstorming for this years ornament I knew if I went there and browsed around I'd find something awesome to spark my imagination and Retro Art did not let me down {plus, they have awesome sales!}.  I saw the Inspirational Fairies and I knew that was what I needed to use this year, so I bought a bunch of kits, matching heads and Dresden wings. I actually wasn't sure what wings would fit the shrines so I emailed Kristin and asked what she thought and she was kind enough to recommend the small Dresden wings.  Once I got my goodies I got to work.
This what was left of mine;
Saving them - you never know!

Each pack of Shrines has four pieces in it so you can make 2 double figures or 4; it's up to you and your design. The set includes 2 solid pieces and two shrine pieces {the shrine pieces have a hole in them to make a small window}. For these I used two pieces for each, one solid piece and one shrine piece.  The first step I took was sandwiching a jump ring in between the two pieces so I could attach an ornament hanger, piece of string or ribbon or even put them on a necklace if I wanted.  I first tried to stick them together with regular glue because I was all out of E6000 - no luck; the jump rings were so loose I could pull them out.  So once I got a new tube of E6000 I glued the rings back in and used binder clips to keep the pieces together while they dried.  I let them dry for  few days to ensure they'd be
The Blue Angel 
sturdy.  I also sandwiched the wings I used between the layers on one of the ornaments; my intent was to do that to all of them, but then I decided since I was going to be decorating them with who knows what that I'd attached the wings to the other three when I was done.  They also come with teeny little pieces of product that you can mount them on so they will stand up.  As well as crowns!


The Red Angel

I wanted a super shiny, almost enamel look on the bodies so I embossed them.  I embossed them so many times I lost count using all the delicious colors from Lindy's Gang as referenced above.  I used my fingernail {something I am SO guilty of - I know I shouldn't use them, but they are so accessible and I often find myself using them without even thinking.  However, I don't recommend it!}  to remove the embossing powder, while it was still warm, on the Red ornament to try and keep the heart shape.  Once all of them were embossed, I coated each with Glossy Accents, except for the head area, and again, on the Red one where the heart design wasn't.  Let them sit again for a few days as I
The Pink Angel
had plenty of projects to finish.  I edged each one with a Krylon Leafing Pen {I've had these pens for YEARS - another throwback to the beginning of my paper crafting.  We used them for everything, mostly to edge paper and to do the original Polished Stone technique with alcohol inks} and used the pens to cover the wings.  Turns out the wings I had attached between the two parts at the beginning took a beating with all the embossing and stuff so I wanted to jazz them up a bit and bring the wings to life.  I also used a leafing pen to color the gold wings silver.  Once the wings dried I layered some matching Stickles on them to make them shine even more; the leafing pen can have a dull finish.  I embellished my angels with bits and bobs I've had in my stash for years and attached the doll head cut outs so they could have faces.  Lastly, I painted one crown silver {with the Leafing Pen} that I gave to the Blue angel, and added some gold dots of Stickles to the Purple angel's crown that was a part of her head.

The Purple Angel

Then I was done.  I find waiting for things to dry the most annoying part of making art and this was a study in patience for sure!  But it felt really good to make something 3D, something fun and out of the box.  I hope my angels inspire you to get some older art supplies {or, buy some new goodies at Retro Art Cafe'!} and have some messy fun.  I really had no idea how these babies were going to turn out so this entire project was an experiment for me.  On that note I'm glad I bought more than one set of the Angel Shrines because I have LOTS more ideas for these!  I hope you enjoyed my tutorial and are having a safe, healthy and artful holiday! Fondly, Christi

I am entering my Angel Ornaments in the following challenges:
Altered Eclectics - M, Anything MM Goes
Rhedd's Creative Spirit - M, {running til Feb} Anything MM Goes
More Mixed Media Challenge - Anything MM Goes
The Three Amigos - Winter
Bleeding Art - M, Shiny & Sparkly
An Inky Mess - Anything MM Goes
CHNC - #416, Anything Christmas Goes
Simon Says Stamp Wednesday Challenge - Christmas
Moo-Mania - Angels
Creative Artiste Mixed Media Challenge - Anything MM Goes
Crafter's Castle - Anything Goes OPTION: Christmas Ornaments
Lindy's Gang - M, Color Challenge
HLS Mixed Media Challenge - Fantasy

Tuesday, October 16, 2018

Laminate Chip Ornaments ~ Oldies but Goodies

I was looking at some of my older {these are at least 8 years old - some of them even older than that} creations today and I came across a bunch of these Formica™ and/or Laminate Chip Sample Ornaments.  Back when using these chips was all the rage, I emailed one of the companies and somehow ended up with a huge box of discontinued samples, all different colors and sizes.  I remember feeling like I hit the jackpot!  In fact, I still have a bunch of them somewhere - I should dig them out and figure out another project for them.  

Years back I used to make a small ornament every year and I've gotten out of the habit.  However, I've just ordered a bunch of teeny little embroidery hoops and I hope to create something festive out of those for this year.  My sister has a tiny little Christmas tree that she puts up and she has all the little ornaments that I've made over the years decorating it.  I think it's time to make her a new one.

There really is no "how to" on these; just use whatever you have on hand.

Take a look at these oldies but goodies:

I used Dresden trim, buttons, and an old pin on these.


This one was made with a sequin tree and a bunch of iridescent little circles.  I remember making the sentiments using Publisher - I obviously hand cut this one!


Another button, sequin, and hand made sentiment ornament.  I think I still have some of that background paper somewhere.


This one is using ribbon and Dresden trim - the snowflake and gold lines are the ribbon.  I just ripped a hole in it to accommodate the string. 


Those are the only pictures I have left of the many ornaments I made.  I didn't think the same way I do today; I never thought I'd have a blog or ever show these publicly.  Thinking back on what my life was like when I was making these was a fun little visit back in time.  I hope you enjoyed visiting with me and if you have any chip ideas, please share them with me!  ~Fondly, Christi

I'd like to enter my Laminate Chip Sample Ornaments in the following challenges:
Simon Says Stamp Wednesday Challenge - Anything But a Card {entry #3}
The Happy Craft Challenge - M, Anything Goes
Creative Artiste - M, #43, Anything Mixed Media Goes
Crafter's Castle - M, #10, Anything Goes OPTION:Winter
An Inky Mess - M, #23, Anything Mixed Media Goes
Altered Eclectics - M, Anything Mixed Media Goes 
The Cat's Pajamas - M, #351, Holiday

Monday, November 24, 2014

Christmas Decorations at Craft-Room Challenges!

For challenge #90 at the Craft-Room Challenge, Hazel has chosen to inspire us to make Christmas Decorations - no cards. I have been intending to make ornaments for the three cats that I had to let go last year (they all lived to a ripe old age; Baby was 19, Spike was 19 and Boo was 17) and I know I did what was needed to for their sake.  What made it so much harder was I lost Spike on December 5th and then Boo on December 6th.  I truly intended on making all 3 ornaments, but, I only got to make one ornament because I got just too emotional to make all three.  I chose to make one for Boo first (and you can read a bit about him here).  Letting go of my furbabies is the worst part of being a pet parent, but the unconditional love, joy and laughter I get from my pets is priceless to me. And, I do have a houseful of five cats, so I am certainly never lonely for cat company. 
Big fat, happy Boo :)

What I Used to Make my Project:
Chipboard Ornament, 2  (I can't for the life of me recall where I got these, but they are about 4" at their widest spot)
Folk Art Acrylic Paint in Metallic Champagne, #675
Ribbon (the metallic gold ribbon was about 1 1/2" wide)
3D Enamel Gel in Satin Gold  (Mine came from Globecraft & Piccolo)
Embellishments
Krylon 18kt Gold Leafing Pen
Bulldog Clips (to hold it together while drying)
Your choice of picture

When I bought these round ornaments, I bought 6 of them so I could make 3 ornaments.  My goal was to cut out a portion of the center on 3 of them, and then use the other three as the backs of the ornament.  That was a great plan, except I have a terrible time cutting in circles - just another one of those things.  I enlisted help and got 3 of the ornaments cut & left three intact.  It helped that they didn't need to be smoothly cut.
 Once they were cut, I picked a pair and brainstormed how I was going to cover the chipboard - I wanted to use paper initially, but after conferring with my teamies, I chose to use ribbon.  So I cut a length of ribbon about as long as my arm (I never measure those kinds of things) and began wrapping it around the ornament with the hole in the center (I'm going to call that ornament the front piece and the back the back piece).  I liked the way the wrapped ribbon came out, and I did try some other ribbons on the other front pieces I had, but the gold looked the best to me. 
The Ribbon I used
I did have to re-wrap the end, up by the hanging piece a few times, but all in all I am satisfied with the results.   Before I glued the ribbon to the front, I colored the area where you put the hook with the Krylon Leafing Pen in case any of it showed.  Then I decided to use the 3D gel on the very top just to give some pop to it.  Once the 3D gel dried (I left it overnight) I glued the ribbon and moved on.


While the ribbon was drying I decided to paint the back portion in a nice, soft gold - Metallic champagne is the perfect name for this color - so the ornament would look finished, plus I think I am going to write a bit about Boo eventually on the back.  I edged the back piece with the Krylon Leafing Pen so all of the chipboard was now covered with something.  I set the back aside to dry.
It dried nicer than this - all the brush marks settled in.


Deciding what picture to use was another issue.  I have no children and I take LOTS of pictures of my cats.  But I found one where Boo is on "his table" (it really wasn't his table, but he adopted it and it became his table), where he'd hang out with me in Connecticut while I was in my art room.  He is fat and healthy in the picture and I felt it was a beautiful representation of him.  I printed out the picture on 4" x 6" photo paper, cut it to size, and sandwiched the 2 pieces of the ornament around the picture.  A bit of glue has seeped onto the top of his picture, and I am sure it would have been fine IF I left it alone, but no - I had to try to wipe it off. 
The red circle shows were the glue is peeking out
I found out what happens when you use a baby wipe on a photo printed picture - it takes the color off.  Yup.  I tried to color in where the color was rubbed off, but the photo paper kept resisting every marker I tried to use.  Mortified that the ornament wasn't going to be perfect, I ripped it apart and printed another picture.  Glued that picture over the ruined picture and sandwiched the ornament again.  I found that the back piece warped a bit so I needed to use some bulldog clips, spaced around the circle, to hold the ornament all together while it dried.


Lastly, I took an old embellishment from my stash (I think it is a part of an earring) and placed that at the top of the ornament.  All the emotion and trouble was worth it because I adore this creation of mine.  I think Boo looks like the handsome kitty he was and this was a fantastic way to remember him.  Maybe I'll be able to make the other 2 ornaments after all.  We'll see. 
Another view - this one is a bit more sparkly

Thank you SO much for reading all of this - I know I over shared, but sometimes that's what I have to do.  I hope you will share your creations with us at Craft-Room Challenge (PLEASE read our pesky rules!) – you have two whole weeks to enter, so get going!  Fondly, Christi

I would like to enter my ornament in the following challenges: 
Crafty Ribbons (w) - Challenge #107,  Animals at Christmas plus Ribbon
CCEE Stampers (w) - Photos & Photography 
The Mirror Crack'd (m) - #3, Christmas Decorations
Unruly PaperArts (m) - RAQ - Santa Claus is Coming to Town
Naughty or Nice Challenges (November) - #9, Festive Furballs
Fairy Tale Challenge - #105, Animal Christmas

Friday, June 20, 2014

Is it Too Early for Holiday Ornaments?


I say NEVER! For this Globecraft & Piccolo post I decided to beat the heat by making a holiday ornament.  Using one of the Ornament Kits (in addition to the kits found on the linked page, there is the DIY Portrait Ornament and the DIY Landscape Ornament) make it SO easy and really fun, but my favorite is using one of the 2 DIY kits, like I did here.  I wanted an icy feel to my ornament, hoping that keeping cool could be a bit of mind over matter!
 
The final ornament - pretty, but I'm still hot!
What I Used to Make My Project
Fishing Line or Craft Filament (I used jewelry cord, clear)
 
The kit with the piece from Bejeweled Snowflakes
First thing I did was cut my long snowflake border from the Bejeweled Snowflake Set in half – there are 8 little snowflakes on each strip, so I just snipped it into 4.  Then I applied the Embossing Fluid and embossed the strip with Aged White Embossing Enamel, both front and back.

Then I embossed the inner circle of the ornament – the inner piece is the
Inner bezel with snowflake piece
piece in the kit that has the loop on the top to hang the ornament.  I just pounced my Embossing Fluid along the outside of the ring (super easy since the Embossing Fluid uses a dauber on the top of it – you never get too much or too little! Just don’t squeeze your bottle as it will explode – or so I hear - hehehe) since I knew once the ornament is assembled you can only see a small bit of the ring; I embossed the inner ring on both sides.  Then, I threaded the cord through the very top of the snowflake strip that I had cut so that the ends of the cord could be glued to the inner ring and the strip would hang correctly.  For that I used E6000 and I did one piece of string at a time (for me that was easier than trying to line the filament up on both sides, ensure the strip was even, then try to glue both ends of the cord – it became like a game, with me fighting against everything.  So, I surrendered and did each end separately).
All the pieces embossed, attached & ready to assemble (except the globes)
While my hanging piece was drying, I embossed the 2 outer rings with Mermaid Tears, being sure to roll the Embossing Enamel to shake up the enamel.  The Globecraft & Piccolo Embossing Enamel is hand blended in the USA and each color is so unique – the Mermaid Tears is such a pretty mixture of colors!  I did one side of each of the outer rings, but I did emboss each side twice.  Then I glued the globes and the rings to the inner ring, lining it up and clamping them together with bulldog clips.  I let it dry overnight and I was done!
 
Another look at the final product (hard to get those bubbles to photograph!)
Also, another great use for the bubbles is to use them as "shields" - when you have items drying, perhaps with Glastique Gloss, you can place a bubble over the item and that helps to keep the cat hair, human hair, Embossing Enamel and all the other floaties out of your finish.  Thanks so much for stopping by – I appreciate your comments and sharing of my posts so much! Hope you have a fantastic weekend! Christi

I would like to enter my project in the following challenges:
Love to Create Challenge Blog - #120, Anything Goes
Simon Says Stamp Monday Challenge - Anything Goes!
Craft Hoarders Anonymous Challenge Blog - #10, Spray it! Ink it! Smear it! Emboss it! 
All Crafts Challenge - Anything But a Card (June/July)
Crafting from the Heart - #23, Anything Goes
A Creative Need - (June) Anything Goes

Sunday, December 15, 2013

Ornaments


Since it is my week to post a project for Anything But a Card Challenge Blog and the current challenge is “Anything Goes, with a Holiday Twist” I thought these ornaments I made fit the bill perfectly.  I love to decorate chipboard and book board shapes and I have built up quite a stash of them over the years.  Classic case of “I like these SO much that I don’t want to use them” - I am really bad at that when it comes to paper; but I have employed a trick to make me use it – I just cut it. Even if I cut off a small square, it’s been cut and therefore loses some of its power and allows me to use it. It seems to work with other items, too, but instead of cutting, I open the package.  Whatever mind games I play with myself, it works for me!  So I tore open my drawer of shapes and dug right in, determined I was going to use something I had hoarded. 

I searched in the stash and found a pack of Buck Naked Ornaments from Cosmo Cricket.  When I searched the Cosmo Cricket website, I couldn’t find them, but if you do a search on the internet, various suppliers will come up.  I must have had these things for at least 10 years and had forgotten all about them.  I opened the pack and selected a few of the ornaments and snowflakes to play with. As always, I gessoed the board before I did anything. As usual, I knew I wanted to use them, but had no clue as to what they’d become. 
All gessoed up & ready to party!
I started the Angel Ornament the week I lost my cat Spike and before I knew that I’d had to send Boo to join him at the Rainbow Bridge (for those of you who aren’t familiar with the Rainbow Bridge click HERE, it will take you to a site where the poem is – but be warned – it is emotional! You may want to bookmark it and read it after the Holidays!). I first painted the ornament red but I didn’t like it at all.  It wasn't a deep red like I wanted, more like an orange red –

The red I didn't like

Blue is one of my favorite colors and JacquardProducts makes the most beautiful blue paint called  Lumiere Pearl Blue, so that is what I decided to use, ditch the red and go with the blue. I painted it and set it aside to dry while I searched for an image to put inside the circle.  I found the beautiful angel in my pile, and it is actually wrapping paper that I picked up a while back at the wonderful dollar store.  I cut the image to size.  I also felt that since it was wrapping paper I wanted to protect the image, so I used my Silhouette CAMEO to cut a circle that fit in the ornament out of acetate.  Once my ornament was dry, I glued the image and the acetate down and covered it with the other ornament.  Glued that together and finished off with a piece of gold ribbon.  Now I have a tribute of my kitties (although I do plan on making something else with their pictures and names on it).  I am very happy with how this turned out and I have it hanging in my craft room since we won’t be having a holiday tree.  We had decided that with the kitten (and now 2 new cats - more on them later) having a tree is just too much this year but I will have one next year!
Sorry I didn't take many pictures while making this!
 The snowflake came from the same pack of Cosmo Cricket book board ornaments.  There are few other snowflake shapes, but this one called to me.  Wasn't sure what color I wanted to paint the snowflake, so I dug through my acrylic paints and found paint by Folk Art called Metallic Champagne – I loved champagne when I was younger (hic) and I like the subtle sparkle of this paint, so the red became metallic champagne.  
I often leave works in progress on my tables so I can see them and when an idea strikes I can work on the project, providing I can find it – my room is organized chaos, but my two female cats have decided they like to play with my goodies as much as I do! Because of that, I do have to be careful about what I leave out. I have some gold ribbon that went perfectly with the pale gold so I wove that through the snowflake. 
 Please ignore the fact that the snowflake looks like a darker gold
 I loved it, but it needed some bling. I found a pack of gems by Darice and I chose to put them around the flake and put a larger one in the middle.  Even though the gems have self adhesive on them, I always add a dab of glue just to make sure. I feel like the snowflake came out looking very elegant and it has also has a home in my room, until next year.
 Tada! With help from Manny once again, here is my finished snowflake
 
I hope you enjoyed my ornaments! They were a pleasure to make – I love to play and decorate naked chipboard - and very easy and fun!  
Don't forget to link up your creations to the Anything But a Card blog! It's inspiring to see how everyone interprets the theme and you just might win!

I would also like to enter my creations in the following challenges:
Stampin with the Dragon - Gifts & Ornaments
Crafting for all Seasons - Christmas, Anything but a Card
Rhedd & Rosie Challenges - Use old Stash (the ornaments are at least 10 years old and mentioned in my post)