Followers

Showing posts with label WOW! Embossing Products. Show all posts

Thursday, March 31, 2022

To the Moon with The Robin's Nest Creatives

 Hi all! Today I have another 2fer for you! It's so much fun when I get so inspired by a stamp set that I have to make two, or more, cards. I had made these cards a while ago - it was one of those cases where as soon as I saw the stamp set I knew how I wanted to play with it :) I am so pleased with how these cards came out and I hope you like them as much as I do! And I knew just how I wanted to decorate them with my Dew Drops!


  Each card started out with a white blank card.  I stamped the sun on one and the moon on another using  the Simon Says Stamp set To The Moon with embossing ink.  Then both images where embossed with white embossing powder .  I set the moon card aside and worked on the sun card first, blending Distress  Oxide yellow inks in the center and orange inks along the sides.  I LOVE the POP you get when using white embossing powder - I really enjoy watching the image come out; reminds me of watching the picture develop when you use a Polaroid camera.  Once I was happy with the blending, I moved on to the Moon card.  In addition to embossing the moon, I embossed part of the sentiment on a piece of dark blue card, cut it out with a fishtail die and set it aside.  I used shades of blue and purple ink for the moon card and again went lighter in the center and darker toward the outside.  

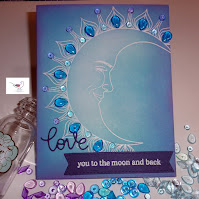
Before I put the sentiment die cuts on the cards {the hello on the sun cut out of white card and the love on the moon cut out of the same dark blue that the embossed sentiment was on} I started to figure out what type of design I wanted on each card using The Robin's Nest Creatives Mini Dews, Tear Drops and Diamonds {I  have included links to each specific product I've used - just click on the link provided}  I used yellow and orange Mini Dews {you can get both orange & yellow Mini Dews in the Paisley Collection}, as well as Diamond yellow Dews on the sun card and purple and light blue Mini Dews, as well as royal blue Tear Drops on the moon card.  I personally love how these 2 cards came out; ink blending is so much fun and the options are endless! Also, the Dew Drops enhance the designs but don't distract from them - perfect if you ask me! Pinterest is fantastic if you are looking for color combinations but beware, you will get lost in the lovely colors so let everyone know you are busy, get a cup of whatever and prepare to be there a while; happens to me every time!  Thanks SO much for dropping by! Christi  

I am entering my cards in the following challenges:
Simon Says Stamp Wednesday Challenge - Anything Goes
Classic Design Challenge, #6 - Anything Goes
Crafts Galore Encore #98 - Anything Goes
Creative Knockouts, #446 - Anything Goes
Creative Fingers, #228 - Anything Goes
Simon Says Stamp Flikr Challenge, #198 - Anything Goes


Monday, March 7, 2022

Lawn Fawn Hope Card

The current situation in the world is making me feel so helpless; I can't do much to help any of the people affected by these events, so I made a card with Ukraine in mind. I actually feel for ALL the civilians involved in this catastrophe and while I may hold strong opinions about world leaders, I do not wish harm to come to any innocent civilian. I have to say, crafting truly does help heal because I feel better, a bit brighter.  I like that this card has a cheerfulness to it.  All the cute daisies actually bring spring to mind as well; and spring is a time for hope. So, this card has two meanings; works for me! Here you go:


All of the dies are from Lawn Fawn; I made the daisies using the Little Flowers set {while not new, this is the first time I have used this set}, using gold glitter card for the flower centers, the grass from this border die, the sun background is this die and the letters are from this set.  Obviously, the colors are sort of the Ukrainian flag's colors {I struggled with incorporating enough blue, but I really loved the sun as the background instead of a blue sky}.  The letters were half pressed {inspired by Jenn Shurkus and how beautifully she does this sort of technique} into embossing ink and then embossed with Wow! Clear Hologram Sparkle embossing powder. The grass is popped up using dimensional tape, some of the daisies are glued to the card and some to the grass. The papers are from my stash, but I think they are Core'dinations because they do have some texture to them. Thanks so much for stopping by ~ stay safe, Christi

PS: Do you want to help Ukraine but don't know how? Go to Yana Smakula's post here - The coordinator, Denzil Quick is amazing! I emailed him and he responded within a DAY!! #freeUkraine

I am entering my card in the following challenges:
Lil Patch of Crafty Friends, #177 - Anything Goes

The Paper Players, #581 - Spring is in the Air
Simon Says Stamp Wednesday Challenge - Use a Die Cut (#2)
Dies R Us, #188 - Anything Goes using a Product they Sell
NBUS Challenge, #36 - Anything NBUS (#2)
Simon Says Stamp Monday Challenge - Add Some Green
The Friendship Challenge, #75 - Anything Goes
Creative Knockouts, #442 - Sparkle & Shine


Sunday, February 13, 2022

Be Mine, Galentine

 Even thought I am not a fan of Valentine's Day, I thought I'd make a card to send to my sister, who is also single, and ask her to be my Galentine.  Hopefully this will put a smile on her face!

I started the card by making the floral heat using Concord & 9th's Triple Step Blooming Heart.  I used the following Distress Inks: Spun Sugar, Kitsch Flamingo and Festive Berries.  Once the heart was done, I found a piece of paper that matched in my stash and dry embossed it with Darice's Mini Hearts Embossing Folder {it is still available, but you need to look}, I then glued that onto the white card base.  I used a strip of red card, embossed the sentiment {which is from MFT, but seems to be discontinued} onto it using white embossing powder then die cut it.  Dimensional tape was used to adhere the heart to the background, I glued the sentiment in place and added two diamond hearts I got ages ago from Maker Forte {the picture makes the hearts look gold when they are actually iridescent}.  I think I did a fairly good job here. I like how all of the colors match :)

Thanks for stopping by and have a fantastic week :) Fondly, Christi

I am entering my card in the following challenges:
Can You Handle the Pressure (NEW CHALLENGE!!) #2, Anything Goes w/ a Twist of Pink
Sweet Stampin'- Love, Love, Love
CCEE Stampers, #205 - Valentine's Day
The Little Red Wagon, #640 - Be My Love/Valentine
Simon Says Stamp Wednesday Challenge - Emboss it
Try it on Tuesday - All Loved Up
Colorful Options, M - Rosy Red


Daring Cardmakers - My Sweet Valentine


Saturday, October 30, 2021

Have a Spooktacular Day!

** Looking for the Cat Lovers Blog Hop Day 6 post?? Where I have a GIVEAWAY going on?? Well, it's right here :)

I have colored and cut out so many sets of these adorable little houses, ghosts, and bats from this Lawn Fawn set I wouldn't be surprised if they end up popping up on all sorts of cards.  I think I colored and cut out an entire town! I love having extra pieces ready to go in case I get an idea to make a card, or have to make one quickly.  Do you stamp, color & cut out more than you need for a project? Please let me know I am not the only one!  Please enjoy my spooky little scene:


What I Used to Make my Card:
Brown Card Base 
Watercolor Paper {I use this} 
Embossing Ink
Tim Holtz/Ranger Oxide Inks Pre-made Sky Background
 
Like I said, I must have stamped, colored, and cut at least 6 neighborhoods of these adorable houses! I chose this group as they are kind of spooky to me since I used grey and brown to color the houses.  I also stamped and cut some ghosts, bats, a few trick or treaters, and that adorable little pumpkin patch.  The sky had been done and was in my stash; I have been working for a while now to get a really spooky sky and I love this one!  I cut the hillside out of a brown slightly darker than the card base to offer some interest, then attached everything you see.  Since I gained some confidence with stamping directly on the cards I am making, I did it again with this sentiment.

This was the first card I'd made with this set {yes, I have had it since it's release} and it was so fun! I'm not sure how I missed posting this last year but I found it in my drafts {yes, from LAST year - hiding out in my drafts!!}, so here it is. I hope you are finding some crafty time, I know for me if it wasn't for this hobby I would of gone mad ages ago! I have to admit, the last year or so hasn't been that much different for me except I don't have to make an excuse to stay home and craft :) Thanks so much for stopping by and please stay safe!  Christi

I am entering my card in the following challenges:
Global Design Project, #315 - Theme Challenge {Pumpkins/Halloween}
Make My Monday, #160 - (e)scape it {landscape}
CCEE Stampers, #2143 - Create a Scene
Little Red Wagon, #625 - Outside
Crafty Gals Corner, #224 - Halloween Colors
Inspired By, #193 - Friends "fall" Together {actually inspired by the title of the challenge!}
Alphabet Challenge - O is for Outdoors
The Card Concept, #162 - Fall Fun {inspired by the cozy closeness - like a bunch of neighborhood kids getting back from trick or treating and hanging out drinking hot cocoa while the adults have some cider!

Inspiration Station, #16 - Inspired by the photo as it looks like a community pumpkin patch, and my scene card is a neighborhood - so I can imagine all the neighbors going to that patch and buying pumpkins all together :)

Inspiration Station's Photo: