Followers

Showing posts with label Washi Tape. Show all posts

Sunday, April 3, 2022

Spring ATCs at the River of Creativity

I have done it AGAIN - this post is too early - the challenge doesn't start until tomorrow {4/5/22}!! So take the rest of today & create something for us :) I apologize for the confusion!!

Hello! Time for another challenge at River of Creativity! For challenge #12, our theme is spring as well as anything goes but a card - that's right, put away your card blanks and get inky with us!  I had planned on making something completely different than these Artist Trading Cards but nothing seemed to coalesce, so I listened to the universe and made a set of 6 ATCs instead of struggling to create something that just wasn't working! I've had a small box of scraps that I have amassed over the years {small die cuts, pieces of Dresden, punched patterns, stickers, scraps of paper, etc} and I decided to use what I had in the box to make set. I'd had the box for so long I really needed to go through all the things I had saved and figure out if I was truly ever going to use the pieces or not; so I went through the box, set aside what I really wanted to use and threw the rest away so a lot of what you see on these is from that scrap box and is almost vintage {grin - ok not really, but I have had it for a long time!}.  Enjoy!


I used a bunch of assorted products on these little guys, and I stuffed them full of bling! I used gems and sequin mixes from Picket Fence Studios, Dresden scraps from Alpha Stamps and many other sources, washi tape (and matching die) from Pinkfresh Studios as well from my stash, a ton of Dream Drops {I used  Indigo Eclipse, Cloud 9 and Love Potion} from Tonic Studios and many other bits and pieces, including stickers and more that are from my huge stash.  The background paper for these ATCs is from ModaScrap from the Fly and Scrap Collection, 6" x 6" paper {I could not find it on the ModaScrap site, but I did do a search and it is available}. I also used a bunch of small alphabet stickers and tiles, most from companies that aren't in business anymore, sadly.  All this stuff I've saved over the years

needs to be used so I can get new stuff! I had so much fun making these ATC's; I am finding myself using lots of bling and glitz in my work lately and I just went nuts with these. Knowing that if I really didn't like how something came out, I could just throw the paper away {I have so many blanks that I have amassed over the years, I could probably make an ATC a day for the next year!} and begin again with no harm.  Something about these little canvases is so freeing!

I was showing these to my roommate and explaining how "back in the

day" we'd make a bunch of ATCs, using the same design and bring them to stamp conventions and trade.  I think I still have a notebook full of traded ATCs. Do you remember those good old days? Hopefully, soon, we will be able to attend stamp conventions again - I miss the energy and all the cool products! Thanks for dropping in and get out your creative muse and create anything but a card and join us at the River of Creativity, optional theme of Spring - hope to see you there :) Christi

PS: To see the smaller pictures bigger, just click on them. If that doesn't work please let me know ~ Thanks!

I am entering my Spring ATCs in the following challenges:
Simon Says Stamp Monday Challenge - Easter/Spring
Country View Challenges - Spring is Coming
We Love 2 Create - Anything Goes
Four Seasons Challenge - Spring Challenge
The Sisterhood of Snarky Stampers, #207 - A is for ATC 


Thursday, February 10, 2022

How I feel About Valentine's Day

It's been so long since I've posted, it feels like months! First, my camera died - I can't say anything bad about it because it was about 18 years old, so getting a new one proved interesting and once I got the new camera I got sick.  So, I am far, far behind; I didn't even post any Christmas cards.  But here I am, and I plan on getting back on track!  Today I am sharing a card for Valentine's Day - I admit, it isn't one of my favorite holidays, and I express that fact with all these Simon Says Stamp dies and a few other goodies!


First I covered the white card base with a stencil from Kindred Stamps using Distress Ink Old Paper - I covered the stencil very lightly as I wanted the background to be visible, but not be the first thing your eye goes to.  Once that was done I cut the first die out of black card, the second part of the sentiment is cut out of red card, and I cut the "happy" off.  I used a cute alphabet from CZ Design to put the "it's" in between the words; looks like the Archie Jr. Solid Alphabet dies{czd50}I used are no longer available, but any small alphabet will do..  I finished the card off by using some old heart washi tape and some red hearts I had cut out using the Chunky Hearts Panel Wafer die.

Now I will be sharing some more "love" cards, and I even have a Galentine one to share :) Thanks for checking out my anti-Valentine :) Fondly, Christi

I am entering my card in the following challenges:
Simon Says Stamp Monday Challenge - Love is in the Air
Use Your Stuff #441 - Hearts/Love
Crafty Gals Corner, #228 - Add a Heart
Sisterhood of Snarky Stampers, #203 - J is for Judgemental {see Emma below}
Inspiration Station, #23 - Candy Hearts {I actually can't stand candy hearts - sorry!!! LOL}


Friday, March 15, 2019

Die Cut Divas and Morgan's Artworld

Hello, crafty peeps!!  How is the month of March going for you?  We just had a MAJOR storm here in Colorado with winds up to 70 mph; some places it reached over 100!!  I hope you are getting some signs of spring where you are and, if you are in the path of the storm, get ready!  Enough weather related stuff.  Here is my card using a Morgan's Artworld digi.  Goodness do they have beautiful stamps, but I knew there was NO way I could do them justice!  Hope you like the card!


What I Used to Make my Card:
Yellow Top Fold Card
Skinny Orange Yellow Washi Tape {manufacturer unknown}
Morgan's Artworld Sunflower Image {join the FB group to purchase}
Frantic Stamper Elementals #11, Bracket Coved Label, #FRA-DIE-09468
Prismacolor Pencils
Pebbles Family Ties Paper Pad {discontinued - available at many stores}
Strathmore Bristol Paper, Series 300
Gamasol {sometimes referred to as Gamsol, readily available}
Blender Stumps {I got mine through Amazon, but readily available}

I had the image of the sunflower printed on Bristol paper and colored it in with Prismacolor pencils, blended with Gamasol using blender stumps and generally putzed around with it until I was satisfied with how the sunflower looked.  I die
Another Peek
cut yellow paper and patterned paper using the Frantic Stamper die.  I noticed the card base itself, which is really old, was sort of cracking at the top, like they sometimes do when the paper is old.  I had already attached everything to it and I like the summery yellow so I thought of a way to "save" it.  I have a pretty good collection of washi tape {that I rarely use} and I found a skinny, orangey-colored tape so I edged the entire card with that.  


So, there is my card; I hope it brings a little spring cheer to you!  You still have a while to enter the challenge at Die Cut Divas "Anything Goes" Challenge for March.  We'd LOVE to see what you have created so please be sure to enter!  Fondly, Christi

I am entering my sunflower card in the following challenges:
A Gem of a Challenge -  Anything Goes
A Bit More Time to Craft - #88, Anything Goes
Crafty Hazelnut's Patterned Paper Challenge - M, Anything Goes
The Rainbow Card Challenge - M, Yummy Yellow
Colour Crazy Craft Challenge - Anything Colored Goes
Creative Friday - #226, Spring is Coming!
Morgan's Artworld - M, #3, Anything Goes
The Creative Crafters - #14, Anything Goes

Thursday, March 1, 2018

Stinkin' Inkers Wishy Washi Challenge

** Yes, this posted early.  Yes, it is my mistake.  Yes, I'm sorry.  Please do join the challenge, due to begin Tuesday, March 7.  Meanwhile, Love is in the Air is still going until March 6!

Hello everyone! Let me just say I am not a washi tape person.  I didn't go crazy {unbelievable, but true!} and buy tons of tape when it first came out.  In fact, for the longest time all I had was the first batch made by Tim Holtz.  But, the more I saw the creative ways people used washi tape, the more that helped me slowly collect more.  I still don't have very many {not compared to some of you!} but I did score these beautiful glitter washi tapes at my Dollar Tree.  And then I saw the sequins that matched and had to buy those, too!  Out of those two supplies was born my "Wishy Washi" card for the March Challenge at Stinkin' Inkers. 


What I Used to Make my Card:
White Card Base
Scrap Paper
Washi Tape, Glitter Purple & Pink
Spellbinders Nestabilities, Curved Rectangles, #S5-006
Distress Ink in Wilted Violet
Sentiment by Riley & Co., Funny Bones, Supermodel, #RWD-399
Sequins
6mm White Craft Foam {Michael's}
Acetate
MISTI
Copic Markers that Match the Frame

Before I get into the card, I need to share this ENABLER alert! The dies I used to make this card are on sale at Spellbinders for $6.99! Regular price is $19.99, so that is a SUPER deal, even if it is getting discontinued!

First, I used a piece of scrap cardstock to layer the washi tape, alternating
the two colors.  The only issue with Dollar Tree glitter washi tape is that the
glitter isn't that great at staying on the tape.  I got glitter everywhere; and I am still finding glitter in places it has no business being.  However, the loss of glitter didn't effect the tape at all, so I guess that makes up for it. I looked on the Dollar Tree website and couldn't find any glitter washi but it's readily available elsewhere or you may be lucky and find some at your local Dollar Tree store.


I thought I'd show you how I make sure the frame of my shaker card matches up with the acetate.  Now, you don't have to be exact; I could have cut out a plain rectangle for the shaker window but I think it adds to the construction of the card if everything is as close to the same shape as can be.  What I did was use removable tape to hold the dies together so when I cut the frame and then the foam the dies stayed in the same place for both.  You can't really see the removable tape but I use it SO much I have a dispenser on the same table as my Big Shot.  It's cheap and I typically don't have an issue with it sticking when it isn't wanted.  I used the dies three times {the frame, the foam, and the acetate} and the removable tape worked wonderfully.  I know some crafters use washi tape to hold their dies in place; I tried that but promptly lost misplaced the roll I'd designated for that purpose in the mess on my die cutting table. Like I said, I have a dispenser - one of the old, heavy ones that teachers used to use in the classroom, and that's fairly hard to lose.


Once all my pieces were cut, I stamped the sentiment on the white card base, using my MISTI and the dies to ensure I placed it correctly.  I adore the whole Funny Bones line of Riley & Co.; they are just as snarky as I am!  Besides, who doesn't love a good giggle?  Before I assembled the card, I colored the edges of the craft foam cut out so the edges wouldn't stick out like a sore thumb.  I used Copic markers, but any alcohol ink marker will work {note: if you decide to do this step, make sure you are wearing latex gloves.  The alcohol ink takes a bit to dry on the foam and you don't want to end up with pastel finger tips like I did.} 
Another Look
As you can tell if you are a follower of mine, I love making shaker cards, and this one was a blast to make.  I hope you enjoyed my little tutorial and you should be breaking out your washi tape RIGHT NOW so you can join us at Stinkin' Inkers! Fondly, Christi

I am entering my Shaker Card in the following challenges:
Frilly & Funkie - Get in on the Action

Scrapy Land - Anything Goes
Craftaholics R Us - #9, Sequins
Simon Says Stamp Wednesday Challenge - Anything Goes (#2)
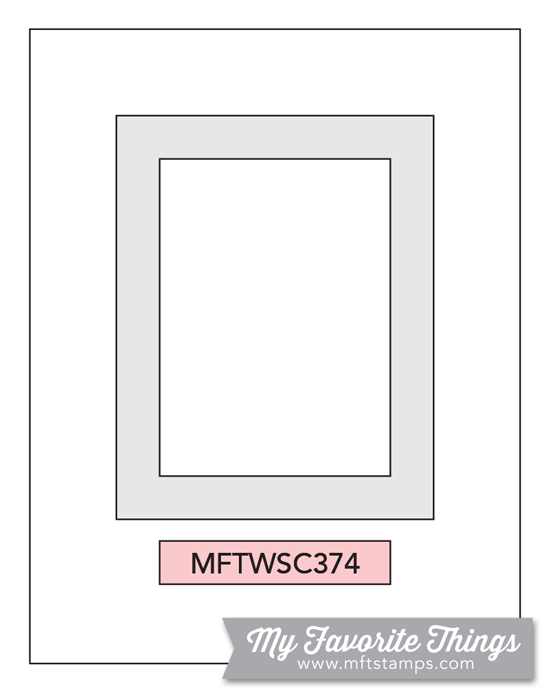
My Favorite Stamps - #374, Sketch Challenge
Die Cut Divas - M,  Monochrome
Stamps & Fun - Glitter
Time Out Challenges - Be Bold!
4 Crafty Chicks - #392, Anything Goes TWIST: Add a Sentiment

Tuesday, January 30, 2018

Hello Shaker Card

I wanted to make something my sister could have on her desk.  We don't get to see each other that often since she works all week and I work mostly weekends.  And every time we make plans, something seems to come up - this last time it was the snow.  So I made this sweet little shaker so she'd know I was always thinking of her <3

What I Used to Make my Card:
White Card
Lawn Fawn Ready, Set, Snow Stamps , #LF973
Lawn Fawn Ready, Set, Shake Dies, #LF975
Acetate {I used an overhead projector sheet}
Hello stamp was a Lawn Fawn Gift {and the first time I've used it}
Versafine Onyx Black Ink
Copic Marker
6mm White Craft Foam {Michael's}
Shaker Fill {explained below}
Washi Tape
This is the actual foam I used.


I filled the shaker with sequin hearts, some glitter, and a few black cats {I have a black cat and she adores my sister} and all of it came from my extensive stash of sequins.  I have quite a collection; aside from your average stars and cups, I have cats, chili peppers, flowers, dots, and much more.  These are all left over from when we used to actually use sequins as an integral part of our cards.  Not just one or two tastefully placed sequins, oh no - we'd plaster happy birthday sequins all over a card!

I digress.  I made this sweet shaker the same way I made the Happy Purrthday shaker.  The only difference is I made the shaker {which is the snow globe} the actual card instead of using it on the card.  I colored the bottom with a red Copic, stamped the "sending you hugs," cut the sentiment out, and attached it to the bottom.  I actually took a chance and stamped the Hello directly on the back of the card.


The inside
The Hinge
I used a piece of washi tape as a hinge - here is the inside of the card {I had already written in the card before I took these pics, so I blurred it out.  I didn't think you all needed to read the gushy sisterly stuff I wrote}. I attached the hinge to the back of the shaker, the back wall that actually holds in all the shake, and then just made another panel and hinged to that. You can sort of see what I mean by looking at the photo. Oh and I added a little red glitter heart that I had lying on my desk.


Here's another look

This set is SO versatile - you can make ornaments out of it for any season or use it like I did.  My sister just sent a text that she loves the card and people in her office want my blog address; I guess I did well! Thanks for reading and have a wonderful day! Christi

I am entering my "Hello Shaker Card" in the following challenges:
Die Cuttin' Divas - #354, Anything Goes
Unicorn Challenge Blog - M, #28, Anything Goes
Crafting with Dragonflies - #96, Anything Goes
Crafter's Castle - #1, Anything Goes
Scrapy Land - Anything Goes
As You Like It - Favorite Die & Why - this is my FAVORITE die set because I love making shaker cards and this makes it SO easy & fun! And Lawn Fawn products are just so stinkin' cute!

Friday, June 2, 2017

Stars for the May Card Chain Challenge

I cannot believe it is already time for the May Card Chain Challenge reveal!   It is absolutely crazy how time just slips away from me.  Anyway, this month I used Stars from the Theme Options and Washi Tape from the Product/Technique Options.  Now, if you decide to play, you can use all four options, or just one; it's up to you!  If you would like to see all of the options, please take a peek at the Card Chain Challenge website.  While you are there, why not sign up for the June challenge; you have until June 7th (plus, you can check out what the upcoming colors, sketch and themes are for the whole year - just click here.) Here is the card I designed for this challenge:


What I Used to Make my Card:
Navy Blue Card Base
Alcohol Ink Panel
Metallic Mixatives in Silver
Verses Birthday Sentiment Stamp, Star Danced, BB0407-D
Silver Star Foil Washi Tape (Available Online)
Silver Paper & Silver Glitter Paper Punched Stars
White Embossing Powder, Detail, Simon Says Stamp

Before I get into how I made my card, I want to share the card I received all the way from Jo in England.  Please do check out her amazing creations by clicking here:
Isn't that card darling??

I sent my card off to Sara in MO, who shows her cards off, as well as her sister's cakes, on her Flicker page.

Now, on to the tutorial. I made the alcohol ink panel first. I always make a few 
8 1/5 x 11" sheets when I have my alcohol inks out; I find that I typically use MUCH more ink than I need to and having the extra sheets out & ready makes it easier to make more sheets and not waste so much ink. .  If you aren't familiar with alcohol inks, I have a sort of
Original on Left; Reworked on Right
"beginners guide" here.  Anyway, my goal here was to make a background that looked like nightfall for this card as well as one that looked like the ocean for another card.  As I show in this comparison photo, I originally made the night sky a bit too busy and too silvery.  So I inked up the applicator with some blue inks and blending solution and lightened the panel up. 


Originally I wanted to emboss the sentiment in silver, but when I tested it out on the alcohol ink background,  the sentiment wasn't readable. I really didn't want to put the sentiment on another piece of cardstock, so, I used detail white embossing powder from
Another Look


Simon Says Stamp. I embossed directly onto the alcohol ink panel.  I edged the long edges of the panel with the washi tape and then placed the stars I had punched out onto various places on the card.  


I can't get a good picture due to the background being so shiny.  I always have a blast when I'm making things using alcohol ink - the only thing I struggle with is actually coloring with it! I've said this before, but making one card a month is such an easy thing to do and I look forward to receiving my card all month long.  It is a very rewarding experience, so, go to the Card Chain Challenge page and sign up to play!  There is even an option to opt out of sending cards overseas if postage is an issue.  I hope you have enjoyed my card ~ Christi

I am entering my Stars card in the following challenges:
Di's Digi Stamps - Birthday
Brown Sugar - #253, Celebrations
4 Crafty Chicks - #353, Birthday
Outlaws Twisted Thursday - Anything Goes, Twist: Stars
Simon Says Stamp Wednesday Challenge - Anything Goes
The Crazy Challenge - #249, Birthday

Where did I find all these fabulous challenges?!? At


Saturday, November 19, 2016

Things with Wings ~ Always Use Rubber Challenge #4

I hope this post finds everyone happy and healthy! Personally, this time of year is not good for my poor old body, but nothing I can't handle!  Today's theme, chosen by Jane, is Things with Wings - you can use anything with wings that you want to as long as you use rubber/polymer stamping! Please take a peek at our simple rules to ensure your entry fits with our challenge.  If you play, you have the chance of becoming our monthly winner of a gift certificate from our fabulous sponsor, Alleystamp!


What I Used to Make my Card
White Card Base
Homemade Background Paper - various washi tapes
Archival Ink in Jet Black
Distress Ink in Antique Paper
Tim Holtz Crazy Bird  Stamps #CMS212
Tim Holtz/Sizzix Crazy Birds Dies #660954
Tim Holtz/Sizzix Crazy Things Stamps #CMS237
Tim Holtz/Sizzix Crazy Things Dies #660953
Tim Holtz/Sizzix Labels, #660060
Zig Clean Color Markers
Dove Blender Pen
Sentiment from Hampton Art, PS0806G (discontinued but Available)
Scrap of Vanilla Card
Black Photo Corners from Xyron (they are shiny) Discontinued but Available


I confess I made the washi tape background eons ago - all I did was take all my white & off white tapes and stick them to some cardstock, then I "dyed" them with Distress Ink in Antique Paper (I smooshed some ink on the tape and used a baby wipe to clean off the excess and dye the tapes).  It's been sitting in my "Use This ASAP" basket since I made it.  I thought the background went well with my dapper bird and sentiment that is done in a vintage sort of font.

I colored my Crazy Bird with Zig Clean Color Markers and a blender pen.  The jaunty little hat was originally going to be part of a Halloween costume, but it never made it - it, too, was colored with the Clean Color Marker.  I cut a slit in the hat and put it on the birds head.  I attached the bird onto the washi tape background.

I then stamped my sentiment on cream (vanilla) colored cardstock, cut it out using the Labels Die Set and edged it in black to give it a bit more oomph. I
Another Look
attached that to the background paper also.  Lastly, I adhered the homemade background paper onto the card base using shiny black photo corners (and a bit of glue).  


I really think his eyes look like he's been out on the town and is just realizing how the sentiment is speaking to him - I'm thinking it's time for him to head back to his nest!

I hope you enjoyed my Things with Wings card and I sincerely hope you'll join in the Always Use Rubber challenge! I appreciate you stopping by and reading all about my card - if you decide to follow me, please leave me a comment with your blog info, I'll pop over and gladly follow you ~ fondly, Christi

I would like to enter my Things with Wings card in the following challenges:
The Amusing Challenge - (M) Anything Goes
Crafty Boots - Things with Wings
Creative with Stamps - #8, Use a Bird Stamp
Critters & Creatures - (M), #9, Must Have a Critter or Creature on Card