Followers

Showing posts with label Dimensional Dots. Show all posts

Wednesday, May 25, 2022

You're My Kind of Peep

 My friend Tom absolutely loves Peeps.  He's never met a Peep he didn't like; in fact, the more sugary and weird the flavor was, the more he loves them.  One year we found fruit punch flavored Peeps but have not been able to find them again.  I hate it when that happens; you find something you love and they either discontinue it or stop carrying it.  That happens to me ALL the time.  Anyway, I thought this slimline card with some pastel Peeps might brighten his day a bit.


I used a homemade white slimline card and covered it in rainbow spotted paper.  I stamped the sentiment using my favorite black ink on watercolor paper and colored it in with Zigs and used a black marker for the shadow.  I then cut the sentiment out using a stitched nesting square die.  Cutting out all the bunnies in shades of pastels really isn't manly, but I wanted to keep the spring feel.  Their tails were just die cut out of white card.  Lastly, I then used dimensional dots to attach the rabbits to the card and glued the sentiment onto the top of the card.  Unfortunately, the stamps & dies {Simon Says Stamp, You're My Kind of Peep} are discontinued, but you might be able to find them online somewhere. I was lucky enough to find them in one of the Facebook Groups I belong to and it's the first time I am using them :)

I love these cute peeps and I feel the card is so charming! I hope this card brings Tom some joy and the very cool part is I am going to visit him {I am leaving on 5/29/22} so I will be hand delivering this card; I am SO excited! I thank you for visiting and appreciate you! Fondly, Christi

I am entering my card in the following challenges:
Simon Says Stamp Wednesday Challenge - Anything Goes
Shopping our Stash, #471 - Make Mine a Tall One {slimline or mini slimline}
Alphabet Challenge Blog - D is for Die Cuts
Crafty Hazelnut's Patterned Paper Challenge - Anything Goes/Use Patterned Paper
The Diva's That Cut - Anything Goes
NBUS, #38 - Anything NEW Goes


Monday, March 7, 2022

Lawn Fawn Hope Card

The current situation in the world is making me feel so helpless; I can't do much to help any of the people affected by these events, so I made a card with Ukraine in mind. I actually feel for ALL the civilians involved in this catastrophe and while I may hold strong opinions about world leaders, I do not wish harm to come to any innocent civilian. I have to say, crafting truly does help heal because I feel better, a bit brighter.  I like that this card has a cheerfulness to it.  All the cute daisies actually bring spring to mind as well; and spring is a time for hope. So, this card has two meanings; works for me! Here you go:


All of the dies are from Lawn Fawn; I made the daisies using the Little Flowers set {while not new, this is the first time I have used this set}, using gold glitter card for the flower centers, the grass from this border die, the sun background is this die and the letters are from this set.  Obviously, the colors are sort of the Ukrainian flag's colors {I struggled with incorporating enough blue, but I really loved the sun as the background instead of a blue sky}.  The letters were half pressed {inspired by Jenn Shurkus and how beautifully she does this sort of technique} into embossing ink and then embossed with Wow! Clear Hologram Sparkle embossing powder. The grass is popped up using dimensional tape, some of the daisies are glued to the card and some to the grass. The papers are from my stash, but I think they are Core'dinations because they do have some texture to them. Thanks so much for stopping by ~ stay safe, Christi

PS: Do you want to help Ukraine but don't know how? Go to Yana Smakula's post here - The coordinator, Denzil Quick is amazing! I emailed him and he responded within a DAY!! #freeUkraine

I am entering my card in the following challenges:
Lil Patch of Crafty Friends, #177 - Anything Goes

The Paper Players, #581 - Spring is in the Air
Simon Says Stamp Wednesday Challenge - Use a Die Cut (#2)
Dies R Us, #188 - Anything Goes using a Product they Sell
NBUS Challenge, #36 - Anything NBUS (#2)
Simon Says Stamp Monday Challenge - Add Some Green
The Friendship Challenge, #75 - Anything Goes
Creative Knockouts, #442 - Sparkle & Shine


Wednesday, February 16, 2022

Hearts and Kitties

 Hi all!! I've made this cute Valentine's {even though you could give it any time of year; I was careful not to add any specific Valentines sentiments} card using Lawn Fawn stamps and dies; some older and newer sets.  I hope you like it!


I started the card by cutting out the slimline panel using the Scalloped Slimline with Hearts, landscape out of dark pink paper, then I used the larger die and cut it out of lighter pink paper.  I also covered a white slimline card using a page from the Watercolor Wishes Rainbow paper pack.  Next, I stamped the curved hearts, from the Scent with Love stamps on watercolor paper, colored the with my Zigs and cut them with their coordinating dies.  I put them around the heart openings.  The kitties, from the Meow You Doin' stamps & dies, were already colored, cut and in my stash {I always have extra cats in my stash}.  I tucked the cats into the heart openings and put a few paper hearts cut from small hearts that are included with many of the Lawn Fawn sets {I can't recall what set I used, honestly, I have a bunch of them on my desk}.  I attached the hearts panel onto the pink scalloped paper, then used dimensional foam tape to pop it up onto the slimline card.  Lastly, I had stamped a few of the small sentiments from the Special Delivery set as well as the Scent with Love set.  I trimmed them down and added them inside the hearts.  Finally a few sequins were added and I was done.  

I had all these sets on my desk as I was to take a class {Love Letters} with the fantastic Jenn Shurkus; the class was originally on for he 5th of February, but they were getting a huge snow storm on the cape, so it was postponed to February 12. I decided to bite the bullet and order the copics she used in class, figuring I'd have them for the February 12th class, but the copics I had ordered never made it to my house, a case of "we delivered them" but *I* don't have them.  So, I am waiting for their delivery and hopefully I will be able to make the cards from the class and share them; thankfully Jenn allows you to access the class tape online along with your class fee so I can go back and take the class when the markers get here.  Ever notice that the more you want something the harder it is to get?  SO TRUE.  Also, the carriers have begun to take SO long to deliver items, not just one of them, all of them, things are taking 2 to 3 weeks that used to take a few days.  I am the type who wants their stuff before I order it and it's frustrating to no end.  But, it is what it is!  I hope you enjoyed my card, and I appreciate you listening to my little saga, and I thank you for stopping by!! Fondly, Christi

I am entering my card in the following challenges:
Simon Says Stamp Wednesday Challenge - Slimline Cards
The Funkie Junkie - Funkie Frilly Valentines
Sweet Stampers, #65 - Furry Friends
Dies R Us, #187 - Love & Hearts
A Place to Start, #202202 - Anything Goes, Twist: Include a Critter
SUYP, #75 - Anything Goes w/ Cats
Happy Little Stampers - Anything Goes With Dies


Double D - Shades of Pink


Sunday, February 13, 2022

Be Mine, Galentine

 Even thought I am not a fan of Valentine's Day, I thought I'd make a card to send to my sister, who is also single, and ask her to be my Galentine.  Hopefully this will put a smile on her face!

I started the card by making the floral heat using Concord & 9th's Triple Step Blooming Heart.  I used the following Distress Inks: Spun Sugar, Kitsch Flamingo and Festive Berries.  Once the heart was done, I found a piece of paper that matched in my stash and dry embossed it with Darice's Mini Hearts Embossing Folder {it is still available, but you need to look}, I then glued that onto the white card base.  I used a strip of red card, embossed the sentiment {which is from MFT, but seems to be discontinued} onto it using white embossing powder then die cut it.  Dimensional tape was used to adhere the heart to the background, I glued the sentiment in place and added two diamond hearts I got ages ago from Maker Forte {the picture makes the hearts look gold when they are actually iridescent}.  I think I did a fairly good job here. I like how all of the colors match :)

Thanks for stopping by and have a fantastic week :) Fondly, Christi

I am entering my card in the following challenges:
Can You Handle the Pressure (NEW CHALLENGE!!) #2, Anything Goes w/ a Twist of Pink
Sweet Stampin'- Love, Love, Love
CCEE Stampers, #205 - Valentine's Day
The Little Red Wagon, #640 - Be My Love/Valentine
Simon Says Stamp Wednesday Challenge - Emboss it
Try it on Tuesday - All Loved Up
Colorful Options, M - Rosy Red


Daring Cardmakers - My Sweet Valentine


Tuesday, November 2, 2021

Paper Funday with CAS-ual Friday Stamps!

 Hi all! Welcome to my monthly design team post for Paper Funday.  Since I am not skilled at using digi stamps I typically don't use the products that our sponsors give us to play with but this time we are sponsored by CAS-ual Fridays and I got to play with a set I've had for a while.  Remember, our challenge is always anything goes, with an optional twist and this month the option is Thanks/Grateful.  I am thankful and grateful for coffee, so my card fits both using the sponsors products and the optional theme!  

I used a white card base and cut out a brown border using a die from Lawn Fawn.  I stamped the sentiment using the CAS-ual Friday Coffee Talk stamp set using my favorite black ink and the word coffee using Hero Arts Cocoa Ink {I received the ink in a My Monthly Hero kit and it isn't available separately right now} right on the card.  I finished by cutting the coffee cup out of Your Next Stamp's paper pad Crazy for Coffee {if you look close you can see there is a tiny coffee bean with the word coffee circling it that makes the pattern - too cute!} and the coffee out of light brown card.  I popped the cup up with dimensional dots and added some iridescent pearls I had in my stash. 

You still have plenty of time to join in and play with Paper Funday this month - who knows, you just might win some goodies! Thanks so much for stopping by & see you soon! Christi  

I am entering my card in the following challenges:
CAS on Friday, #217 - Coffee
Ellibelle's Corner - Use Die Cuts and/or Punches
Allsorts Challenge, #648 - Add a Sentiment
Creative Fingers Challenge, #218 - Anything Goes
A Bit More Time to Craft Extra - Anything Goes
DL Art - Anything Goes

CAS on Friday's Inspiration Photo


Friday, October 29, 2021

You are Spooktacular!

Hi everyone! This card was made with an older Lawn Fawn set and even though it's older, I think it's an adorable stamp set {the set was released in 2014!!}.  You can still buy this set from Lawn Fawn, or any place that sells their products but I was lucky to find the stamps and the dies on one of my de-stashing FaceBook groups.  


I started out stamping the bats on standard white cardstock, then filled in the background using the candies and stars from the Spooktacular set.  I left the bats black and white, coloring the other items with some Copic markers.  I trimmed the background and attached it to a white card with dimensional dots.  I stamped the sentiment with the same black ink I used on the background, Gina K's Amalgam ink in Obsidian on white card, cut it out with Stitched Rectangle Dies from Memory Box and layered it onto dark purple card which I then trimmed as well.  I have to take a moment and talk about this Amalgam ink - it is the only ink I have found that can be used for both water coloring and alcohol marker coloring.  Granted, if I am going to watercolor, I typically stamp on this watercolor paper, so it isn't as if I don't know what medium I will be using as I am making a card, but it takes out that little bit of worry wondering if the ink I have used will smear once I am coloring it.  The color is vibrant and the price point is right in line with most inks.  So I attached the sentiment to the card with dimensional dots as well, finishing the card off with some sequins I had in my stash and Stickles in the color Cosmic.  Stay tuned as I have another card I made using the same stamp set on the way.

While this card is a bit more juvenile than I typically make I am very pleased with how colorful and cheerful it looks.  I tend to lean towards the darker side of Halloween, so this was a nice break from the spookier side of the holiday. However, a friend did say to me that she feels things don't come much scarier than this overload of cuteness - fear not, the dark side is on the way :) Thanks for stopping by! Christi  

I am entering my card in the following challenges:
Lawn Fawnatics, #111 - Coffee, Tea & Treats {I used LOTS of Treats!}
Creative Knockouts, #425 - Anything Goes
Funkie Junkie Challenge - Grunge, Ghouls or Giggles {entry 2}
Creative Moments, #225 - Anything Goes
Daring Cardmakers - Halloween Inspired
Retro Rubber, #170 - Fallin' for Autumn


Tuesday, October 26, 2021

CLBH Hot Flash {DAY 2}

Hello!! Welcome to my blog and one of the cards I have made for the Cat Lovers Blog Hop! I've had this stamp since Rabbit Hole Designs was a brand new company; at the time they didn't have the matching die so I filed it away and actually forgot about it until I reorganized all my stamps & dies and found it! I promptly went and bought the matching die because I HATE fussy cutting. This is the first card I've made a card with the set and I think the card came out nicely {and the sentiment - well, let's just say I can relate}!


I stamped my image on watercolor paper, using the Caffeinated Cat stamp, colored it in with Zigs, then cut it out using the coordinating die.  I made a background using the Sizzix/Tim Holtz On the Go embossing folder {#660248 - retired} and brown paper and attached that to the white card base.  For the sentiment I used one from Funny Bones {Riley & Company}, then cut it out with a stitched square die.  I adhered the sentiment to the embossed background, then used dimensional dots to attach the cat.  

Thanks for stopping by :) Christi

I am entering my Coffee Loving Cat Card in the following challenges:

Cat Lovers Blog Hop - Day 2
NBUS - Anything New Goes {entry #2}
Friendship Challenge, #70 - Pets
Happy Little Stampers - Anything Goes w/ Die Cuts
Die Cut Divas - Anything Goes w/Die Cuts {entry 2}
SUYP, #71 - Anything Goes


Wednesday, October 20, 2021

Let's Party!

I am a huge fan of CZ Design; I adore her use of different fonts and the little bit of snark she adds to most of her stamp sets.  You can only get them at Simon Says Stamp but that isn't a bad thing since I always need at least a few things from them! I scored this stamp and die set last year after Halloween was over so while I have had it this is my first time using it.  Now, this is my kind of party!


Ghost Close Up
This is a simple black and white design, but the sparkle of the ghosts gives it a little something extra.  Using the Halloween People stamp set, I started by stamping the sentiment and all the bats with black ink on white card then cut them using the matching die. I stamped the saying directly onto the card and added the sentiment and bats with dimensional dots.  I stamped the ghosts out with clear embossing ink and used WOW! Hologram Sparkle embossing powder to make them shine and cut them with their coordinating die and used dimensional dots on them as well. I finished the card off with a few black sequins I had in my stash.  By the way, you can purchase the stamps and dies separately; the link I used will take you to the bundle.  While this isn't a typical clean and simple card, I still think it fits the criteria of CAS.  I hope you like my card and hope to see you soon! Christi

I am happily entering my card into the following challenges:
Simon Says Stamp Wednesday Challenge - Spooky/Halloween
Fab 'n Funky, #536 - Spooky Season
ModSquad Challenge - Halloween
Simon Says Stamp Monday Challenge - Spooky/Halloween
Try it on Tuesday - Halloween
The Male Room, #155 - Black & White
Funkie Junkie Challenge - Grunge, Ghouls or Giggles
Cupcake Inspiration, #530 - Halloween Fun


Tuesday, October 5, 2021

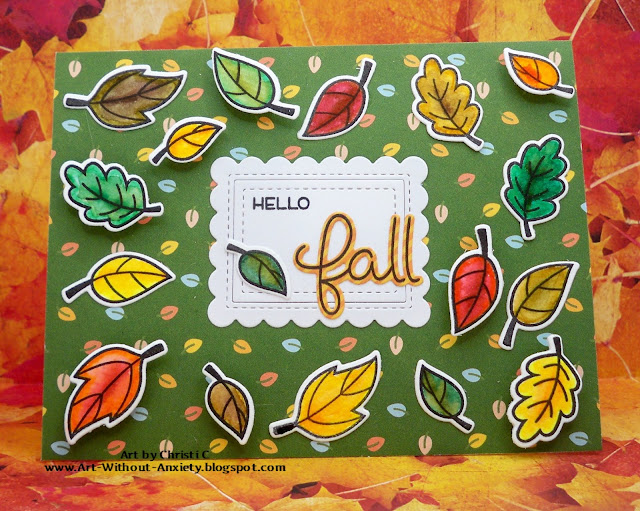
Hello Fall!

 Hi everyone! Well, fall is here, at least once the sun goes down.  The nights have actually gotten so chilly I have had to shut the window and put the heat on! I was inspired to make this card by the background paper that I got as a freebie from my most recent Lawn Fawn order {and where the leaves came from - a first time use from a new release!}; and then when I spied last week's Lawn Fawnatics challenge {it was #109 - Awesome Autumn} this cute card was born! While this isn't exactly a sky, I am entering my card in the most recent Lawn Fawnatics Challenge, #110 - Spectacular Skies - just pretend these leaves are swirling all about in the sky :)


I started with a white card, covered it with Fall Fling paper, then stamped, colored and cut out the leaves and the word fall.  I used the new Scripty Autumn Sentiments stamps and dies for the leaves and sentiment, framing the sentiment with Mini Picture Frame dies.  The frame dies actually cut out in 2 separate pieces, the frame and the middle - I just kept the die cut together {used a bit of tape on the back}, stamped hello and layered on the word fall.    Then I used dimensional dots for some of the leaves and scattered them all around the card without much thought.  Fall colors are one of my favorite themes because I love mixing all the colors; you really can't make a mistake blending with that color palette.  The cute frames are one of my first Lawn Fawn purchases but I don't think I've ever used them before! Well, they are out on my desk now which means I am sure you will be seeing them again soon.  

I am not sure if I like this new format of my blog; it does save me time, but I don't think it flows like my original style did.  I'm sure it will work itself out!  Thanks for taking the time to stop by & I hope you and yours are healthy and safe ~ Christi 

I am entering my card in the following challenges:
Lawn Fawnatics, #110 -Spectacular Skies
Try it on Tuesday - Autumn Blessings
NBUS - Challenge #31 {must use never before used stuff}
Die Cut Diva's - Anything Goes
Dies R Us, #178 - Anything Goes
Country View Challenges - Autumnal Colors
Crafty Hazelnut's Patterned Paper Challenge - Anything Goes using Patterned Paper
The Four Seasons Challenge - Anything Goes Fall
Sunday Stamps #267- Autumn Boldness {graphic below}
Pammie's Inky Pinky Challenges, #2140 - Anything Goes


Tuesday, July 6, 2021

Pet Talk

Hi Friends of Dies R Us! Yes, another multiple card post - just a 2fer this time! I used some older Lawn Fawn stamps and dies, but the NEW RELEASE is now available at Dies R Us, just go to the website and choose NEW ARRIVALS {you'll find more than just Lawn Fawn - I have my eye on some of the great Visible Image sets}!!   Enjoy!


What I Used to Make my Cards:
White Card Base
Pink Card
Lawn Fawn Speech Bubble Backdrop, #LF1989
Lawn Fawn Critter Chatter Stamps, #LF1964
Lawn Fawn Critters at the Dog Park, Stamps #LF515, Dies #LF520
Lawn Fawn Meow You Doin'? Stamps #LF1315, Dies #LF1316 
Watercolor Paper {I use this}

Zig Clean Color Brush Markers
Gina K Amalgam Ink Pad in Obsidian Ink

Dimensional Dots
Pink Ink


I started these cards by cutting the backdrop out of white card and pink card, twice each.  Then I began to stamp the different dog and cat sounds on various white speech bubbles from the backdrop cut out which I then attached to my white card bases. I placed the stamped speech bubbles onto different spaces left by the die cut and filled in a few of the more empty spaces with the pink speech bubbles, leaving some of the spots empty.  The cat and the dog I used on the cards were previously colored and cut so I just added the dimensional dots to them and attached them onto the cards.  Lastly, I stamped the sentiments on white card, trimmed them and dotted them onto the card fronts.  I also stamped the small heart in pink ink and the paw print in black ink onto 2 of the smaller panels.  I like the look of the different levels created by the dots and the speech bubbles.  They are a different type of "I love you" card but every bit as important as the cards someone might get from humans; and a such nice way to say that your pets care about their pet parent {or aunt, grandparent, etc.} as much as you do!  

Thank you for stopping by to look at my work. I hope you and yours are doing well and are staying safe! I hope you had a fantastic weekend and see you here, at Dies R Us very soon!!  Fondly, Christi

 Don't forget to come join in the fun at the Dies R Us Challenge Blog. There's a new challenge theme offered on the 1st and 15th of each month and one lucky randomly drawn winner will receive a gift voucher prize to the Dies R Us Store.  

  For your convenience, all the important Dies R Us links are provided below.


click below for:

STORE

CHALLENGE BLOG

FACEBOOK

INSPIRATION BLOG

FRIENDS OF DIES R US PINTEREST PAGE

I am entering my "Pet Talk" cards in the following challenges:
The Sisterhood of Crafters - Anything Goes
Paperminutes, #699 - Small Animals
Simon Says Stamp Monday Challenges - Fun & Quirky (entry #2)
Fab 'n Funky Challenges, #531 - Anything Goes
Cardz for Gals, #150 - Get Inky
Crafting Happiness, #103 - Anything Goes