Followers

Showing posts with label Slimline. Show all posts

Monday, October 31, 2022

Guest Designer at the Four Seasons Challenge

 I am so excited to be the Guest Designer at the Four Seasons Challenge for this month.  

Here is the Mood Board for this challenge.  I can't wait to see what you create with this! This is my card - hope it feels Fall to you!


I had made this background of leftover glitter paper quite a while ago but have been saving it since the colors speak fall to me; the glitter is crisp and the colors are so pretty! I stuck strips of the various glitter card to a piece of plain white card then cut it out with a stitched scalloped slimline die.  That was attached to a white slimline card. The sentiment is cut from 2 different dies; happy is from Elizabeth Dies (the die is discontinued, but if you do a search you can find it - item number is 1161, Happy Birthday 2) and the fall is from this Pinkfresh Studio's Alphabet, both are cut from Curious Metallic's Ice Silver card.  Once I attached the words, I decorated the card with various gems from Picket Fence Studio (they have the BEST gems; they are a bit pricey but SO pretty and sparkly in person!).  

I am so looking forward to the start of fall weather! I've had enough of the heat and am SO ready to snuggle under some quilts and break out my flannel shirts! 

Thank you so much for stopping by and please be sure to check out the Four Seasons Challenges! Fondly, Christi

I am entering my card in the following challenges:
Dragonfly Dreams, M - Halloween/Autumn
The Sisterhood of Crafters - Fall Colors
Dream Valley Challenges, #281 - Dies and/or Punches
Try it on Tuesday - Sparkle and Shine
Die Cut Divas - Anything Goes
Inspiration Station, #40 - Harvest (honestly, the word inspired me more than the picture!)


Saturday, October 29, 2022

Cat Lovers Blog Hop Day 6 - Last day to enter!

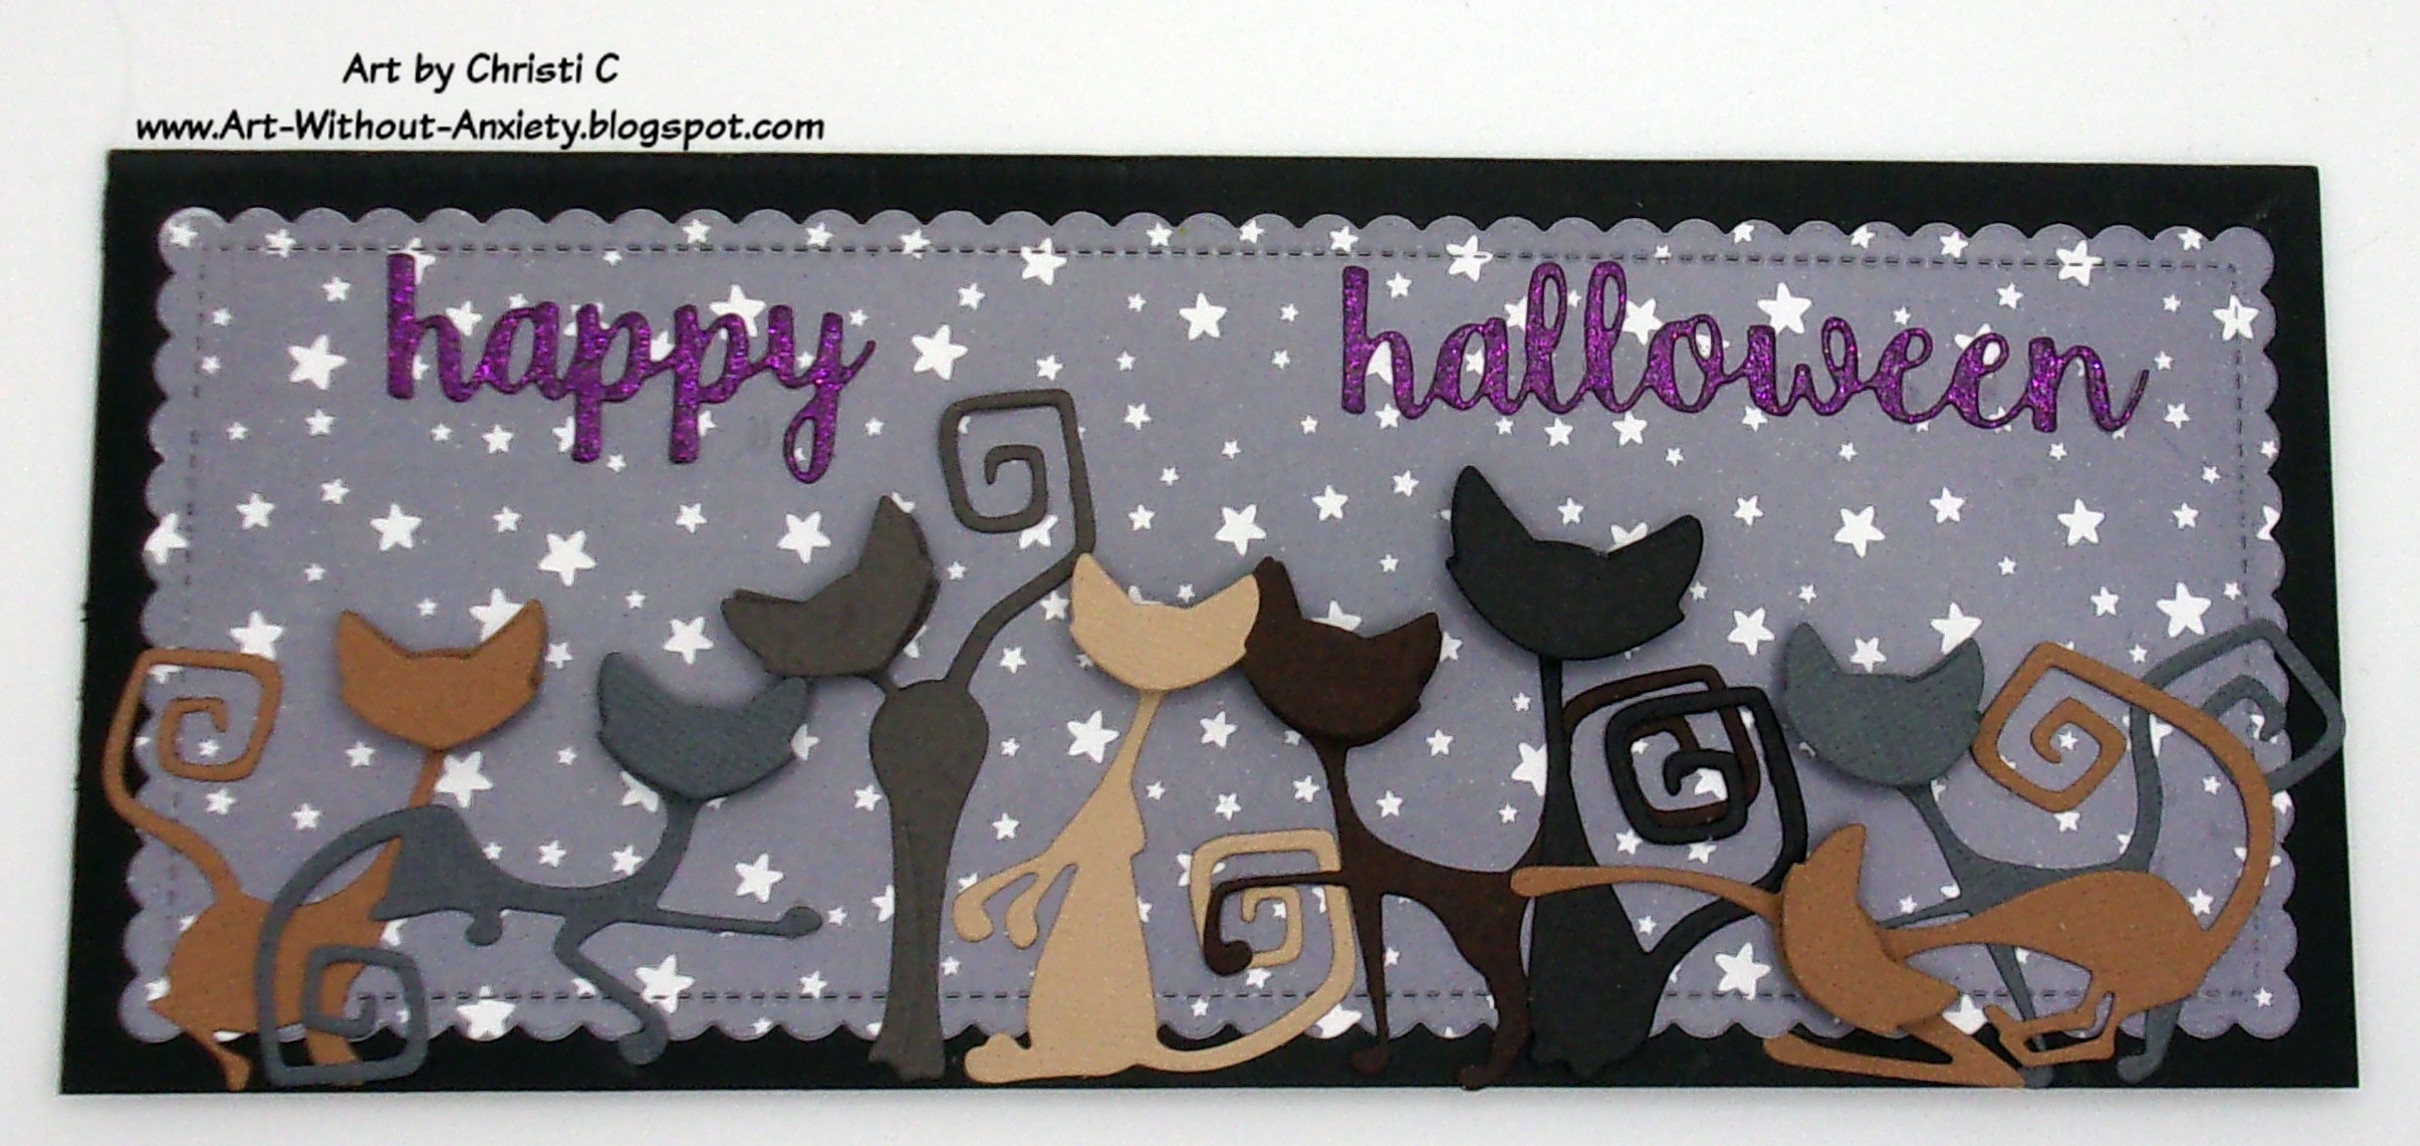
 Yes, another Happy Halloween cat card for the Cat Lovers Blog Hop, Day 6!!

This is going to be a quick post as I am VERY late getting my card up for this last day to enter (I'm shocked! No, not really) and I need to get cracking on the comments! So I used a white slimline card base, covered it with black card and cut out the grey star paper with the scalloped frame die from this Lawn Fawn set.  The kitties are all from the newest Tim Holtz Mischievous Die set, I cut them all out and then popped on the extra faces so all of their heads are on black foam tape.  The colors don't match my cats, but there are eight die cut cats, one for each of my own (yes, I have 8 cats).  Then to add a bit of color I used dark purple glitter card for the sentiment which is from Elizabeth Designs Words 3 (sadly, discontinued, but it is available on Amazon).  I used nothing but scrap card to make the kitties, it is a great way to use it up!


Thank you so much for visiting and hopping - I appreciate any followers on any of my social media (I've got them all linked on the sidebar) and if you do decide to follow me, please let me know! Fondly, Christi 

I am entering my card in the following challenges:
Cat Lovers Blog Hop ~ Day 6
Allsorts, #700 - Any Celebration
Sisterhood of Snarky Stampers, #221 - H is for Halloween
Sweet Stampin' - Colors of Halloween
Happy Little Stampers - Anything Goes with Dies
Lost Coast, #154 - Cats and/or Dogs
CRAFT Challenge, #656 - Halloween
Through the Purple Haze, #197 - Halloween and/or Color Palette


Wednesday, May 25, 2022

You're My Kind of Peep

 My friend Tom absolutely loves Peeps.  He's never met a Peep he didn't like; in fact, the more sugary and weird the flavor was, the more he loves them.  One year we found fruit punch flavored Peeps but have not been able to find them again.  I hate it when that happens; you find something you love and they either discontinue it or stop carrying it.  That happens to me ALL the time.  Anyway, I thought this slimline card with some pastel Peeps might brighten his day a bit.


I used a homemade white slimline card and covered it in rainbow spotted paper.  I stamped the sentiment using my favorite black ink on watercolor paper and colored it in with Zigs and used a black marker for the shadow.  I then cut the sentiment out using a stitched nesting square die.  Cutting out all the bunnies in shades of pastels really isn't manly, but I wanted to keep the spring feel.  Their tails were just die cut out of white card.  Lastly, I then used dimensional dots to attach the rabbits to the card and glued the sentiment onto the top of the card.  Unfortunately, the stamps & dies {Simon Says Stamp, You're My Kind of Peep} are discontinued, but you might be able to find them online somewhere. I was lucky enough to find them in one of the Facebook Groups I belong to and it's the first time I am using them :)

I love these cute peeps and I feel the card is so charming! I hope this card brings Tom some joy and the very cool part is I am going to visit him {I am leaving on 5/29/22} so I will be hand delivering this card; I am SO excited! I thank you for visiting and appreciate you! Fondly, Christi

I am entering my card in the following challenges:
Simon Says Stamp Wednesday Challenge - Anything Goes
Shopping our Stash, #471 - Make Mine a Tall One {slimline or mini slimline}
Alphabet Challenge Blog - D is for Die Cuts
Crafty Hazelnut's Patterned Paper Challenge - Anything Goes/Use Patterned Paper
The Diva's That Cut - Anything Goes
NBUS, #38 - Anything NEW Goes


Tuesday, May 3, 2022

Family Challenge at Paper Funday!

Hello everyone! Today is the start of the May challenge at Paper Funday and our optional theme is FAMILY.  I had a few options in my mind for this challenge, but decided to go with a family of cats; if you follow me on any social media I am always posting pictures of my cats (I have eight which is why I found this sentiment to be particularly fitting)  and talking about their crazy antics! I hope you enjoy my card:

I started with a handmade slimline base in white and covered that with the brick paper (this paper is from a pack I got in a bundle from My Favorite Things & I couldn't find it on their website) for the wall and used dark blue cardstock for the floor; pretending it's carpet, to give the illusion of a room.  Then I used my favorite black ink on watercolor paper and stamped all of the cats as well as all of the other items I used in my scene.  The sentiment was stamped on white card scrap and cut out with a fishtail banner die.  I colored everything with my Zig markers, cut out all the items and glued them to the card.  I had found a wooden heart embellishment with a paw cut out (discontinued product)  which I covered with Foundry gilded wax and being it a flat piece, I added some Diamond Glaze to seal the heart otherwise the wax just flakes off - it needs dimension to stay on something.  I watched the Tim Holtz video on Foundry wax and I had to get ALL the colors after I tried out the gold.  The pictures don't do this product justice - it really is amazing!  The heart was the last thing I attached to the card and it was finished.

I hope you enjoyed my card and maybe it will help you think of different ways family can be interpreted.  And most of all, I hope to see you join in at the Paper Funday challenge for May! Thanks so much, Christi

I am entering my card in the following challenges:
Krafty Chicks, #610 - Stamp Act
DreamValley Challenges, #269 - 4 Legged Friends
Critter Crazy Challenges, #62 - Anything Goes w/ Critters
Crafty Friends, #155 - Animals
The Diva's That Cut - Anything Goes
Country View Challenges - Cats and/or Dogs


Monday, April 4, 2022

April Showers at The Paper Funday Challenge

 I am really pressed for time right now and I just squeaked this card under the due date for my design team position at Paper Funday - that's right, it's another challenge at Paper Funday!! For the month of April our theme is "April Showers" and I was SO happy I had gotten a bunch of new goodies from Lawn Fawn's latest release as they fit perfectly for this theme, I used the Beary Rainy day stamp and die set - perfect for an April Showers card! Here's my card:


I started with a white slimline base but when I tried to stencil in the raindrops I messed it all up; so I got another slimline base card and set it aside.  I used another piece of paper and stenciled in the raindrops, using Distress Oxide Hickory Smoke, added some Distress Tumbled Glass to give a blue tint to the sky and a bit of Distress Tea Dye at the bottom.  I discovered that when you need to use a stencil more than once to cover a large scene, don't go all the way to the edge; if you do, you will end up with a line, which is what I got the first time I tried to make the card.  I then used a stitched slimline die to cut out the portion of the card I liked best.  I set the card side while I glued that portion to the top of the actual card.  While that was drying, I pulled out the Lawn Fawn stamp and die set {brand new - called Beary Rainy Day}, stamped using my favorite black ink, colored the stamps in with my Zig markers {Oh and I am SO excited - I finally got my hands on the 30 new colors; and I am finally going to do swatches of all 120 markers that I have!} and cut them out.  It took me a bit to figure out the puddles as I really wanted to use holographic paper but you can't stamp on it {well, you can, but then you have to use embossing powder since it is coated and the ink will not dry on it's own} but I figured if I cut the puddles out with a little rain drop it would look as if the puddles were real.  I'm still not sure, what do you think? I cut the clouds out of vanilla paper and then cut a few more clouds using the Butterfly Kisses dies.  I added the clouds to the scene, stamped the sentiment {the first part of the sentiment comes from a set that I think was a freebie called "Here for you Bear" - it isn't available from Lawn Fawn yet, but I am sure it will be soon} and cut it using this banner set and then I was done. 

I hope you like the card as much as I do - we need rain in Colorado badly, so maybe the card will work as a rain dance? We'll see.  I hope to see your "April Showers" creations at Paper Funday - thanks so much for stopping by! Christi

I am entering my card in the following challenges:
Shopping our Stash, #467 - Under the Weather
NBUS, #37 - Never Before Used Stuff
Unicorn Challenge, #75 - Include an Animal
Simon Says Stamp Monday Challenge - Easter/Spring
Make my Monday, #171 - Use a Stencil (Lawn Fawn Rainy Sky Stencil, #LF2816)
Allsorts, #670 - Any "real" Animals
Dies R Us, #190 - Flowers/Spring
The Funkie Junkie Challenge - April Showers Bring May Flowers


Wednesday, February 16, 2022

Hearts and Kitties

 Hi all!! I've made this cute Valentine's {even though you could give it any time of year; I was careful not to add any specific Valentines sentiments} card using Lawn Fawn stamps and dies; some older and newer sets.  I hope you like it!


I started the card by cutting out the slimline panel using the Scalloped Slimline with Hearts, landscape out of dark pink paper, then I used the larger die and cut it out of lighter pink paper.  I also covered a white slimline card using a page from the Watercolor Wishes Rainbow paper pack.  Next, I stamped the curved hearts, from the Scent with Love stamps on watercolor paper, colored the with my Zigs and cut them with their coordinating dies.  I put them around the heart openings.  The kitties, from the Meow You Doin' stamps & dies, were already colored, cut and in my stash {I always have extra cats in my stash}.  I tucked the cats into the heart openings and put a few paper hearts cut from small hearts that are included with many of the Lawn Fawn sets {I can't recall what set I used, honestly, I have a bunch of them on my desk}.  I attached the hearts panel onto the pink scalloped paper, then used dimensional foam tape to pop it up onto the slimline card.  Lastly, I had stamped a few of the small sentiments from the Special Delivery set as well as the Scent with Love set.  I trimmed them down and added them inside the hearts.  Finally a few sequins were added and I was done.  

I had all these sets on my desk as I was to take a class {Love Letters} with the fantastic Jenn Shurkus; the class was originally on for he 5th of February, but they were getting a huge snow storm on the cape, so it was postponed to February 12. I decided to bite the bullet and order the copics she used in class, figuring I'd have them for the February 12th class, but the copics I had ordered never made it to my house, a case of "we delivered them" but *I* don't have them.  So, I am waiting for their delivery and hopefully I will be able to make the cards from the class and share them; thankfully Jenn allows you to access the class tape online along with your class fee so I can go back and take the class when the markers get here.  Ever notice that the more you want something the harder it is to get?  SO TRUE.  Also, the carriers have begun to take SO long to deliver items, not just one of them, all of them, things are taking 2 to 3 weeks that used to take a few days.  I am the type who wants their stuff before I order it and it's frustrating to no end.  But, it is what it is!  I hope you enjoyed my card, and I appreciate you listening to my little saga, and I thank you for stopping by!! Fondly, Christi

I am entering my card in the following challenges:
Simon Says Stamp Wednesday Challenge - Slimline Cards
The Funkie Junkie - Funkie Frilly Valentines
Sweet Stampers, #65 - Furry Friends
Dies R Us, #187 - Love & Hearts
A Place to Start, #202202 - Anything Goes, Twist: Include a Critter
SUYP, #75 - Anything Goes w/ Cats
Happy Little Stampers - Anything Goes With Dies


Double D - Shades of Pink


Tuesday, February 1, 2022

You're Sweet at Paper Funday!!

Boy, pink is a TOUGH color to photograph! But I still love this card and made it for the Paper Funday February "Hugs & Kisses" challenge.  I adore Lawn Fawn Products and this was made with some of the older ones, but I have some new ones in the works, so stay tuned!I


What I Used to Make my Card:
White Slimline Card Base
Pink Card
White Card
Lawn Fawn Slimline with Hearts, Landscape, #LF2476
Kat Scrappiness Slimline Never Ending Nesting Dies
Lawn Fawn You're Sweet Line Border, #LF1560
Lawn Fawn Polka Heart Backdrop Die, Landscape, #LF1830
Lawn Fawn Hedgehugs Die, #LF730

I stretched myself making this card; there is NO stamping on it at all!  I almost had to stamp a sentiment, but as you can see I worked that out. Let me explain how I made the card. I started with the slimline card and cut out the back layer and the front layer, using pink and white card. Then I cut out the hearts so they were visible through the hearts on the front of the card.  I wanted the small hearts to be white, so I used some scrap white card to layer behind it.  I attached that portion close to the top because my plan was to use the sentiment at the bottom of the card.  Well, that didn't work out very well. First it didn't fit and then there was the dilemma of what color should the sentiment be?  I really did not want to introduce another color to the pallet so I just moved the sentiment up a bit and placed it onto the focal part of the card. Then I had to figure out what to add to the bottom since there was too much space to just leave it {at least I thought so.}  I debated if I should trim it {there doesn't seem to be any real standard yet for slimline cards.}  No trimming; instead I focused on something I could add.  I tried pearls and gems until my eye settled on the Hedgehugs set that was on my desk.  Perfect!  I cut out those little hearts five times and adhered them to the bottom of the card.  I doubt you'd think that space was unplanned if I didn't tell you!  I love the way the card came out, especially the little hearts along the bottom!  I hope to see your "Hugs & Kisses" projects on the Paper Funday Challenge! Thanks for stopping by!  Fondly, Christi


Thursday, October 28, 2021

Slimline Trick or Treat Card

Another Halloween Card - I cannot believe only a few more days until Halloween, so I am posting like crazy! I'll probably be posting 2 cards a day until the Holiday is over.  

If you are looking for the Cat Lovers Blog Hop post, click HERE 

I went a bit nuts with this card but in my defense I had just gotten the Pink & Main Plaid Slimline die and I wanted to play with it; so play I did!

I started by cutting the Plaid die out of white card, then I used the die cut as a stencil, coloring the paper with Distress Ink Twisted Citron, Carved Pumpkin and Wilted Violet.  Once that was done, I set the colored die cut aside and used Trinity Stamps Slimline Embossed Circles die to cut out the circles.   I had some leftover Halloween characters from a cut and color I had done using Lawn Fawn's Booyah! stamps & dies so I popped those critters in the circles.  I finished off the card with the Trick or Treat Lawn Fawn border in black card.

It's honestly a bit more colorful than I am used to, but I think it's pretty cool looking.  I hope you are crafting away for the season and hope to see you soon! Christi 

I am entering my card in the following challenges:
Crafty Gals Corner, #224 - Halloween Colors
Krafty Chicks Challenge, #583 - All Occasions
Happy Little Stampers (dies) - Anything Goes with Die Cuts
Creative Craft Cottage Challenge, #145 - Autumn/Halloween
Dies R Us, #179 - Anything Goes w/ a Die Brand they Sell
Sweet Stampers, #61 - Autumn/Halloween
Crafting Happiness Challenge, #116 - Use any or all colors:  Purple, Orange, Green & Black
Happy Little Stampers (stencil) - Anything Goes w/ a Stencil


Tuesday, October 12, 2021

Oh Sheet!! Super Easy Slimline Halloween Card

When I saw this stamp at Trinity Stamps I KNEW I had to have it - I like that it's easy {you don't have to really do anything except stamp it if you don't want to} and it fills up an entire slimline card!  Plus, that little snark factor just makes me giggle!


All I did was stamp the image onto a slimline card and add the sentiment - I don't think you can get much easier than that!  I hope you get a giggle out of this like I did and I plan on posting many more cards as soon as I can get my butt in gear and get them in posts.  So don't be surprised if my posts are shorter {really, does anyone read them anyway??} and I am always available to answer any questions you might have about one of my creations.  Hugs! Christi  

I am entering my card into the following challenges (where did I find these challenges to enter? At Challenges for Days! Check it out!)
Two Old Bats - Anything Halloween (entry #2)
Happy Little Stampers CAS Challenge - One Layer Cards
Alphabet Challenge - N is for No Layers
Simply Create Too, #174 - All Things Spooky, Scary, Etc.
NBUS, #31 - October Challenge
Try it on Tuesday - Halloween


Thursday, July 22, 2021

Happy Everything!

 Hi everyone!! I felt the need to make a happy card and since I adore the Simon Says Stamp "All the Feels" release, especially the Slimline Florals stamp and die, it was the perfect set to turn to.   


What I Used to Make my Card:
White Slimline Card Base
Light Blue Card for Background
Simon Says Stamp Slimline Florals Stamps, #SSS202299c
Simon Says Stamp Slimline Florals Dies, #SSSD112349c
Lawn Fawn Scalloped Slimline w/ Hearts, Landscape, #LF2476
Watercolor Paper {I use this}
Simon Says Stamp 
Fine Detail White Embossing Powder
Zig Clean Color Brush Markers
Gina K Amalgam Ink Pad in Obsidian Ink

The first step to making this card was to make the slimline base.  I found a phenomenal cardstock to use for my card bases, suggested by Jennifer McGuire, called Accent Opaque White 8.5" x 11" Cardstock Paper, 120 lb. - I get mine through Amazon and I LOVE it! My cards are much sturdier now and the paper isn't too pricey; at least I don't think so.  So I used that paper to make my slimline base.  I cut the blue background paper with the Lawn Fawn die and set it aside.  I then stamped and colored the florals, die cut them once they were fully dry {I typically wait over night} and used them to figure out where I wanted to put my sentiment.  I heat embossed the sentiment onto the blue panel, glued the floral line to the panel and then the panel to the slimline base.  

I hope my post finds you and yours well and maybe brought a bit of color to your day.  Thanks SO much, Christi

I am entering my card in the following challenges:
Addicted to Stamps and More #410 - Die Cuts and/or Stencils
The Sisterhood of Crafters - Embossing
Simon Says Stamp Wednesday Challenge - Out with the Old, in with the New
Alphabet Challenge Blog - Use Happy in your Sentiment
Pammie's Inky Pinkies, #2129 - Anything Goes

Friday, June 18, 2021

The Best Cat Dad

 Hi everyone! 

I had so much fun making my first card with this stamp set and, as usual, I had a bunch of kitties left over, so decided to make another Cat Dad card for the River of Creativity current challenge, Parent and Child.  As you can see by my cards we are looking for your interpretation of the theme; it can be anything you choose that speaks to YOU!


What I Used to Make my Card:
White Slimline Card Base
Simon Says Stamp Happy Meowthers Day Stamps, #SSS202293C
Simon Says Stamp Happy Meowthers Day Dies, #SSSD112342C
Trinity Stamp Slimline Series, Stitched Card Panels & Windows Dies, #TMD-010
Designs by Reminisce Paper,  Love my Cat Paper Kit
Watercolor Paper {I use this}
Zig 
Clean Color Brush Markers
Gina K Amalgam Ink Pad in Obsidian Ink

The cats I used on this card were left over from my project here, and I thought they were just too cute not to use. I always stamp, color and cut extra images; I think that is a practice left over from the days when I'd ruin more than I'd use! Die cutting was something I struggled with for a very long time until I started using low tack tape to hold the dies in place; I can't tell you how many images I ruined because the die moved when I went to cut it! Anyway, now I make sure I have plenty of images to choose from and I always have extras which is a good thing in case I need to throw a quick card together.  I have been getting a bunch of slimline dies to play with and I am loving the extra room they allow!  For this card all I did was cut out the window panel, using the patterned paper, then the matching background paper from one of the panels, stamped the word balloon with the heart inside and sentiment, attached the panels together and lastly, placed the cats on the card and I was done.  I really like this card; the kitty peeking around the corner is so cute!!

I hope you can take some time to join us at River of Creativity; we welcome any type of craft and you have until the end of the month to join in and being the new challenge on the block we'd love the support!  In addition to being on Blogger, we are also on Instagram {tag your projects with #riverofcreativity and/or #rocparentandchild02} and you can also join us on  Twitter at River of Creativity (RiverCreativity), why not subscribe to all three? I hope to see you there {or somewhere on social media}! 

Fondly, 

Christi

I am entering my card the following challenges:
Alphabet Challenge - F is for Furry Friends {entry #2}
TGIF Challenge, #321 - Peek-a-boo Window
Scrapping 4 Fun, #194 - Anything Goes with an Animal
Stinkin' Inkers - You're the Man
Simon Says Stamp Wednesday Challenge - Animal Antics {entry #2}
The Male Room, #151 - For Dads & Grads
Try it on Tuesday - For the Man in your Life
Crafty Animals, #51 - Anything Goes with an Animal
Shopping Our Stash, #447 - Fur Babies {entry #2}


Tuesday, May 11, 2021

Simple Slimline Thank You Card

Hi everyone! 

While I do love to get out my markers and a bunch of stamp and dies, there are times when I just need to make something a bit easier.  I love using paper packs and Birch Press Designs dies when I need to make a quick card; I especially love that the intricate nature of the dies make it look like I worked for ages to make the card, yet all it typically takes is a few turns of my die cutting machine.  This week for my Dies R Us design team post I am showing you this simple, yet elegant, thank you card:


What I Used to Make my Card:
Slimline White Card Base
DCWV Paper Stack, 12" x 12", Peri & Peach
Birch Press Designs Flora Heart Layer Set, 56120 {This is a NBUS set of Dies for me!}
(you could also use Caprice Heart Layer Set,  Dahlia Heart Layer Set or Petal Heart Layer Set)
Birch Press Designs Big Thanks Sugar Script, 57142 
Nuvo Delux Adhesive
Sequins from Stash

Once I had made my slimline card base, I set that aside and cut out a bunch of the hearts using all of the beautiful papers in the paper stack.  I recommend keeping each layer separate while you are doing this as it is easier to assemble them, I have a tendency to mix up some of the layers and don't realize it until I begin to put the layers together.  I use a toothpick to dot the adhesive onto thin die cuts like these but have found the tip of the Nuvo glue works so well with dispensing a tiny dot that I have been able to cut down on using  tooth picks! In the past I've tried the needle precision tips {and a bunch of others} but they always clog on me, not so with this glue! Putting these hearts together was a breeze! I had cut enough layers to make 5 complete hearts so I saved the other two to be used later.  I chose to use the "thanks" sentiment rather than a more formal sentiment to keep the card playful and not too elegant.  Dies R Us carries an amazing selection of Birch Press Designs Dies at the best prices I have found online - my collection is growing quite fast now!  I hope this little tutorial finds you and yours healthy and happy! 

Fondly, 

Christi


I am entering my card in the following challenges:
Addicted to Stamps & More, #405 - Use Dies and/or Stencils
Pammie's Inky Pinkies, #2119 - Anything Goes
Dragonfly Dreams - Add Some Sparkle {paper I used & sequins}
Just Us Girls, #583 - Trend Week, Layers
Carlin's Cards, #34 - Flowers & Hearts {Flowers = patterned paper}
Craftyhazelnut's Patterned Paper Challenge - Anything Goes w/ Patterned Paper
Mix it Up, #49 - Anything Goes w/ 3 or More Layers {each heart is 3 layers}
NBUS Challenge, #26 - Anything Goes with Never Before Used Schtuff


Sunday, February 21, 2021

Hey, you! Happy Valentine's Day

Hey everyone!

If you follow me on any social media then you know I love cats.  I am an animal lover, but cats have a special place in my heart; so, when I see a new stamp set with cats in it I have to get it! This adorable stamp set falls in that category {see what I did there?!?} and while it is technically a Valentine's Day set, I think it can be used anytime.  Here is my first creation using this set:


What I Used to Make this Card:
White Slimline Card Base
Leftover Pink Scalloped Slimline Piece {from this Lawn Fawn Die Set}
Gina Marie Designs Big and Little Chain Die Set
Simon Says Stamp Heart Animals Stamp Set, #SSS302247C
Simon Says Stamp Heart Animals Die Set, #SSSD112290C
Watercolor Paper {I use this}
Zig Clean Color Brush Markers
Gina K Amalgam Ink Pad in Obsidian Ink
Pink Card

Once the animals were stamped, colored and cut I set them aside for a bit whilst I decided what kind of card I wanted to make. Since I wanted to use all the critters, I decided it had to be a slimline card.  Luckily I had the white scalloped panel left over so I used that to attach my animal panel to, after edging them with a pale pink marker to make them stand out a bit more.  Once I had them on the panel I then stamped the sentiment directly onto it before layering onto the pink chain card I had cut out. Finally I layered the whole thing onto the slimline white card.  I really think the "hey you" sentiment in this set is so quirky and I expect to be using that a lot in my upcoming projects. 


This was a fun card to make and the images make me smile! I like that you can see just a bit of pink peeking out from under the white and the card doesn't do the chain die set justice, I am sure I will be making another card featuring those dies, so you can get a good look at them.  Thanks so much for taking the time to stop by and check out my card; if you follow me on any of the social media platforms on the right side please let me know so I can follow you back!

Crafty hugs, Christi

I would like to enter my card in the following challenges:
CCEE Stampers, #2107 - Love your Pet Day
Cute Card Thursday, 674 - Slimline
Addicted to Stamps & More, #339 - Any Occasion
Double D Challenges - Anything with a Heart {mood board below}
Creative Inspirations Challenges - Animals {Jan - Feb Challenge}
SUYP Challenge, #63 - Furrything goes with a Cat
Crafty Animals, #47 - Anything Goes with an Animal
NBUS, #23 - Anything Goes with Using New Stuff {entry 2}


Thursday, February 11, 2021

Sending Lots of Love

I have been seeing these adorable Lawn Fawn slimline cards everywhere and I am sure you have, too.  The images are so cute and I finally broke down, bought the stamps and dies, then made my own and here it is:


What I Used to Make my Card:
White Slimline Card Base
Watercolor Paper {I use this}

As always, my first area of business is to stamp, color, and cut all of the elements I want to use on my card.  Second, I used the cloudy stencil to make the sky and stamped the sentiment directly onto the card base. I dressed up the canary to make him look like a mailman and adhered him and the owl to the card, followed by all those cute little letters and hearts.  I really enjoy making scenes and I am happy I am fortunate enough to have acquired all the cool backdrops that I have as they make it so easy to make a scene card.  Honestly, I am not a huge fan of Valentine's Day but being able to make a cute card like this makes all the engagement commercials worth it! 

I hope this card put a smile on your face!  I appreciate you taking the time to visit me here and I hope you'll consider following me.  If you do, leave me a message so I can follow you back. Fondly, Christi

I am entering my card in the following challenges:
Simon Says Stamp Wednesday Challenge - Make a Slimline Card
Mod Squad - Must Have the Word LOVE
Fab 'n Funky, #510 - Love, Heart
Cuttlebug Mania - Put an Animal on it {hope the birds count!}
NBUS Challenge, #23 - Never Before Used Stuff {the stamps, dies and stencil!}
Shopping our Stash, #438 - Love is in the Air
Double D Challenge - Valentine Love
The Paper Players, #527 - Hearts and/or Stars


Friday, January 1, 2021

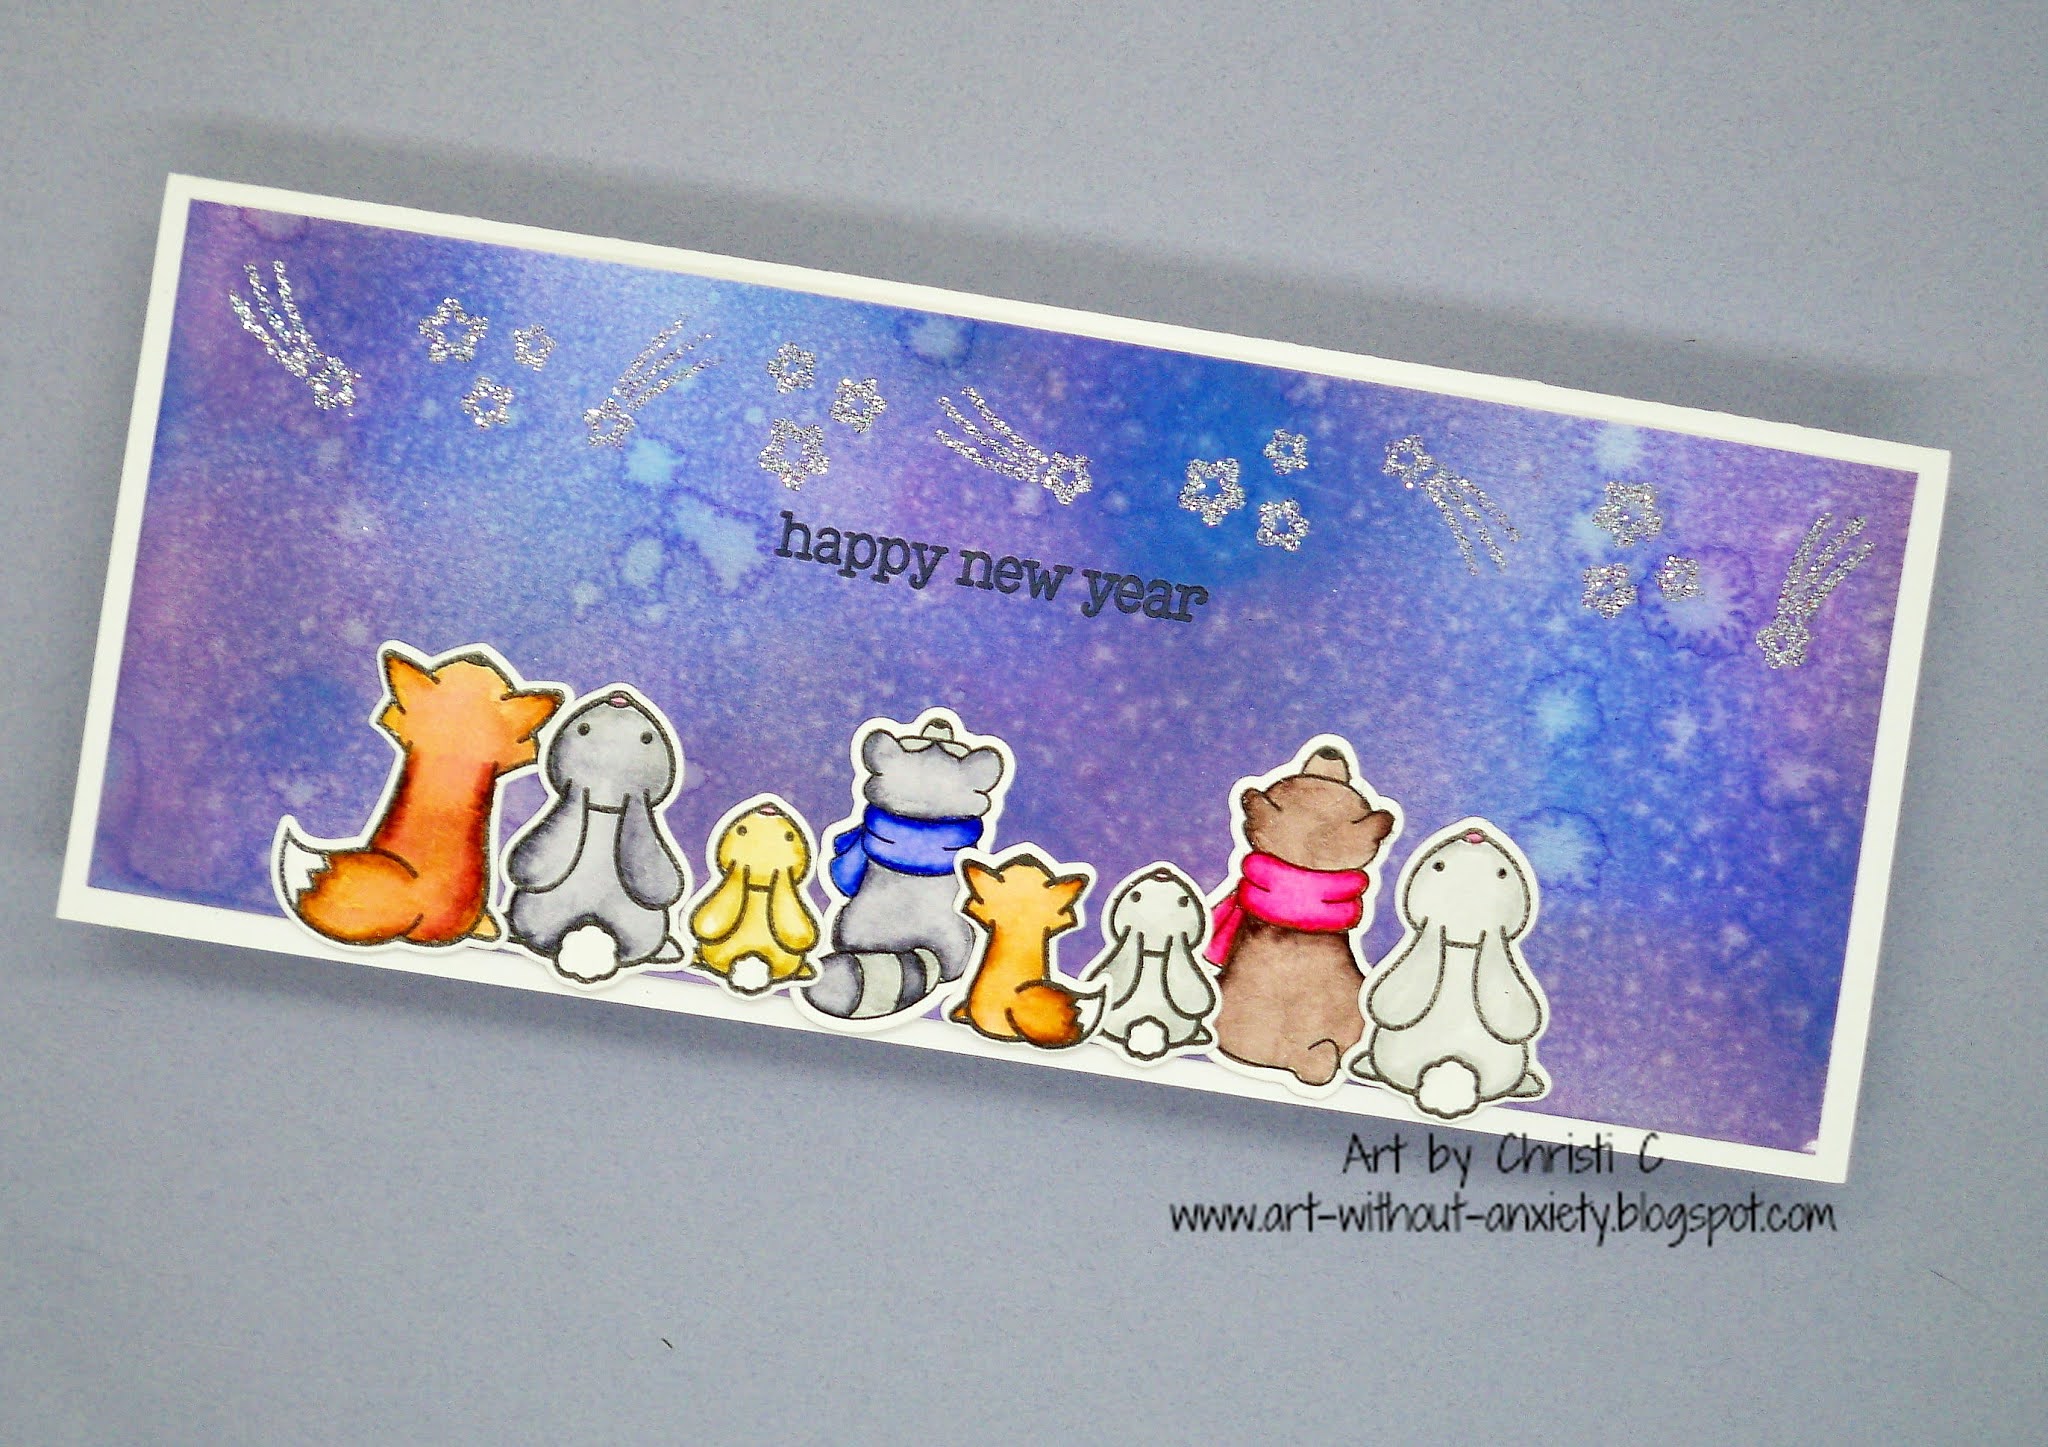
Lawn Fawn Critters Wish you a Happy New Year

*~*~* HAPPY NEW YEAR *~*~*

I don't know about you but it feels like 2020 lasted forever!! I am SO glad that year is over with & I am hoping we all have a better 2021!  I hope you enjoy my card :)

I got to use another premade Distress Oxide Ink background making this card.  I make a lot of backgrounds for my projects that don’t give me the look I want, or they just don’t fit the theme but instead of throwing them away, I save them.  It’s remarkable how many times a background I would have thrown away actually became the very thing I needed for a specific card.  I think I made this background for a Halloween card, but it didn’t work.  I think it works perfectly for this card!


What I Used to Make my Card:
White Slimline Card Base {hand made}
Premade Oxide Ink Background
Lawn Fawn Upon a Star Stamps.  #LF1407
Lawn Fawn Upon a Star Dies, #LF1408
Lawn Fawn Winter Skies Stamps, #LF1763
Lawn Fawn Winter Skies Dies, #LF1764
Lawn Fawn Toboggan Together Stamps, #LF976
WOW! Embossing Powder, Fairy Dust, #WS104R
Watercolor Paper {I use this}
Zig Clean Color Brush Markers
Gina K Amalgam Ink Pad in Obsidian Ink


I had an idea of what I wanted this card to look like; I wanted it to look like a celebration, fireworks, and fun.  I’m not completely happy with it; turns out I have NO fireworks stamps! So I thought I’d make the stars sparkle.  I began by stamping, coloring, and cutting out all my critters.  My first idea was to use a black sky so I stamped a bunch of stars on black card, embossed them, and cut them out.  The stars didn't give the look I wanted, but they were so pretty I saved them.  I am sure I will be using them for another card very soon.  Embossing  right onto the cardstock is something I am not confident in doing; I struggle with doing anything directly onto the cardstock as I have totally messed up so many beautiful cards that way, but I am getting better!  But I decided that was what I needed to do to get the look I wanted, and it worked!  Once the stars were embossed, I set up my characters and then stamped the sentiment directly onto the card. This was especially nerve wracking for me as I had to modify the sentiment; it read “and have a happy new year” and all I wanted was 
"happy new year”.  I devised a little trick using sticky notes that made it much easier to modify the saying to fit what I needed. 

Photo isn't that good, but you
get the idea :)

All I did was position the sentiment where I wanted it, then used a sticky note placed so the portion of the wording that I did not want on my card was on the sticky note.  Then I stamped and you can see on the card how beautifully it worked.  Just another way to stretch your investment! 

I am so looking forward to this new year!!  I am sure I am not alone.  I hope you all had a fabulous New Year - mine was quiet and that is just fine with me :)  I hope you and yours are safe and healthy and we all have a better year!  Fondly, Christi

I am entering my card in the following challenges:
Lawn Fawnatics, #91 - New Year
Simon Says Stamp Wednesday Challenge - Sparkle & Shine
Cut it Up, #216 - Winter
Dies R Us Challenge, #160 - Anything Goes
2 Crafty Critter Crazies - Anything Goes with a Critter {or 8}
Happy Little Stampers Watercolor Challenge - Anything Goes
Crafty Animals, #46 - Anything Goes with an Animal


Thursday, December 24, 2020

Season's Tweetings!

First, let me wish all of you a 


I sincerely hope that you & yours have a wonderful holiday season!

When I saw this collaboration set from Lawn Fawn and Simon Says Stamp STAMPtember release, I knew I had to get it {and I am so glad I did!  It sold out in record time!} and then I knew I had to make a slimline card - so here it is :) 


What I Used to Make my Card:
Slimline Card Base
Watercolor Paper {I use this}
Zig Clean Color Brush Markers
Gina K Amalgam Ink Pad in Obsidian Ink
Lawn Fawn & Simon Says Stamp STAMPtember Season's Tweeting's Stamp Set {Sold Out}
Lawn Fawn & Simon Says Stamp STAMPtember Season's Tweeting's Die Set {Sold Out}
Lawn Fawn Cloud Stencil, #LF2250
Kat Scrappiness Never Ending Nesting Slimline Dies
Nuvo Crystal Drops in Morning Dew, #677N
Gel Pens
Glitter Card Stock

First thing I did was stamp, color, and cut out all the cute little birds.  As usual, I have plenty left over so I am sure they will be visiting again soon!   Then I stenciled on the clouds, and trimmed and stamped the string of lights.  After covering each light with the drops and waiting for it to dry, I placed the birds where I wanted them, glued them down, and stamped the sentiments onto the card.  I cut another panel of glitter card and adhered all of the layers together and onto the card.  I just have to ask, for those of you who blog or post how many times have you typed "slimeline" instead of "slimline"?  I've done it a gazillion times already!

This was the first time I had tried using the cloud stencil and I was surprised and pleased at how easy it was!  It's sad that the stamps and dies sold out so quickly, but the good news is there is a small set of Lawn Fawn's called Winter Sparrows that is still available around the web.  I thoroughly enjoyed working on this card and I hope you like it!  Posts are getting shorter now that that I am seriously trying to get all my cards and crafts posted.  I'm sure you don't mind as we are all feeling the crunch.  Happy, Healthy & Safe Holidays, Christi

I am entering my card in the following challenges:
2 Crafty Critter Crazies, #45 - Anything Goes with a Critter
Simon Says Stamp Monday Challenge - Celebrate!
Simon Says Stamp Wednesday Challenge - Sparkle & Shine
Crafter's Cafe - Holidays
Christmas with the Cuties, #45 - Anything Goes based on a Carol/Song
Bitten by the Bug - Die-lirious Holiday
Crafty Animals, #45 - Anything Goes w/ an Animal
Let's Craft & Create, #166 - Anything Goes
Merry Little Christmas - Anything Christmas Goes
The Card Concept - Picture of your Tree or Favorite Christmas Card