Followers

Showing posts with label Tutti Designs. Show all posts

Wednesday, May 4, 2022

Home Sweet Home Recycled Wall Hanging

 I had been perusing Pinterest to find something to do with all these friggin' buttons I had left over from when it was a big thing to put buttons on your cards {something I never really got into, but HAD to have all the stuff in case the moment grabbed me and I felt the urge to make hundreds of cards with buttons on them} and I found all these Christmas wall hangings with button trees on them So I actually made the Christmas wall hanging during the season this past year and decided I needed to make one that could be used all year long.  I came up with the Home Sweet Home wall hanging that I am using for this month's recycle challenge at River of Creativity {remember we are an Anything But a Card challenge!!}:

I started with an 8" x 10" wooden shadow box frame {no covering on this frame} that I had painted with white gesso and rubbed some gesso on the actual frame part to soften the darkness of the wood.  I took some Scrabble tiles I had {I have SO many of these tiles I am sure I could cover an entire wall
Making the Heart
with them} and spelled out Home Sweet Home to make sure the sentient would fit.  Then I cut out the largest heart using Tutti Nesting Stitched Hearts, #TUTTI-216, and covered it with the buttons.  I could NOT get the shape of a heart to work when trying to do it by hand, so I used the die cut as a template.  Since the background of the shadow box is white it is really difficult to see the white paper heart beneath the buttons.  Once I had finished the heart and glued it to the center of the shadow box, I glued down the Scrabble tiles.  I am really pleased how this came out! I think I could almost actually sell them if I could find a cheap source for the shadow frames; I have sourced a few and they are just too pricey right now - at least if I wanted to make a marginal profit and I can't see having to spend more money to use up the stash I already have.  But, I do have a project I made for my sister for Christmas that I was SURE I posted but can find no record of it, so more button projects on the way!

Getting back to the challenge on River of Creativity, this months theme is RECYCLE so if you'd like to use the theme make sure your entry has some sort of recycle, or upcycle in it.  We can't wait to see all the gorgeous entries! I am personally so pleased at how you all have embraced the changes we made to this challenge and it's a testament to how people are still creating other things besides cards! Thanks SO much and I hope to see you at the challenge ~ Fondly, Christi

I am entering my Home Sweet Home Wall Hanging in the following challenges:
Mix it Up Challenge, #59 - Anything 3D Goes
Creative Artiste Mixed Media Challenge, #82 - Anything Mixed Media Goes
A Perfect Time to Craft, #5 - Anything Goes
Mixed Media Lovers, #13 - Anything Goes
The Creative Crafters, #51 - Anything Goes
We Love to Create, #5 - Anything Goes

Wednesday, November 10, 2021

It's Your Own Asphalt

 Yes I think it is time for just a bit of snark - I can only handle so much holiday stuff, especially this early! I think that soon there will never be any time off from families making cookies and wearing matching PJ's while the snow softly falls in the background. . . I don't know about you, but that wasn't my holiday experience!  But I will save that for another time. I made this card to save my sanity. 


It's a very simple, yet effective, card.  I used Ink Road Stamps Roadies V11 to make the card, I stamped the scene on some watercolor paper, colored it with Zig Clean Color Markers and then cut it out with Stitched Nesting Squares from Tutti Designs.  I then attached the scene onto the white card base, stamped the sentiment under the scene with my favorite black ink and I was done.  And I feel a whole lot better.  Hope you get a chuckle from the card ~ fondly, Christi

I am entering my card in the following challenges:
Sisterhood of Snarky Stampers, #197 - R is for Rude
The Corrosive Challenge, #11 - Anything Goes
HLS Watercolor Challenge - Anything Goes
Pammie's Inky Pinkies, #2145 - Anything Goes
NBUS Challenge, #32 - Anything goes with new Stuff (entry 2)


Monday, October 25, 2021

CLBH Hero Arts Purrfect Halloween {DAY 1}

Another card for the Cat Lovers Blog Hop!  This card was any easy one and I love that it really does look spooky - at least to me it does!


First step was cutting the grey card {cut to card size} with the Cloudy Moon die.  I then placed the die over the white card base and marked the circle with a few dots.  Removed the paper and used a small bit of Hickory Smoke Distress Oxide Ink for the moon.  I then glued the grey paper to the card base.  Next, I stamped, embossed in black embossing powder and cut out the cats from the Luna the Halloween Cat set. It's difficult to see, but the cats are shiny black. I set them aside, stamped the sentiment with black ink on white card and cut it out using  Scalloped Stitched Nesting Squares from Tutti Designs.  I glued the sentiment onto the card and placed a few cats about.  Easy! I think all of the elements of this card make a very appropriate Halloween card!

Do think about joining the blog hop - your projects don't need to be Halloween, they just need a cat {or 2}! Thanks for looking and I hope you stop by again soon! Christi 

Happily entering my card in the following challenges:
Cat Lovers Blog Hop - Day 1
Sweet Stampin' - All Hallows Eve
Cut it Up, #237 - Boo to you {Halloween Project w/ Die Cut}
Stay Crafty w/ Hero Arts, #28 - Fall Colors
Crafty Animals, #55 - Anything Goes w/ an Animal


Tuesday, April 13, 2021

Happy Spring!

Hello everyone,

Since moving I have found {and am STILL finding!} a bunch of craft and card making items that I'd forgotten all about.  Some of it needs new homes and some of it needs to be used! I found this package of white flowers I had gotten from the Dollar Tree ages ago and that is how this card started!

What I Used to Make my Card:
5" x 7" white card base
DCWV 180 Floral Fair Cardstock Stack {available but not on the DCWV site}
Tutti Rose Frame Die, #TUTTI-178
Tutti Birdies Trio, #TUTTI-102
Distress Oxide Inks in Peeled Paint, Tumbled Glass, Tattered Rose and Brushed Corduroy
Lawn Fawn Tree Before 'n Afters Stamp Set, #LF2018
Picket Fence Studio Blending Brushes, 6 pack
White Flowers from Dollar Tree {any small white flowers will work}
Die-Namics Stitched Fishtail Banners

Product I Used

As I said, finding these flowers inspired me to actually USE them, so I started going through
my dies and found the two from Tutti Designs that sing "spring" to me.  Instead of deciding on which one to use, I decided to use both; I like how the Birdies Trio fits in the Rose Frame.  Next came the paper I was going to use; I had previously looked through my patterned paper {the cover of the exact stack I used is pictured} and pulled out a few sheets I liked.  Luckily, in the same paper pad, there was a yellow shade of paper that matched my chosen design wonderfully.  I started the card by cutting the frame out of my previously picked paper, then the birds out of the matching yellow.  One thing to remember when using dies from across the pond, they may not
The Dies

fit our standard card sizes, so I moved to a 5" x 7" card base and centered the frame and birds and glued them to the base.  I colored the flowers with the Distress Oxide Inks {I love the fact that you can make these inks as dark or as light as you want to; I inked the flowers with a small blending brush until the color matched the patterned paper!}, cleaned off the center gems so they'd sparkle. Lastly, I finished off the card with the sentiment that I had stamped onto white card, using the Brushed Corduroy ink,  and then cut with a stitched fishtail banner.  

Detail Close Up
These colors are outside of my comfort zone, I typically
struggle with pastel colors. This year I am trying to step out of my comfort zone and experiment with making projects that include colors, techniques, and subjects I am not comfortable with {I am actually going to USE the items I've purchased to make a light up card!} and I would love it if you'd join me on this journey!  Thanks SO much :)

Fondly,
Christi
 

Don't forget to come join in the fun at the Dies R Us Challenge Blog. There's a new challenge
theme offered on the 1st and 15th of each month and one lucky randomly drawn winner will receive a gift voucher prize to the 
Dies R Us Store.  


   For your convenience, all the important 
Dies R Us links are provided below.

 click below for:

STORE

CHALLENGE BLOG

FACEBOOK

INSPIRATION BLOG 

FRIENDS OF DIES R US PINTEREST PAGE

I am entering my card in the following challenges:
Always Fun, #209 - Pastel Colors
Dreamvalley Challenges, #245 - Springtime
Use Your Stuff, #420 - Spring/Easter
Crafty Catz, #546 - Anything Goes
The Flower Challenge, #55 - Pretty Pastels
Moving Along with the Times, #129 - Animals/Birds {I used birds}
Inspiration Station, #3 - Photo Inspiration = Love the beautiful, soft flowers & that inspired me to use soft colors on my card.


Saturday, February 27, 2021

Hero Arts Love is Love

Hi everyone,

Hero Arts periodically offers items that when they are purchased, a portion, or all of the profits go to different causes.  Both of the sets I used to make this card are an example of such products.  In addition to their own charitable giving, Hero Arts also collaborated with many other stamp companies to put out products such as the We Stand with You stamp set; it is worth a look, especially with so many different styles in one set!  The sets I used for this card are part of the Kindness Campaign {you can read about the various ways Hero Arts gives and supports various charities by clicking that link}.

What I Used to Make my Card:
White Card Base
Tutti Designs Nested Stitched Hearts die, #TUTTI-216
Hero Arts Support Prayers Love stamp set, #CM219 {retired}
Hero Arts You Are Loved stamp set, #CM171
Kaleidacolor Ink Pad in Spectrum,  #KA-000-001
Dimensional Dots

I just have to start with the fact that I have had this Kaleidacolor ink pad for over 20 years and I have never had to re-ink it or ever had any issues with the pad or any other Kaleidacolor pads I have.  I even had one on which the top got cracked during a move and I put the pad in a zipper bag and it STILL works!  When I find a product that I feel is a great value, I just have to share it!  So I stamped the image of the hands holding the heart globe on a scrap piece of white card, cut that out with the stitched heart die, and set it aside.  Then I took the card base and stamped the sentiment on it with the same Kaleidacolor pad as I used to stamp the focal image. I attached the heart with dimensional dots and I was finished. I think the message of this card is so timely and the CAS design catches your eye. What do you think?

Thank you for stopping by and taking the time to look at my card.  I appreciate it SO much! Also, in the near future I will be having a giveaway on my Instagram account so if you are a part of that social media I urge you to begin following me, don't worry, I will happily follow you back!  If you aren't yet on Instagram, well, you don't know what you are missing!  There is more content, crafters, ideas, and things to inspire you than anywhere else I have seen.  And you can use your computer; just go to Instagram.com and make an account!  Hoping you and yours are healthy & happy!   

Fondly, Christi

PS: My editor and dear friend, Nana Connie is in the hospital with pneumonia - maybe you could pop over to her blog and let her know you are thinking of her?? She can read her FB posts in the hospital and I know many of you know her.  I'm sure she'd appreciate so love! She also said, if you have her address, send cards there.  Praying for you Connie!!

I would like to enter my card in the following challenges:
Love to Scrap, #142 - Love is. . .
Love to Craft Challenge Blog (LCCB), #55 - Anything Goes
Krafty Chicks, #548 - Occasions {I think love is an occasion!}
Simon Says Stamp Wednesday Challenge - Anything Goes
Double D Challenges - Anything With a Heart {2nd card}
Happy Little Stampers CAS - Love is in The Air
Day of the Month Card Club, #24 - Valentine's Day/Love
Sweet Stampers, #53 - CAS
Dare to be Artzy - Love


Thursday, December 3, 2020

From All of Us

I had made this post for the Cat Lovers Blog Hop and obviously neglected to post it! That will teach me to get distracted! Instead of saving it for next year, I thought a break from all the holiday crafting would be nice so I am sharing it with you.

Outside of the Card                                                        Inside of the Card

This card is another fairly simple one using Avery Elle's set All of Us, brand new to me and the first time I've used it.  I had originally made this card for a co-worker who had gotten another job but I was unable to give it to her.  I kept it and I am very sure something will arise and this card will be perfect!!  I stamped the group of cats out on watercolor paper, colored them in with my Zig Clean Color Brush Markers and then die cut them using the matching dies. I also used a stitched square die on the white card base to make a peek a boo window. I used Gina K. Amalgam Ink Pad in Obsidian Ink to stamp out the cats and the sentiment.  The groups of cats were attached, each one slightly atop the other, and then the paw and the congrats sign were placed on the card.  
 
I think this is a really cute card and the set has other animals and sign sayings so you can use the set for almost any occasion.  I hope you enjoyed my card! With this craziness, COVID and the holiday season, I hope you & yours are safe and healthy! Thanks, Christi
 
I'd like to enter my card in the following challenges:
PIP Challenge, #2048 - Animals 
Cute Card Thursday, #663 -  Anything Goes
Art Impressions -  Pets 
Krafty Chicks Challenge, #536 - Stamp Act (Use a Stamp) 
NBUS Challenge, #21 - Stamp Set is NBUS
Crafty Animals, #45 - Anything Goes w/ an Animal (or a bug!) 
2 Crafty Crazy Critters, #45 - Anything Goes w/ a Critter


Monday, April 13, 2020

Hope You're Day GLOWS. . .

Another card from the "ready to publish" batch I have from cards I made before my sabbatical.  The items aren't exactly new anymore, but perhaps they are new to you? This was the first time I used the GITD embossing powder as well as the stamp & die sets. It is snowy and dreary here and I needed to brighten things up so I chose to publish this post now. I hope you enjoy this write up!

I love playing with new stuff and playing with new stuff that does something {other than stamp or die cut} is even better! I was perusing Amazon and this bundle pack of Lawn Fawn stuff came up; the light bulb set, Lights Out, this set, both with coordinating dies, and a bottle of the new Glow in the Dark embossing powder.  Was it cheaper?  I dunno, but I had wanted all of it, so my finger slipped pressed the button and they ended up in my cart.  I had so much fun with this card, I hope you like it!


What I Used to Make my Card:
White Card Base
Distress Oxide Inks - Salty Ocean, Wilted Violet, Squeezed Lemon, Mermaid Lagoon, Seedless Preserves & Black Soot
Zig Clean Color Markers
Lawn Fawn Little Fireflies Stamps, #LF1593
Lawn Fawn Little Fireflies Dies, #LF1594
Lawn Fawn Grassy Border, #LF613
VersaMark Ink 
Ranger Archival Ink in Jet Black
Lawn Fawn Glow In the Dark Embossing Powder, #LF1577
Tutti Designs Stitched Nested Rectangles, #TUTTI-217
Shades of Green Paper
Watercolor Paper
Dimensional Dots

These fireflies are SO cute! I pondered for a while how I was going to use the GITD {Glow in the Dark} embossing powder so I watched the video which Lawn Fawn puts out with each new release.  I took the idea about making the fireflies' butts glow using little dots.  I covered a piece of white card with VersaMark ink and sprinkled on the GITD embossing powder and heated it up with my heat gun.  I did this multiple times (honestly, at least 8 times) as I wanted to be sure the powder was thick enough to really glow.  I set the paper aside while I continued working on the card.
Another Look

I made my background with Oxide Inks, set that aside, and stamped my little fireflies on watercolor paper using my MISTI.  While I had everything out, I also stamped my sentiment.  I used Clean Color markers to color the fireflies {this was a challenge - I have no idea what color real fireflies are, but I suspect they aren't that pretty.  I improvised to make mine look sweet when they aren't glowing} and cut them out, as well as my sentiment.  I needed something to ground the scene so I cut out the Grassy Border twice, using two shades of green.

Next step was to die cut the little circles out of the paper I had coated with the embossing powder.  Then I attached them to the firefly butts and let them dry.  Once my background was fully dry, I attached the grass cuts and the sentiment.  I also cut out two of the "twinkles" from the embossed card so I could put them around the word GLOWS in the sentiment.  I popped most of the fireflies up with some dimensional dots and I was done! 
The card matched up with the Glow In The Dark spots
I was so anxious to see what it looked like in the dark, and I am SO pleased at how the card came out, but my camera refused to take a picture of the card! Absolutely refused.  I figured I'd try my cellphone and luckily that worked!  I hope you like this adorable card as much as I do! ~ fondly, Christi

I am entering my card in the following challenges:
NBUS {Never Been Used Schtuff}, #13 - Anything New Goes 
2 Crafty Critter Crazies, #37 - Anything with a Critter {fireflies are critters?}
Take It, Make It Challenge, April - Anything Goes 
Coloring in Scrapland, April Challenge - Anything Goes w/ Option of Embossing
Dream Valley Challenge, #223 - Things with Wings
Pammies Inky Pinkies, #2015 - Anything Goes


Monday, February 25, 2019

May All Your Wishes Come True - Hero Arts Kit

I've been lucky enough to be able to subscribe to what I think is hands down the BEST paper kit out there, My Monthly Hero by Hero Arts.  I've tried other kits and, while there is nothing wrong with them, the one thing I like best about My Monthly Hero is that they include dies in their kits.  Not too many kits give you stamps {and a FULL set of stamps, not just two or three individual stamps}, dies, paper - you can count on those each month.  In addition you might get some ink cubes, glitter, embossing powder, glimmer spray or lacquer, stickers, gel pens - basically if you want or need it for paper crafting, it's included.  Can you tell I'm a huge fan?  On top of ALL that, they release companion products; other stamps, dies, stencils and more!

Here is a cute, clean and simple card I made with the December 2018 kit:

What I Used to Make my Card:
White Card Base
Watercolor Paper {I use this}
Ranger Archival Ink in Jet Black
My Monthly Hero Kit, Hero Arts, January 2019
Tutti Designs Scalloped Stitched Nesting Dies, #TUTTI-419
Dimensional Dots
Sakura Gelly Roll Stardust Clear Glitter Pen {I got mine in the MHK December 2018}

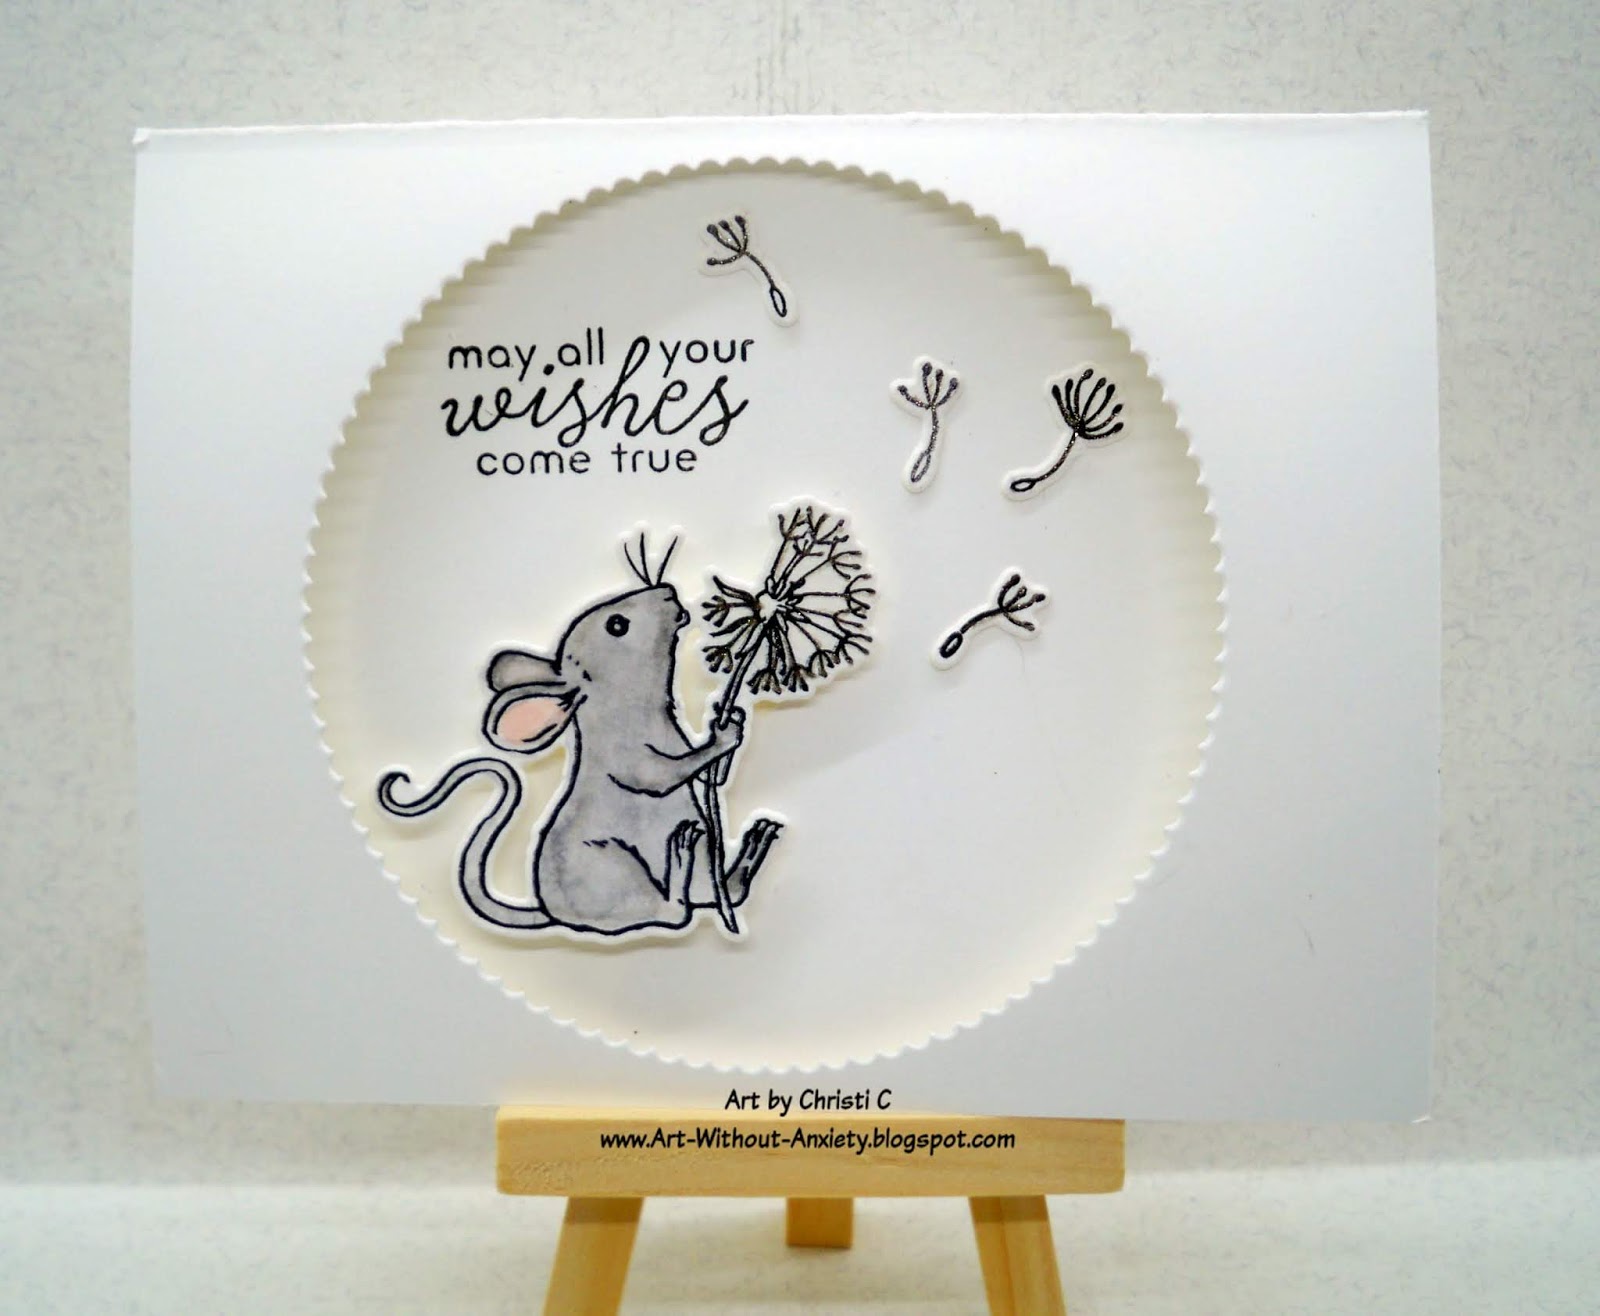
This card was a cinch to make!  First, I stamped all of the elements on watercolor paper with the Jet Black ink, colored them, and once they fully dried, cut them out with the matching dies.  I took a plain, white, A2, card blank and cut out the scalloped circle for the front.  I mounted the mouse with dimensional dots and glued the little dandelion parachutes right onto the card.  Lastly, the sentiment was stamped.

That's it!  There isn't much room on the inside to write anything more than a small salutation, but you could always go on to the back of your card if need be.  

I'm following the dandelion craze of late {as my credit card can attest} and I'm gathering quite a few stamp sets but this is one of my absolute favorites.  I love how each piece of the dandelion has it's own die so you can add as many seed bearing, umbrella, feathery bristles as you want either by stamping directly or cutting them out.  I looked up what these little floating, feathery, parachute things are actually called and technically they are called a 'pappus,' which I never knew.  All I knew is my dad used to have a fit when I blew all the fuzzies off the dandelions!  Feel free to look it up yourself and check out all the different ways people describe them.  Now you can say you weren't wasting time online because you actually learned something!  I personally like "seed bearing parachutes" which was what one person called them.  

Well, I hope you enjoyed my card.  I truly appreciate each and every comment, and if you do leave one, please leave your personal blog address so I can stop by and oooh and ahhh over your creations!  Fondly, Christi

I am entering my cute little mouse card in the following challenges:
A Place to Start - M, Inspirational
613 Avenue - M, Anything Goes TWIST: Use an animal
Crazy for Challenges - #472, Show a Pet on your Card {while *I* don't own a mouse, I know people who have - and I had a hamper once, hope it counts!}
Cardz TV - Anything Goes
Creative Fingers - M, #158, Anything Goes
Creative Friday - #224, Use Only 3 Colors {Black, Gray & Pink}
Mod Squad Challenge - Only Name Brand clear/rubber stamps
Die Cuttin' Diva's - #408, Random Acts of Kindness
The Cat's Pajama's - #354, Furry Friends {graphic below}
Sparkles Monthly - M, #113, Include an Animal 


I just have to say it is so weird to enter these animal challenges with a MOUSE instead of a CAT {like I typically do!}  My furbabies forgive me though, I think they do. . .  

Wednesday, February 13, 2019

Binge Together

Those who binge together, stay together!  When the Man and I first met, I would go to see him in Detroit and there was nothing to do {meaning I couldn't craft} so we'd binge watch TV.  We watched two seasons of Orange is the New Black, countless Law and Order marathons, and much more.  I think you learn a lot about a person by the television shows they watch!  The fact that he had the same sick sense of humor I have had a major impact on our relationship ~ this card is for him!  

What I Used to Make my Card:
White Card Base
Lawn Fawn Stitched Wood Grain Backdrop, #LF1501
Lawn Fawn Screen Time stamps, #LF1684
Lawn Fawn Screen Time dies, #LF1685
Tutti Designs Cross Stitched Nesting Rectangles, #TUTTI-410
Die-Namics Stitched Oval STAX
Die-Namics Stitched Fishtail Sentiment Strips
Watercolor Paper {I use this}
Ranger Archival Ink in Jet Black
Kraft, Dark Brown, Dotted Red Cardstock {stash}

Once I embossed the kraft paper with the wood grain backdrop {this reminded me of the paneling we had in the living room in the house where I grew up but the wood grain on the die is much nicer than the fake wood grain we had}, I proceeded to design my room.  I've seen quite a few cards featuring this set and the artists have drawn sofas and chair for seating the people - nope.  You probably wouldn't be able to tell WHAT they were sitting on if I tried that, so I decided they were on a beanbag chair which I cut using the oval die and the red card with dots.  You can't really see the dots in the picture, but they are there.  Then I cut the TV stand out of the dark brown card using the rectangle die.  I thought about adding a side table to the bean bag chair but it looked too crowded. 

The figures, television, food, drinks and other accessories were stamped, colored, and cut.  I actually made the male figure holding a soda and a pepperoni pizza, as my Man has been known to do.  I prefer to snack on chips so I made myself a bag of PopCorners chips in the Kettle Corn flavor.  Have you tried these chips yet? They have literally changed my life!  As far as snacks go, they aren't terrible for you; the bag is biodegradable and there all sorts of good reasons to eat them.  I bought a small bag at the Dollar Tree and loved them SO much I began ordering them by the case via Amazon.  If you like Kettle Corn, or sweet and salty snacks, these chips have your name written all over them.  I'd be happy to send you a sample {seriously, they are THAT good.}  Just look on the right side of the blog, find my email and drop me a line. 
Close Up

Back to the card - I attached all the pieces of the scene to the main card and put the little heart bubble above the Man's head since he's thinking how much he loves me since I've gotten him hooked on all kinds of reality television; nothing too fake, no famous-because-they-made-an-x-rated-tape type shows, just competition shows like Hell's Kitchen and some of the Marriage Boot Camp shows so we can giggle.  Oh, and we like American Beauty Star, Project Runway, and he turned me on to Chopped which is quickly becoming one of my favorite shows.  For the record, we also watch lots of documentaries so we aren't complete bubble heads.  What shows do you watch? Anything you'd recommend that I should watch?  Leave me a comment, making sure your blog info is available so I can visit your blog and leave you some bloggy love in return!  Hope to see you soon!  Fondly, Christi

I am entering my Binge Together Card in the following challenges:
Creative with Stamps - M, #35, Love
The Male Room - #104, Love Your Men
The Sisterhood of Crafters - Non-traditional Valentines
Watercooler Wednesday - #208, All About Occasions
Die Cuttin' Diva's - #407, Love
Try it on Tuesday - Romance
Shopping our Stash - #389, Make Your Mark {use markers}