Followers

Showing posts with label Stampers Anonymous. Show all posts

Saturday, October 30, 2021

CLBH A Nervous Halloween Kitty {DAY 6} and a GIVEAWAY

UPDATE: Winner chosen!!!

Another fun Halloween card for the Cat Lovers Blog Hop!!! Today is the LAST day to enter, but you still have a few days to show all the entrants & sponsors some love! I love the holiday SO much I truly think we should make it last longer. . .  How about 2 months of Halloween? Maybe 6? Too much? 


I have to admit I have been longing for all the sets of snarky cats that Tim Holtz put out, but I wanted the matching dies. Now I can't find the dies for any of the sets and it seems he may be getting ready to discontinue the lot of them so I gave up.  I was happy to have found this little combo which includes these stamps and a stencil which was much more inexpensive than the set so I scooped it up.  I also found one for birthdays and I am sure that will be making it's debut soon.  On a piece of water color paper I stamped the cat, the bat and the two sentiments.  I colored in the cat and pumpkin with my Zigs then layered the panel onto the patterned paper that I had already attached to the white card base.  I love the look on the cat's face!

Now the Cat Lovers Blog Hop has a HUGE amount of prizes to be won; and a bunch of ways you can win them - so I urge you to go and check it out :)  Thanks SO much for stopping by ~ hugs! Christi 


PS: I have a little prize to give away to all the Cat Lovers Blog Hop folks who comment on this post & follow me {to be eligible PLEASE put CLBH in your comment, as well as what social media platform you follow me on}  You can find all my social media links here, so please choose one or all of them : ) So sorry but due to outrageous postal costs, USA entrants only for the prize, but I will have a $10 GC for folks out of the USA. Closes November 2 and I will choose the winner November 5, 2012.  Feel free to share!!! 

Entering my card in the following challenges:
Cat Lovers Blog Hop ~ DAY 6
The House that Stamps Built, #2721 - LOL, Funny, Snarky
Simon Says Stamp Wednesday Challenge - Anything Goes (entry 3)
Modsquad Challenge - Halloween
Cardz TV, #152 - Anything Goes
Art Impressions - Feline Crazy (entry 2)
Daring Cardmakers - Halloween Inspired (entry 2)
Allsorts Challenge, #648 - Add a Sentiment


Thursday, August 6, 2020

I am Currently Unsupervised. . .card 2

If you read my post from here, this is basically the same thing. Some ingredients have changed but not much else so feel free to scroll on down to the card :)

I am lucky enough to work on a blog called Challenges for Days where we update the current challenges for people like myself who can't remember all the wonderful challenges out there.  I tell you this because there has been many times that I am updating my day {which is Saturday} and I will come across a challenge that I just HAVE to enter.  It happened this past Saturday with Sisterhood of Snarky Stampers current challenge: D is for Dogs; the challenge goes until the end of the week, so drag out those doggie stamps and join in!


What I Used to Make my Cards:
White Card Base
Tim Holtz Mini Crazy Cats & Dogs Stamps, #CMS272
Tim Holtz/Sizzix Mini Crazy Cats & Dogs Dies, #661594
Watercolor Paper {I use this}
Derwent Inktense Watercolor PencilsNuvo Crystal Drops in Ebony
Sakura Gelly Roll Pens, Stardust
Tim Holtz Mini Stencil Set #10, Flourish, #MST010
I am Currently Unsupervised Sentiment Stamp, Dylusions, Say How it is,  #DYR37774
Distress Oxide Ink in Worn Lipstick
Googly Eyes

Again, the dog was stamped, colored and die cut. I used the stencil to decorate
Another Peek
a strip of white cardstock, trimmed it down and attached it to the card base.  I stamped the sentiment in clear ink and embossed it in black, trimmed that and attached it to the strip that was stenciled.  I chose this dog because I love putting google eyes on the Crazy Cats, Dogs & Birds - they just fit perfectly!!!

Thank you for stopping by! I appreciate you using your time to stop and see my creations! Hugs {social distanced hugs!} Christi

I am entering my card in the following challenges:
Funkie Junkie - Stencilmania
Mix it Up, #40 - Anything Goes, twist: Embossing {I used wet}
Sisterhood of Snarky Stampers, #165 - D is for Dogs
Double Trouble, #63 - see challenge {you HAVE to read it - SO funny!}
2 Crafty Critter Crazies, #41 - Anything Goes with a Critter {card 2}

Monday, June 1, 2020

Snarky Birds and Cats

I am back with a whole bunch of cards to share with you!  I, like most of you, am stuck in the house and decided I'd play only with the items I had in my craft room at the moment (I still have a great deal in storage).  While flipping through all my half finished cards, lots of already colored bits and bobs and die sets this is the bunch I came up with.  I love snarky sentiments and I had so much fun pairing the animals with the sayings.


I remember when Tim's Crazy Birds were all the rage and when I got my set I stamped and colored like crazy!  I ended up with a huge surplus of crazy cats, birds and dogs.  I have six cards to share with you so to simplify things I compiled a basic list of items used in making this set. All of the cards are sized A2 (5 1/2" x 4 1/4"), every bird or cat was colored and cut prior to making the card using either Zig Clean Color Markers or Prismacolor Pencils and sometimes both mediums were used.  All of the accent dies are the ones I had on hand from MFT Die-Namics, Sizzix, Spellbinders, Mama Elephant and other manufacturers.  The sentiments are from Riley & Company Funny Bones and were stamped with Gina K amalgam ink in obsidian.  Last but not least every card used either Bird Crazy stamps and dies or Crazy Cats stamps and dies.  If you have any questions about the specific items I've used please feel free to contact me.  Now here we go!


Sentiment #RWD-399 {Unfortunately this stamp is discontinued}


Sentiment #RWD-441
Background Paper from Lawn Fawn Watercolor Wishes Petite Pack, #LF1355


Sentiment #RWD-370


Sentiment #RWD-535


Sentiment #RWD-530
Kraft Card Base
I think I tarted up the cat to use on a Halloween card


Sentiment #RWD-578


I hope you got a giggle while reading these, I can relate to every single one!  I have only used a small fraction of the precolored animals I have but my muse was going crazy and I had to get creating some other cards, too.  I can't choose a favorite; one second I like this one, then the next I like that one - do you have a favorite one, or maybe one that speaks to you? Please leave me a comment - I'd love to know what you think! Let me say after taking almost a year off I feel so good to be crafting again and I hope you enjoyed my post! Plus, after this past week I needed to laugh! Hugs, Christi

I am entering my bunch of cards in the following challenges:
2 Crafty Critter Crazies, #39 - Anything Goes w/ a Critter
Carlin's Cards - Scrap Paper & Dies {the bulk of the backgrounds are made from scraps}
Crafty Animals, #39 - Anything Goes as long as there is an Animal
Moving Along with the Times, #119 - Things with Wings
International Art & Soul, #84 - Humorous
Inkspirational, #214 - Funny Sentiments
Try it on Tuesday - Cut it Out! 
SUYP, #55 - Anything Goes with a Cat

Creative Moments, #91 - Use Birds or Bees {I used Birds}
Sweet Stampers, #44 - Animals and/or Birds


Saturday, May 26, 2018

Prison Orange ~2018 Spring/Summer Coffee Lover's Blog Hop


I am frantically making cards for the 2018 Spring/Summer Coffee Lover's Blog Hop - so far, out of the few I've made, this is one of my favorites.

What I Used to Make my Card
White Card Base
Bird Crazy Stamps & Dies {already colored & cut}
Clean Color Markers
Riley & Co. Coffee. Because Prison. . .#RWD-544
Wendy Vecchi Mini Brick Stencil, #WVSFA053
VersaFine Onyx Black
Googly Eyes
Distress Ink in Hickory Smoke

This was an easy card.  I already had my bird ready to go, complete with her googly eyes.  I colored her with Clean Color Brush Markers.  I ripped a piece of scrap paper {making sure it was big enough for me to add my sentiment} and
stenciled all around it with the Distress Ink using the Bricks stencil.
Another Look

Then I stamped my sentiment and added my bird.  I love that this card was so easy to make and at the same time makes me giggle!  You know how I love my snarky sentiments!

Thanks so much for popping by! While you're here, I'd love for you to join my giveaway, you can get all the details here.  I am finding more and more good stuff to add to my package and I promise you won't be disappointed!  Hugs!  Christi


I am entering my card in the following challenges:
2018 Spring/Summer Coffee Lover's Blog Hop
Crop Stop - M, Anything Goes
CuttleBug Mania - Butterflies and Birds
The Artistic Stamper - M, Backgrounds
Country View Challenges - M, Be Humorous, entry #2
Dies R Us - #97, Birds
Sisterhood of Snarky Stampers - I is for Inky

Tuesday, May 1, 2018

April Showers Bring May Flowers

For the theme this month at Stinkin' Inkers, April Showers Bring May Flowers {use flowers}, I decided to use some Tim Holtz background stamps and I had so much fun making the first one, that I made a twofer!  While it did take some time to make the "Birthday Wishes" card, I adore how it came out and it was worth the effort.  For the other one, who doesn't like rainbows?  To make it easier to describe each card, I've divided the cards by the sentiment but here is a picture of the two cards:


What I Used to Make my Card {Birthday Wishes}
White Card Base
Tim Holtz/Stampers Anonymous, Vines and Roses Stamp, #CMS298
Tim Holtz/Sizzix Labels, #660060
My Sentiments Exactly!, Handwritten Sentiments, #Y500
Ranger Archival Ink in Jet Black
Clean Color Markers
MISTI


I made this card first.  I wanted to color each individual part of the stamp a different color to mimic a painting.  I started with the leaves on the stamp and I used the Clean Color Markers in two shades of green.  First I used the light green and then I used the darker green to give the leaves some depth.  Then I colored the flowers using two shades of pink, again starting with the lighter shade and using the darker shade last.  It took a while to get the colors as vibrant as I wanted; the key to this technique is keeping the stamp on the MISTI in the same place for all the stamping.  I even cleaned the stamp between colors without taking it off.  Since the markers I used are water color, I just used a baby wipe in between colors.  

Once the background was done, I trimmed it down and mounted it on a white card base.  The sentiment was stamped on a piece of white scrap, using black ink, then cut out using a die from the Labels set.  Lastly, I attached the sentiment to the card.   


I am entering my Happy Birthday card in the following challenges:
Seize the Birthday - Anything Goes
Simon Says Stamp Wednesday Challenge - Anything Goes
Inspiration Destination - #149, Anything Goes
Everybody Art Challenge - #424, Floral Greetings
Happy Little Stampers - M, May, Watercolor Challenge


What I Used to Make my Card {Thinking of You}
White Card Base
Tim Holtz/Stampers Anonymous, Vines and Roses Stamp, #CMS298
Tim Holtz Crazy Talk, #CMS236
Tim Holtz/Sizzix Labels, #660060
Ranger Archival Ink in Jet Black
Kaleidacolor Ink Pad, Spectrum
MISTI


It was much easier to make the Thinking of You card.  All I did was ink up the stamp using a Kaleidacolor ink pad and stamped it onto some white card.  I trimmed down the stamped background and attached it to the card base.  The sentiment was stamped in black and cut out using one of the dies in the Labels set and then attached to the card.  


Picture from Simon Says Stamp
If you don't have this stamp set, it comes with two different background stamps and both are very pretty.  You can also purchase the other pattern {the one I didn't use to make these cards} as a mounted stamp from Stampers Anonymous, #X1-2994, called Roses.  But, for a few dollars more, you get both background stamps and they are cling mount to work with your stamping system.


I am entering my Thinking of You card in the following Challenges:
The Paper Girls - #150, Rainbows
Not Just Cards - M, April - Anything Goes
Always Fun Challenges - #56, Flowers
Crop Stop - M, April - Anything Goes, Spring
Creates and Makes - M, April, Anything Goes
Everybody Art Challenge - #424, Floral Greetings
Simon Says Stamp Wednesday Challenge - Anything Goes

I hope my cards inspire you to join in the fun at Stinkin' Inkers; after all, who doesn't have a few flower stamps in their collection? And you can use those wonderful flower embellishments that have been hanging around, like I did in last year's Stinkin' Inkers April challenge, which was our very first one.  Thank you for hanging in for the long haul, I know this post was a bit long and I truly appreciate your support.  Fondly, Christi

Monday, March 19, 2018

Snarky Birds

If you are a reader of my blog you know I have been trying to use up some of my images that I've pre-colored; when I am in the mood to color, no image is safe, regardless of if they are old or new, and the crazy animals in the Tim Holtz line are some of my favorites to color.  Perhaps it's because I basically learned how to color on them, or because they have an expression that fits almost every occasion, but I have more birds, cats, and dogs than anything else.  So today you get a twofer; two for the price of one!


What I Used to Make my Cards:
Pre-Colored Bird Crazy Birds, Stamp Set {CMS212}& Die Set {660954}
Hero Arts Ink in Navy Blue
Light Blue Card {for sentiment}
Dylusions Say It How It Is stamp set, #DYR37774
Dylusions Shut Up & Color stamp set, #DYR55525

These cards were actually inspired by the card bases.  I got them years ago {at least 10 years ago now!} and I recently came across them.  So, in trying to use up the old {to make more room for the new}, I put them on my desk and resolved to use them.  It just so happens I found a few Bird Crazy birds that I had colored ages ago and the shades of blue were perfect for the card blanks.  Off I went. 

Nothing beats a snarky sentiment {I am a huge fan of the sarcastic and snarky} and Dylusion Stamps has the best sentiments.  For these cards I stamped the sentiment on light blue card and hand cut them.  Then I put the first part of the sentiment on the front of the cards; the last part on the inside.  I rarely put anything on the inside of my cards, I like to leave them blank so I can write whatever I wish, but these cards were calling out to be snarky!

Here are the insides of the cards.

Card A
Card B
Since they use practically identical products, I've called the card on the left Card A and the card on the right Card B.  I honestly can't choose which one I prefer; both of the sentiments work for me and I adore both of the birds. How about you? Which one do you prefer? Which of the sentiments speaks to you the loudest? 

I'm going to give these cards to the troops.  I figure there has got to be a deployed person who's significant other would appreciate getting one of these in the mail.  They are such a nice change of pace from all the feminine flowers and syrupy sentiments!  

Thanks for stopping in! Please consider following me and, if you do, let me know and I will follow you back.  Not only is it good Blogging karma but I'm amassing quite a huge giveaway and you will want to know when it's announced {and you'll have to be a follower to win}.  Have a snarky day! Christi

I'm Entering my Snarky Birds in the Following Challenges:
Cards in Envy - No Patterned Paper
Addicted to CAS - #132, Birds
International Art & Soul - #29, Add Humor 
Daring Cardmakers - Watch the Birdie!
The Sisterhood of Crafters - M, Birds
Sisterhood of Snarky Stampers - #105, Z is for Zig Zag (Jane pointed out to me that my frames are zig zag!)

Tuesday, February 6, 2018

Bird Crazy Lovers

I'm still crazy about Tim Holtz' "Crazy Birds."  I've been wanting to break them out again and I think Valentine's Day is a perfect time to play with them, especially when there is a fabulous challenge to enter!  The theme for February at Stinkin' Inkers is "Love is in the Air" and your creation can be for Valentine's Day, an anniversary, or even a wedding; anything to do with L-O-V-E.  So, while love is flying all over the place, I present my Bird Crazy Lovers:

What I Used to Make my Card:
White Card Base
Versafine Onyx Black Ink
Watercolor Paper
Tim Holtz/Stampers Anonymous Bird Crazy Stamps, #CMS212
Tim Holtz/Sizzix Bird Crazy Dies, #660954
Tim Holtz/Stampers Anonymous Crazy Things Stamps, #CMS237
Tim Holtz/Sizzix Crazy Things Dies, #660953
Clean Color Zig Markers
Derwent Water Color Pencils
Hero Arts MMH January 2017 You Are Loved Sentiment
Heart Googly Eyes {Dollar Tree}
MISTI
Dimensional Dots

Playing with these stamps feels like I'm home.  I love all the crazy animals Tim's designed and I always have a stash colored and cut, ready to use when the mood strikes me.  However, for this card, I made these characters just for this card.  I didn't want the birds to be too red or pink; in other words, I wanted the card and embellishments to say Valentine's Day - not the color of the birds. 
Mr. Bird
Also, it was important that the birds were looking at each other; and I wanted to color.  Before I get into the making of the card, 
I just have to detour for a quick second.  I was rummaging through my stamp pads and found my Versafine Black Onyx pad; I must have had this pad for at least 15 years {and five of those years were in storage} and I figured this pad would need to be re-inked, but I'd recently seen a card on Pinterest that used this ink and wanted to try it again.  To my surprise, there was NO re-inking needed!  This pad was so juicy and vibrant that I only needed to stamp with my MISTI one time! Only once! I am hooked on this pad again.  It's been taken out of the drawer and is living on my desk.  Simply amazing since every other black ink I've used on watercolor paper has taken at least two re-inkings to get a good image -
Ms. Bird
these images were clearer and crisper than I've ever gotten on watercolor paper.  So, yes, I've gotten my images happily stamped and I colored them in with my Derwent Watercolor pencils first, and then added some more color using the Clean Color Markers.  I like using more than one medium to color; it gives me the richness I want and it's fun.

Angry Ms. Bird

I cut all my images and accessories, including an extra wing for our fancy guy, and assembled my birds.  I put a bow on her head and he's dapper with his hat and bow tie.  In his wing he is carrying a box of chocolate-covered birdseed to give to his honey.  As you can see, they both have love in their eyes; and, since they are birds, I expect they will get some "Love in the Air" as well <wink>.
A calmer Ms. Bird
One thing you need to be aware of when using shaped googly eyes is how the eyes are pointed.  See how she looks awfully angry in the above picture! Just a little thing to be aware of!  Thank you so much for stopping by and I hope you enjoyed my little tutorial.  You have an entire month to enter your Love is in the Air creation at Stinkin' Inkers; I hope to see you there! Christi


PS: As the requirement for Retro Rubber is to state how long I've had these stamps I'm going to say at least since April of 2015.

I'm entering my Bird Crazy Lovers in the following challenges:
a2z Scrapbooking - M, It's a Love Thing
Die Cut Divas - M, Love is in the Air, entry #2
2 Crafty Critter Crazies - M, #11, Anything Goes w/ a Critter {or 2}
Simon Says Stamp Monday Challenge - Love is in the Air
Retro Rubber - M, #79, Inspired by Love
The Paper Players - #379, Will You be my Valentine?
Just Us Girls - #426, Love
Simon Says Stamp Wednesday Challenge - Anything Goes
 

Tuesday, January 16, 2018

Let it Snow

Another snowflake card; sorry to those who are getting snowed under!  We had a bit of snow yesterday, but most of it is already gone.  We are due for a good snowstorm!

What I Used to Make my Card:
White Card Base
Tim Holtz/Sizzix Mini Paper Snowflakes Die, #661599
Lawn Fawn Let it Snow Border Die, #LF992
Tim Holtz Mini Swirly Snowflakes Stamps, #CMS320
Simon Says Stamp Embossing Powder, Detail White
Embossing Ink
Vellum
Pale Gold Card
Homemade White Brads

This card started out with stamping the snowflakes on vellum with embossing ink and then embossing them with detail white embossing powder; I had no plan for the vellum, I just love the way white embossing looks and I wanted to play.  I made this panel at the same time I made the panel used in my Simple Snowflake Cards.

When I went to adhere the vellum panel to the card base I realized I had no white brads {yes, I found some later, which is always the case for me}.  So, I made some.  I've done it before and it is so simple; just dip the head of your brad into some embossing ink, then the embossing powder, heat, and repeat until you are satisfied with the results.  Easy!  Once the brads were made, I set them aside to cool down and set about making the embellishments for the card. I cut the sentiment out of the same card as the snowflakes {choosing which  
snowflakes to use out of the set was the most difficult part of making this card!}, a luscious pale gold that I've had for years.  Once the vellum was
Another Look
attached to the card base, I glued the sentiment and the snowflakes I'd chosen to the card.


It really is so pretty in person! I am absolutely fascinated with white embossing, as you may have noticed lately.  It just looks so fresh and clean to me.  Have you jumped on this craze as well?  If so, I'd love to stop by and see your creations, just leave me your information in the comments.  And, since you are already here, I'd be grateful if you'd consider becoming a follower.  It took me a very long time to get the guts to share my art and now that I'm an old pro at sharing, I'd be honored to continue sharing it with you.  Thanks so much and I hope to see you soon! Christi

I would like to enter my Let it Snow card in the following challenges:
Use Your Stuff - #295, Monochromatic
A Snowflakes Promise - M, #47, Anything Goes
Artistic Stamper - M, #1, Anything Goes
Crop Stop Challenge - M, Anything Goes (#2)
Card Mania - M, #100, Monochromatic
Get Creative With Stamps - M, #22, Snowflakes


Thursday, December 21, 2017

Simple Snowflake Cards

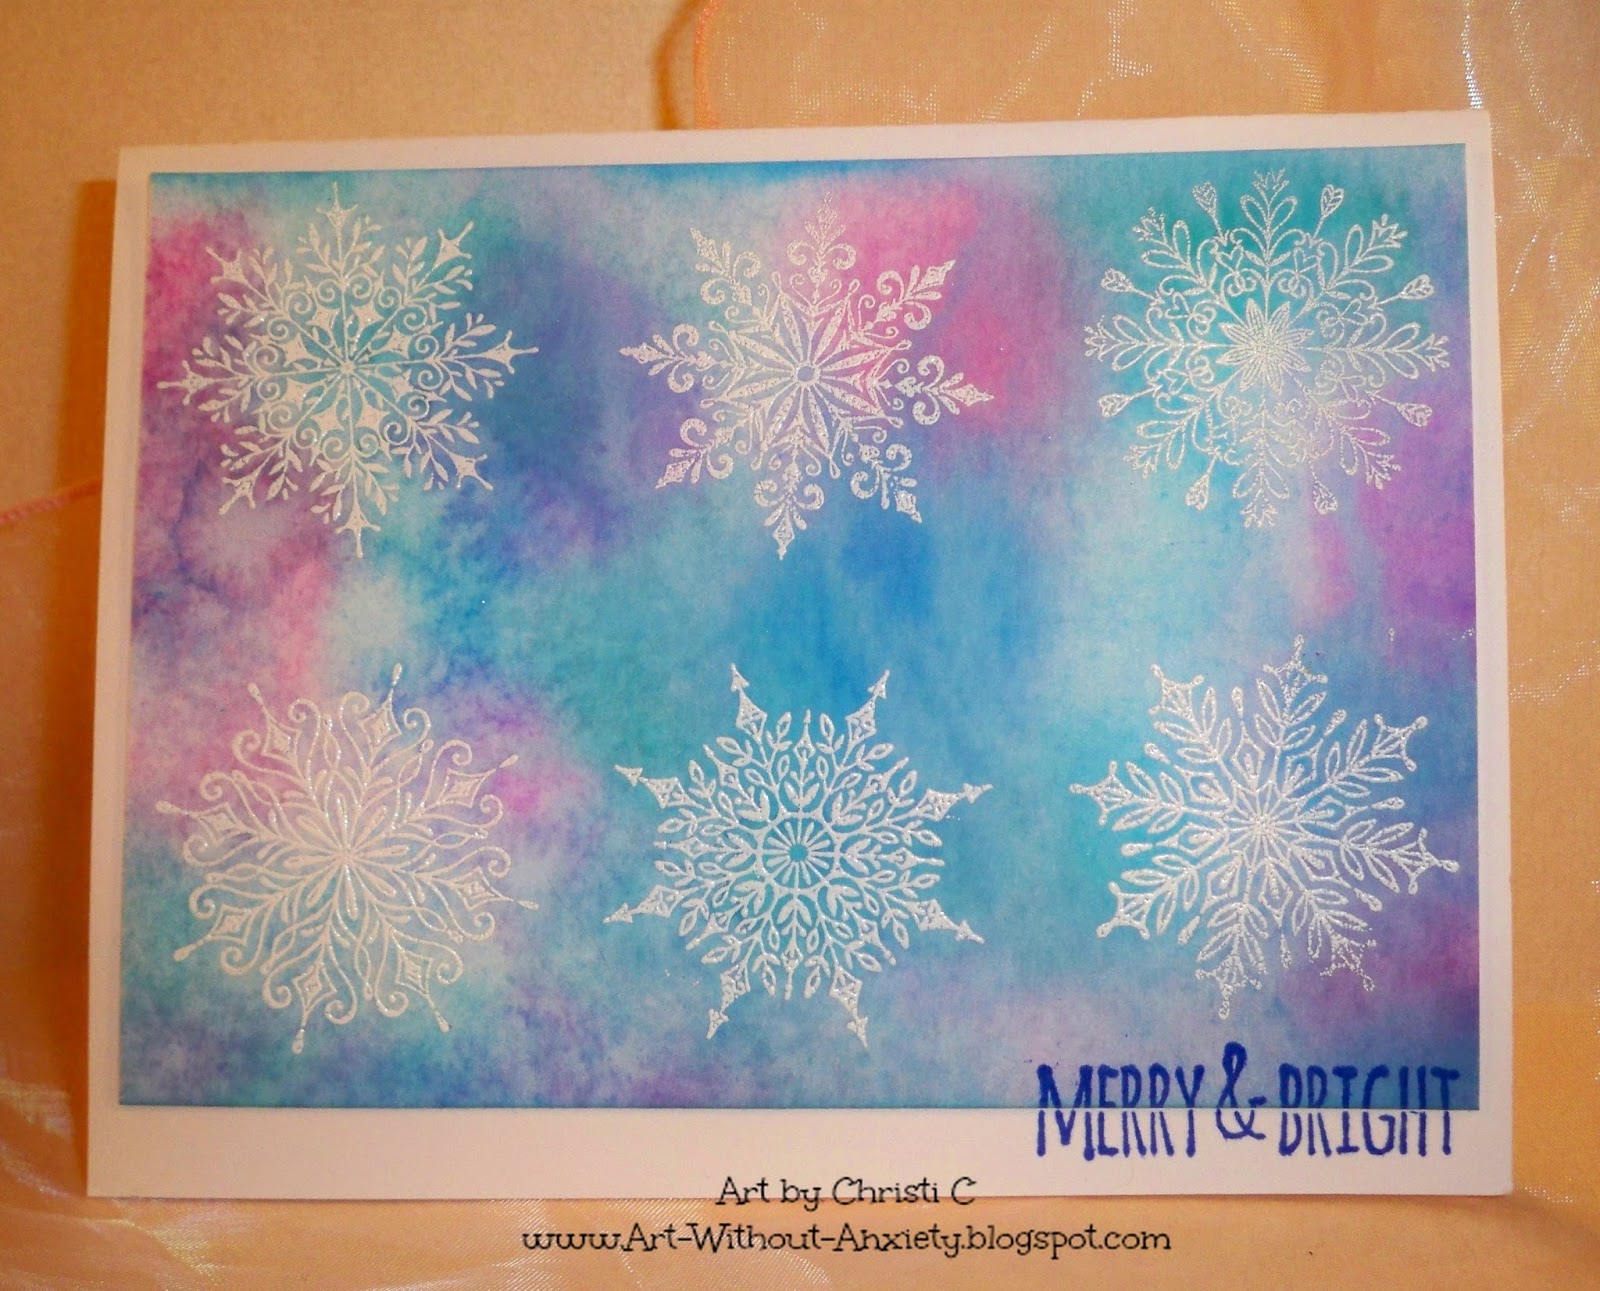
Hello everyone, I hope this post finds you and yours doing well.  I have a confession.  I'm am addicted to Oxide Inks.  I find myself designing cards around the inks, saying "how can I use them"?, "will they look good in this application"? - I'm just glad there are so many ways to use them and that the palette has SO many cool colors! These cards are a remake of an oldie but goodie technique.  There are numerous ways we used embossing powder and various inks and techniques on our cards; just do a google search on embossing powder techniques and you will find enough information to keep you busy for a while.  I honestly never put much stock in white embossing powder; it NEVER worked for me, always leaving white spots on my cardstock, but this year I decided to try it again.  I started using a quality embossing powder and it made all the difference!  Anyway, this card was SO easy to make, you get a twofer!  Enjoy!


What I Used to Make my Card:
White Card Base

Ranger/Tim Holtz Distress Watercolor Paper, half a sheet
Oxide Inks in Salty Ocean, Seedless Preserves, Peacock Feathers & Wilted Violet
Mini Swirly Snowflakes, CMS320
Sentiment from Scribbly Christmas, CMS249
Distress Ink in Blueprint Sketch
Simon Says Stamp White Embossing Powder, Fine
Embossing Ink
MISTI
Mini Blending Tool
Ranger Distress Sprayer

I used almost the whole half a sheet of the watercolor paper.  My first intention was to stamp the snowflakes randomly, but each of them are truly works of art on their own, so I just used the six smallest in the set.  I stamped all six on one end of the paper, with the help of my MISTI {watercolor paper sucks up ink so fast, I always re-stamp my image a few times}.  I turned the paper around and did the same thing on the other end.  There was about 3/4" to an inch of paper in the middle, between the two designs.  I proceeded to emboss all the flakes
Onefer :)
with the white embossing powder {and FYI, I have used clear embossing powder on another project and it just doesn't give me the crispness I like}.  Once my flakes were embossed and cooled, I went to town with the Oxides.


I smooshed, dotted and generally went nutty with the Oxides and my blending tool.  I spritzed water, mopped it up, inked, spritzed a gazillion times until I liked the colors.  Your white embossing may look a bit faded, but once the Oxides dry, your embossing will pop right out.  I trimmed each snowflake panel and adhered them to white card bases.  Lastly, I used Blueprint Sketch Distress Ink and the sentiment, which I stamped in the lower right hand corner.  

The freshness of the pastel colors and the pop of the white snowflakes really appeal to my sense of being festive.  I adore trying to make cards and such without using traditional holiday colors and I think these will brighten someone's day; essential once the weather causes those dreary wintry grey days.  Thank you so much for visiting and I hope your holiday season is fabulous! Christi

I am entering my Simple Snowflake Cards in the following challenges:
Moo-Mania - Christmas
Muse: Christmas Visions - Any Holiday Card
Stampavie - #296, Christmas 
Addicted to Stamps - #159, Christmas
Delicious Doodles - Christmas - Non-Traditional Colors
Just For Fun Rubber Stamps - Happy Everything!