Followers

Showing posts with label Gel Pens. Show all posts

Thursday, November 4, 2021

Happy Birthday!

 I can never have too many birthday cards in my stash and I was in a coloring mood so I pulled out some Mama Elephant stamps, some dies and my Zigs.  This is what I created:


What I Used to Make my Card:
White Mini Slimline Base
Watercolor Paper {I use this}
Zig 
Clean Color Brush Markers
Gina K Amalgam Ink Pad in Obsidian Ink
Mama Elephant The Birthday Bash Stamps
Mama Elephant The Birthday Bash Dies
Simon Says Stamp Happy Birthday Die, #SSD111778
Gel Pens
Purple Glitter Card

Once I had made the mini slimline card, I had stamped the stamp on watercolor paper, colored and cut the image out. I wanted the gifts to be the focal of this card so I colored the critters with some light colors; colored the gifts with some vibrant colors and the ribbons with sparkly gel pens.  I attached the image onto the card and proceeded to search for the perfect sentiment. I have quite a few sentiment dies and stamps but I always have to search for what I feel matches the tone of the card. In this case I wanted the sentiment to be happy, bright and fun so I chose the die and cut it out of purple glitter card.

It took me quite a while to color the card as I had to wait for each portion I water colored to dry before moving on to the next.  I can't even tell you how many things I have ruined by not having the patience to let the markers dry!  It is something I am trying to work on and it helps when I have more than one {maybe 5 or 6?} project going on so I don't lose my mojo and get bored.  I love all the sparkle in this card and I think it is the perfect birthday card!  Thanks for stopping by! Christi

I am entering my card in the following challenges:
Krafty Chicks, #584 - Stamp Act
Simon Says Stamp Wednesday Challenge - Thinking of You
Watercooler Wednesdays, #328 - All About Occasions
Critter Crazy Challenge, #56 - Featuring Critters
Dies R Us, #180 - Anything Goes w/ Dies
Simon Says Stamp Monday Challenge - Any Holiday Occasion
AAA Birthday Challenge, #31 - Animals
Inspiration Station, #17 - Animal Antics


Friday, June 4, 2021

Happy Father's Day!

Hey everyone!

I am SO glad you are visiting me as it is time to get your flow on and join us in the River of Creativity with any project depicting parent(s) and child(ren). My cats, who, whether they like it or not, are my children, were truly kind to me this Mother's Day and gifted me with some Harry & David dark chocolate truffles, my favorite in the world {so far, feel free to send me your favorite dark chocolate truffles and I will compare them for you.  I'm nice like that!} my roommate does have children but he sees the cats more than his human kids {especially since they live in another state} and Simon Says Stamp made THE perfect set for me to make him a Father's Day Card! So, here is my card!


What I Used to Make my Card:
White Square Card Base
Simon Says Stamp Happy Meowthers Day Stamps, #SSS202293C
Simon Says Stamp Happy Meowthers Day Dies, #SSSD112342C
Watercolor Paper {I use this}
Zig 
Clean Color Brush Markers
Gina K Amalgam Ink Pad in Obsidian Ink
Simon Says Stamp Black Embossing Powder
Red Glitter Card
Simon Says Stamp Chunky Hearts Panel, #SSSD112288
Gel Pens

What I did first for this card was stamp, cut and color all of the kitties.  Between the two of us, my roommate and I,  we have eight {yes, 8!} and I wanted them all on this card.  Granted these eight cats don't exactly look like our eight, I haven't figured out how to color a black cat without making it look like a black blob, but I am working on it! So, consider these cats as stand ins for the real ones. I wasn't planning on making a square card, but I couldn't fit all the cats on any other way. Once I got the placement of the cats down, I embossed the sentiment using black embossing powder. Then, I glued the cats in their positions.  I felt like the card needed a bit of color, so I die cut a heart using glitter red card and popped that, using dimensional dots between the second and third sentiment.  As per usual, I had enough cats left over that I actually made 2 cards, but I will be posting that one later. Now would be a purrfect time to subscribe to the River of Creativity blog so you don't miss a post; we are on Instagram {tag your projects with #riverofcreativity and/or #rocparentandchild02} AND Twitter at River of Creativity (RiverCreativity)!

I hope you consider joining us at the River of Creativity - we encourage any and all crafts and would love to see your interpretation of this months theme, Parent & Child.  There are a million ideas in my head on how to express this theme; maybe I will get crafty and make some more for the challenge! You have until the end of the month to join us so I hope to see you there! 

Fondly, 

Christi

I am entering my card in the following challenges:
SUYP Cat Challenge, #67 - Furrything Goes
CARDZ TV, #142 - Anything Goes
Scrapping 4 Fun, #193 - Male/FathersDay/Masculine
C.R.A.F.T. Challenge, #600 - Masculine
Little Red Wagon, #604 - Make it Masculine
Simon Says Stamp Wednesday Challenge - Masculine
Watercooler Wednesday, #317 - All Things Masculine
The Male Room, #151 - Dads & Granddads
Happy Little Stampers - June Watercolor Challenge


Thursday, May 20, 2021

Thinking of You

I have been collecting the Little Agenda Stamp & Die sets from Mama Elephant for a while now.  I have always had a soft spot in my heart for miniature things and these adorable little critters are just SO cute!  I actually made this card with various Little Agenda animals I had hanging around and the frame was one I had made a while back.  I hope you enjoy this card!


What I Used to Make my Card:
White Card Base
Grey Card with a subtle dot background {frame}
Darker Grey Card {sentiment}
Uniquely Creative Circle Cover Plate Die, #UCD1801
Mama Elephant Little Agenda Stamps & Dies, Monkey
Mama Elephant Little Agenda Stamps & Dies, Chickie
Mama Elephant Little Agenda Stamps & Dies, Cats
Mama Elephant Little Agenda Stamps & Dies, Dogs
Mama Elephant Little Agenda Stamps & Dies, Bunnies
Simon Says Stamp Thinking of You Die, #SSSD111927
Watercolor Paper {I use this}
Zig Clean Color Brush Markers
Gina K Amalgam Ink Pad in Obsidian Ink
Various Gel Pens
Derwent Inktense Pencils
Dimensional Dots

Like I said above, the critters were already stamped and colored.  I just added some gel pens for the accessories they are holding {they are tiny and I find it very difficult to watercolor in the items they are holding. Maybe someday when I learn how to use my Copic markers, I won't need to use gel pens!  But they do give a nice shine and bling to the images.}  Then I cut them out.  The frame was already attached to the card.  It had ripped while I was taking it out of the die but I still wanted to use it as I felt I could hide the rip somehow.  After I used dimensional dots to attach the critters to the card, I cut out the sentiment using darker gray card stock.  Lastly, I glued the sentiment onto the card, placed a glittery small heart I had {left over from another project} next to it, and I was finished.  I absolutely adore these Little Agenda sets and there are so many more for me to collect including little fairies, elves, reindeer, and more!

I hope you like my card!  I would love it if you'd consider following me on any of the social media sites where I am a part, including FaceBook. Feel free to let me know if you do decide to follow me and I will certainly return the favor. Thank you so much for visiting! Fondly, Christi

I am entering my card in the following challenges:
Simon Says Stamp Wednesday Challenge - Use Dies and/or Punches
Addicted to Stamps & More, #405 - Dies Cuts and/or Stencils
Simon Says Stamp Monday Challenge - Four Legged Friends
Sisterhood of Snarky Stampers, #185 - A is for Animals
TTCRD - Anything Goes
2 Crafty Critter Crazies, #50 - Anything Goes with a Critter {or 9!}

Friday, January 8, 2021

Happy New Year with Newton's Nook

I had made only a few cat cards for the holiday so when I discovered this set in my collection {yes, I had forgotten that I had it, have never used it and that also makes it a NBUS!}, I knew I had to put it to good use.  What better way to ring in the new year than with a cat AND champagne!


What I Used to Make my Card:
White Card Base
Watercolor Paper {I use this}
Zig Clean Color Brush Markers
Gina K Amalgam Ink Pad in Obsidian Ink
Newton’s Nook New Year Stamp set,#NN1811S05
Newton’s Nook New Year Die set, #NN1811D05
MME Joyful 6”x6” paper pad, #JYF109 {retired but available}
Dimensional Dots
Gel Pens

I started this card as I do almost all the others I make, by stamping the cat, coloring it in and then cutting it out.  I used a lot of gel pens on this design, I wanted some sparkle and I

Close up of Sparkle 
“dotted” a juicy gold gel pen to make it look like bubbles in the glasses and in the champagne exploding out of the bottle.  I pop dotted the kitty on a white panel, used some gold starred patterned paper for the top of the card, attached the white panel to the bottom of the card. 

 I am very pleased with the bubble effect, it came out better than I envisioned it.  I hope you like this card as much as I do; I think it conveys the fun and excitement that only a New Year can bring!  Thank you for taking the time to stop by and checking out my card! I hope you & yours have a fabulous New Year! Fondly, Christi

PS: Consider following me on Instagram - I am going to be having a fantastic giveaway for my Instagram followers only & you want to be a part of it, trust me! Thanks :)

I am entering my card into the following challenges:
NBUS, #22 - Stamp Set & Die have never been used :)
Moving Along with the Times, #126 - New
Simon Says Stamp Monday Challenge - Use a New or Unused Product
Make my Monday, #139 - Something New in Your Stash
Use Your Stuff, #413 - It's all about the New
Shopping our Stash, #436 - Use Something New
Simon Says Stamp Wednesday Challenge - Something New
Krafty Chicks, #541 - Stamp Act {must stamp}
Paperminutes, #673 - Happy New Year!
Creative Fingers, #199 - Anything Goes


Sunday, December 27, 2020

Merry Christmas or Yappy Wolfmas?

Mama Elephant is one of my favorite stamp companies; they make the cutest critters!  My very good friend loves dogs so I thought what is better card for her than one that features dogs doing all kinds of crazy things??


What I Used to Make my Card:
White Card Base
Light Blue Card
Navy Card
Mama Elephant Yappy Woofmas Stamp Set
Mama Elephant Yappy Woofmas Die Set
Lawn Fawn Snowfall Backdrop, Portrait, #LF1803
Mama Elephant Winter Forest Cover
Merry Christmas Script Die
Watercolor Paper {I use this}
Zig Clean Color Brush Markers
Gina K Amalgam Ink Pad in Obsidian Ink
Gel Pens

As always, I stamped, colored, and die cut all the dogs that I wanted to use in my scene.  Then I cut out the background; the snowfall out of light blue card and the forest out of white card and adhered them to the card.  I placed the critters in the scene where I wanted them and I was done!

Another Christmas card posted!  I feel I am making progress :) At least now the madness is over! Now we move on to the winter cards & New Years!! I for one cannot WAIT for this year to be over; to be fair, something happens every year that makes me yearn for the upcoming year, BUT this year was a doozy!!!  Hugs! Christi

I am entering my card in the following challenges:
Crafty Hazelnuts Christmas Challenge, #522 - Anything Goes, Christmas
Sweet Stampin' - Let it Snow
Crafters Castle - Anything Goes
Alphabet Challenge - S is for Snow Scene
C.R.A.F.T. Challenge, #581 - Christmas, the last stretch
Little Red Wagon, #581 - Merry Christmas

Saturday, December 26, 2020

Pastel Merry Catmas

I've had this idea rumbling around in my head for a while to create a card that can be used as a baby's first Christmas card.  You know I LOVE my cat craft stuff so it was a natural thing for me to reach for some kitties to help welcome a new baby.  By the way, I don't know anyone who is expecting or who has a new baby but I suspect I got inspired by the card I will show you below.

You can see the sparkle of the gel pens I used on the hats, presents, scarves and ornaments!


What I Used to Make my Card
White Card Base
Mama Elephant Oh Kitty Tree Stamp
Mama Elephant Oh Kitty Tree Die
Zig Clean Color Markers
Watercolor Paper {I use this}
Zig Clean Color Brush Markers
Gina K Amalgam Ink Pad in Obsidian Ink
Various Gel Pens 
Sue Wilson Australia Collection Background die, #CED8101 {retired but available}
MFT/Die-Namics Stitched Fishtail Sentiment Strips, #MFT-1123
Distress Ink in Hickory Smoke


Now that you have seen my card, let me show you the beautiful card I CASE'd.  While this card by Toni Maddox of Frankie Helps Craft was showcased on the Doodlebug Blog using Oh Penguin Tree.  I just switched it up a bit and used "Oh Kitty Tree."  I think it was the pastels that caught my eye - definitely a different color palette! 


So I colored the kitties in pastel colors, detailed them a bit with some gel pens, cut out the tree, and layered it onto the background die which was cut out of light purple paper.  I used light grey ink to stamp the sentiment (I didn't want your eye to go right to the sentiment, so I thought grey would be better than black) and die cut that using the fish tail strips.

I think the colors are a nice change from traditional Christmas colors and the card doesn't have to be for a baby's first Christmas, which is a good thing!  Thanks so much for stopping by. ~ Christi

I am entering my card in the following challenges:
SUYP, #61 - Anything "cat" Goes
Cardz TV #130 - Anything Goes
Colour Crazy Challenge, #50 - Anything Colored Goes
Winter Wonderland - End of Year Challenge, Anything Christmas Goes
Krafty Chicks, #539 - Any Occasion
Crimbo Crackers, #666 - Anything Christmas Goes
Watercooler Wednesday Challenge, #302 - Anything Goes
Die Cut Diva's - Anything Goes
The 12 Months of Christmas, #72 - Anything Christmas Goes
Crafty Gals Corner, #214 - 'Tis the Season
Simon Says Stamp Wednesday Challenge - Sparkle & Shine 


Thursday, December 24, 2020

Season's Tweetings!

First, let me wish all of you a 


I sincerely hope that you & yours have a wonderful holiday season!

When I saw this collaboration set from Lawn Fawn and Simon Says Stamp STAMPtember release, I knew I had to get it {and I am so glad I did!  It sold out in record time!} and then I knew I had to make a slimline card - so here it is :) 


What I Used to Make my Card:
Slimline Card Base
Watercolor Paper {I use this}
Zig Clean Color Brush Markers
Gina K Amalgam Ink Pad in Obsidian Ink
Lawn Fawn & Simon Says Stamp STAMPtember Season's Tweeting's Stamp Set {Sold Out}
Lawn Fawn & Simon Says Stamp STAMPtember Season's Tweeting's Die Set {Sold Out}
Lawn Fawn Cloud Stencil, #LF2250
Kat Scrappiness Never Ending Nesting Slimline Dies
Nuvo Crystal Drops in Morning Dew, #677N
Gel Pens
Glitter Card Stock

First thing I did was stamp, color, and cut out all the cute little birds.  As usual, I have plenty left over so I am sure they will be visiting again soon!   Then I stenciled on the clouds, and trimmed and stamped the string of lights.  After covering each light with the drops and waiting for it to dry, I placed the birds where I wanted them, glued them down, and stamped the sentiments onto the card.  I cut another panel of glitter card and adhered all of the layers together and onto the card.  I just have to ask, for those of you who blog or post how many times have you typed "slimeline" instead of "slimline"?  I've done it a gazillion times already!

This was the first time I had tried using the cloud stencil and I was surprised and pleased at how easy it was!  It's sad that the stamps and dies sold out so quickly, but the good news is there is a small set of Lawn Fawn's called Winter Sparrows that is still available around the web.  I thoroughly enjoyed working on this card and I hope you like it!  Posts are getting shorter now that that I am seriously trying to get all my cards and crafts posted.  I'm sure you don't mind as we are all feeling the crunch.  Happy, Healthy & Safe Holidays, Christi

I am entering my card in the following challenges:
2 Crafty Critter Crazies, #45 - Anything Goes with a Critter
Simon Says Stamp Monday Challenge - Celebrate!
Simon Says Stamp Wednesday Challenge - Sparkle & Shine
Crafter's Cafe - Holidays
Christmas with the Cuties, #45 - Anything Goes based on a Carol/Song
Bitten by the Bug - Die-lirious Holiday
Crafty Animals, #45 - Anything Goes w/ an Animal
Let's Craft & Create, #166 - Anything Goes
Merry Little Christmas - Anything Christmas Goes
The Card Concept - Picture of your Tree or Favorite Christmas Card 


Monday, December 21, 2020

Fa La La La Llama

This adorable set was a collaboration between Simon Says Stamp and Clearly Besotted; sadly it is no longer available so if you can find it, you should buy it!  While I was searching for information for this post, I looked for the set to see if I could find it, and if you decide to do the same, just know that some stampers are calling the set "Little Llama."  I couldn't find the set anywhere but maybe you will have better luck!  I jazzed up every llama on this card to make it extra special - I hope you like it!

What I Used to Make my Card:
White Card Base
Watercolor Paper {I use this}
Zig Clean Color Brush Markers
Gina K Amalgam Ink Pad in Obsidian Ink
Fa La La La Llama Stamp & Die Set {retired} 
Simon Says Stamp Fa La La La Die, #SSSD111767
DCWV Blue Noel 12" x 12" Paper Stack
Red Shimmer Paper from Stash
Gel Pens
Various Gems from Stash

As usual, I started this card by stamping, coloring, and cutting the llamas.  I used sparkle gel pens for the scarf and Santa hat, then used gems for the "bells" around one llama's neck and as earrings for the middle llama {I felt bad since there was nothing I could color in and use, so she had her ears pierced and was very brave.}  I used the Blue Noel paper, trimmed, to cover the white card, and also stamped and trimmed the sentiment.  For the Fa La La die I

Close up of the sparkle
used an old envelope made of shimmer paper I found in my stash; it was from a kit that I had gotten many years ago.  See, this is why we crafters save things!  You just never know!  I found the green snowflakes on my desk and have no idea what set or die was used.  

Right now my desk is a HUGE mess.  I like to pull out all the items pertaining to the season or holiday so I have all my winter, Christmas, and Valentine's Day stamps, dies, embellishments, and cat fur all over my desk.  This has caused me to rethink my storage method.  I have been storing my stamps and dies by company and, while that seems to be working for the companies I use all the time, it definitely causes me to forget some of the amazing products I have from the companies that I don't have as much.  So I inquired on Instagram how all of those talented stampers store their items and overwhelmingly they organize by season, holiday, or whatever other subject is important to that crafter.  So, I have decided that next month I am going to reorganize.  It isn't as big an undertaking as it sounds; I basically have all of my stamps and dies stored in plastic pouches, complete with a 5" x 7" magnet if applicable, and they all hang out in the refrigerator organizers that Jennifer McGuire uses {this link is from just one of her fabulous organizer posts; but it explains all the items she uses and has links to buy those exact items.}  However, I get all my supplies from Amazon and since she doesn't list magnets, here is where I buy mine.  I also use Dollar Tree bins {they are open bins with cut out handles; you can see the exact ones I use here} for my larger stamp sets, all of my word dies, and plastic cutting mats for my dividers.  I cut the mats into four sections and then label them.  Since you get two in each pack, a few can go a long way.  I also found them to be sturdy enough to keep everything apart but flexible enough that a cat can walk on it and not ruin it.  So, reorganizing really just means making some new dividers and, well, dividing.  

Wow, this post has turned out to be much longer than I anticipated!  I hope you and yours are happy and healthy and that your holiday plans are moving along smoothly!  I have a few gifts in the works and I am hoping to get them posted before the holiday, so why not take a second and follow me on any, or all, of the social media listed on the side bar. Thanks so much for stopping by & socially distanced hugs!  Christi

I am entering my card in the following challenges:
2 Crafty Critter Crazies, #45 - Anything Goes with a Critter
Simon Says Stamp Monday Challenge - Celebrate!
Crafty Animals, #45 - Anything Goes with an Animal
Crafty Calendar - Christmas Time
Die Cur Divas - Anything Goes
The Paper Funday Challenge - Anything Goes, TWIST: Christmas
Country View Challenges - Anything Christmas
Simon Says Stamp Wednesday Challenge - Christmas Critters

Monday, April 20, 2020

We Were Mermaid for Each Other

While this is an older Lawn Fawn set, it's brand new to me and what better time to break out an adorable mermaid couple than when we are all stuck together and maybe not feeling so loving towards those we are stuck with?  I dearly love my family, but things are starting to feel a bit. . . crowded.  I just keep telling myself this too shall pass :) 


What I used to Make my Card:
Navy Blue Card Base
Lawn Fawn Mermaid for You stamps, #LF1167
Lawn Fawn Mermaid for You dies, #LF1168
Pre-made Distress Oxides Ink Background {I always have a bunch of these around}
Various Hero Arts Inks
Watercolor Paper {I use this}
Ranger Archival Ink in Jet Black
Light Blue Card
Sakura Gelly Roll Silver Pen, Stardust
Scrap White Card

I had already made the background of the card; I find it very helpful to have a bunch of these backgrounds in various colors ready to make into a card at any time.  I find it very relaxing to play with the Distress Oxides.  I love the fact that you really can do no wrong with them.  If you don't like the way the colors blended or thought it would look different, you can always add more Oxides to the watercolor paper or use any number of shimmer sprays to liven it up.  I also keep all the scraps from my backgrounds {at least the ones that are 1/4" or bigger.}  You'd be surprised at how many uses come up between stamping a sentiment or weaving bits together.

Since my background was done, I moved on to the elements of the card.  I stamped, colored, and cut all the pieces, some on watercolor paper and some on plain scrap white.  For the images I stamped on the white scrap that didn't need to be colored, I used various Hero Arts inks.  The Oxide Ink background was
Another Look
glued onto a navy blue card, another scrap of white was glued inside so the giver would be able to write inside the card, and then all of the pieces were glued onto the front of the card.  I am by no means a talented color-er but looking back at my earlier creations, say last year and the year before, I'm happy to say I've gotten better, at least with water coloring.  I look at my cards from way back and I just cringe, but I try to look at how I've grown rather than focus on how bad I was.  I'm talking cards so bad they will never see the light of this blog.  I've also lost my irrational fear of alcohol ink markers which is handy since I am watching videos and reading tutorials on how to use them {one of my on going goals.}  How are you doing with your crafty goals?  Do you go back to your older cards and marvel at your progress?  You should!  Maybe I should make a page {or start a challenge!} for "The Cards We Made Way Back Then!"  Hope you enjoyed my post and I hope you come back and visit me soon!  Fondly, Christi


I am entering my card in the following challenges:
Simon Says Stamp Monday Challenge - Make a Scene 
Little Patch of Crafty Friends, #130 - Anything Goes
Three Muses - Something Fishy
Through the Purple Haze, #166 - Anything Goes
Cardz TV, #112 - Anything Goes
Alphabet Challenge Blog - A is for Anything Goes

Monday, February 25, 2019

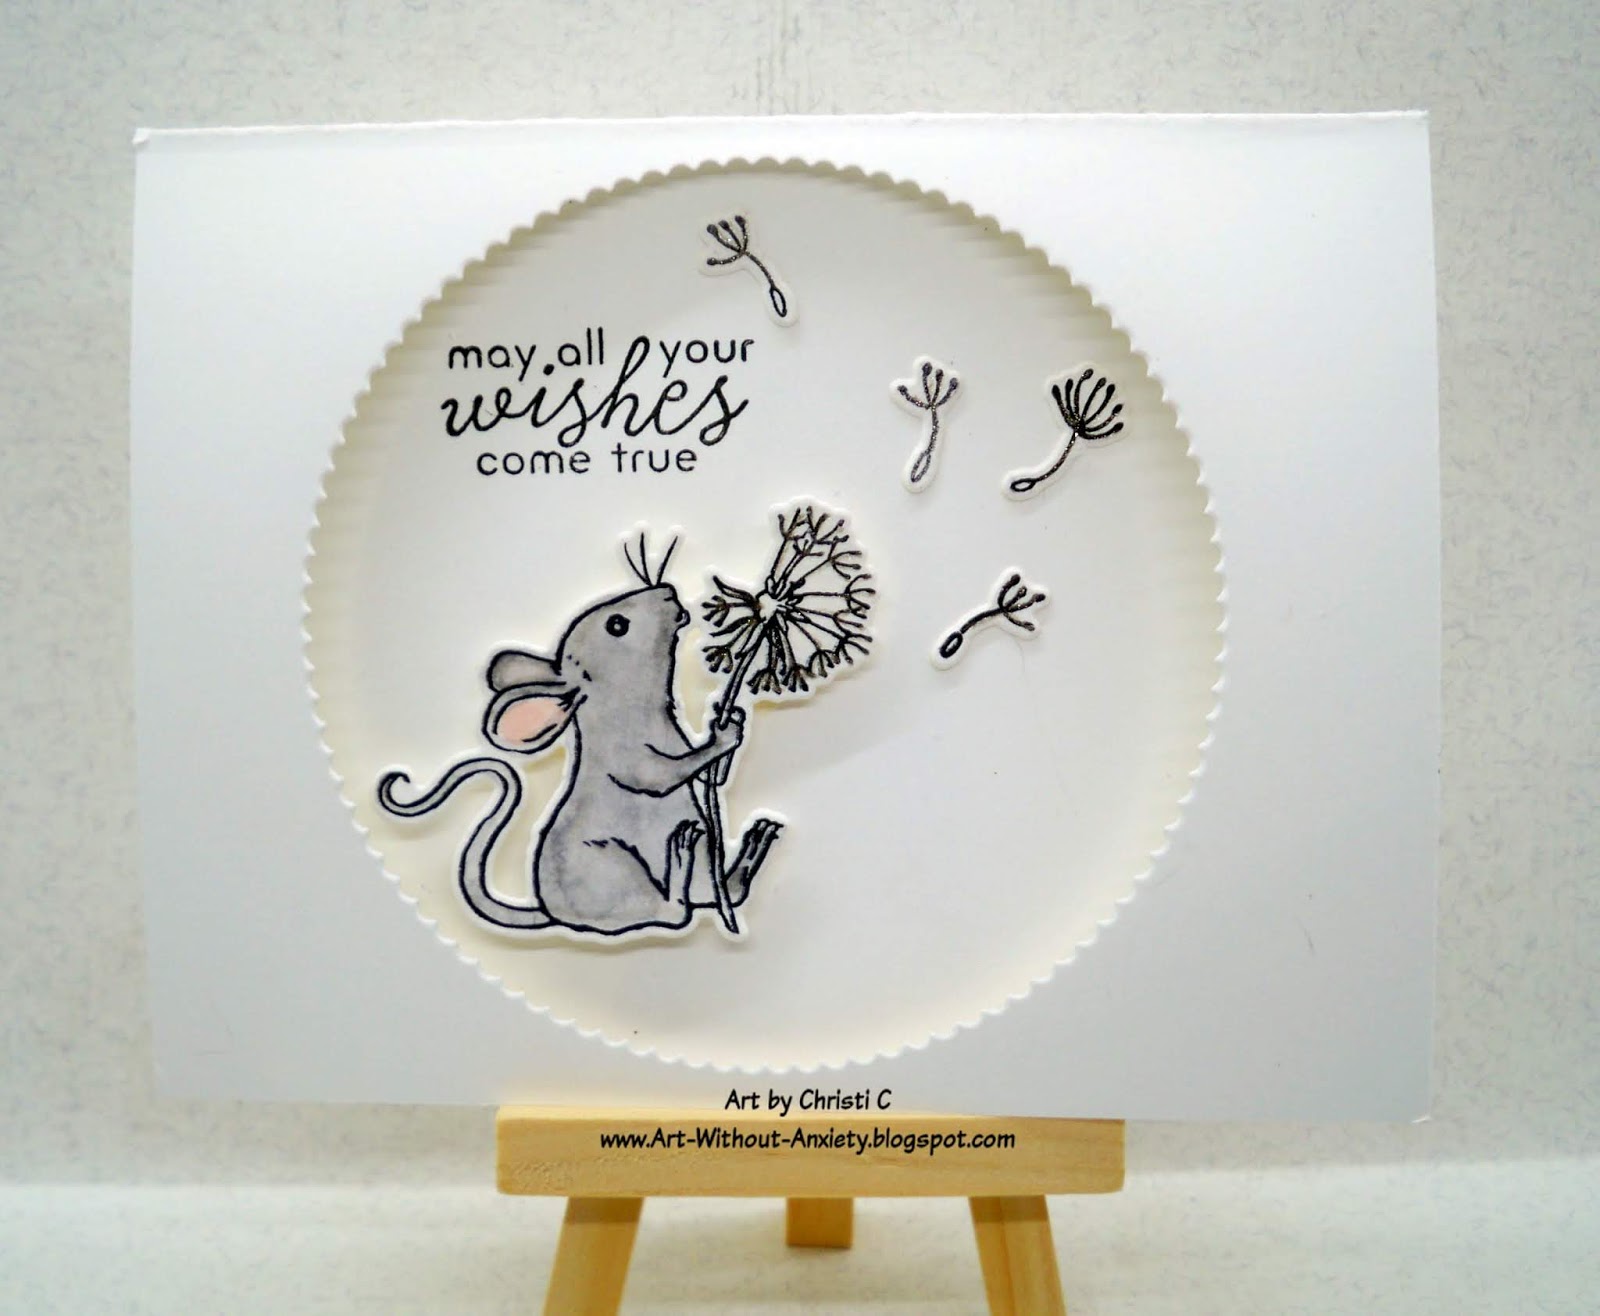
May All Your Wishes Come True - Hero Arts Kit

I've been lucky enough to be able to subscribe to what I think is hands down the BEST paper kit out there, My Monthly Hero by Hero Arts.  I've tried other kits and, while there is nothing wrong with them, the one thing I like best about My Monthly Hero is that they include dies in their kits.  Not too many kits give you stamps {and a FULL set of stamps, not just two or three individual stamps}, dies, paper - you can count on those each month.  In addition you might get some ink cubes, glitter, embossing powder, glimmer spray or lacquer, stickers, gel pens - basically if you want or need it for paper crafting, it's included.  Can you tell I'm a huge fan?  On top of ALL that, they release companion products; other stamps, dies, stencils and more!

Here is a cute, clean and simple card I made with the December 2018 kit:

What I Used to Make my Card:
White Card Base
Watercolor Paper {I use this}
Ranger Archival Ink in Jet Black
My Monthly Hero Kit, Hero Arts, January 2019
Tutti Designs Scalloped Stitched Nesting Dies, #TUTTI-419
Dimensional Dots
Sakura Gelly Roll Stardust Clear Glitter Pen {I got mine in the MHK December 2018}

This card was a cinch to make!  First, I stamped all of the elements on watercolor paper with the Jet Black ink, colored them, and once they fully dried, cut them out with the matching dies.  I took a plain, white, A2, card blank and cut out the scalloped circle for the front.  I mounted the mouse with dimensional dots and glued the little dandelion parachutes right onto the card.  Lastly, the sentiment was stamped.

That's it!  There isn't much room on the inside to write anything more than a small salutation, but you could always go on to the back of your card if need be.  

I'm following the dandelion craze of late {as my credit card can attest} and I'm gathering quite a few stamp sets but this is one of my absolute favorites.  I love how each piece of the dandelion has it's own die so you can add as many seed bearing, umbrella, feathery bristles as you want either by stamping directly or cutting them out.  I looked up what these little floating, feathery, parachute things are actually called and technically they are called a 'pappus,' which I never knew.  All I knew is my dad used to have a fit when I blew all the fuzzies off the dandelions!  Feel free to look it up yourself and check out all the different ways people describe them.  Now you can say you weren't wasting time online because you actually learned something!  I personally like "seed bearing parachutes" which was what one person called them.  

Well, I hope you enjoyed my card.  I truly appreciate each and every comment, and if you do leave one, please leave your personal blog address so I can stop by and oooh and ahhh over your creations!  Fondly, Christi

I am entering my cute little mouse card in the following challenges:
A Place to Start - M, Inspirational
613 Avenue - M, Anything Goes TWIST: Use an animal
Crazy for Challenges - #472, Show a Pet on your Card {while *I* don't own a mouse, I know people who have - and I had a hamper once, hope it counts!}
Cardz TV - Anything Goes
Creative Fingers - M, #158, Anything Goes
Creative Friday - #224, Use Only 3 Colors {Black, Gray & Pink}
Mod Squad Challenge - Only Name Brand clear/rubber stamps
Die Cuttin' Diva's - #408, Random Acts of Kindness
The Cat's Pajama's - #354, Furry Friends {graphic below}
Sparkles Monthly - M, #113, Include an Animal 


I just have to say it is so weird to enter these animal challenges with a MOUSE instead of a CAT {like I typically do!}  My furbabies forgive me though, I think they do. . .