Followers

Showing posts with label Embellishments. Show all posts

Thursday, April 16, 2020

Something a little different. . .

Hi all! I hope everyone is doing well & keeping busy.  I'm happy to say all the people in my life are doing well and I am crafting up a storm!  This card is a little different than what I normally create; I didn't use any ink or coloring on it.  I'd love to know what you think! Also, if you'd like to see the photos bigger, just click on it ~ thanks!


What I Used to Make my Card:
White Card Base

Pink, Lavender and Light Green Scrap Paper
Memory Box Springtime Tulips Die, #94216
Spellbinders Nestabilities Fancy Edges Circles, #S4-903 {available online}
Various Small Half Pearls in Green, Pink and Yellow


The very first thing I did for this card was I cut the Springtime Tulips out of
heavy duty white card. I had gotten a large bag of mixed colors of half backed pears and used the second to the smallest size on this {I repackaged the pearls and neglected to write down the sizes.} I started to stick the half pearls with a wax holder pencil; the type that has a small metal tube in the front and you pick up a bit of the wax and then your item and then place it on your substrate.  Well, I got SO frustrated that I could not continue and I searched for a solution. I even tried the actual "wax pencils," that you sharpen as a real pencil, that supposedly
work the same way but the "lead" is a sticky substance with no luck. I found all of those items while searching and most of them were in the Nail Art section - perhaps they'd work better if you were placing a gem onto wet nail polish?  Finally, I had read about the Marvy Uchida Jewel Picker - this thing is GREAT! I was never good using tweezers and I have no trouble using this product! You can buy the Jewel Picker with one tip or two tips {the one I used}.  I breezed through the rest of the design in no time!

Close Up of the Tulips
When the die was covered with the pearls I cut the background circle out of lavender paper, the leaves out of light green paper and the pink strip.  I assembled the card as you see in the pictures.  I honestly wasn't expecting the project to come out as well as it did; fighting with embellishments is one of my least favorite things to do! But I really liked how the half pearls fit perfectly on the tulip die and I am glad I persevered and finished the card.  I hope you enjoyed my small write up; I'd love to hear what you do with your embellishments that might be a little different.  Feel free to leave me a message letting me know you were here as well as a link back to your blog so I can leave you some love.  Fondly, Christi
Another Look

Outside The Box - Memory Box Die Challenge, April, Spring Fling
Crafty Gals Corner, #206 - Easter/Spring
Double D Challenges - Showers & Flowers 
Happy Little Stampers - Anything Goes with Dies 
Not Just Cards - April, Anything Goes
TTCRD - Anything Goes 
Shopping Our Stash, #418 - Happy Spring, Easter and/or Passover 
Make My Monday, #120 - Spring Flowers 
The Paper Girls, #197 - Florals 
Dragonfly Dreams - Add a Flower


Saturday, January 19, 2019

Happy 2019 with a2z Scrapbooking!

I am still in that holiday coma as I completely forgot I needed to have a post ready for the a2z Scrapbooking's January Challenge, which is the wonderful {and easy} theme of ANYTHING GOES! Thank goodness I had already made the card and only had to write up this post.  As you can see, I was really feeling the festivities and went a bit overboard on the embellishments and the bling, but hey, it's only once a year, right? And it was SO much fun to just go a bit crazy!


What I Used to Make my Card:
White Card Base {5" x 7"}
Grey Card
Black Card
Hero Arts Birthday Celebration, stamps, #CM123
Hero Arts Birthday Celebration, dies, #DI343
Spellbinders Filigree Numbers, #S6-141
Hero Arts Embossing Powder in Silver, Gold and Silver Sparkle
WOW! Embossing Powder in Silent Night, #WS101R
Hero Arts Intense Black Ink, #AF345
Gold Card
Couture Creations Embossing Folder, Chiaro, #723156 {available online}
Memory Box Happy Birthday die, #99684
Iridescent Plastic Dots, Mixed Colors and Sizes
Studio Katia Clear Round Dots, Mix 1, #SK2410

When I think of New Year's Eve, images of women in gowns, men in tuxedos, confetti, champagne, and classic elegance come to mind.  I wanted this card to convey some of that festive party mood so I used a classic palette of silver, gold, black, and gray.  I used a white 5" x 7" card base since I knew I wouldn't be able to fit all the elements I wanted to use on my usual A2 {5 1/2" x 4 1/4"} sized card.  I trimmed down the gray card and ran it through my Big Shot using an embossing folder that I didn't even remember I had!  I tend to keep the crafty items that I don't use that much in the back of whatever storage I have and this one was hiding.  Being a larger size than I typically use means I put the folder in the very back.  However, I think it helps the festive nature of the card and I'm glad I came across it.  Once the card was dry embossed, I glued it onto the base and stuck it under the tile to dry overnight.  I've had trouble getting intricate embossed paper to stick to the base so I knew if I loaded it up with glue and set it to dry overnight it would stick.
Another Look

Meanwhile, I stamped the balloons with embossing ink and embossed them with black, silver, gold embossing powder, and a little silver glitter powder, then I cut and set them aside.  I did the same with the balloon strings.  I stamped the drinks in black ink and die cut them as well.  I don't have many number dies and I bought these without having a project in mind, but I knew they'd come in handy and they did! I cut them out of gold card, sort of a dull gold.  Lastly, I had to decide what "happy" I wanted to use and eventually settled on one.  I didn't want the "happy" to be the focal point of the card so I chose a small one, cut it out of black card, and all of my elements were ready to go.

I added all the die cut pieces and then went a little crazy with some iridescent and clear dots.  I started wanting the bubbles to come up out of the glasses like champagne but that didn't work so well so I just put the dots anywhere and everywhere I wanted.  I think it makes the card a celebration all on it's own!  Thank you for reading my tutorial and I hope you join us at a2z Scrapbooking this month; after all, you can't win if you don't play and how can you not play when Anything Goes! Fondly, Christi

I am entering my Happy 2019 Card in the following Challenges:
2 Sisters on the Blog - Use Numbers
Dies R Us - Anything New {New Year! New Die!} Entry 2
Mix it Up - #21, Anything Goes w/ Sentiment as the Focus
Sparkles Forum - #112, New Year, New Stash {the stamps & dies are all new}
Tuesday Throwdown - #423, Embossing {I used dry & wet}
Crafty Gals Corner - #183, Make it Sparkle
A Blog Named Hero - M, Crafter's Choice

Sunday, June 24, 2018

Pets or Animals at Die Cut Diva's

Hello, fellow die lovers!  Have you entered the current challenge at Die Cut Diva's yet?  This month's challenge is Pets or Animals and we are sponsored by the fabulous Frantic Stamper!  They are offering an adorable prize, worth $20!


I decided to use a Frantic Stamper die that I already owned to make this card:

What I Used to Make my Card:
White Card Base
Pink Paper
Frantic Stamper Floral Frame & Hummingbirds, #FRA-DIE-10412
Oxide Inks
Impression Obsession Love Die, #DIE385-B
Wood Heart {you could use this one}
VersaMark Pad 
Hero Arts Pink Prisma Embossing Powder {from My Monthly Hero Kit, Jan. 2018. But any of these pink embossing powders would work}
3 mm Pink Crystals {I got these from online, looking at the Nail Art section!}

The first step to making this card was gathering all my pink, purple, and red Oxide Inks plus a piece of watercolor paper to make the floral frame.  I just worked the colors until I was happy; layering them, spritzing them, adding more color, subtracting color, and I didn't write down the colors I used.  If you have any Oxide inks then you are familiar with the process - if you don't have any Oxide inks, what are you waiting for?!?  Once the paper was fully dry {this is very important - it is disastrous trying to die cut wet, or even slightly damp, paper - trust me!}, I cut out the frame.

Then I cut the hummingbirds out of white card and attached little pink gems for their eyes {as I said above, I got these from the Nail Art Supply section of an online retailer - I got 10 different colors, all divided up in a container similar to a weekly medicine holder, for less than $5!} and set them aside to dry.  

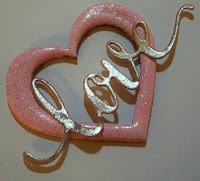
Meanwhile, I chose a wooden heart from my stash and began embossing it with VersaMark ink and pink embossing powder.  I think I embossed it at least 10 times; I didn't want any of the wood to show through.  I actually worked on the
heart for two days, obviously taking many breaks along the way.  I had a scrap piece of paper floating around on my desk from this project and, frankly, I was at the point where it needed to be used or thrown out.  I was pleasantly surprised to see that the shimmer on the scrap matched the shimmer on the heart really well.  So I cut the word love from that paper and attached it {draped it?} over my wooden heart.  The heart was glued onto the card, as were the hummingbirds and there you have it!

Looking at this write up it makes it appear that there was a lot of work involved making this card, but the construction went smoothly and it didn't seem as labor intensive as this tutorial sounds.  I wanted to stretch myself and NOT use cats on the card - trust me, they are my go-to, as many of you may know - and it was fun to think outside the litter box!  I hope you can find some time to enter the Pets or Animals challenge at Die Cut Diva's because you can't win if you don't play!  Fondly, Christi

I am entering my Floral Hummingbirds Card in the following challenges:
Die Cuttin' Divas - #374, Heat Embossing 
Shopping Our Stash - #359, She's a Crafting Machine {used Big Shot & Heat Gun}
Back to Basics - #5, Heat Embossing
Sunny Day Crafting - #25, Any Animal 
Happy Little Stampers - (M) Anything Goes with Dies

Tuesday, October 3, 2017

Join the Monster Mash at Stinkin' Inkers!

The challenge this month at Stinkin' Inkers is "Monster Mash" - you can use ghosts, monsters, or witches; basically anything Halloween-y and/or scary.  I had decided to throw a costume party with the help of Tim Holtz' Crazy Cats, Dogs and Birds.  I hope you enjoy! 


What I Used to Make my Card:

Vanilla Watercolor Card, 5 x 7 (this was the only size card onto which everything would fit and I have NO idea where I got them)
Tim Holtz Crazy Cats Stamps, #CMS251
Tim Holtz/Sizzix Crazy Cats Dies, #661209
Tim Holtz Bird Crazy Stamps, #CMS212
Tim Holtz/Sizzix Bird Crazy Dies, #660954
Tim Holtz Crazy Things Stamps, #CMS237
Tim Holtz/Sizzix Crazy Things Dies, #660953
Tim Holtz Mini Cats & Dogs Stamps, #CMS272
Tim Holtz/Sizzix Mini Cats & Dogs Dies, #661594
Tim Holtz Mini Bird Crazy & Things Stamps, #CMS250
Tim Holtz/Sizzix Bird Crazy & Things Dies, #660949
Happy Halloween Sticker from Stamp on It #DD7256
Hero Arts My Monthly Kit, April 2017 #HeroArts 
Red and Black Cardstock
Derwent Intense Pencils
Kuretake Zig Clean Color Markers
Watercolor Brush
Dove Blender Pen

Various Embellishments: Washi Tape, Sequins, Glitter, Bling on a Roll, Various Gems, Fabric Roses, and more.

I began by coloring and die cutting all the animals I wanted to use.  I have
Ms. Cat and
Little Tongue Out Dog
found that once my colored pencil dries it sometimes isn't as vibrant as I'd like, so I embellish the coloring further with the markers.  Sometimes it works out, sometimes not, but it is always fun!


There were a few "alterations" I had to do to make the costumes fit properly  First, Ms. Cat needed her front paws cut out again so they could be glued on the outside of her gown.  You couldn't see them otherwise.  And Diva Pink Bird also needed a new pair of wings to go over her sash.  
Diva Pink Bird and Slightly
Confused Dog


Now, there is a little story about this card.  Ms. Cat wanted to have a costume party for the neighborhood children so she invited Little Tongue Out Dog, Shy Orange Cat, Diva Pink Bird and Slightly Confused Small Dog. All of the invitees did a fabulous job with their costumes, as did Ms. Cat (she chose to wear a red dress made from the April 2017 collection of the House of Hero Arts and topped off the outfit with Silver/Silver Bling on a Roll earrings and choker, just be her glamorous self.)  Little Tongue Out Dog dressed himself up as a rose garden , using actual fabric roses as a headpiece  

The Crew
and an entire body rose.  Shy Orange Cat added bat wings to herself so if she felt nervous, she could just fly away.  Diva Pink Bird showed off her most recent pageant win, complete with glittery crown and sash.  If you look close, you can even see the sparkle in her eye.  Lastly, Slightly Confused Little Dog put on her star collar and witch hat that she customized by adding a matching star to the tip of the hat.  All of the kittens and puppies ate their fill of treats (no chocolate!) and had a grand time.  I hope you did, too! 

Another Look
I do hope you will join us this month at Stinkin' Inkers - I KNOW you are making Halloween cards, so you really have NO excuse not to join in the fun!  Thanks for visiting, and if you would, comment below on which costume you like the best.  If I get enough votes, I might give out a treat of my own, so please feel free to share this post! You don't need to follow my blog, but it is greatly appreciated (let me know in your comment so I can be sure to follow you back!)

** UPDATE: When I get 75 comments telling me which costume you like the best I will be doing a random drawing for a little prize. Open internationally! Please spread the word! (expires November 1, 2017)

I'd love to see your Monster Mash creations, so please join us at Stinkin' Inkers! Stay tuned for some more frightening fun Halloween creations! Hugs, Christi

I am entering my Monster Mash card in the following challenges:
Simon Says Stamp Monday Challenge - A Walk on the Dark Side
Naughty or Nice Challenge - #44, Something Spooky
Frilly & Funky - Show Us Your Stamps 
Scrapy Land - #75, Anything Goes 
Double D Challenge - Fright Night Challenge
Creative Friday - #189, Die Cuts/Punches
2 Crafty Critter Crazies - #7, Anything Goes w/ a Critter

Saturday, November 1, 2014

Happy Halloween ATCs


I love Halloween and I started getting in the mood a few weeks ago.  I broke out my Halloween cardstock and embellishments and started making these Artist Trading Cards.  To create for the love of creating is so much fun!

I didn’t intend on making so many ATCs, but once I got started, I couldn’t stop.  I actually have a few more I made, but I had to cull the field or we’d be here until winter reading it all.  I typically make a list of the items I used when I create something but this time I used so many different items, from bits of paper, sequins, Dresden, stickers and embellishments from years past, there really was no way I could think of to make the list.  However, each ATC is actually built off a blank playing card that I did purchase ages ago at Silver Crow Creations, they still sell them, 60 to a pack – if you are interested, click here (you should go and check out the store anyway – they have amazing goodies!).  So, no list for the ATCs but all the pictures I used are either from my stash (I used actual photos and scanned them) or found online.  But, if you spot one that you really like and just have to know where I got the items from, just ask in the comments section below and I will do my best to answer.  Since the captions may be difficult to read I am going to type them out for you, along with a little bit behind the creation of the ATC if warranted.  On with the show!


The first card I called “Sisters”.  The caption reads, “Abigail always knew Lenora was a bit different”. Personally, I think her hat gives it away.

The second card I called “Trick or Treat”.  It reads, “He thought it was a treat, but it was a trick”.  I envision a jealous female (the green hearts = jealousy) giving her sweetheart a taste of some special brew.

Then we have the card called “The Baby”.  The caption reads “There was something strange about the baby”.  It’s really hard to see, but the darling infant has red eyes and all those ghosts flying about. It’s easy to see why someone would think there is something strange!

“Boo-tiful” is just a fun card.  I think the two women in this picture are best friends and always dress alike for Halloween. The picture is raised to give the card some dimension.

For the fifth card, the one I call “Coven” is about a group of women, meeting for what looks like a picnic. They are dressed so formally compared to what I would wear to a picnic! The sentiment reads “The Coven met promptly at 8PM.  Once all the women arrived, the fun began”.


The next card is called “Bat Girl” (and that is what the caption reads) and I found her image online somewhere.  The big bat is a cut out that I made on my Silhouette Cameo that didn’t some out right, so I used it on this card.  I like her costume; it actually looks like something I'd wear!


“Witch” is the title of the next card.  I like the kookiness of the glasses and that hat! She is a very stylish witch.  The bat on the very bottom is from Tim Holtz’ Mover & Shaker Die Set.

 Lastly, we have the Prince of Horror, Edgar Allen Poe.  I had the background of this ATC made for ages, it’s actually a really pretty silver fabric paper (for lack of a better term) and I framed him with an old Dresden frame.  I didn’t think he needed any words.

So there are my eight little ATCs that I made.  I hadn’t made any in such a long time I truly forgot how much fun they are!  And they use up so many tiny scraps of paper and embellishments.  I have now designated a small container that I keep on my desk just for little snippets of stuff too good to throw out but too small to use on a card so I can toss in anything I may use later.   I hope you enjoyed my ATCs, and my humor. I'm curious to know, which one was your favorite? Let me know in the comments, please! I sincerely hope everyone had a fang-tastic Halloween ~ Christi

A am entering my ATC's (all to be considered one project, or entry) in the following challenges:
Artistic Inspirations Challenge Blog - #115, Anything Goes, Spooky
Simon Says Stamp Wednesday Challenge - Anything Goes
Wicked Wednesday ATC Challenge -Things that go Bump in the Night
Pixie's Snippets Playground - week 149 (I used snippets on almost every one of these)
Open Minded Crafting Fun - #22,  Halloween and/or Dress up
Left of Center Challenges -  #52, Happy Halloween
Haunted Design House - Week 2 of  Hellacious Halloween

Psst! What list do you use to check for challenges you'd like to enter? I use Challenges for Days & I highly recommend that you do too! Take a peek at the daily lists and don't forget to bookmark the page!