Followers

Showing posts with label My Monthly Hero. Show all posts

Thursday, October 28, 2021

CLBH Birthday Whiskers {DAY 4}

 I have been fortunate enough to be able to subscribe to the Hero Arts Kit of the Month club once again and this card was born from the June 2021 kit.  I made it so I could use it for the Cat Lovers Blog Hop, something a little brighter than all the Halloween makes! 
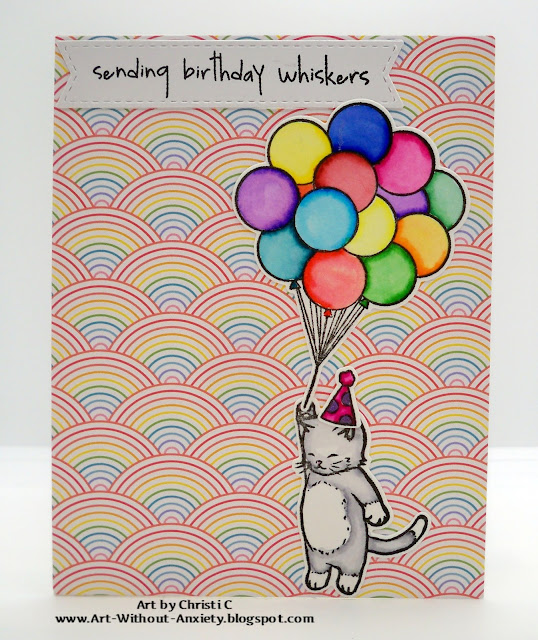

I started the card, as always, by stamping, coloring and cutting out the cat and the balloons.  I used the Gina K ink pad and Zig Clean Color Markers to stamp & color.  I got the background paper free from a Lawn Fawn order and I felt it matched with the happy vibe of the card so I trimmed it down to size used it to cover the white card. The sentiment was stamped on white card and die cut using the fishtailed banner.  A small bit of gel pen was used to color the dots on the birthday hat, and everything was glued onto the card.

Thanks for stopping by & stay turned for more Cat Lovers Blog Hop cards! Til next time, Christi 

I am entering my card in the following Challenges:
The Cat Lovers Blog Hop - Day 4
Simon Says Stamp Wednesday Challenge - Anything Goes (entry 2)
Crafty Hazelnut's Patterned Paper Challenge - Anything Goes w/ Patterned Paper
NBUS, #31 - First Time Using the Stamp Set (entry 2)
Seize the Birthday, #226 - Always Anything Birthday Goes
Day of the Month Card Club, #32 - It's My Party Day
SUYP Challenge, #71 - Anything Goes w/ a cat :)


Tuesday, April 6, 2021

Party Like it's 1922!

I have been a fan of Hero Arts since I started stamping and when they came out with their My Monthly Hero kit I HAD to subscribe!! I've been crafting for a long time and the value of these kits amazes me every month!  With moving {again!} and helping my friend pack his home and prepare for his move cross country, plus all the fun things life throws at you {like needing a new car and a kitty with tooth issues!} I haven't been able to play with the kits as much as I'd like to, but I did manage to make a cool retro card with the kit from February {the stencil in this kit is calling my name!} I think this card is especially relevant since we have all been inside all winter and now it's getting warmer; puts me in the mood to PAR TAY! 


What I Used to Make my Card:
White Card Base
Black Cardstock
Gold Card
Hero Arts My Monthly Hero Kit, February 2019
Hero Arts Gold Embossing Powder, #PW100
Wink of Stella Clear
Die-Namics Stitched Fishtail Sentiment Strips
Krylon Gold Leafing Pen
Dimensional Dots

I glued the sized, black card to the base, then attached the background piece which I cut out of gold card.  I kept the largest piece from the background cut and glued that back into the center of the card.  The dancers were embossed with the gold embossing powder, as was the sentiment on the banner.  I cut the banner and dancers and attached them to the card, using dimensional dots for the banner.  It was then I decided to add some sparkle with the Wink of Stella pen in clear.  

I learned something - don't start with an old pen and finish with a new pen! The difference between the sparkle was very evident, so I went over the spaces with the new pen.  Honestly, it would have been easier if I had gone over the black panel before putting the background die cut on, but I rarely do things the easy way!  When inspiration strikes, you need to listen!  I also decided to lightly edge the banner in gold after it was attached to the card - not the brightest move, but it came out better than expected.  Leafing pens used to be all the rage and that is what we used to use to make alcohol ink backgrounds {called Polished Stone back in the day} before companies released all the cool mix ins formulated specially for alcohol inks.  The pens can be costly, I've seen them up to $10 apiece {I've also seen them for under $6}, but they last such a very long time I feel they are worth the price.  Plus, I use them for other things than just art - I've used my silver leafing pen to touch up jewellery {the leafing pen is duller than polished silver, but I've put clear coat on the touched up spots and it blends in fine} and many other uses that escape me at the moment.  

Anyway, this card is so festive and while it is traditionally a birthday card, I think I could send it out to anyone needing a lift.  I hope you like it as much as I do!  Are you on social media?  I am and I would love it of you'd give me a follow.  If you do decide to subscribe to me, please leave me a comment so I can return the favor!  Thanks so much for reading,and have a fabulous day!  Fondly, Christi
 
I am entering my card in the following challenges:
TTCRD - Anything Goes
Pammie's Inky Pinkies, #2114 - Anything Goes
Simon Says Stamp Monday Challenge - Layer It
A Place to Start, #4 - Anything Goes & Make it Elegant
Crazy for Challenges, #578 - Party Themed Card

Thanks for reading all of this and stay safe & healthy!!

Tuesday, March 12, 2019

Hello

Hello, crafty people!  Today I am sharing a card I made using a layering color set by Hero Arts.  They have so many new sets out now with the new catalog; I'm just waiting to get my new goodies!  Have you seen the new catalog yet? You can check it out by clicking this link HERE.  For this card I used a set that's been around for a bit, read on for more information. 


What I Used to Make my Card:
White Card Base
Purple Panel
White Card {panel and scrap}
Hero Arts Color Layering Nasturtium stamp set, # CM266
Hero Arts Color Layering Nasturtium die set, # DI472
Hero Arts Inks in Passion Flower, Amethyst, Mint Julep, Moss and Lavender
Hero Arts Hello Stamp & Cut set, #DC151
Dimensional Dots

For this type of set having a stamp positioner is invaluable, regardless of the type.  I used my Tim Holtz platform and stamped the flower onto white card using passion flower ink and then filled in the details using amethyst.  Then I stamped the leaves beginning with mint julep ink and detailing with moss ink.  One of the wonderful things about this particular set is you don't have to align the stamps perfectly. I can never seem to get them lined up properly, even though the stamps are clear and I use my platform.  But it sure beats when I used to stamp using Stampin' Up! two step stamping!  Those stamps were wood mounted and it was literally a hit or miss if I got them even close!  Do you have any tricks that you use when layering stamps?  I'd love to hear them!  All of the inks I've used I've gotten from the My Monthly Hero kits; I've checked out a LOT of subscription services and I think that My Monthly Hero is by far the best deal out there! {I get no compensation from saying this; I just think it's true!}

I then stamped "hello" right onto the white card panel, stamped the butterfly using lavender and amethyst inks, and cut it out.  I wasn't going to use the butterfly but I got a spot on the card that needed to be covered up and the butterfly ended up being handy!  Just to add a bit of interest, I mounted the butterfly on a dimensional dot.  Lastly, the white panel was adhered to the purple card, then the purple card was trimmed and mounted onto the white card base.  To me this card just screams spring and, since we have had more snow now than in years, I am longing for some warmer weather!  I hope you enjoyed my card and I'd love it if you'd become a follower - I am on almost every social media except YouTube {I just can't make a good video yet!} and which ever you choose, let me know in the comments so I can follow you back.  Have a GREAT day. ~Fondly, Christi

I am entering my card in the following challenges:
Shopping our Stash - #391, Celebrating Friendship
Unicorn Challenge - M, #41, Spring
Simon Says Stamp Monday Challenge - Feminine/Girly
Creativ Fusion Arts & Crafts - M, Spring
Crazy4Challenges - #474, Flowers
CARDZ TV - #84, Anything Goes
Cut it Up! - #169, Hello Spring!
Craft Rocket Challenges - #57, Flowers
The Flower Challenge -#30, Anything Goes


Monday, February 25, 2019

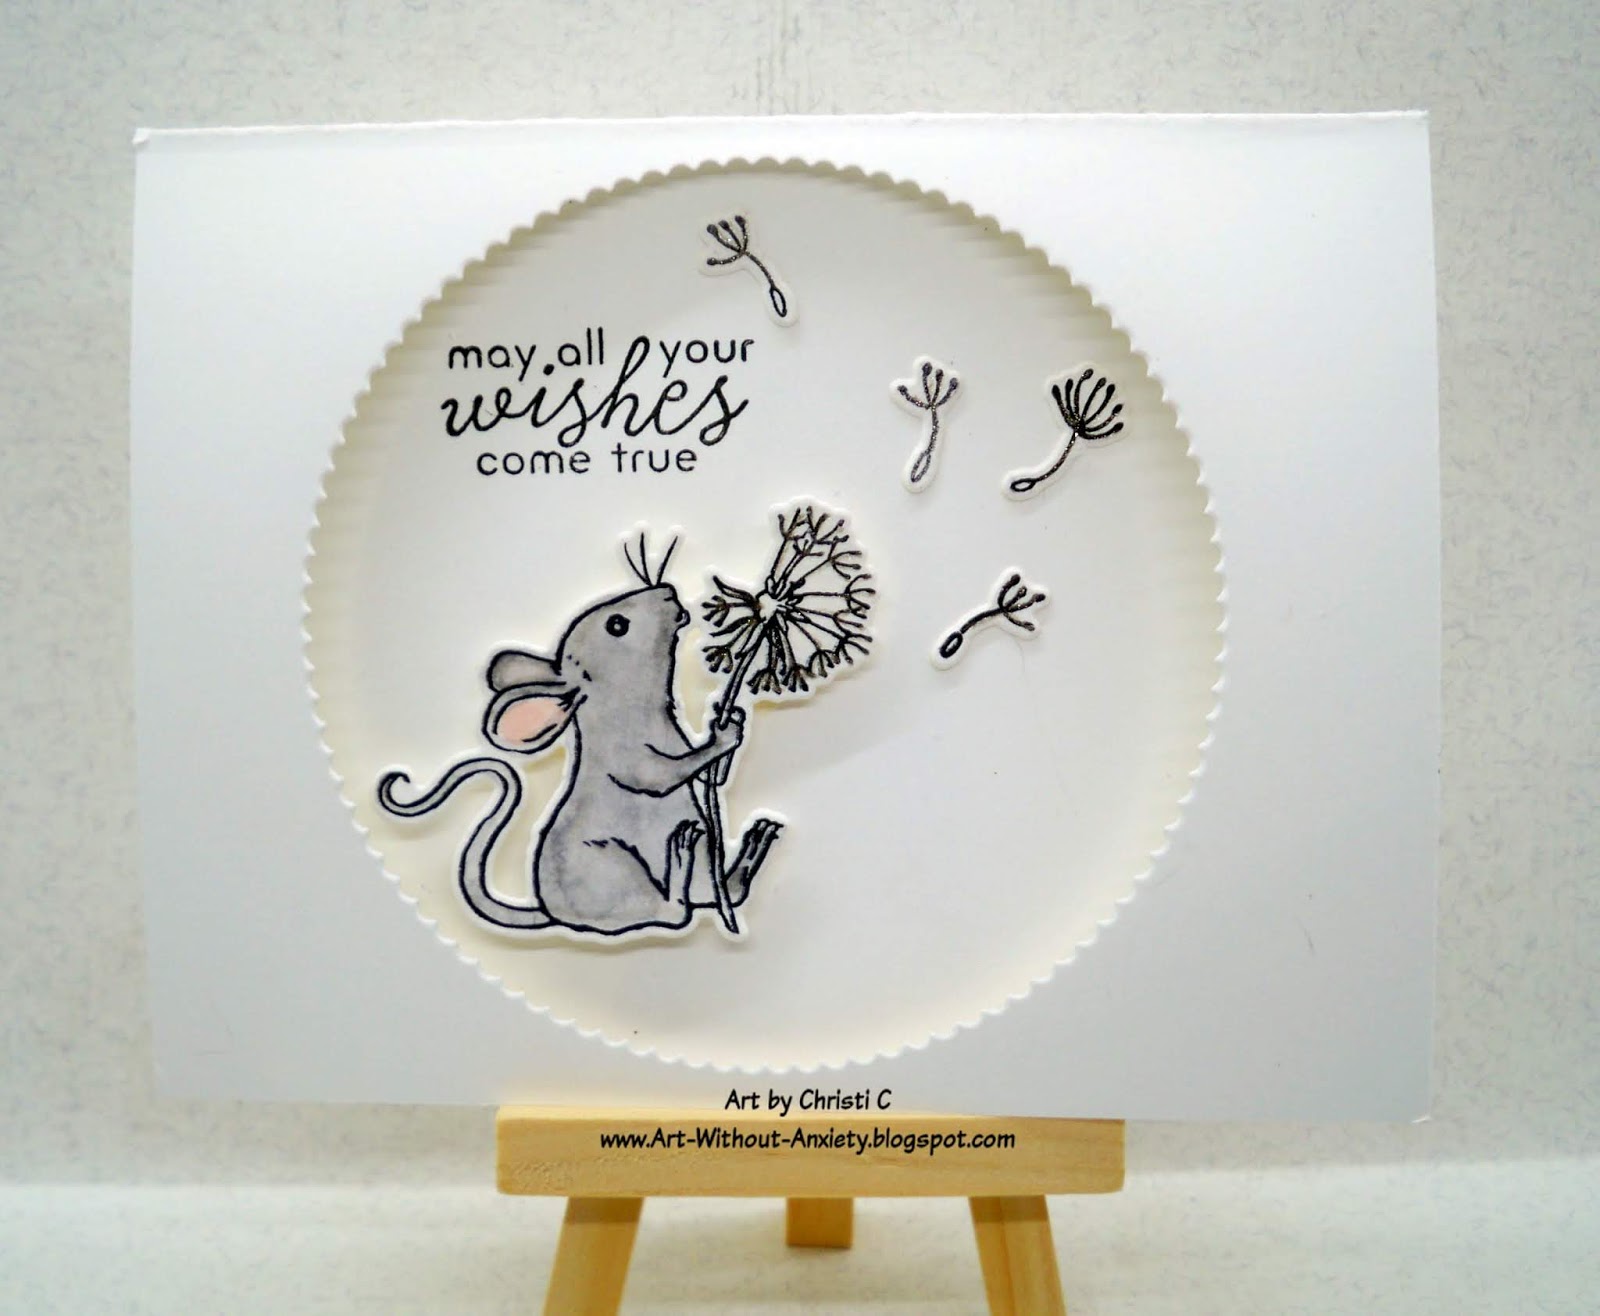
May All Your Wishes Come True - Hero Arts Kit

I've been lucky enough to be able to subscribe to what I think is hands down the BEST paper kit out there, My Monthly Hero by Hero Arts.  I've tried other kits and, while there is nothing wrong with them, the one thing I like best about My Monthly Hero is that they include dies in their kits.  Not too many kits give you stamps {and a FULL set of stamps, not just two or three individual stamps}, dies, paper - you can count on those each month.  In addition you might get some ink cubes, glitter, embossing powder, glimmer spray or lacquer, stickers, gel pens - basically if you want or need it for paper crafting, it's included.  Can you tell I'm a huge fan?  On top of ALL that, they release companion products; other stamps, dies, stencils and more!

Here is a cute, clean and simple card I made with the December 2018 kit:

What I Used to Make my Card:
White Card Base
Watercolor Paper {I use this}
Ranger Archival Ink in Jet Black
My Monthly Hero Kit, Hero Arts, January 2019
Tutti Designs Scalloped Stitched Nesting Dies, #TUTTI-419
Dimensional Dots
Sakura Gelly Roll Stardust Clear Glitter Pen {I got mine in the MHK December 2018}

This card was a cinch to make!  First, I stamped all of the elements on watercolor paper with the Jet Black ink, colored them, and once they fully dried, cut them out with the matching dies.  I took a plain, white, A2, card blank and cut out the scalloped circle for the front.  I mounted the mouse with dimensional dots and glued the little dandelion parachutes right onto the card.  Lastly, the sentiment was stamped.

That's it!  There isn't much room on the inside to write anything more than a small salutation, but you could always go on to the back of your card if need be.  

I'm following the dandelion craze of late {as my credit card can attest} and I'm gathering quite a few stamp sets but this is one of my absolute favorites.  I love how each piece of the dandelion has it's own die so you can add as many seed bearing, umbrella, feathery bristles as you want either by stamping directly or cutting them out.  I looked up what these little floating, feathery, parachute things are actually called and technically they are called a 'pappus,' which I never knew.  All I knew is my dad used to have a fit when I blew all the fuzzies off the dandelions!  Feel free to look it up yourself and check out all the different ways people describe them.  Now you can say you weren't wasting time online because you actually learned something!  I personally like "seed bearing parachutes" which was what one person called them.  

Well, I hope you enjoyed my card.  I truly appreciate each and every comment, and if you do leave one, please leave your personal blog address so I can stop by and oooh and ahhh over your creations!  Fondly, Christi

I am entering my cute little mouse card in the following challenges:
A Place to Start - M, Inspirational
613 Avenue - M, Anything Goes TWIST: Use an animal
Crazy for Challenges - #472, Show a Pet on your Card {while *I* don't own a mouse, I know people who have - and I had a hamper once, hope it counts!}
Cardz TV - Anything Goes
Creative Fingers - M, #158, Anything Goes
Creative Friday - #224, Use Only 3 Colors {Black, Gray & Pink}
Mod Squad Challenge - Only Name Brand clear/rubber stamps
Die Cuttin' Diva's - #408, Random Acts of Kindness
The Cat's Pajama's - #354, Furry Friends {graphic below}
Sparkles Monthly - M, #113, Include an Animal 


I just have to say it is so weird to enter these animal challenges with a MOUSE instead of a CAT {like I typically do!}  My furbabies forgive me though, I think they do. . .  

Saturday, October 13, 2018

Sending Hugs and Prayers. . .

A friend in one of the many Facebook groups has had to put her husband, who she has been with for 48 years, into Hospice.  When asked what we, as a group, could do for her, she requested cards.  This is the one I made for her:


What I Used to Make my Card:
Vanilla Card Base
Watercolor Paper
Zig Clean Color Markers
Simon Says Stamp Beautiful Flowers Stamp, #SSS101826
Hero Arts Stamp & Cut Sympathy, #DC183
Hero Arts Pink Tourmaline Ink {only available in the MMH December 2017 kit}
Ranger Archival Ink in Jet Black
Pink Cardstock
Sequins {from stash}

I began by stamping the flowers onto a panel of watercolor paper using black ink.  Then I colored the flowers using my Zig Clean Color Markers.  Once the flowers were colored, I sorted through my papers to find one that matched the flowers, then cut the word "prayers" using the die included in the Stamp & Cut set.

Then I stamped the rest of the sentiment using the Bubble Gum ink, placed various sequins around the card, {I used some clear, pink, and white sequins} and the card was finished.  I am very pleased with how the card came out and I hope that it brings some joy to her and her family.

I am awful at making sympathy cards.  I never know what to say, what to write, what colors to use; I generally work myself into a frenzy of complete and utter self doubt.  I tried something new making this one.  I chose a pretty stamp and
Another Look
just went with what felt right.  Since the recipient is a card maker herself, {and honestly, one of the most creative people I know} I worried about every little mistake I made.  Then I realized that she wouldn't be scrutinizing my card; she'd be gaining comfort that someone felt enough for her that they took the time to make it.  I really need to concentrate on that rather than the imperfections.  After all, when I get a card that someone has sent me, I KNOW what that person did; I know the concern, self doubt, the traps we set up for ourselves.  And I just enjoy the card.  I don't look for mistakes.  I feel happy and loved.  That is going to be my thing for 2019.  Enjoy the process and know I am going to make someone happy.  Isn't that what life is all about?


Thank you for stopping by to view my card.  I appreciate every one of you! Fondly, Christi

I am entering my Sending Hugs and Prayers card in the following challenges:
Sparkles Monthly Challenge - M, #108 - Use Dies and/or Punches
The Flower Challenge - #25, Add Sparkle
The Artistic Stamper - M, Inktober {and happy 8th Blogaversary!}
Dream Valley Challenges - #188, Flowers
Word Art Wednesday - Anything Goes
Scrapy Land - #99, Anything Goes w/ A brand they carry {Hero Arts}
Make It, Take It - M, Anything Goes
Colour Crazy Craft Challenge -  Anything Goes
Just Add Ink - #430, Inspirational Challenge, graphic below
Inkspirational Challenge - #171, Word Prompt - Comfort {graphic below}
Happy Little Stampers Anything Goes with Dies - M, Anything Goes {graphic below}


Monday, October 8, 2018

Autumn Shaker Card

It's October and at Die Cut Diva's the challenge this month is Halloween or Autumn; and to top it off, the lovely Dies R Us is sponsoring us and giving away a $10 voucher!

I've made quite a few shakers cards and I have to admit, this is one of my very favorites.  The entire card was easy, there were no mistakes or mess ups, and I am so happy with how the front of the card looks.  To me, this card has all the elements of a fabulous card; it's a long tutorial, so you may want to go to the bathroom and grab a drink, maybe even a snack. :)  Without further ado, here is my card and how I made it:


What I Used to Make my Card
White Card Base
Handmade Alcohol Ink Paper
Tutti Designs Maple Vine Frame, #TUTTI-139
Light Gold Paper
Craft Foam Board {Dollar Tree or local dollar store} Called Readi-Board
Tutti Designs Stitched Nested Rectangles, #TUTTI-217
Embossing Powder - Not So Rusted Penny by the Powder Keg (bought by PK                                    Glitz, then purchased by Stamp On It!)
Hero Arts My Monthly Hero Kit, September, 2018, sentiment
Simon Says Stamp Embossing/Watermark Pad
Sequins
Acetate {you can use packaging, projector sheets, or the stuff they sell especially for shaker cards}
Red Double Stick Tape

I began this card by making the alcohol ink paper first.  I used glossy paper and various alcohol inks, some from Ranger, some from Jacquard  {specifically the Piñata Colors} and some very old Pantone inks, which are the refills for the Letraset Tria markers {which are now known as ProMarker, and has been
purchased by Winsor & Newton.}  I did not keep track of the colors I used; I just chose the ones that looked the most like fall and autumn colors to me.  I did, however, make the marks I made with the inks purposely small.  I didn't want the die to cut out a hunk of one color and none of the other.  Another item I used was the Gold Mixative by Tim Holtz and Ranger.  A little dab of that goes a long way and it gave the paper a golden sheen, if the light catches it correctly.  I made a bunch of backgrounds while playing with my inks, as I typically do, and I'm going to be trying the Alcohol Lift Ink soon to see if it works with glossy paper as well as it does when it's used with YUPO paper.  I do have a small bit of YUPO but I always forget about it when I'm playing with my alcohol inks.  OK, enough about the inks, let's carry on! 

Once the paper I'd made was fully dry, I used the Maple Vine Frame to cut out some of the paper.  I was SO tickled that it came out as beautifully as it did and I really feel the key was using small dabs of the ink.  Once I had the frame cut, I put it aside.  I adhered the light gold paper to my craft foam board, figured out which rectangle die fit it the best and, once the glue was dry, proceeded to cut a gold frame.  I had tried to make the frame by cutting the craft foam, then cutting the paper, and then tried to match it up.  Even though I taped my dies together, I could NOT get the two pieces to play nicely.  That's why I glued the paper onto the craft foam board.  The Maple Vine cut out is attached to this frame so I have the walls for the shaker.  I glued the acetate to the top of the gold frame and attached the Maple Vine to that.  I set that aside, under the tile on my desk, for overnight to ensure there was a good solid connection - I know acetate can be stubborn when you use a wet adhesive.
The Readi Board Label

The next day I took a white card base and added the sentiment, which I embossed with a fabulous powder called Not So Rusted Penny.  It's a perfect fall color; bits of brown, rust, and flecks of gold; the pictures do not do it justice!  Once the sentiment was done and cooled, I got the bright idea to use double stick red tape to put the frame onto the card.  I pinched a bunch of sequins and piled them on top of the sentiment; attached the red tape to my frame, managed to get it as straight as I could, and attached it.  It was all fine and dandy, but I had forgotten that some of the tape would be sticking out, where it didn't quite have the frame cover it all.  So, with my first shake a billion sequins got stuck on the tape.  Fortunately, there were {and are} still some loose sequins so the card can be shaken, but I can tell you I won't be making THAT mistake again.

All in all, I am very proud of the card.  When I look at the alcohol ink paper I
Here is a sparkly pictuer
made, and then at the frame, it's hard to believe that the paper made that frame!  This is one of the first times I've been happy with an alcohol ink background the first try.  I usually mess up the colors and they don't cut as nicely as I see it in my head, but this was successful!  Of course, having all the sequins bobbing about in the card would have been nice, but that's the charm of handmade, right?!?  Yes, I say that a lot.  It makes me feel better.  Well, I hope you enjoyed my tutorial.  You can see more examples of my shaker cards here and here.  I've used both craft foam and craft board and I can't see a difference in the final outcome of the card; the foam board is much cheaper, so I'll be sticking with that for a while.  I'd love to see your Halloween or Autumn makes in the challenge; just link up here at Die Cut Diva's! And don't forget, our sponsor, Dies R Us carries SO much more than just dies! Take good care and thank you for stopping by! Fondly, Christi


I am entering my card in the following challenges:
Die Cuttin' Divas - #390, 3D projects
Papercraft Challenges - M, #22, Dies and/or Punches
{PIN}spirational - #226, Photo Inspiration (see below)
Unicorn Challenge - M, #37, Autumn or Halloween
Addicted to Stamps - M, #167, Autumnal Colors
Creative Friday - #215, Shaker Card
Simply Create Too - M, #143, Make a Shaker Card
Moving Along with the Times - M, #81, Autumn/Fall
DL Art - Thankful Thursday - #236, Fall Colors


{PIN}spirational


Monday, August 6, 2018

Steamed Heat at Stinkin' Inkers

Just in time for the hottest month of the year {it is here at least}, Stinkin' Inkers August theme is "Steamed Heat."  If there is one thing I can blog about endlessly is the summer heat!  We have broken many records this summer due to the high temperatures in the Denver area; thank goodness we have a swamp cooler to help keep things cool.  Now, I'd never even heard of such a thing when I first moved here, and I still can't really wrap my brain around how it works, but it does work and that's all that matters!  I made this card to help all of us experiencing steamed heat visualize being a little cooler!  I hope to see you this month at Stinkin' Inkers "Steamed Heat" August challenge!


I made my card using the Hero Art's My Monthly Hero kit for the month of
June.  The entire card is made using the items in the kit, except for the white card base.  I first used the mini ink-blending tool and Soft Sky ink to make the sky.  I then flipped the card over and used the Deep Ocean and Summer Sky inks to make the ocean.  The kit includes all the stamps you need to make the ocean seem full of waves and texture.  You just layer the stamps with ink colors going from light to dark and BAM! you have an 
ocean!  Once the sky and ocean were finished, I
embossed the beach by dabbing Versamark ink on the lower half of the card and embossed the beach
 directly onto the card with the Sand embossing powder. 
The embossing powder is SO pretty in real life - it has notes of various browns and sparkly copper in it.  Next, I stamped the Adirondack chairs on light brown card and embossed them with Simon Says Stamp white detail embossing powder and die cut them. I cut the clouds out of white, coated, shiny card {from my stash - I'm sure it's as old as the hills} and the cute starfish out of some pink scrap card.  I put a few white accents on the starfish so he wouldn't get lost in the scene, then stamped my sentiment and cut it out with Tutti Designs Cross Stitched Rectangles.  I attached the sentiment, then the chairs and the starfish, and then I used dimensional dots to adhere the clouds to the sky.  It looks like a beautiful day in my scene! Hopefully, your sky is as pretty as this one is.  

Thanks for stopping by and I hope to see your creations at Stinkin' Inkers August Challenge "Steamed Heat!" Fondly, Christi

I am entering my Beach Scene Card in the following challenges:
{Where do I find all these FABULOUS challenges?? At Challenges for Days - and easy to read blog that helps you easily find challenges to enter - check us out!}
Lost Coast Portal - #58, Anything Goes
Unicorn Challenge - #35, At The Beach
CardsInEnvy - Something New {First time I've used the MMH Kit}
Just Us Girls - #452, Word Week: Beach
a2z Scrapbooking - Anything Goes {August}
The Artistic Stamper - Anything Goes {August}
Emerald Creek - The Great Outdoors {August}
Papercraft Business Challenge - #9, Anything Goes, TWIST: Summer
Craft Rocket Challenge - #51, Anything Goes


Thursday, August 2, 2018

Swinging Under the Trees

When I received the May My Monthly Hero kit from Hero Arts it brought back SO many fond memories of my best friend.  She and I lived next door to each other and it is because of her that my childhood was as amazing as it was.


What I Used to Make my Card:
White Card Base
Black Card
My Monthly Hero Kit, May 2018 {Hero Arts}
Watercolor Paper
Distress Oxide Inks
Versafine Ink in Onyx Black
MISTI

As I created the background for this card I forgot to write down which Oxide Inks I used; I apologize!  But I do recall thinking I wanted the background to look like a summer sky as the sun was setting and I think I achieved that look, don't you?


Another Look
Once the background was dry, I cut the overlay out of black card using a die that was included with the kit.  I'm so glad I got this kit because this stamp, along with the die, reminds me of swinging at my best friend's house, using a swing attached to her old oak tree.  I can still feel the sense of being free as the wind flowed all around me and I can still hear us laughing as we took turns pushing each other as high as we could.  We let our imaginations run wild with that oak tree; we played acorn hospital under the tree, the tree was "home base" in many games, many times.  Unfortunately, her house {not the one where the oak tree is, that is where her parents still live} was one of the many which were damaged when a tornado hit a few towns in Connecticut.  My plan is to send her this card {along with some other goodies} and I hope it brightens her day a bit.

Having the die cut in place, I stamped the image directly onto the background paper, using my MISTI to help with placement.  Isn't that a fabulous stamp? There are ALL kinds of beautiful silhouettes in this kit; I got so many ideas from it I had to write them down so I could get them out of my head and make room for other creative ideas to take form!


I hope you like this card as much as I do and I truly hope you have some fond childhood memories of swinging on a swing with your loved ones.  Have a wonderful day.  Christi


I am entering my Swinging Under the Trees Card in the following challenges {all found using Challenges for Days}:
Lost Coast Portal to Creativity - #58, Anything Goes
a2z Scrapbooking - M, August, Anything Goes
The Artistic Stamper - M, August, Anything Goes
Carlin's Cards Challenge - #1, M, July/August, Anything Goes
Papercraft Business Challenge #9, August, Anything Goes
Eclectic Ellapu - M, August, Friends from Afar {in fact her package was mailed today!}
Simon Says Stamp Wednesday Challenge - Make Your Own Background
Watercooler Wednesday Challenge - #182, Feminine Anything Goes
Scrapy Land - #95, Anything Goes
The Sisterhood of Craft - Summer Vacation {make a card relating to summer activities}
Die Cuttin' Diva's - #380, Anything Goes
Pammies Inky Pinkies - #1830, Sunny Days
A Vintage Journey -M, July, Get Sentimental
A Gem of a Challenge - M, July, Summertime/Holidays


Monday, June 11, 2018

Dreaming of You

A while back I posted a card made with a Memory Box die that had these adorable bunnies and I spoke about buying the sheep at the same time.  Now, I KNEW I had made a card with the sheep; they are just too cute to keep filed away.  Today I finally found the card that I knew I'd made! I'm happy I found the card; not so happy that I forgot about it! 


What I Used to Make this Card:
White Card Base
Memory Box Leaping Sheep Die, #99903
VersaFine Ink in Onyx Black
Silver Shimmer Card
Silver Glitter Card
My Monthly Hero, August of 2017, for sentiment and clouds
Die-Namics Stitched Oval STAX, #MFT-521
White Card
Black Card

I knew exactly how I was going to use these sheep, but before I settled on which ones I was going to use I cut out a bazillion, like I typically do.  In addition to this sheep, there is one that is smaller.  I made brown sheep, beige sheep, and even black sheep - in both sizes.  That was wonderful until one of my darling fur babies got into the stash and tipped it over.  All over.  Needless to say, a sheep herder I am not.  I'm STILL finding them and this was over 2 months ago.  Happily, I had set aside these four already, so the damage wasn't too great.
Another Peek

Having my sheep done, I chose a dark grey for the night sky, silver card for the moon, silver glitter card for the large star, some white puffy clouds, and a few sequin silver stars.  I used the Hero Arts My Monthly Hero kit from August, 2017 for the moon, large star, clouds, and the sentiment.  I cut the sentiment using one of the stitched oval stax dies.  Once I had the placement down, the card made itself.  In retrospect, a few of the sheep just might be looking a tad too high, but I still think it's a cute card.

I hope you like this card as much as I do - it's a bit different than what I typically make, but I have SO many other ideas.  Wouldn't these sheep be darling on a baby shower card? I can see them frolicking in the snow for a winter themed card, perhaps meeting up with the bunnies.  I could go on and on but I won't.  Thank you for stopping by and I hope to see you again soon! Christi 

PS: My giveaway will be closing on June 30, 2018 - it is open internationally and you can get all the details here. Good Luck!

I am entering my Dreaming of You card in the following challenges:
2 Crafty Critter Crazies - M, Anything Goes with a Critter
a to z Scrapbooking - M, Monochrome
Creative with Stamps - M, Cute Animals
Happy Little Stampers - M, Anything Goes w/ Die Cuts
Get Creative Challenge - M, Monochrome
Path of Positivity - #60 - M, Anything Goes w/ specified color {neutrals}
Monochrome Magic - #11, Monochrome {entry 2}
Art Impressions - Odd Animals
Inspiration Destination - #152, Anything Goes, and Use a REAL Stamp
Stars Stampz - Monochrome


Sunday, April 29, 2018

It's Birthday Season!

Most of the people in my life celebrate their birthdays in the next 4 months and I just found out that April 21st is my favorite boss's birthday; I literally made this card in a few hours since I was seeing her the next day and then she had some time off.  I wanted to be sure she had this in time for her birthday.  Deana, my boss, loves the color pink and the bunnies have a special meaning between us, so you know the card had to include both! Here is the card I made for her:
The colors actually do match in real life!
What I Used to Make my Card:
White Card Base
Avery Elle Balloon Elle-Ments
Lawn Fawn Some Bunny Stamps, #LF1587
Lawn Fawn Some Bunny Dies, #LF1588
Derwent Inktense Pencils
Die-Namics Stitched Oval Stax, #MFT-521
Hero Arts My Monthly Hero, March 2018 {used the word Birthday}
3mm Gems {these are marketed for nail art - MUCH cheaper than craft gems!}
Pink Glitter Card

Light Tan Card
Pink and White Card
Hero Arts Ink in Bubble Gum
Hero Arts Pink Accent Pearls
Momento Ink in Tuxedo Black


I was really pressed for time {I typically take at least a day to design a card} but I had this type of birthday card in my head since I got the Balloon Letter
Dies. I grabbed 2 pre-colored bunnies and set them aside; these were left over from my spring cards and colored with Inktense Watercolor Pencils.  I cut out the word HAPPY using the Balloon Elle-Ments and accented them with tiny gems.  I got 12 colors of these gems in the nail art section - I think I paid about $6 for the bunch and they come in their own little container!  I have enough of these to bling everything and anything for quite some time.  If you want info on where I got them, send me an email using the contact form on the right side.  

Next, I attached the string cuts, styling them as needed so the bunnies could hold the balloons.  

I stamped the sentiment {it is incredibly hard to find a birthday stamp - tons of Happy Birthday, but just birthday? Thank goodness the Hero Arts monthly kit had one!} on some white card, cut it out using the stitched oval stax, and then used a larger oval to cut out the glitter card.  I know in the photos the pinks don't look like they match, but they do compliment each other in real life just fine {I hate it when I can't make the colors look right!}  I attached the sentiment oval onto the glitter card and set it under the tile to dry and adhere really strongly - I've found that glitter card doesn't always take to something attached to it, so the weight of the tile works wonderfully.

Meanwhile, I adhered the bunnies and the balloon letters to the card base.  I used some pink pearls I had and punched out some tiny hearts from the left
Another Look
over pink glitter card.  I arranged the pearls and hearts where I wanted them, then attached the sentiment.  I'm very pleased how well it came out and how well the design transferred from my head to actual paper!  She loved the card and that's another birthday down! You can be sure I added it to my calendar so I won't be caught off guard next year.  


Thank you SO much for stopping by! Since you have read this entire post I will let you in on a secret - my giveaway is coming up by the end of this month! One of the requirements is going to be that you are a follower of this blog, so why not do that right now while you are thinking of it and so you'll get notice of the giveaway.  I'm actually thinking of having two separate prizes, but more info on that will be in the post.  I appreciate all the follows and comments; I read each and every one! I hope you got a bit of inspiration from my card and I'll see you soon ~ Fondly, Christi

PS: She LOVED the card :) xo

I am entering my Happy Birthday card in the following challenges:
Pattie's Creations Challenge - #145, Bunnies and/or Ducks
Cute Card Thursday - #527, Pretty in Pink
Simon Says Stamp Wednesday Challenge - Anything Goes
Cards in Envy - It's Birthday Party Time!
Sweet Stampers Challenge - Too Cute