Followers

Showing posts with label Wall Hanging. Show all posts

Saturday, June 4, 2022

Time Project for River of Creativity's June Theme

Hi all!! I am here presenting my design team project for River of Creativity's June Challenge where the theme is Time; I'd advise you to get a nice drink and relax because this is picture heavy and there are a lot of great things to see! Now, I could have done the whole clock thing, or even a birthday thing {after all, when does time bite you in the butt the worst?} but I really wanted to get messy and have fun.  I am a night creature; some people get their second wind at a nice normal time, say 5ish, or even 7ish but me? Nope.  If I am not in bed by 9pm, my second wind comes around at 10 pm.  In fact, I am typing this post at 12:30 a.m.  So, for my June piece I've turned Time into Nighttime.  Clever if I do say so myself.  My mom can tell you stories of a young me fighting my bedtime {no matter when it was} as early as 3 years old when I told my mother I was not yawning because I was tired, I was yawning because my brain needed more air.  I was such a joy, but I digress.  My hope for this project was that you'd see something new each time you looked at the panel; let me know what you think! 

Before you start I wanted to let you know you can click on the photos to make them bigger; I made collages out of what I feel are the important details so you wouldn't have 10 or so pictures to look through.  If there is any problem with getting the pictures bigger, please let me know!


I have been making this panel for the last few months as it has paper clay pieces and I needed to get molds and the actual clay to get the forms I wanted.  I used DAS Paper Clay which is available at any local craft store or online and made the moon and the stars.  I used a panel that is 9" x 12" from Artists Loft, but any panel or canvas would do. I also accumulated a bunch of molds from Amazon because they
have such a selection, and you know that Prime shipping is addicting!  Some of the molds I got were too small, some just didn't fit the look I wanted, and I ended up using a simple Moon and Stars mold to make the paper clay pieces.  I also got some keys, gears and clock metal bits and now I have enough to make a gazillion projects. Other supplies I used included Stickles in Crystal, Tim Holtz Foundry Wax {all the colors, I even layered them}, Picket Fence Gem Mixes, no name gems from my sash,
 Cosmic Shimmer Glitter Jewels in Midnight Snow, Krylon Leafing Pen in Silver, Golden Gel Medium in soft gloss, Lumiere Paint in Silver as well as beads and the like.  I think the most important part is the background and I first painted my panel with Golden Black Acrylic Paint and once that was dry I used some Distress Oxide Ink Pads {I just smooshed them onto the panel} and Sprays in various blue and purple hues, sprayed water here and there, dried with my heat gun, added more ink, more water and so on.  The shimmer was created by using Distress Mica Spray in Crooked Broomstick {it was a Halloween release from Ranger, but you can still find it online} and any Mica Spray would work. 


I fiddled with the background until I liked it and then set it to dry for actually a few days.  Once it was dry, I had painted, inked and waxed the items I wanted to and set about the placement as well as the swoosh of clear glass beads {the tiny kind with no holes} glitter and gem placement.  I wasn't concerned with placing too many gems as I really wanted this to sparkle being the night sky.  I could probably have added many more gems, but I was struggling with glue sticking to the paint and ink on the background.  I initially used hot glue, but after Sylvester knocked it off my desk and most of the gears and metal came off, I switched to E6000.  I'm not a huge fan of either glue but the E6000 worked much better than the hot glue.  Now I know and you know, too, so pry the top off your E6000 if you are gluing onto paints and/or inks.  I've linked to most of the items that were easily found online, and it there is something you want the specifics on please use the email option on the right side; I'll happily supply you with the actual links to the items.  


Another Look at the Entire Panel

 I am happy with my Nighttime art, and I had SO much fun making it.  It's been a long time since I have made such a piece, running with abandon with colors and paints and inks and goodies.  But that is what the River of Creativity challenges are all about! We would love for you to join us, either using Anything Goes or the theme of Time, for our June challenge; the only thing we won't accept is cards. So, get your inks, paints, clay and molds out and have some fun! Hope to see you soon! Christi

 I am entering my piece into the following challenges:
We Love to Create - Anything Goes
Creative Fingers - Anything Goes
Creative Artiste, #83 - Anything Mixed Media Goes
Mixed Media Lovers, #14 - Anything Mixed Media Goes
Country View Challenge, June Challenge - Seeing Stars

Thanks!!

Wednesday, May 4, 2022

Mixed Media with The Robin's Nest Creative

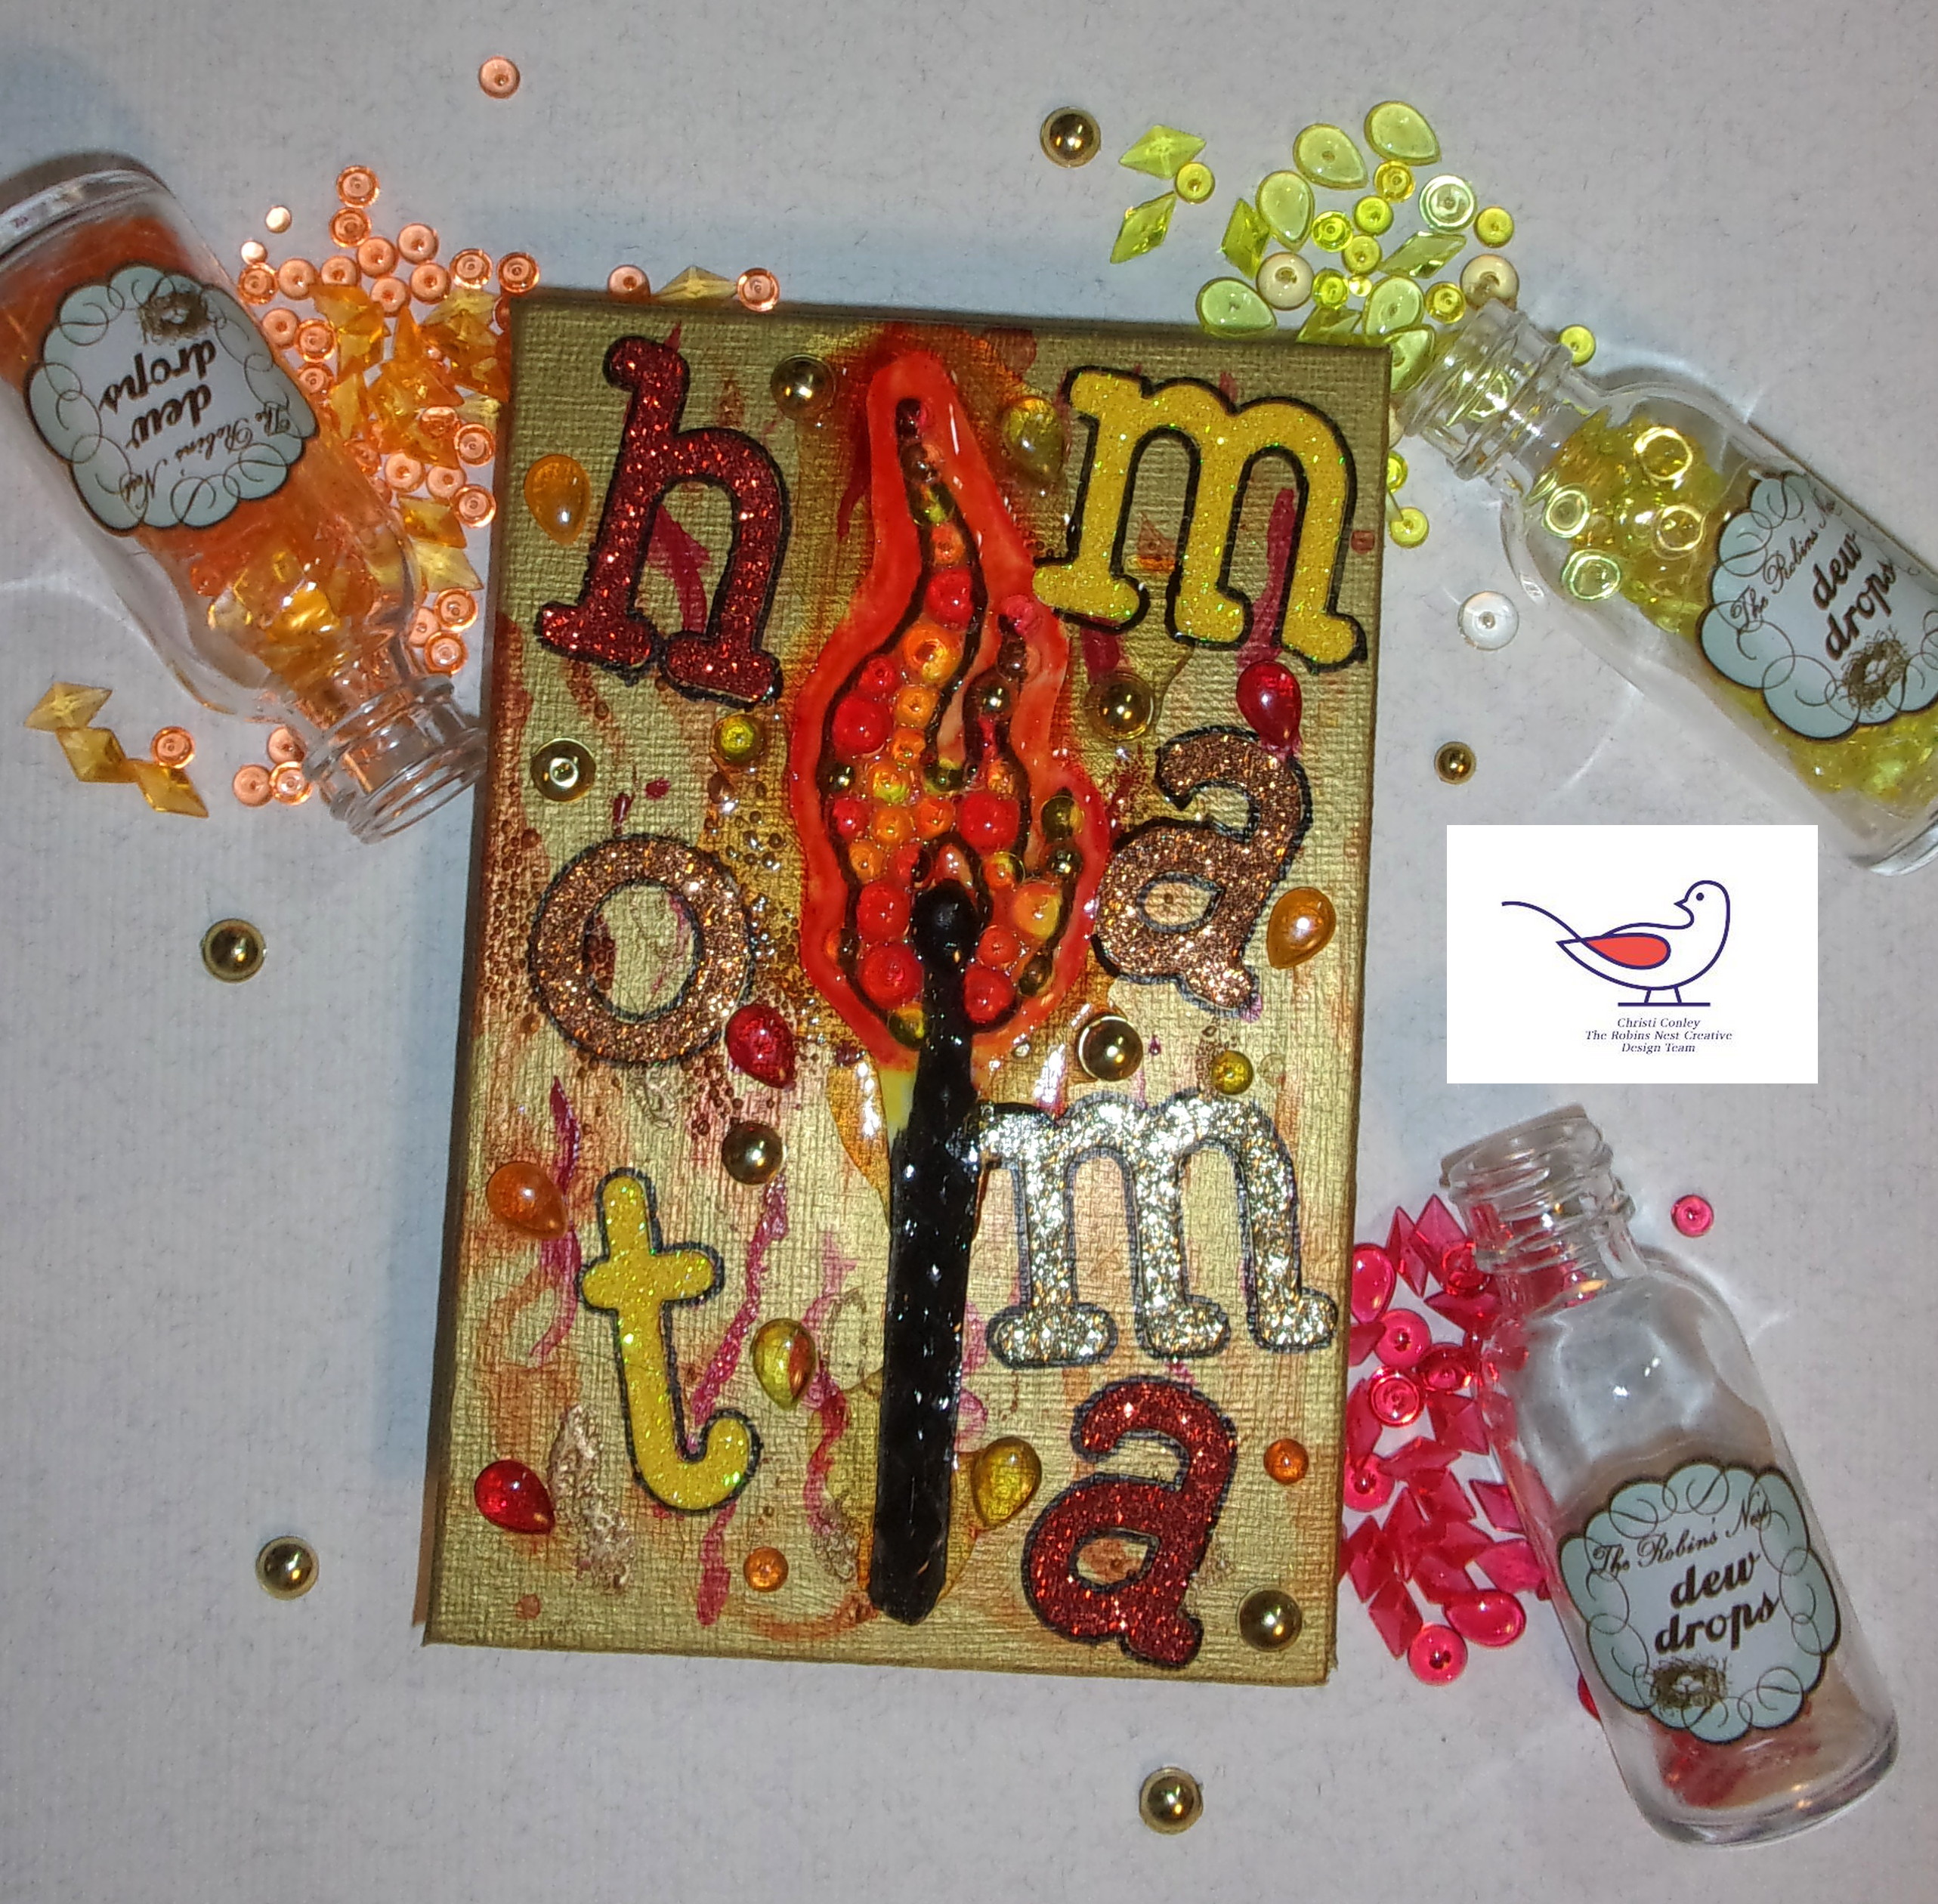
 Hello everyone! For my Design Team project at The Robin's Nest Creatives I decided to go all out and get really messy.  I used to make mixed media items all the time, but have since gotten busier and really haven't had time to play; I made up for lost time!  Let's get to it, here is the project; it's made on a Frederix 4" x 6" panel - this is a long post, I apologize, but I used a lot of different products (some not so successfully) while making this piece.


The first thing I did was use one of the really cool kits they have at The Robin's Nest called Creative Dew Drop Canvas and there are some amazing pictures to choose from, I used the Matchstick Creative Dew Drop Canvas for today's project.  These kits come with everything you need (except glue) to make a masterpiece worthy of framing - AND they come in different sizes! I used Dew Drops that I though would represent the flame best, orange, gold, red and yellow and filled it in completely with both Regular and Mini Sized Dew Drops. Black Diamond Dews were used on the wooden part of the match. I also colored around the flame to sort of give it that halo glow you sometimes get around fire using Copics right on the canvas.  I smothered it with Diamond Glaze and let it sit overnight to dry.  I wanted

Another Look
to use a panel as my substrate so I cut the match out.  I actually did this back in the beginning of being on the Design Team but I put the match somewhere and couldn't find it - shocking, I know - it popped out of where ever those items go when "they were right here" and then they are gone (another dimension with lost socks?? I don't know) but I found it.  Setting the match aside, on my desk so it couldn't escape again, I painted the 4" x 6" panel gold using Lumiere True Gold Paint. I have to swoon for a second because I love Lumiere Paints - if you like rich color, some of the coolest pearlescent colors (some of them are blended with 2 colors and the effects are amazing!) you need to check this paint out.  It is sold for use on fabric, but I have used it on everything and I have never been disappointed with it.  It's a quality product and it may seem pricey (if you shop around you can get a jar for around $6, a 2.25 fl. oz, jar, but they also come in sets with little squeeze bottles, called Exciter packs), but a little goes a long way. Sorry for that little detour! 

So once my panel was dry this is basically where I went crazy.  I used a flame stencil and some sprays to try and make a fire background, well the gold paint did not like the sprays (they are water based and just beaded up and dripped away) but some of the color did take.  At this point I just started to throw products at the panel; and I used so many different colors I couldn't begin to list them all. I used a few different embossing powders from Wow Embossing Powders, some diluted red paint from Golden, and some more embossing powers -which again were an issue because the embossing ink just beaded up on the paint.  No worries I just made the background really, really abstract.  I glued the Matchstick Creative Dew Drop Canvas that I had cut out onto the panel and attached the alphabet letters I had cut out of  6" x 6" DCWV glitter stacks and I then added more Dew Drops using the same colors I used to fill in the flame, but I used the Tear Drop style of Dew Drops instead.  I added a few Mini Dew Drops as well.  I wanted them to sort of look like sparks from the flame.  I glued the sentiment onto the panel and the letters just blended right in with everything else so I used a permanent black marker and traced them all so they'd be easier to read and pop a little.  The final step was to smother the match stick once again with Diamond Glaze and once that dried I was done.

I am actually happy how this panel ended up.  It is very interesting with all the colors, glitter, glaze and, of course, Dew Drops.  I hope you enjoyed my long story- I have been trying to make my posts shorter and I think I am succeeding, but sometimes I just have to tell the whole story!  Thanks for your support ~ Lots of love, Christi

I am entering my Mixed Media Panel in the following challenges:
Crafting Happiness, #123 - Anything Goes
Love to Craft Challenge Blog, #68 - Anything Goes
Mix it Up Challenge, #59 - Anything 3D Goes
Creative Artiste Mixed Media Challenge, #82 - Anything Mixed Media Goes
A Perfect Time to Craft, #5 - Anything Goes
Mixed Media Lovers, #13 - Anything Goes

Home Sweet Home Recycled Wall Hanging

 I had been perusing Pinterest to find something to do with all these friggin' buttons I had left over from when it was a big thing to put buttons on your cards {something I never really got into, but HAD to have all the stuff in case the moment grabbed me and I felt the urge to make hundreds of cards with buttons on them} and I found all these Christmas wall hangings with button trees on them So I actually made the Christmas wall hanging during the season this past year and decided I needed to make one that could be used all year long.  I came up with the Home Sweet Home wall hanging that I am using for this month's recycle challenge at River of Creativity {remember we are an Anything But a Card challenge!!}:

I started with an 8" x 10" wooden shadow box frame {no covering on this frame} that I had painted with white gesso and rubbed some gesso on the actual frame part to soften the darkness of the wood.  I took some Scrabble tiles I had {I have SO many of these tiles I am sure I could cover an entire wall
Making the Heart
with them} and spelled out Home Sweet Home to make sure the sentient would fit.  Then I cut out the largest heart using Tutti Nesting Stitched Hearts, #TUTTI-216, and covered it with the buttons.  I could NOT get the shape of a heart to work when trying to do it by hand, so I used the die cut as a template.  Since the background of the shadow box is white it is really difficult to see the white paper heart beneath the buttons.  Once I had finished the heart and glued it to the center of the shadow box, I glued down the Scrabble tiles.  I am really pleased how this came out! I think I could almost actually sell them if I could find a cheap source for the shadow frames; I have sourced a few and they are just too pricey right now - at least if I wanted to make a marginal profit and I can't see having to spend more money to use up the stash I already have.  But, I do have a project I made for my sister for Christmas that I was SURE I posted but can find no record of it, so more button projects on the way!

Getting back to the challenge on River of Creativity, this months theme is RECYCLE so if you'd like to use the theme make sure your entry has some sort of recycle, or upcycle in it.  We can't wait to see all the gorgeous entries! I am personally so pleased at how you all have embraced the changes we made to this challenge and it's a testament to how people are still creating other things besides cards! Thanks SO much and I hope to see you at the challenge ~ Fondly, Christi

I am entering my Home Sweet Home Wall Hanging in the following challenges:
Mix it Up Challenge, #59 - Anything 3D Goes
Creative Artiste Mixed Media Challenge, #82 - Anything Mixed Media Goes
A Perfect Time to Craft, #5 - Anything Goes
Mixed Media Lovers, #13 - Anything Goes
The Creative Crafters, #51 - Anything Goes
We Love to Create, #5 - Anything Goes

Friday, November 5, 2021

River of Creativity's November Challenge "The Gift"

Hi all!! I took this month's challenge at River of Creativity literally and made a gift :) I don't exchange holiday gifts with my family, my mother is blind so she can no longer appreciate my art {and she has more clothes than she can wear!}, my brother, well, he's my brother and while he will admire what I make he really couldn't care less and my sister has become my biggest cheerleader.  I made this shadow box for her as she decorates for the holiday {I mean it looks like every holiday icon has thrown up in her apartment}.  Since we have so many cats I no longer decorate for the holidays - if I like something it stays up all year long and most of that is not really in the spirit of the winter festivities.  Anyway, I made this little shadow box as a gift, hence it fits the challenge :) I hope you have made something that fits the challenge; we are fairly easy and if you are stuck these prompts might help: the gift of your art, your love or just sharing appreciation for the changing season.


I began the box {that I found in a big box store for, get this, .99!! You can get yours by following this link} by getting a piece of packing foam and cutting it down to the size of the snow drift I
wanted in the box.  The material I used isn't Styrofoam, it has some give to it and it

isn't as dense; plus {BIG PLUS} you don't get all those little pills everywhere from cutting it. Once I had the piece in the right size I literally slathered it with Multi Medium Matte just using my fingers.  I then used "snow" I purchased from the Dollar Tree.  I set that aside to dry and painted the box white, waiting overnight for them both to fully set and dry.  Once the box and the hill were dry, I glued the hill into the box and added the blue sky using a dry brush and Blue Violet Opal Magic Paint.  Next, I added the trees {also a Dollar Tree purchase}, the trees came on little wooden circles but I just unscrewed them so I used just the tree. I made the little house out of cardstock using the dies from this Lawn Fawn set, and the sentiment is also from Lawn Fawn.  I had all the little sparkly and clay snowflakes in my stash as well as the snowflakes on the sides of the sentiment; they were actually buttons and I just snipped off the shanks! 

I hope my sister likes her gift; I am sure she will, and if she doesn't, she won't tell me LOL. I also hope I have inspired you to join us for the Gift challenge at River of Creativity - we happily take ALL crafts! Hope to see you there ~ Fondly, Christi 

I am entering my gift to the following challenges:
TTCRD - Anything Goes
The Holly and Ivy Christmas Challenge - Anything Christmas Goes
Country View Challenges - Christmas Gifting
Moving Along with the Times, #136 - Anything But a Card (entry 2)
Classic Design Team Challenge, #11 - Anything Goes
Pearly Sparkles Challenge, #68 - Merry Christmas
Simon Says Stamp Monday Challenge - Any Holiday Occasion
Lawn Fawnatics, #112 - Make the Sentiment the Star


PS: If you'd like to see my other Shadow Boxes, here is the Fall one {it lights up!}
and here is the Halloween one :)


Tuesday, November 2, 2021

Fall Light Up Shadow Box

This is the 3rd Shadow Box I've made in the last 2 months and I am having SO much fun getting messy and creative! When I first started stamping I was much more involved in mixed media than I am now and it's a blast to get back into some 3D art.  I LOVE this wall hanging and it was really easy to make so let's get started on the details!

I added full sized pictures of both the unlit and lit boxes at the end
of this post if you want to see them full sized.
Plus in this photo they are a bit blurry to me but I can't seem to get them crisper.

The back of the box
I used one of these small {5" x 5"} wooden shadow boxes that I found in a well known large craft store - they also had some other sizes - and the price was so good, I bought a bunch of them {which is why I've made so many in such a short period of time - I am positive there will be many, many more to come}.  This time I broke out the hot glue gun; which I am NOT proficient at, but I rarely use it.  I started by figuring out how the lights would work around the outside of the box and once I had the spacing down, I hot glued them all around the box.  There were two left over but I just snipped them off.  I got the lights at the Dollar Tree store and I think I need to go back and get some more 'cause I think they are just adorable being shaped like little leaves.  I did drop the entire string and cracked the case the batteries go in so that it wouldn't close anymore, but I quickly fixed that with a twist tie.  I like that you can turn the lights on or off with just a switch.

Next I needed something to fill in around the lights so I used Lawn Fawn's Fall Leaves Backdrop;  I just used the leaves that are extras, not the actual frame.  I cut two of each leaf in a bunch of colors I found in my scrap box, and then cut the acorn stems out of dark brown and the acorn bodies out of Kraft.  I also used the hot glue gun to attached the leaves all around and I can now see why everyone loves these guns.  The glue sets SO fast and I had no issues with attaching the leaves to the bumpy wire that I bunched together between the leaves that light up.  Once I was done with the frame, I added berry garland that I also found at the Dollar Tree; I just left it in the circle it came in instead of unwrapping it.  Lastly, I used Kelly Alpha Lower from Pinkfresh for the word fall.  I chose red for the sentiment since I feel it stands out a bit more.  While I try to make most of my 3D art able to either sit on a shelf or hang this one needs to hang on a nail about 1 1/2" away from the wall to accommodate the power box on the back.  I think next time I will try to put it on the frame and hide it.  I probably could of done that here but as usual I didn't know what I was going to use for what.

I hope you like my little shadow box!  Like I said, I had SO much fun making it! As well as the others I've made.  I'm glad I bought a bunch of them!  Now if I can find room to set up my Silhouette machine I just might make some signs next :)  Thanks so much for stopping by & see you soon! Christi

Thanks again!!

I am entering my project in the following challenges:
We Love to Create, #11 - Anything Goes
Mix it Up Challenge Blog, #55 - Anything Goes + 3D project
Simon Says Stamp Monday Challenge - Any Holiday Occasion
Challenge up Your Life, #141 - Interactive
Moving Along with the Times, #136 - Anything but a Card
NBUS, #32 - Everything is new except the Alphabet :)
Creative Friday, #293 - Anything But a Card


Monday, October 25, 2021

Haunted Times Wall Hanging

If you are looking for the Cat Lovers Blog Hop post, click here :)

 As I was scouring the internet for Halloween miniatures I stumbled across these small {5" x 5"} wooden shadow boxes in a well known large craft store - they also had some other sizes - and the price was so good, I bought a bunch of them. I try to make something 3D for Halloween every year {last year I made a spell book that you can see here} and this shadow box is this years' 3D project.  It's the first time I used one of my new shadow boxes and I had a blast making it! 


Haunted Times
First, I primed the wooden box with white gesso, then painted it black.  While the box was drying I shaped the skeleton, which I got at the Dollar Tree {they are sold in a garland with 4 or 5 of the plastic skeletons tied to a piece of jute. Since the skeletons are plastic, I heated up where I wanted with my heat gun and gently bent him; a plus is that their arms and legs move so even though I bent his legs to make knees the left leg is movable still. This way the box can either be hung on the wall and his leg can dangle, or you can gently put his foot onto the bottom of the shadow box and have it sit on a shelf. I shaped him to be sitting down by bending his legs and I bent his arms to create elbows.  I glued googly eyes to him and set him aside.  I also purchased the hay bales, the silver bat sticker and the background ribbon I used in the box from the Dollar Tree. 


I cut the ribbon to fit the back of the box and glued that down, glued a Tim Holtz/Idea-ology drippy candle onto another hay bale and put some googly eyes on the pumpkin which I sat on some paper leaves from my stash.  The metal letters used to spell out spooky are from Memory Makers, which has gone out of business, they were actually buttons, but I trimmed off the shank.  I cut Happy Halloween from DCWV metallic silver glitter paper using an Impression Obsession die and attached that to the back wall of the box, glued the silver bat under that and added the hay bale with the candle on it to the scene. The last thing I made was the "Haunted Times" newspaper; this is the reason that Mr. Skelly Ton has the googly eyes.  See, he is reading about himself in the gossip portion of the newspaper.  I actually typed up the paper and sized it down to fit in his hands which makes it almost too small to read so I thought I'd post the entire newspaper above.  You will need to click on the image to be able to read it.  If he had lips they'd be open in surprise but he doesn't so let's move on.

Lastly, I glued Skelly Ton on the hay bale, attached the newspaper to his hands and I was done!  I Hope you find this as humerus {see what I did there?} as I do and enjoyed the peek into Skelly's life ~ thanks so much for stopping by and above all, reading the entire post! Christi

Entering my Halloween Wall Hanging in the following challenges:
Creative Artiste Mixed Media Challenge Blog, #76 - Anything Mixed Media Goes
My Time to Craft - Halloween or Fall Colors {Halloween}
More Mixed Media Challenge - Anything Goes, Option of Orange
Crafty Catz, #569 - Anything Goes w/ Option of Layers
Mixed Media Palace - Mood Board {inspired by all the Halloween-like pictures}
Mix it Up Challenge - Anything Goes
The Corrosive Challenge - Anything Goes
Use Your Stuff, #434 - Halloween or Pumpkins
Love to Scrap, #150 - Anything But a Card
Mixed Media Academy Challenge Blog - Mood board & compulsory item is BUTTONS {word spooky was buttons, I removed the shank!}


Tuesday, January 29, 2019

On The Prairie with Hero Arts

Thank you SO much for stopping by and I hope you can join us at a2z Scrapbooking! This month's theme is anything goes and I am SURE you have something whipped up that you can enter!
Ever since I made the Angel Ornaments, my muse has been begging to play with some more decor and answering the call is what prompted me to make this cow skull shadow box.  This die was in a goodie box that was sold by a well known paper artist {the proceeds were donated} and at first I was stumped as to how I was going to use it.  I've always been attracted by Southwestern style art and I used to have a huge cow skull with feathers and whatnot.  I no longer have that cow skull so I decided to make myself another one.  


What I Used to Make my Art:
Blick Canvas Panel, 5" x 7"
Blick Artists' White Gesso
Shadow Box Frame {bought on eBay years ago}
Hero Arts On the Prairie Fancy Die, #DI511
Light Green, Green, Pink, Red, Yellow and Blue Card
Distress Oxide Inks in Wild Honey, Vintage Photo, Fossilized Amber and Gathered Twigs
Distress Sprayer
White Card
White Craft Foam {I use Creatology™ from Michael's, 6mm, 9" x 12"}


Before                                After
Years ago I bought a bunch of shadow boxes through eBay.  I bought different sizes and frame colors and I've been saving them {for what I don't know} but it was time I started to use these supplies that I've kept packed away.  The frame I envisioned for this piece was weathered so the first thing I did was sand down the frame slightly, cover it with gesso and sand it a bit more once it was dry.  Originally, the frame was a medium brown and, as you can see by the picture, I did a fair amount of work to make it look like it had been out in the harsh sun, rain, and other elements for years. 

In between working on the frame, I started to make the panel.  Using Distress Oxide inks I colored the panel, giving what I think is a more Southwestern feel.  I used some ink blending brushes and, to get the depth of color I wanted, I inked, spritzed, inked again, and spritzed again quite a few times, drying each layer of ink before applying the next.  I just kept on reworking the colors until I was happy with the outcome.  Once I was satisfied, I put the panel aside to dry completely overnight.

I ended up making two different skulls; on the first one I used foam core to get
Not in the Frame Yet

the dimension I wanted.  But when I cut the foam core board, the board got crushed too much and I didn't want to use a smooshed focal point.  I used craft foam for the second skull and it came out much better.  The craft foam held up to the die cutting machine much better than the foam core board {you can see all about the craft foam I use HERE}.  I did end up using the first skull on a matching card so it didn't go to waste.  Once the shape was cut, I layered two pieces of cut white card on the top and, while that was fully drying, I cut out the flowers and
Some Dimension
the leaves.  As usual, I cut out more than I needed so I also made a wreath out of the leftovers but I haven't used it yet.  I still think it's better to have too many embellishments than not enough!  I added the flowers and leaves to the cow skull and glued it to the panel.  Lastly, the panel was put in it's new home and it is ready to display proudly.  What do you think? Are you planning on any home decor or 3D projects in the near future? I'd love to hear about it! {and yes, that is a pop top on the back of the hanging - they are free and work just fine to hang something!}

I hope I get to see your NEW creations and that you join up at a2z Scrapbooking! Thanks so much for stopping by! I appreciate your support! ~ Fondly, Christi

I am Entering my On the Prairie Project in the following challenges:
Scrapy Land - M, Anything Goes w/ a Brand of Die they sell
TTCRD - Anything Goes
Crafty Friends - Animals/Birds
Cardz TV - Anything Goes {entry 2}
A Blog Named Hero - M, Crafter's Choice
Bleeding Art Challenge - Anything Goes
More Mixed Media - Anything Goes {I did not use the option of Blue}
Happy Little Stampers - Dies - Anything Goes with Dies {badge below}
Happy Little Stampers Mixed Media - Layers - the skull is layered {badge below}