Followers

Showing posts with label Wendy Vecchi Ink. Show all posts

Sunday, December 5, 2021

Celebrate with River of Creativity!

 December is here and this months challenge at River of Creativity is Celebrate! You can enter anything that you've created that means celebration to you! I made this card especially for this challenge to celebrate my growth as a card maker and to celebrate this wonderful season.  I hope you like it!
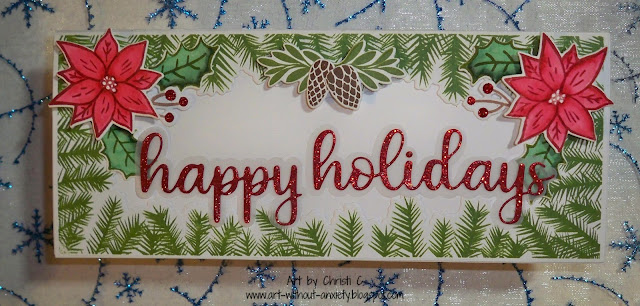
I used Trinity Stamps Slimline All Spruced Up stamp set to make the fur tree outline, the pine cones, poinsettia flowers & leaves; I stamped the fur trees with Wendy Vecchi's Archival Ink in Fern Green,   for the pine cones I used Potting Soil, all on regular card.  Then I used the Fern Green for the poinsettia leaves and Red Geranium for the flowers on watercolor card (the Fern Green and Red Geranium are the best inks to use for green & red designs in my opinion.  I haven't found better colors yet!).  I used my Zigs to color in the poinsettias and the leaves. I used the coordinating dies to cut everything out and used a slimline card base. Then I cut out the sentiment from glitter card and glued it onto vellum. That was placed on the card, the poinsettias are pop dotted and the little glitter dots are Christmas Red Stickles.  I realize my sentiment isn't perfectly placed, but I loved this card so much I wanted to share it anyway. I hope you have a celebration project you can share with is at River of Creativity - remember, you can enter anything that is handmade!

This is the last challenge for now - after the holiday season is over stay tuned for a NEW River of Creativity Challenge - we are doing a revamp!! COMING SOON!!!

I wish that each & every one of you has a peaceful holiday season :) Be safe :) Thanks!! Christi

I am entering my card in the following challenges:
Simon Says Stamp Monday Challenge - Sparkle Mode
Simon Says Stamp Wednesday Challenge - Holidays/Christmas
International Art & Soul, #123 - Use Dies and/or Punches
Allsorts, #653 - Use a Die
Cut it Up, #240 - Holiday Cards
Crazy 4 Challenges, #613 - Christmas Flowers/Foliage
Crafty Hazelnut's Christmas Challenge, #571 - Anything Christmas
Peace on Earth Christmas Challenge, #5 - Anything Christmas



Wednesday, January 9, 2019

Anything New with Die Cut Diva's

Happy New Year! I hope your holiday season was wonderful!  Since it is a new year, Die Cut Diva's has chosen the January 2019 challenge to be Anything New and we are sponsored by the fabulous Bugaboo Digi'sBugaboo is offering a
$12 gift certificate to our winner; you can get some great digi's with that much credit!  For my Anything New entry I used these Altenew dies which are brand new and, honestly,  I probably would not have purchased them myself, so I consider them a new design for me as well.  They came in a box of stamps and dies I had bought from a designer; lots of popular designers get so much given to them and they typically design for more than one team, that they can't possibly use it all.  Now, since they can't resell the items {which I didn't know}, a few have put together charity boxes where they stuff as much product as they can into a box, sell the box, and then the proceeds go to their charity of choice.  It's a win for everyone; the designers get to clear out some stash, the buyer gets FANTASTIC deals on stuff, and the charity gets money!  


What I Used to Make My Card:
White Card Base
Grey,  White, Yellow, Red, Orange, Blue, Green & Purple Card
Altenew Shattered Triangles Die Set, #ALT2031
Die-Namics Fishtail Sentiments Strips Die
Altenew Painted Rose Stamps, #ALT1542
Wendy Vecchi Ink in Watering Can
Line Stitched Die {literally a metal line with a pattern on it - manufacturer unknown}
3mm Crystals
Orange Copic Marker


Click to make photo larger
The first step in making this card was cutting out all of the triangles.  I used the smaller set of dies and I first cut out the top of six triangles in white, which are actually the detailed dies in the picture, then cut out the bases, the solid die.  I made a "cheat" sheet of how the dies look so it would be easier for you to understand my references.  Then I cut out the colors using the detailed top again.  I chose muted primary colors - not exactly pastel but I didn't want the colors to be the focus of attention.  I wanted you to notice the intricate detailed "tops." 
Tons of Triangles

Once all the triangles were pieced together and glued, I set them aside.  I cut a panel from gray card and covered the white card base.  Then I used the fishtail die to cut a small banner.  The sentiment was stamped onto a scrap piece of white card.  I wanted some stitching on the sentiment panel but I don't have a die the right size; this is where the line dies come in handy.  I used the stitched one and put stitching on the top and bottom of the sentiment, tucked the gray banner under it, and attached those to the card.  While I was pleased with the triangles, I felt they need a little something more so I put matching gems on each one.  I didn't have an orange gem to match so I colored a clear one with an orange Copic marker.

Finally, after trying out many configurations, I decided to just glue the triangles
Another Peek
randomly onto the card.  I did keep the colors in rainbow order but I didn't place the triangles in any special manner.  I love this card and I'm already thinking of ways to use these triangles; I could cut them out in red and green for the holidays, metallics for special occasions, and tones of red for Valentine's Day!  Making this card has opened up so many possibilities for the geometric dies I have.  I'm thinking of how I could use all the shapes I have in different ways, other than just to mat images or sentiments.  


I hope your imagination has gotten a bit of a spark from this creation and you look at your geometric shape dies in a different way!  I especially hope to see your Anything New entry in this month's challenge.  It's the perfect time to try a new technique, new stamp set, and of course, new dies!  Thank you so much for stopping by!  I'd love to visit you back so be sure to leave your blog, Instagram and/or Pinterest link in your comment.  See you again soon!   Fondly, Christi

Since I posted this late, I am now entering my Card in the following challenges:
Fab 'n Funky - #422, New Beginnings {well, new product?}
City Crafter - #444, Give Piece a Chance
Cuttlebug Mania - New {new product}
Simon Says Stamp Monday Challenge - Use Something New
Make my Monday - #87, Use Words or a Sentiment
Challenge Up Your Life - #103, New {new product}
Papercraft Business Challenge - Anything Goes, option of New Beginnings 
Take It, Make It - M, Anything Goes
Cardz TV - #80, Anything Goes
Happy Little Stampers - Anything Goes w/ Dies


Saturday, December 29, 2018

Home for the Holidays with Hero Arts

Since winter is still here, I wanted to share this winter wonderland card I created using the Home for the Holidays set from Hero Arts.  It's my last entry in the Winter Wonderland challenge at a2z Scrapbooking.  If you look closely, you can see the sparkle on the card and I accomplished my goal of creating my own Winter Wonderland!  There is a bit more time left in the challenge, so why not link up your own Winter Wonderland creation? 

What I Used to Make my Card:
White Card Base
Hero Arts Home for the Holidays Stamp Set, #CM282 {you can special order from the store}
Hero Arts Home for the Holidays Die Set, #DI556 {you can special order from the store}
White Shimmer, Gray and White Cardstock
Watercolor Paper {I use this}
Zig Clean Color Markers
Sue Wilson Mini Expressions Warmest Wishes die, #CEDME018
Lawn Fawn Stitched Hillside Backdrop, Landscape, #LF1502
Wendy Vecchi Archival Ink in Fern Green and Potting Soil
Hero Arts Ink in Intense Black, #AF345
Stickles in Stardust

I wanted a charming landscape for my houses so I began this card with the backdrop which I cut from white card.  I had found this grayish white, almost speckled paper {it almost looks like vellum to me} in my stash and decided to use that for my sky.  I added some Stickles snowflakes to the sky as well.  It's difficult to see in the pictures, but there is glittery snow on the houses and trees.  I stamped all of the houses on watercolor paper, colored them using Zig Clean Color Markers and, when they were fully dry, used the coordinating dies to cut them.  I stamped the trees with colored ink on scrap card and cut them out as well.  I wanted the card to look a bit old fashioned so I colored the houses lightly to give a Norman Rockwell feel to the card.
Another Look

Even though this is a Christmas set, you could essentially use the houses without snow {like the cabin} any time of year.  I think sending a card after the holiday "rush" is almost better than getting a holiday card.  Like getting a present out of the blue.  In order to compose the scene, I cut the hillside backdrop and the sentiment both out of white shimmer card.  I placed the houses and trees in various places on the backdrop and the sentiment in the top right hand corner.   As I am looking at the card now I think perhaps I should have made some smoke come out of the chimneys to add a bit more warmth.  What do you think?  Regardless, this setting is definitely a Winter Wonderland to me.  I can picture a roaring fireplace inside the homes, the families gathered around it drinking hot cocoa, all  warm and snug in their flannel pajamas.  Sounds really good to me! I hope you get some inspiration from my card and perhaps compose your own Winter Wonderland to enter into this month's challenge at a2z Scrapbooking.  If you need some supplies, feel free to use my discount code CHRISTI15 at the a2z Scrapbooking store to get 15% off your order of any size, even special orders!  Thank you so much for dropping by, it's been nice to share the end of the year {can you believe it!?!} with you and I hope you will continue to pop in ~ Fondly, Christi

I would like to enter my Home for the Holidays card in the following challenges:
A Blog Named Hero - M, Winter {graphic below}
Country View Challenges - M, Christmas
The Artistic Stamper - Christmas {entry 2}
Ellibelle's Creative Moments - Christmas
Double D Challenges - Let it Snow {graphic below}
Simon Says Stamp Wednesday Challenge - Anything Goes
Crimbo Crackers - #174, Anything Christmas Goes


Saturday, December 30, 2017

Christmas Has Gone to the Dogs

Settle in, dear readers, this is a slightly long story, but it is a story of miracles and things happening at just the right time.  As some of you may recall, my next door neighbor has an adorable dog named Lolly.  Well, Lolly now has a boyfriend, Bear.  Bear literally showed up next door, matted, hungry, & thirsty.  My neighbor was going out, so I took Bear into my fenced-in backyard.  I looked him up, found a rabies tag, and tried to find his owner.  The local animal shelters attempted to make contact with the information they had but, no one contacted me or the shelters.  It began to get dark and I couldn't have Bear come to my house, not knowing if he was ill and could possibly infect, or attack, the Fabulous Feline Four, so I called my good friend, Tom, to come and take Bear until his owner could be found.  Fast forward a week and no one was looking for Bear.  The Man and I even drove around the neighborhood where Bear used to live to see if there were lost dog signs.  Tom and Bear fell head over heels for each other and have been inseparable.  Tom was going through a very lonely time and Bear couldn't have showed up at a better time.  It's been about nine months and Bear is healthy, happy, and has a fabulous owner.  Bear and Lola are medium, mixed-breed dogs, but they appear to be mixes of the same breeds.  They are almost exactly the same size and they LOVE to play when Bear comes over.  They run around the yard like little race cars, yipping, following each other and sharing treats.  Both dogs have been introduced to the Fabulous Feline Four with only small squabbles, mostly due to Sylvester's temper. To celebrate how happy everyone is, for Christmas this year I made Helen, Lolly's mom, and Tom, Bear's dad the exact same cards with just a few differences.


What I Used to Make my Cards:
Blue Card Base
White Card
Vanilla Card
Gold Card
Tim Holtz Mini Cats & Dogs Stamps, CMS272
Tim Holtz Framelits Mini Cats & Dogs Dies, #661594
Newton's Nook Newton's Curious Christmas
Spellbinders Petite Labels One, #S3-205
Tim Holtz Scribbly Christmas Stamps, CMS249
Wendy Vecchi Ink in Potting Soil & Fern Green
Ranger Archival Ink in Jet Black
Derwent Inktense Pencils
Word Bubbles made with Silhouette Cameo
Tim Holtz Boneyard, TH93596
Ranger Glossy Accents
Various Gel Pens
Gold Star Sequins
Tissue Paper {Dollar Tree}
Blue Ribbon
Dimensional Dots

Bear has a silver skull charm hanging from his collar; Lolly has a festive red acrylic bow.

I had already colored and die cut the two dogs; Bear is a darker grey, with one white leg, whereas Lolly is all grey and white.  Each of their noses got a dot of Glossy Accents and they were set aside.  The cats were also pre-colored and I chose the two I did due to the similarity to my cats.
Bear's Card

I designed and cut out the word bubbles using my Silhouette Cameo and stamped the sentiments in the bubbles.    I then used the Labels die to cut out the "Dear Santa, define good" sentiment and the gold paper. I glued them together and set them aside.

To begin my scene, I stamped the tree, which I inked with the Wendy Vecchi inks, slightly off the edge of the card.  I wanted to ensure I had enough room, plus I wanted the dogs to be the focal point. I colored in the baubles with various gel pens and attached a gold sequin star to each tree.  I "wrapped" each bone with tissue paper and ripped the sides to make it seem like the dog had done it.  I used dimensional dots to pop out the dogs, adding little pieces of the tissue paper to each dog; Bear has it in his mouth while Lolly got some on her head during her ravaging of the bone.  I made sure there was enough space
Lolly's Card
between the dog and the tree so I had room to add some more tissue paper scraps.  


I attached the gold and white card sentiments above each dog's head, while using the word bubble sentiment off to the right side of the card so it appeared that someone out of the scene was telling the dog not to peek.  That little warning came a bit too late.  Now, neither dog lives with any cats, but, knowing how curious cats are, I decided to add a cat to the side of the card, with a wide eyed look.  I wanted it to seem like the cats were both amazed and appalled at what the dog was doing, and quite possibly, might tattle. 

I had a great time figuring out how I was going to get my message across; and everyone loved the cards.  You can bet you will be seeing these two rascals in more of my creations. Thank you so much for reading this post; I know it was long :) Hugs!! Christi

I am entering my Christmas has Gone to the Dogs cards in the following challenges:
Fussy & Fancy - #202, Christmas Challenge
Stamplorations - December Challenge, Stamps & Gold
Stamplorations Anything Goes - Ongoing
Kraftin' Kimmie - Anything Goes or Sketch
Sisterhood of Snarky Stampers - #100, N is for Naughty Christmas
Sweet Stampin' Christmas - Anything Goes Christmas
Simon Says Stamp Wednesday Challenge - Anything Goes
The Merry Christmas Challenge - #49, Anything Goes & Christmas

Sunday, December 17, 2017

Merry Christmas Wreath

One of my favorite things is when I can stretch my crafting supplies - I love it when I can make something intended for something else, another holiday or project and shape it into something entirely different.  Today I am sharing a card I made with what I'd call a spring die, after I turned it into a holiday die.


What I Used to Make my Card:
Red Card Base
Small Fairytale Oval, Memory Box, #99172 {Calla Oval Wreath will work also!}
Poinsettia Mini, PoppyStamps, #1971 {could use this poinsettia set}
Stitched Oval Stax, MFT/Die-Namics, #MFT-521
Sentiment, Merry Christmas, My Sentiments Exactly! #G545
Wendy Vecchi Ink in Red Geranium
White and Green Card
Red Glitter Card
Stickles in Gold

I got the idea for this card after I spied the Poinsettia dies in the Dies R Us store.  I had to have them and the flower is so tiny and cute, I hope to be able to incorporate it into some other projects.  First, I cut the Small Fairytale Oval out of green card.  Then I set to work on the poinsettias.  I cut each layer out of red glitter card {there are three layers to each flower}, glued them together, then added the gold stamen.  The gold Stickles came out really dark and I was thinking I might have to make the flowers all over again, but once it dried it was fine. 

Once the poinsettia flowers were dry, I added them to the Small Fairytale Oval.  I trimmed some of the green flora to accommodate the flowers and also the
sentiment. The sentiment I chose fit just so even after I trimmed the inside of the oval a bit, so in order to ensure that I'd get the Merry Christmas in the right spot I taped the oval with washi tape around the sentiment while I glued it.  You can see the washi tape right under the ink; I used a scrap piece of white card since I knew I was going to cut the entire design out again.  Before I go further, I have to gush about the Red Geranium Wendy Vecchi ink.  In my opinion, it is the truest red ink I've found.  You may not be able to tell with the sentiment being so thin, but it is the only ink I use on my holiday projects that call for red ink.  Plus, it's archival so it dries permanent on most surfaces and it's waterproof.  I don't care for tomato red or orange reds when I need a true deep red.  Enough about the ink. 


When the oval dried around my sentiment, I cut it out using one of the Stitched Oval Stax dies and adhered it to a red card base.  This is all part of my attempt to be a bit more clean and simple with my card designs.  I hope you enjoyed my tutorial and are enjoying the holiday season! 

I do hope you will continue to join us at the Dies R Us Inspiration blog - we are there through the holidays with tons of brilliant inspiration! Fondly, Christi


Don't forget to join in on all the fun at the Dies R Us Challenge Blog.  
There's  a new challenge theme offered on the 1st and 15th of each month
 and one lucky  randomly drawn winner will receive a gift voucher prize to 
the Dies R Us Store.  For your convenience, all the important Dies R Us 
links are provided below.


click below for:

I am entering my Merry Christmas Wreath card in the following challenges:
Muse:Christmas Visions - ANY Holiday Card, #90
Outlaws Twisted Thursday - Anything Goes, Twist: Poinsettia 
Die Cut Diva's -Winter Time
Lost Coast Portal to Creativity - #43, Christmas/Winter
Incy Wincy - Red & Green

Monday, February 13, 2017

Love is in the Air (literally)

OK, so I said my last post was going to be my last Valentine's Day post so let's just say this is an anytime card.  Fabulous.  While searching through challenges to find appropriate ones to enter my other cards in, I noticed a few where the theme was "Love is in the Air".  Ever since I noticed the theme, I just could not get it out of my head! I composed the card over and over in my thoughts until tonight I just HAD to make it.  

What I Used to Make my Card:
Pink Square Card Base (5 1/4" x 5 1/4")
All Night Media Stamp, Catnip, #838D (retired)
Hot Air Balloon, Silhouette File #26040
Scrabble Alphabet - Ma Vinci's Reliquary (closed)

Wendy Vecchi Red Geranium Ink

1/2" Scallop Square Punch, Marvy Uchida (retired)

Ranger Ink in Jet Black 
All of the cardstock is from my stash


This was a very quick card to make; it took me the longest to choose an alphabet to spell out "love" with.  What I did first was cut the hot air balloon out using the file from the Silhouette Store. I used dark gray cardstock for the outline of the balloon, light brown for the basket and pinkish purple for the actual balloon.  I went through my cat stamp stash and found one that I thought would fit best with the size of the balloon. I eyed where the basket
Just another peek
would be in relation to the card and stamped the kitty directly on the cardstock. I chose the grayish blue with white specks to seem like it is night time. The balloon was assembled and glued over the cat so all you see is the top half of his body, and how he is joyfully gazing up at the balloon (I don't know why it's a he.) The scrabble letters were stamped with Jet Black onto white card, punched out and glued to the balloon.  I took the panel with everything on it and attached that to a pink square card.  


I have had the alphabet stamps and the kitty stamp for years.  It amazes me when I think how long I've been stamping because I typically get bored with things quickly.  I've never been bored with stamping and having all the new goodies that come out continually helps keep things interesting.  Just don't look at my credit card bills <grin>.  Thank you so much for your visit ~ fondly, Christi

I would like to enter my card in the following challenges:
Glitter 'n Sparkle - #226, Love is in the Air
Paper Creators - (M) Love is in the Air
Dragonfly Journeys - #85, Love is in the Air
Cardz for Gals - #40, Love is in the Air
Simon Says Stamp Wednesday Challenge - Cute
Come and Get It Challenges - Love is in the Air
Naughty or Nice Challenge - (M) #36, Love is in the Air Optional Colors

Monday, December 26, 2016

Noel

Happy Day After Christmas!!
I hope you all had a fabulous day 
and that your holiday
season continues to be joyous!
~~~~~~~~~~~~~~~~~~~~~~~~~~~~~~~~~
I remember seeing these peg stamps years ago.  Like decades ago.  I was always fascinated with them and amazed at the lovely creations that were made with them.  Honestly, it seemed too simple and I thought that I would never be able to create such beauty even if I bought myself a set.  Well, Rubber Stamp Tapestry had a sale and I could resist no more. I purchased two sets for myself and below is a card I made with one of the sets:

What I Used to Make this Card:
White Card Base
Oval Die Cut (I used Die-Namics Stitched Oval Stax, MFT-521)
Rubber Stamp Tapestry Noel Set, SWD-3801
Adirondack Dye Ink in Lettuce & Cranberry (discontinued but available)
Wendy Vecchi Archival Ink in Geranium, Potting Soil & Fern Green
White Cardstock to Stamp On
KaiserCraft Decorative Paper from Yuletide, PK484

Now, some of the really cool things about these stamps is:

  1. You can purchase every stamp they make separately.  You don't need to buy the set if you are in love with one stamp.
  2. They include a "How To" sheet with each set that explains how to achieve the look on the front of the package.  They even include ink colors! And, if you lose the sheet, you can download it from the site! Click HERE, then choose Download Card Insert  to see the "How To" sheet for the Noel Set.
  3. There is ALL sorts of information about peg stamps, tutorials, reviews and more - you really cannot fail using the tips and tricks that they share with you.
OK, back to my card.  I stamped the NOEL with the Fern Green ink, then tried to put the oval die cut over the NOEL so that it would be centered.  I didn't accomplish that, my NOEL is a tad too close to the top of the card, but, (say it with me) that adds to the charm of handmade <grin>.  I then proceeded to stamp the pine cones in Potting Soil ink, the little poinsettia flowers in Geranium ink and the squiggle in the Lettuce ink.  After I went around and around, turning the card as I went, I decided I needed a bit more color and stamped the flowers a few times using Cranberry ink.  I am pleased with the final results, off center NOEL and all, and proceeded to stamp around the "O" with the same images and inks.  I then matted the stamped cardstock onto some KaiserCraft decorative paper and mounted that on the white card blank. 
Another Look
I am SO glad I purchased this set and I am looking forward to using the other set very soon.  Rubber Stamp Tapestry is having a sale right now and you can get yourself a few sets at a great price - just click HERE to go to the specials page (I am not affiliated with any of the above mentioned companies, but I love to pass on a great deal when I see one). There is no end date for the sale, but it is called December Deals so I wouldn't wait too long to scoop up some goodies. I hope my NOEL card inspired you to stretch your limits and see what you can create!  Thank you for stopping by my blog - I'd love it if you'd leave me a comment and follow me ~ Hugs, Christi

I am entering my Noel Card in the following challenges:
Kraftin' Kimmie - #362, Winter
Perfectly Created Chaos - #7, Christmas Anything Goes (December)
Cards in Envy - Celebrate the Season
Sisterhood of Snarky Stampers - #74, X is for XXX-mas
Christmas Card Challenge - #2 (second entry)


Saturday, December 12, 2015

Serene Christmas Scene

When I received my card from Asha, via the Card Chain Challenge, I fell in love with the stamp set she used. She told me that it was manufactured by Clearly Besotted, called Christmas Cheer, but, sadly, had been discontinued. Well, I went on the hunt - I found the stamp set at one store and the dies at another, and I won't even tell you how much I spent to get the set, a gift to me from me.  This is my first card with the new set and you'll notice there are no decorations on the tree.  If there were, the cat would be sure to turn this serene scene into a mess!
What I Used to Make my Card:
Vanilla Card Base
Clearly Besotted "Christmas Cheer" stamp & die (discontinued)
Tim Holtz/Stampers Anonymous "Scribbly Christmas" #CMS249
Tim Holtz Distress Inks in Tea Dye, Mowed Lawn, Fired Brick, Pumice Stone and Brushed Corduroy
Wendy Vecchi Archival Ink in Red Geranium
Ranger Archival Ink in Jet Black
Vanilla, White, Black, Gold Glitter Cardstock
Stickles in Gold
The Art Institute Glitter in True Red
McGill Cat Punch
Pop Dots

First thing I did was stamp all of the Clearly Besotted Christmas Cheer stamps and then die cut them. I die cut the candelabra twice, once out of black cardstock and once out of gold glitter card, layered them together and adhered.

Once I had all my pieces, I stamped the string across the fireplace to hold the round banner.  I assembled all the die cuts and set them aside to dry, including the flames, which I also put gold Stickles on and loose red glitter from the Art Institute.  I took a vanilla card panel and stamped one of the trees out of the Scribbly Christmas set on it, being sure to leave enough room for the fireplace.  I have a very old McGill cat punch (ok, I have  a few many, many cat punches) and I punched the cat out of black cardstock.  I assembled everything, adhered it all to the vanilla panel and edged the panel with Pumice Stone ink. I saw the strip of gold glitter card on my desk, so I grabbed it, glued it to my base card and then pop dotted the panel to the base.
Another look

I adore the Christmas Cheer set and I am so glad I found both the stamp set and the matching dies. Not a one could be found, not even on eBay!  I am already thinking of other ways to use these stamps and to me, that makes it a good investment worth the money I spent (I can justify almost anything).

Please consider following me as I have a goal of getting 100 new subscribers to my blog before 2016 and I think I only need about 7 more to make it - I would greatly appreciate it and will follow you back if you mention that you are following me in your comment.  

I am entering my Serene Christmas Scene in the following challenges:
The Sisterhood of Snarky Stampers - #49, X is for Xmas
Cut it Up - #86. Brrrrr! Winter!
Frilly & Funkie - 'Tis the Season
Simon Says Stamp Monday Challenge - Holly Jolly Stamping
Dream Valley Challenges - #121, Die Cuts & Punches
Crafty Hazelnut's Christmas Challenge - #259, Anything Goes, as long as it's Christmas
Show Us Your Pussies Challenge - (M) #1, CatMouse is Coming!


Sunday, August 16, 2015

CELEBRATE with Anything But a Card's Final Challenge

It's with mixed feelings that I write this post.  I'm thrilled to have been on the Design Team for Anything But a Card since November of 2013; it was my first design team ever and due to my fellow teamies and Susan Brown's encouragement, humor, help (lots and LOTS of help) I have been blessed with designing for a few more manufactures and such.  I have always loved making things other than cards and this experience definitely enabled me to learn, experiment and grow as a person and a crafter.  So, before I get started on my project I want to shout out to all my fellow DT's, both past & present and to all the beautiful creations that people have entered! Now, as you see, the theme for this last month is Celebration.  I hope you can make a Celebration project and join us. You still have until September 6, 2015 to whip something up and join us (and keep checking the Anything But a Card blog, I hear there may be some surprises in the works!). My favorite holiday is Halloween, so I made this wall hanging to celebrate my favorite holiday:


What I Used to Make my Project:
White Memory Tray - postcard sized squares (I painted it black)
Graphic 45 Papers in Steampunk Spells & Rare Oddities
Rare Oddities Journaling & Ephemera Cards
Retro Art Cafe - Pumpkin podspaper skeletonsskull cameochipboard feather, acrylic black cat & bat 
Prima Resin Frames #572372
Tim Holtz Sizzix Small Bird & Cage Die Set #657207
Tim Holtz Simple Sayings Set, #CMS155
Blood Drip stamp is from Viva Las Vegas!
Potion Bottles from The Porkchop Show
Plastic Bone, Black Cat Kittens & Fiber (stash)
Distress Ink in Frayed Burlap (colored embossed bone & edged sign)
Wendy Vecchi Archival Ink in Potting Soil (colored resin frame)
Ranger Embossing Powder in Rich Red
Homemade Embossing Powder (SU! Black & Hologram Highlights mixed, used on feather)
SU! Antique Ivory Embossing Powder (on the bone)
Clear Embossing Powder

I figured it would take me too long to explain this piece step by step, plus, I worked on it for about 3 weeks (on and off) and can't recall them all, so, I am just going to explain some of the embellishments.  Every square uses either Steampunk Spells paper, Rare Oddities paper or Rare Oddities Journaling & Ephemera Card for the background. 

Square #1 "Ravens" - I used a piece of flower stem from my backyard for the tree & mixed my own embossing powder for the feather. Also, the Raven Feathers advertisement is a Rare Oddities Journaling & Ephemera Card.

Square #2 "Cats" - I think the little blood drip is awesome. I admit, I was nervous that I would mess the paper up (I hoard Graphic 45 papers like crazy), but it came out fine. Whew!
Square #3 "skull" - I antiqued the Prima frame with Frayed Burlap ink, but I was concerned about it drying, so I threw a bit of clear embossing powder on it. 

Square #4 "Happy Halloween Sign" - it took me forever to get the plastic bone covered with the embossing powder, but I am really happy how it came out.  I had originally wanted the sign to hang freely, but the fiber was creased, so the sign is glued to the background. This is what the bone looked like when I started next to the finished bone. 

Square #5 "Potions" and Square #6 "Skeletons" are fairly self explanatory.  I loved making this to celebrate Halloween - it's never too early to get your freak on! 


Another Look
Thank you so much for stopping by & please consider following me. I am on a mission to get 100 new followers in the year 2015 (i'm almost there!).  I hope you have many reasons to celebrate! ~ Christi

I am entering my Halloween Wall Hanging in the following challenges:
My Sheri Crafts - #163, Show Me Your Decor
Simply Create, Too - #92, Anything Goes
Simply Papercraft - #11, Anything Goes
Quoth the Raven, Nevermore - #47, Pick Any 3
Decorate to Celebrate - #106, Anything Goes
Crafty Gals Corner - #32, Any Holiday

Friday, January 30, 2015

Shabby Chic Valentine

In my quest to use my stash, I have had a both of the papers featured on this card for a while but this project is the first time I have used them on anything.  I adore DCWV paper stacks and on this card I used Burlap Paper and Adhesive Fabric Paper in Pink.  Not my usual style, but it was fun trying out some new textures and color combinations. 

What I Used to make my Card:
Vanilla Card Base
Scrap of Vanilla Cardstock
DCWV Adhesive Fabric Paper in Pink, 12 x 12
DCWV Burlap Paper, 6 x 6
Happy Valentine's Day rubber stamp (manufacturer unknown)
Brads from Making Memories
Distress Ink in Victorian Velvet
Wendy Vecchi Ink in Potting Soil
Silhouette Cameo
Cut File - Heart

The Fabric Paper from DCWV
I wanted to create something old fashioned-looking, sort of shabby chic if you will.  I started the card by choosing the 2 papers. I have never worked with either of these papers, and I was surprised that the burlap paper is truly burlap, but it is much easier to use.  I got out my sheet of burlap (they are only 6 x 6) and cut it to fit on the top of the card so it appeared that the entire card was made out of burlap (but don't attach it to the card yet!). I edged the burlap panel with the Wendy Vecchi's ink in Potting Soil to give it some oomph. I went to my Silhouette machine and found a heart, sized it down to fit
Close up of the Heart
on the card, and cut it out of the fabric paper.  That was an experience since I didn't know which setting to use, but I settled on the light fabric setting and it cut out fine.  I thought I might have to help the fabric heart stick, since it was burlap, but it grabbed on with no problem! At this point the burlap is still not glued to the card, you still need to work with it.


Then I chose to stamp the sentiment on vanilla card instead of white, white just seemed so stark next to the warmth of the card.  I used Distress Ink in Victorian Velvet and I think it matches the colors in the heart perfectly! I also lightly edged the sentiment with the Potting Soil ink.  I decided to use brads to attach the sentiment to the card and I found these light green ones in my Making Memories brad stash - I usually use plain old silver or gold brads, but these sort of matched the green in the heart,  and the other colors were just too loud.  Once I added the sentiment to the card, I then glued the burlap panel to the front of the vanilla card.  I stepped out of my safety zone and I am so glad I did! Thanks for stopping by and please consider following me as I am on a quest to get 100 followers! Fondly, Christi
Another peek at the final card


I would like to enter my Shabby Chic Valentine in the following challenges:
Artistic Stamper - January Challenge, New Beginnings 
Die Cut Diva's - January Challenge, Anything Goes
Silhouette Challenges - January Challenge, Anything Goes
Simon Says Stamp Wednesday Challenge - Anything Goes 
Shopping our Stash - #186, Love Me Do