Hi everyone! I am finally feeling rested after the Valentine's Day frenzy. Every year I do the same thing; I tell myself I am not going to make any more Valentine cards and I end up making one, teeny, little card and the next thing I know it's five days later, I have glitter glue in my hair, my hand is glued to my desk, and I can't see anything among the scraps, stamps and embellishments that are all over the place. I envision it like a crafter's "hangover" and it takes a while to recover!
Anyway, I made this card, which is totally out of my comfort zone (at least I think so) just because, but then I signed up for the Card Chain Challenge and discovered it fit the challenge! I was really inspired by the new (to me) Spellbinders die set and I had some colorful scrap paper so off I went! Here are the themes from which we were able to choose for March at the CCC:
Color Palette:
Sketch

You can orient this sketch in any direction and/or flip it.
OR
One of the following themes: – Flowers or Fish or Friendship
OR
One of the following products: Stampers Anonymous stamps, Sequins, Fussy Cutting
My card, which was sent to Lizzy all the way in Australia, follows the theme of flowers and friendship. I hope you like it!

What I Used to Make my Card:
Square Card Base in Mint Green (5 1/4" x 5 1/4")
Blue Sky Paper (from stash)
DCWV Tie Dye Stack (discontinued but available)*
Unity Stamps "Hello" from He's a Wordy Buck, UK-705A
Spellbinders Die D-Lites Flower Field
Distress Ink in Wilted Violet
Martha Stewart Mini Pastel Pearls
Gems from my Stash
Pop Dots
*First, once again Die Cut With a View (DCWV) has released another stack with
the same name as the stack I used in this project. Just in case you absolutely need the Tie Dye stack I used, this is a picture of the cover. I love DCWV stacks but they can be pretty pricey so I often end up buying them when they have been discontinued.
All of the papers except the card base come from this DCWV Tie Dye Stack. I cut out the dies a bazillion times and a bunch of extra flowers. If you aren't familiar with DCWV stacks they often include specialty papers and this one includes both glitter and gloss (a coating similar to the many commercial glazes out there). All I used on this card were parts of the paper that had glitter, gloss or both, so I got some really pretty flowers. And for once the gloss isn't leftover glue on the card.
Once felt I had enough of the die cuts, I figured out the placement on the mint green card base and started gluing the cuts down. I ended up pop dotting some of the flowers but you can't really see that in the photos. There is plenty of texture with all the glitter and gloss; I added even more by using gems and pearls for the middle of some of the flowers. You should be able to make any of the photos on my blog bigger by just clicking on them; let me know if you have trouble with this.
Please take a moment to see the Card Chain Challenge Reveal that is posted on the main blog today.
 You get to see who sent who what and where everyone lives. I am thrilled to be back playing in this "challenge;" it is SO cool to get a card in the mail - it sure beats junk mail! This month I was the lucky recipient of LesLee's card, isn't it fabulous!?! She had to take a short break from crafting, but do pop over to her blog and take a look at the work she has done - it really is marvelous and after that stop over to the Card Chain Challenge and check out the reveal! Some of us may even include a goody or 2!
Thank you for stopping by and reading this rather long post. I encourage everyone who makes cards to participate in the Card Chain Challenge. It's so much fun to see a card online and actually have it in your hands! Please consider signing up, and if you have any questions not answered in the FAQs, feel free to email me and I will see what I can do to help you out. The rewards out weigh the effort! Fondly, Christi
I am entering my Flowery Hello card in the following challenges:
Pixie's Crafty Workshop - week 275/276 - Anything Goes
Southern Girls Challenge - #156, Dyeing to See You (use a die)
Simon Says Stamp Wednesday Challenge - Anything Goes (entry #2)
Deep Ocean Challenge - #151, Flowers Everywhere
Simon Says Stamp Work It Wednesday - Spring has Sprung
Anyway, I made this card, which is totally out of my comfort zone (at least I think so) just because, but then I signed up for the Card Chain Challenge and discovered it fit the challenge! I was really inspired by the new (to me) Spellbinders die set and I had some colorful scrap paper so off I went! Here are the themes from which we were able to choose for March at the CCC:
Color Palette:
 |
These colors are your guideline - exact matching is not necessary.
ORSketch

You can orient this sketch in any direction and/or flip it.
OR
One of the following themes: – Flowers or Fish or Friendship
OR
One of the following products: Stampers Anonymous stamps, Sequins, Fussy Cutting
My card, which was sent to Lizzy all the way in Australia, follows the theme of flowers and friendship. I hope you like it!

What I Used to Make my Card:
Square Card Base in Mint Green (5 1/4" x 5 1/4")
Blue Sky Paper (from stash)
DCWV Tie Dye Stack (discontinued but available)*
Unity Stamps "Hello" from He's a Wordy Buck, UK-705A
Spellbinders Die D-Lites Flower Field
Distress Ink in Wilted Violet
Martha Stewart Mini Pastel Pearls
Gems from my Stash
Pop Dots
*First, once again Die Cut With a View (DCWV) has released another stack with
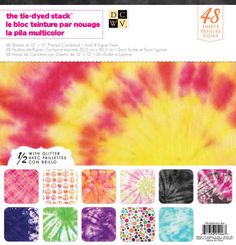 |
| Original Tie Dye Stack |
All of the papers except the card base come from this DCWV Tie Dye Stack. I cut out the dies a bazillion times and a bunch of extra flowers. If you aren't familiar with DCWV stacks they often include specialty papers and this one includes both glitter and gloss (a coating similar to the many commercial glazes out there). All I used on this card were parts of the paper that had glitter, gloss or both, so I got some really pretty flowers. And for once the gloss isn't leftover glue on the card.
 |
| Another Look |
Please take a moment to see the Card Chain Challenge Reveal that is posted on the main blog today.

I am entering my Flowery Hello card in the following challenges:
Pixie's Crafty Workshop - week 275/276 - Anything Goes
Southern Girls Challenge - #156, Dyeing to See You (use a die)
Simon Says Stamp Wednesday Challenge - Anything Goes (entry #2)
Deep Ocean Challenge - #151, Flowers Everywhere
Simon Says Stamp Work It Wednesday - Spring has Sprung


