Followers

Showing posts with label Design Team. Show all posts

Wednesday, May 4, 2022

Mixed Media with The Robin's Nest Creative

 Hello everyone! For my Design Team project at The Robin's Nest Creatives I decided to go all out and get really messy.  I used to make mixed media items all the time, but have since gotten busier and really haven't had time to play; I made up for lost time!  Let's get to it, here is the project; it's made on a Frederix 4" x 6" panel - this is a long post, I apologize, but I used a lot of different products (some not so successfully) while making this piece.
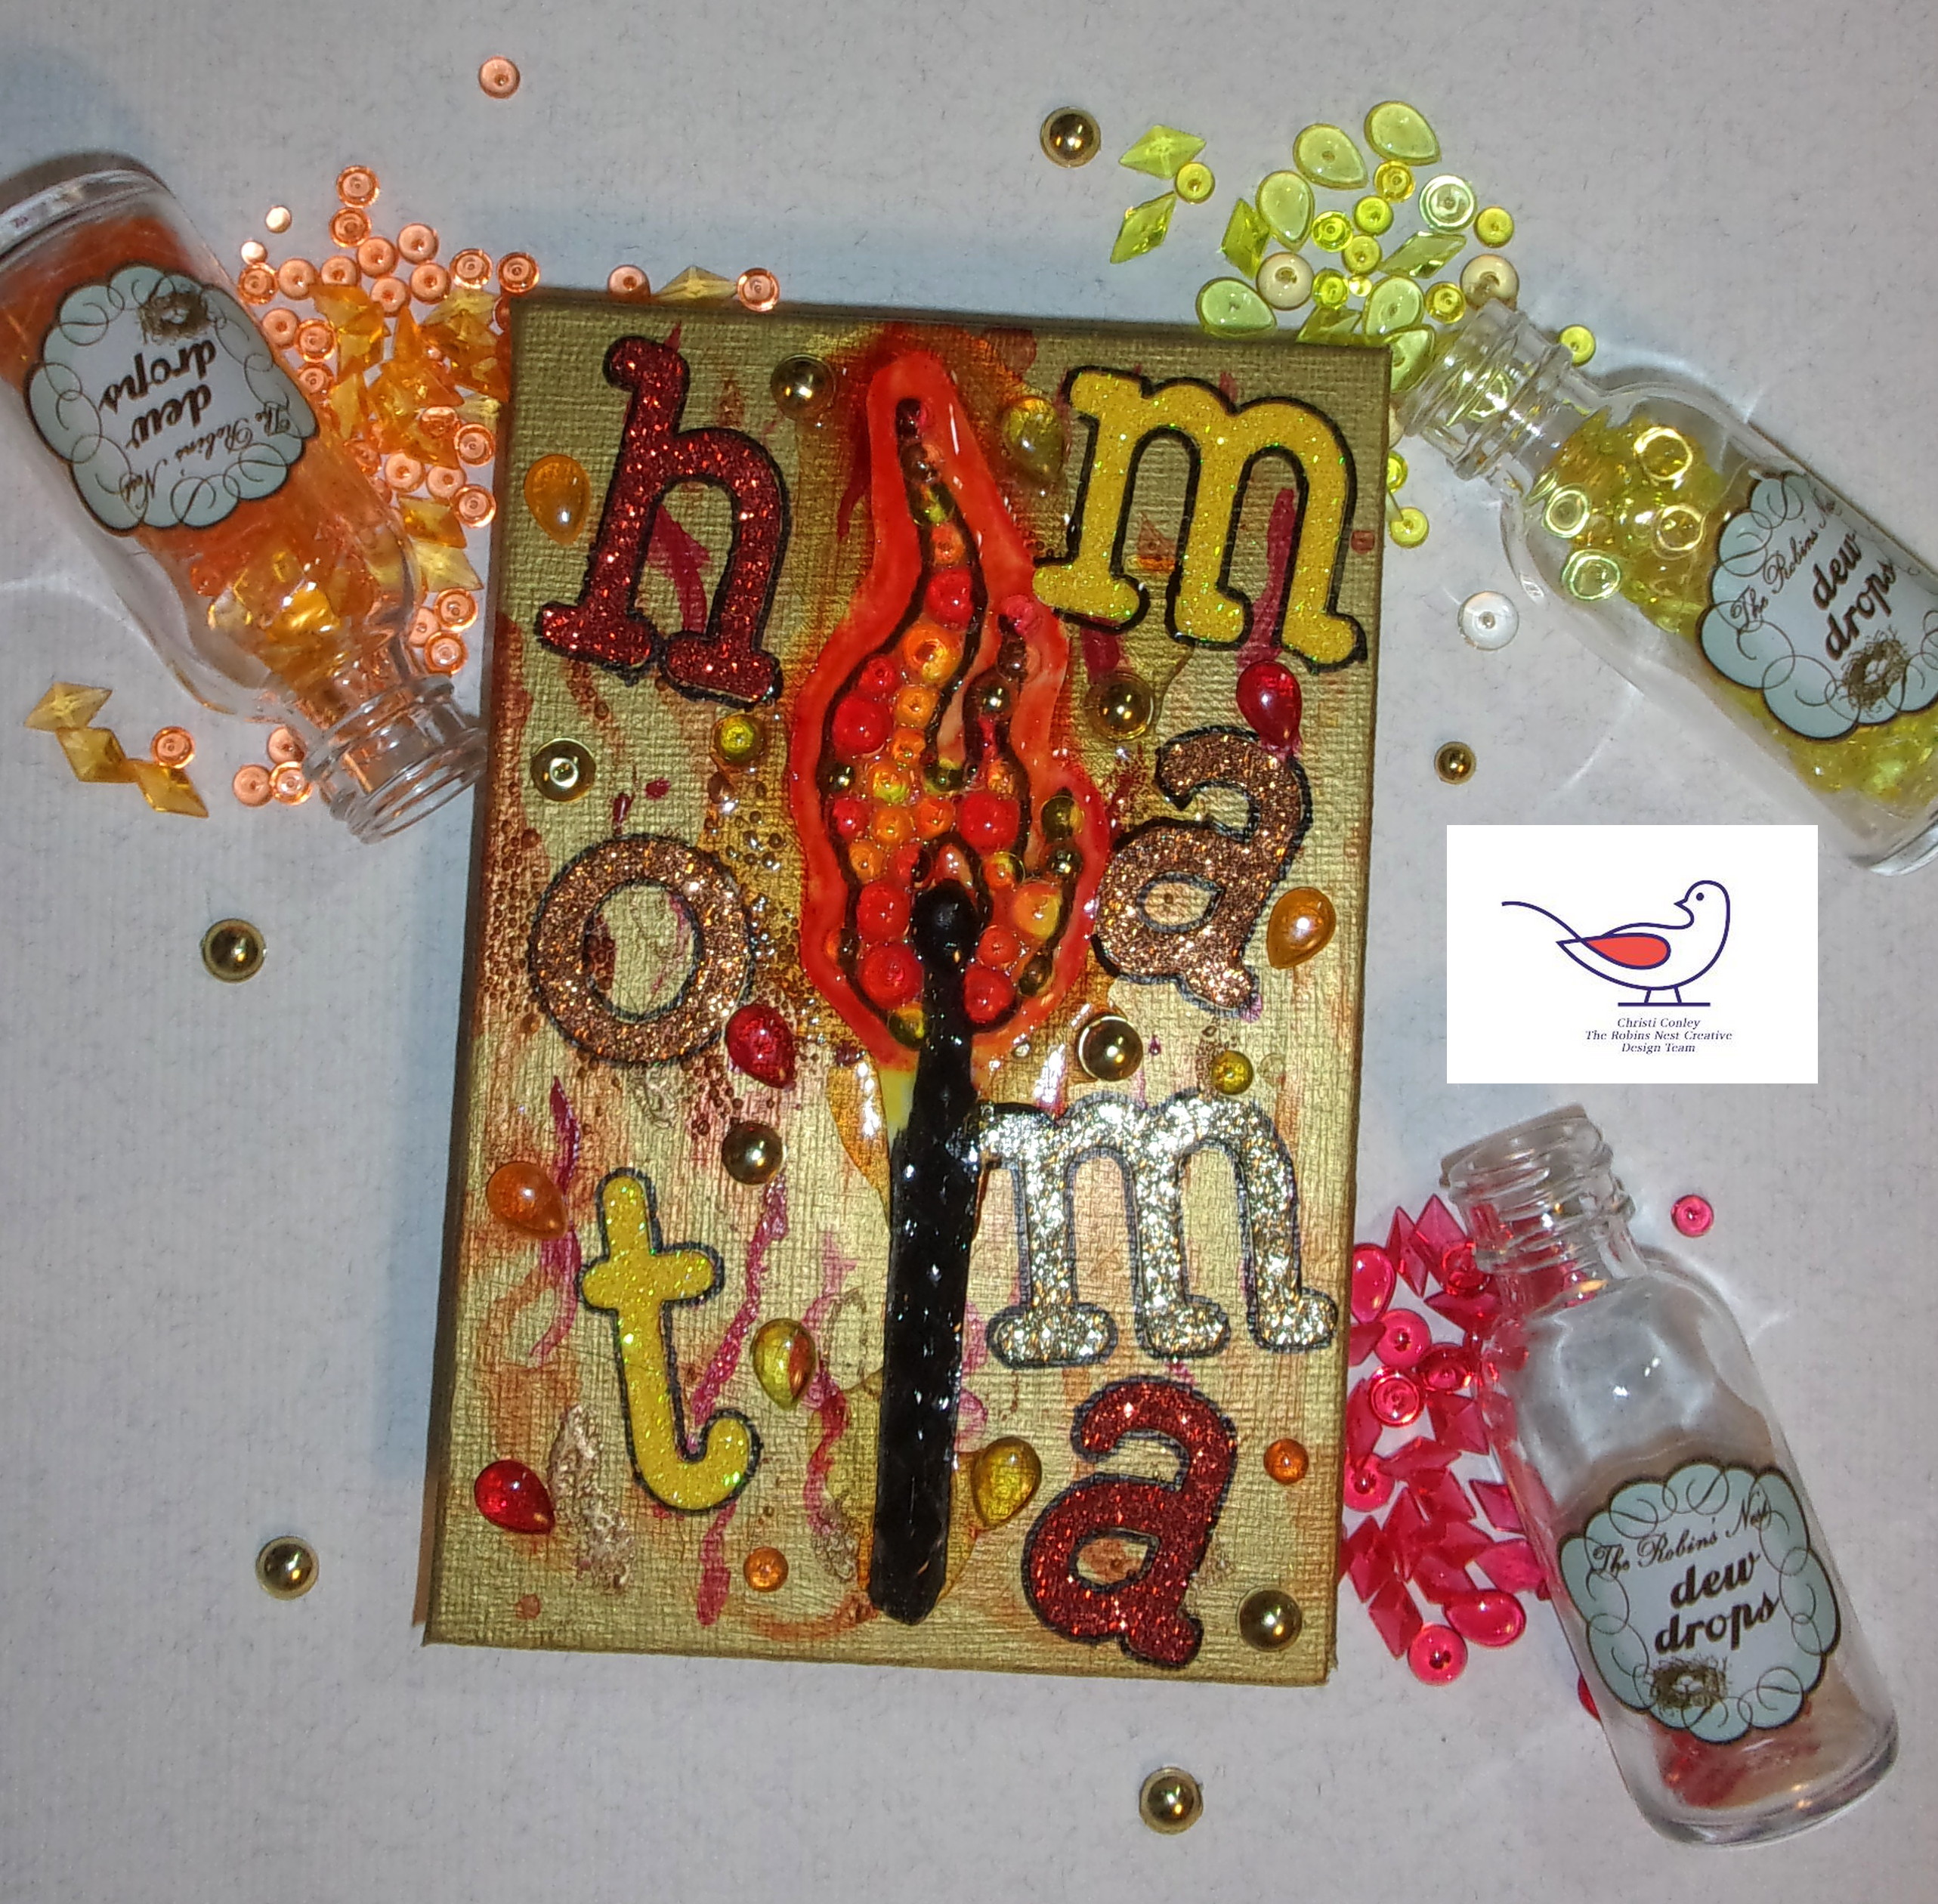

The first thing I did was use one of the really cool kits they have at The Robin's Nest called Creative Dew Drop Canvas and there are some amazing pictures to choose from, I used the Matchstick Creative Dew Drop Canvas for today's project.  These kits come with everything you need (except glue) to make a masterpiece worthy of framing - AND they come in different sizes! I used Dew Drops that I though would represent the flame best, orange, gold, red and yellow and filled it in completely with both Regular and Mini Sized Dew Drops. Black Diamond Dews were used on the wooden part of the match. I also colored around the flame to sort of give it that halo glow you sometimes get around fire using Copics right on the canvas.  I smothered it with Diamond Glaze and let it sit overnight to dry.  I wanted

Another Look
to use a panel as my substrate so I cut the match out.  I actually did this back in the beginning of being on the Design Team but I put the match somewhere and couldn't find it - shocking, I know - it popped out of where ever those items go when "they were right here" and then they are gone (another dimension with lost socks?? I don't know) but I found it.  Setting the match aside, on my desk so it couldn't escape again, I painted the 4" x 6" panel gold using Lumiere True Gold Paint. I have to swoon for a second because I love Lumiere Paints - if you like rich color, some of the coolest pearlescent colors (some of them are blended with 2 colors and the effects are amazing!) you need to check this paint out.  It is sold for use on fabric, but I have used it on everything and I have never been disappointed with it.  It's a quality product and it may seem pricey (if you shop around you can get a jar for around $6, a 2.25 fl. oz, jar, but they also come in sets with little squeeze bottles, called Exciter packs), but a little goes a long way. Sorry for that little detour! 

So once my panel was dry this is basically where I went crazy.  I used a flame stencil and some sprays to try and make a fire background, well the gold paint did not like the sprays (they are water based and just beaded up and dripped away) but some of the color did take.  At this point I just started to throw products at the panel; and I used so many different colors I couldn't begin to list them all. I used a few different embossing powders from Wow Embossing Powders, some diluted red paint from Golden, and some more embossing powers -which again were an issue because the embossing ink just beaded up on the paint.  No worries I just made the background really, really abstract.  I glued the Matchstick Creative Dew Drop Canvas that I had cut out onto the panel and attached the alphabet letters I had cut out of  6" x 6" DCWV glitter stacks and I then added more Dew Drops using the same colors I used to fill in the flame, but I used the Tear Drop style of Dew Drops instead.  I added a few Mini Dew Drops as well.  I wanted them to sort of look like sparks from the flame.  I glued the sentiment onto the panel and the letters just blended right in with everything else so I used a permanent black marker and traced them all so they'd be easier to read and pop a little.  The final step was to smother the match stick once again with Diamond Glaze and once that dried I was done.

I am actually happy how this panel ended up.  It is very interesting with all the colors, glitter, glaze and, of course, Dew Drops.  I hope you enjoyed my long story- I have been trying to make my posts shorter and I think I am succeeding, but sometimes I just have to tell the whole story!  Thanks for your support ~ Lots of love, Christi

I am entering my Mixed Media Panel in the following challenges:
Crafting Happiness, #123 - Anything Goes
Love to Craft Challenge Blog, #68 - Anything Goes
Mix it Up Challenge, #59 - Anything 3D Goes
Creative Artiste Mixed Media Challenge, #82 - Anything Mixed Media Goes
A Perfect Time to Craft, #5 - Anything Goes
Mixed Media Lovers, #13 - Anything Goes

Thursday, April 14, 2022

Raindrop Dew Drops on a Rainy Spring Card

 I had already had the background made that I used for this card so I built off of it.  I had never used the Lawn Fawn Stitched Umbrella die, it had been sitting on my desk for inspiration for a while now and it was definitely time to put it to good use!  Since Raindrops Dew Drops are obviously the shape of raindrops, I felt the backdrop and the umbrella would all go together perfectly and create a cute, whimsical card. I hope you like the card I created:


As I said, the background was already made with some light blue and grey card along with the rainy backdrop; to give it some interest I cut it out using a fancy scalloped stackable and attached it to a white

card base.  I proceeded to cut the umbrella out of white card using a freebie paper I'd gotten for the inside of the white cut out.  I cut the handle and the tip of the umbrella out of brown card and glued it to the front over the rainy backdrop.  Included with the umbrella die are raindrop dies, I used them to cut out pastel raindrops in light blue, green, pink, yellow and light purple.  I glued clear Raindrop Dew Drops onto the colored raindrops which added some great dimension to the card!  I still had some space left so I added some more clear raindrops to various places on the card. I stamped out the sentiment and used a stitched rectangle die to trim it down then added it to the card and I was done! 

Thanks so much for stopping by! Fondly, Christi

I am entering my card in the following challenges:
Creatalicious, #233 - Anything Goes w/ Optional Spring Colors
CCEE Stampers, #2214 - Look up into the Sky
NBUS Challenge #37 - Never Before Used Schtuff
Happy Little Stamper - Anything Goes with Dies
Lawn Fawnatics, #122 - Spring Inspiration Board {see graphic}


Tuesday, November 2, 2021

Paper Funday with CAS-ual Friday Stamps!

 Hi all! Welcome to my monthly design team post for Paper Funday.  Since I am not skilled at using digi stamps I typically don't use the products that our sponsors give us to play with but this time we are sponsored by CAS-ual Fridays and I got to play with a set I've had for a while.  Remember, our challenge is always anything goes, with an optional twist and this month the option is Thanks/Grateful.  I am thankful and grateful for coffee, so my card fits both using the sponsors products and the optional theme!  

I used a white card base and cut out a brown border using a die from Lawn Fawn.  I stamped the sentiment using the CAS-ual Friday Coffee Talk stamp set using my favorite black ink and the word coffee using Hero Arts Cocoa Ink {I received the ink in a My Monthly Hero kit and it isn't available separately right now} right on the card.  I finished by cutting the coffee cup out of Your Next Stamp's paper pad Crazy for Coffee {if you look close you can see there is a tiny coffee bean with the word coffee circling it that makes the pattern - too cute!} and the coffee out of light brown card.  I popped the cup up with dimensional dots and added some iridescent pearls I had in my stash. 

You still have plenty of time to join in and play with Paper Funday this month - who knows, you just might win some goodies! Thanks so much for stopping by & see you soon! Christi  

I am entering my card in the following challenges:
CAS on Friday, #217 - Coffee
Ellibelle's Corner - Use Die Cuts and/or Punches
Allsorts Challenge, #648 - Add a Sentiment
Creative Fingers Challenge, #218 - Anything Goes
A Bit More Time to Craft Extra - Anything Goes
DL Art - Anything Goes

CAS on Friday's Inspiration Photo


Wednesday, February 3, 2021

Love is in the Air with Paper Funday's February Challenge

Hello everyone! I'd like to take this time to announce that I am now on the Design Team of  The Paper Funday Challenge Blog which is a monthly challenge open to any and all papercrafts!  I am very excited to share my first creation for the month of February; our challenge is Anything Goes with the Option of Love is in the Air.  I chose to work with the option this month and here is my card:


What I Used to Make my Card:
White Card Base
Red Cardstock
Light Pink Cardstock
Simon Says Stamp Pawsome Love Stamp Set, #SSS102077
Simon Says Stamp Pawsome Love Die Set, #SSSD112094C
Simon Says Stamp Ornate Love Dies, #SET12180L {retired, I just used the heart die}
Gina Marie Designs Lacey Lattice Rectangle Dies 
Watercolor Paper {I use this}
Zig Clean Color Brush Markers
Gina K Amalgam Ink Pad in Obsidian Ink
Derwent Inktense Pencils
Stickles Glitter Glue in Christmas Red 

I've been finding that using colored pencils, watercolor or not, along with my Zig Clean Brush Markers allows me to color in designs better and I have much more fun when I am mixing mediums.  That is what I did with the images I used on this card; I stamped them, colored them, {I can't remember which I used first but I think it was the pencils} and then cut them out, and set them aside.  For a background, I used the lace lattice dies and red cardstock.  I had first used a clear dimensional gel on the heart balloons but for some reason as it was drying it cracked and while that look may be fine for some projects, it just didn't work for this one so I covered the clear dimensional gel with the Christmas Red Stickles and they came out nice and sparkly.  I stamped the sentiment onto light pink card and used a heart die to cut it out.  Lastly, I adhered all the pieces to the card base and here you have it!

I love how each of the kitties is different; I still have yet to master adding stripes to my cats without them looking silly, but I think these cats are adorable even without the stripes!  Now it is your turn to create a paper craft or two and enter it into our challenge; after all you have the entire month so I am positive you can make something and join in the fun{day}!  I hope you enjoyed my card!  I am hoping to see you soon!  Fondly, Christi

Tuesday, February 19, 2019

Hero Arts Paper Layering Heart Card

Hello crafty people! It's about halfway through this month's Mood Board
challenge at a2z Scrapbooking and that means you have plenty of time to take a look at the board and whip up a card!  I was very inspired by this mood board!  I took out all my fancy papers, started about a thousand new projects {because I always get inspired looking at all the pretty paper I have, and I have a LOT!} and I finally chose some that I think showcase the die very nicely.  Now I have a bunch of other cards and such in progress scattered all over my craft room!

What I Used to Make my Card:
White Card Base
Corner Punch {a very old one}
Hero Arts Paper Layering Heart Die, #DI162
DCWV Peri & Peach 12" x 12" Stack {not in the DCWV store, but available}
Grey Pattern Paper {stash}

I adore this card! The papers are so pretty; the grey pattern has a very subtle pattern of cream colored little swirls going through it; it looks so delicate.  And the overlay paper, well, it's DCWV, so you KNOW it's beautiful.  I've captured the


shine in the picture above.  Since I knew the focus of the card was to be the heart die, it was very important to me to choose some nice papers.  And they match the mood board!  Always a plus when you can fulfill your Design Team duties by using what they want!

This card was very easy to make.  I cut the grey paper to a panel to fit the A2 card base and then cut a smaller rectangle out of the DCWV paper.  I attached the grey paper to the card and let it sit overnight to dry completely.  I used the heart die on the peach paper, flipping the cut outs and gluing them to the other side.  I felt like the card needed a bit more pizzazz so I used the corner punch on the overlay paper.  I attached the die cut and punched paper to the card over the grey paper and I was done!  I'm fascinated by how one little touch, be it gems, dots, glitter, or a corner punch can elevate a card to a different level.  Do you remember using corner {or any} punches? I still have quite a few that I'm just not ready to part with.  

I hope you will enter the a2z Scrapbook challenge - you could win a fabulous prize!  Go check out the a2z store - it's full of Hero Arts goodness and use my discount code CHRISTI15 to get 15% off your purchases of $25 or more before shipping.  Remember you could Request Custom Order if the item is not in the store.  While Valentine's day may be over, I feel it's always a good time to let someone know you care about them!  You can never have too many heart cards and the mood board is full of inspiration.  I hope to see you there and don't forget to visit me again.  ~Fondly, Christi

I am entering my card in the following challenges:
A Blog Named Hero - Love is in the Air
Happy Little Stampers - Anything Goes w/ Dies
Unicorn Challenge - #40, Include a Heart
Unstampabelles - #86, Bright & Cheerful
Creations in Pink - #7, Anything Goes w/ Mostly Pink
Ellibelle's Wednesday Challenge - Dies/Punches or Something w/ Heart {I used all three}
Crafty Gals Corner - #185, Love is in the Air
International Art & Soul - #52, Shades of Any Color
Path of Positivity - #66, M, Love, Love, Love
TTCRD - Anything Goes


Wednesday, January 30, 2019

Love has Four Paws

Good morning! I'm so glad you stopped by and I hope you like my most recent card for Die Cut Diva's.  This month's theme is Anything New and this image, provided by our sponsor, Bugaboo Digi Stamps is brand new; at least to me!  You still have a little time to enter this month and I hope to see you there!

What I Used to Make my Card:
White Card Base
Pink Card
Alcohol Ink Markers
Bugaboo Valentine Pup Set, #BUGVALPUPSET
Kat Scrappiness, Pet Sentiments dies
Darice Mini Hearts embossing folder, #1219223 {retired? Still available}
Tutti Scalloped Stitched Nesting Circles, #TUTTI-419
Altenew Enamel Dots, Red Cosmos, #ALT2591
Wink of Stella, Clear
Gelly Roll Gel Pen, Clear
Gelly Roll Gel Pen, White, #10 {I highly recommend the 3 pack}

I had printed this pup out on two different type of paper just to see if different
If you look close you can
see the sparkle on the
heart and a few around
the puppy.
paper printed better - I could see no difference.  I just grabbed the image closest to me and started to color away with my hodgepodge of alcohol ink markers; the reason I don't note the colors I've used is because I have such a mix of the markers half the time I'm not even sure which manufacturer I'm using!  The picture was colored and I added the white dots around the smaller heart {which is a different color than the large heart - I'm not sure if that is clear on your monitor}, some clear Wink of Stella around the large heart and I added some little sparkles around the dog with my clear gel pen.  


Once the image was colored I concentrated on the rest of the card.  I like the light pink background but it lacked something; the card needed more interest so I embossed the background paper with the mini hearts folder.  I trimmed that paper down and adhered it to my card base.  I then cut the dog out using the stitched scalloped circle die and cut the love out twice, using white and red card.  I inlaid the paw with the red pieces and glued that to the card.  Finally, just to add a bit more embellishing I finished off the card with three enamel dots on the lower right side; one of them blends in very well with
Another Look
the pink card so you might have to look for it.  


I am becoming more comfortable with using digital stamps and I still plan on learning how to use my alcohol markers properly.  I realized while coloring this image that alcohol ink markers use color to highlight and blend not a blender.  Might not sound like a breakthrough to you but I was happy; I felt as if I cracked one of the many secrets of using these markers.  I'd love to hear your secrets to using alcohol markers, please leave me a comment {complete with your info so I can return the blog love and visit you!} with your breakthroughs or tips and tricks, I could use all the help I can get!  As I said, there is still a bit of time to enter this Die Cut Diva's challenge, using the theme of Anything New,  but if you can't make this one there will be a brand new one tomorrow.  I hope to see you there! Fondly, Christi

I am a day late in adding my card to some challenges! I forgot I had this card scheduled :)
2 Crafty Critter Crazies - #23, M, Anything Goes w/ a Critter
Pearly Sparkles Challenge - #37, M, It's a LOVE thing
Dies R Us - #114, Use the Color Red
Color Crazy Challenge - Anything Colored Goes (week 4)
Creative Friday - #223, Love is in the Air
Cut it Up - #166, Hearts
Kat Scrappiness Challenge - Hearts

Tuesday, September 4, 2018

Jump for Joy!

It's almost fall and I can definitely feel the difference in temperature {my favorite part} and the days are getting shorter {my least favorite part}.  Which leads me to this month's challenge at Stinkin' Inkers.   We are celebrating fall.  Our theme is "Falling Leaves" and I hope you can grab a few stamps, dies, alcohol inks, whatever, and join in the fun!


What I Used to Make my Card:
Vanilla Card Base
Brown, White, Yellow, Orange, Red and Green Cardstock
Lawn Fawn Leafy Tree Backdrop - Landscape #LF1237
Lawn Fawn Jump for Joy Stamp Set, #LF1212
Ranger Archival Ink in Jet Black

I have to be honest - I completely forgot about my Design Team duties for this challenge.  Completely.  I've been trying to complete some of my DT duties ahead of schedule and I think I thought I'd already made a project for this challenge.  Nope.  The good news is this card was SO easy to make I threw it together in record time!

I first cut the Backdrop out of white card, then cut the tree out of brown
The Bare Tree

 card.  I attached the tree to the die cut, then attached the panel to a vanilla card just so there would be a slight color difference between the panel and the actual card.

Tons of Leaves

Cutting out the leaves was super easy.  The Backdrop set has a row of leaves that cuts out 6 at a time.  In no time I had a pile of leaves ready to be attached to my tree.  I glued the leaves around the tree, purposely leaving a bit of the branches sticking out.  

The falling leaves are meant to look like they are swirling off the tree; I suppose I could have used a stamp to drive that point home - some sort of movement stamp - but I didn't think of it until I was writing this post.

Lastly, I stamped the sentiment onto the card with the help of my stamp platform.  I absolutely adore this thing and I'm so happy I made the switch from my old stamping tool.  

I hope you've had a relaxing long weekend.  I've been making Halloween cards and decor like crazy; that shouldn't come as a shock because you know Halloween is my favorite holiday and it is never too early to get your Halloween on!  I hope you get your fall stamps and colors out and join us at Stinkin' Inkers; you have NO excuse, the challenge runs the entire month. Thanks for stopping by!  Christi

PS: It's almost that time for the Cat Lovers 2018 Blog Hop - start getting your kitty makes together now so you'll be ready!


I am entering my card in the following challenges: {where did I find all these awesome challenges to enter?? At Challenges for Days!)
The Cat's Pajamas PaperArts - M, #350, Fall
Paper Smooches - M,  CAS
Scrap From Your Heart -M, Autumn Colors {see below}
Dream Valley Challenges - M, Autumn Colors
Lawn Fawnatics - 2W, #36, Mood Board {see below}
Alphabet Challenge Blog - L is for Leaves
a to z Scrapbooking - M, Clean & Simple {see below}


Thursday, August 9, 2018

Die Cut Diva's August Challenge

This month,  the Die Cut Diva's challenge is sponsored by the wonderful Cheapo Dies
and the theme for August is Silhouettes!  If you enter you'll be in the running for a $15 gift certificate!!  Now, in my world it is NEVER too early for Halloween; in fact, I think we should celebrate Halloween all year long! 


I am trying something a bit different for this post; instead of giving you a list of the items I used in making my card, I am going to incorporate them into the post.  I'm hoping this will accomplish two things; one, that you, my dear readers will enjoy it and, two, it won't take me so long to write a post.  So I would appreciate it immensely if you'd leave me a comment letting me know what format you prefer. 

So, onto the Halloween card! I used an A7 sized card {5" x 7"} which is much larger than I typically make.  I just could not fit all of the action on an A2 {4 1/4" x 5 1/2"} sized card!  All of the dies I used on this card are unbranded; the Haunted House came with the bats, moon, and a Happy Halloween sentiment.  You could easily use this die for the Haunted House and any of these dies for the moon.  While I am in LOVE with the alphabet dies I used too spell out "spooky,"
you could certainly use any alphabet dies you have on hand.  I used a vanilla {off white} card base, black card for the house and bats, some scrap yellow card for behind the windows, a piece of gray card for the background, a thin, sparkle silver for the moon and, finally, shiny mirror orange for the letters.  All of the card stock came from my stash, except the mirror orange, which I purchased at my local Dollar Tree.


Once I had cut all the elements, the first thing I did was back the windows with the yellow card to make it appear as if there were lights on in the house {I am currently working on making cards that light up. I think having actual light come from the windows would be awesome! I am struggling with getting all 
the connections and wires to work but, hopefully, soon I will have one to share with you}.  I attached the gray card to my card base, then assembled the card as shown in the picture.  I personally cannot wait for the cooler, crisper air of fall. It's easily my favorite season!

I hope my little tutorial has inspired you to get some of your Halloween cards done; everyone is always so concerned with Christmas - send me a Halloween card anytime!  Thanks for reading and please let me know what you think of the format!  Hope to see you at the challenge! Christi

I am entering my Spooky Halloween Card in the following challenges:
Craft Rocket Challenges - #51, M, Anything Goes {entry 2}
Crafting with an Attitude - #42, M, Anything Goes
Happy Little Stampers Anything Goes With Dies - August Challenge
Crafty Creations - #372, Anything Goes
Shopping our Stash - #366, Silhouettes

Monday, August 6, 2018

Steamed Heat at Stinkin' Inkers

Just in time for the hottest month of the year {it is here at least}, Stinkin' Inkers August theme is "Steamed Heat."  If there is one thing I can blog about endlessly is the summer heat!  We have broken many records this summer due to the high temperatures in the Denver area; thank goodness we have a swamp cooler to help keep things cool.  Now, I'd never even heard of such a thing when I first moved here, and I still can't really wrap my brain around how it works, but it does work and that's all that matters!  I made this card to help all of us experiencing steamed heat visualize being a little cooler!  I hope to see you this month at Stinkin' Inkers "Steamed Heat" August challenge!


I made my card using the Hero Art's My Monthly Hero kit for the month of
June.  The entire card is made using the items in the kit, except for the white card base.  I first used the mini ink-blending tool and Soft Sky ink to make the sky.  I then flipped the card over and used the Deep Ocean and Summer Sky inks to make the ocean.  The kit includes all the stamps you need to make the ocean seem full of waves and texture.  You just layer the stamps with ink colors going from light to dark and BAM! you have an 
ocean!  Once the sky and ocean were finished, I
embossed the beach by dabbing Versamark ink on the lower half of the card and embossed the beach
 directly onto the card with the Sand embossing powder. 
The embossing powder is SO pretty in real life - it has notes of various browns and sparkly copper in it.  Next, I stamped the Adirondack chairs on light brown card and embossed them with Simon Says Stamp white detail embossing powder and die cut them. I cut the clouds out of white, coated, shiny card {from my stash - I'm sure it's as old as the hills} and the cute starfish out of some pink scrap card.  I put a few white accents on the starfish so he wouldn't get lost in the scene, then stamped my sentiment and cut it out with Tutti Designs Cross Stitched Rectangles.  I attached the sentiment, then the chairs and the starfish, and then I used dimensional dots to adhere the clouds to the sky.  It looks like a beautiful day in my scene! Hopefully, your sky is as pretty as this one is.  

Thanks for stopping by and I hope to see your creations at Stinkin' Inkers August Challenge "Steamed Heat!" Fondly, Christi

I am entering my Beach Scene Card in the following challenges:
{Where do I find all these FABULOUS challenges?? At Challenges for Days - and easy to read blog that helps you easily find challenges to enter - check us out!}
Lost Coast Portal - #58, Anything Goes
Unicorn Challenge - #35, At The Beach
CardsInEnvy - Something New {First time I've used the MMH Kit}
Just Us Girls - #452, Word Week: Beach
a2z Scrapbooking - Anything Goes {August}
The Artistic Stamper - Anything Goes {August}
Emerald Creek - The Great Outdoors {August}
Papercraft Business Challenge - #9, Anything Goes, TWIST: Summer
Craft Rocket Challenge - #51, Anything Goes


Saturday, February 20, 2016

Challenge #14 ~ ANYTHING GOES at Twofers!!

For this challenge at Twofers, the lovely Jane has decided to go with ANYTHING GOES ~ you can't get a much easier challenge than that (provided you follow our rules).  I took the opportunity to use one of my very favorite stamp sets, Newton's Antics from Newton's Nook and a brand new set of 72 (!!) Derwent Inktense pencils my Valentine gave to me (I am SO blessed!).  This time I kept the cats relativily natural looking, but watch out - I can feel some colorful creations coming my way!
How I made my Card:
Red Card Base
White Card Panel
Newton's Nook Newton's Antics Stamp & Die Set
Paper Smooches Charmed Cat 2 Set
Derwent Inktense Pencils
Ranger Archival Ink in Jet Black
Wendy Vecchi Ink in Red Geranium
Glitter Paper Punched Heart
Paw Print Charm (colored silver with leafing pen)
Dove Blender Pen
Pop Dots

I began my card by stamping the cats with the Jet Black ink on watercolor paper.  I colored them in using the Inktense pencils, and die cut them out.  
Dimension

I set the kitties aside and stamped the sentiment from Paper Smooches on white card using the geranium ink (by the way, if you are looking for a real red, Wendy Vecchi's is the BEST red ink I've found; archival, water proof and has matching embossing powder). I cut the sentiment out and edged it using the geranium ink as I didn't want it to blend in with the white panel.  I attached the sentiment, and glued with glitter paper heart on the end of it, finishing it off with the cute charm of a cat paw print.

I pop dotted the pair of felines onto the panel and I was done! The kitties look like they are in deep snuggle mode and I just think they are so freakin' cute! I hope you enjoyed my little tutorial and that you will join us over at TWOFERS, you might even win a $20 gift certificate to Alleystamp! Thanks so much, Christi

PS: Don't forget to enter my blog candy since you are here :)

Another Look :)
I would like to enter my Kitties card in the following challenges:
Aud Sentiments - #149, Cute & a Sentiment
Addicted to Stamps - #181, Anything Goes
SUYP - #3, Kitty Love
Cuttlebug Mania - I {heart} You
The Cat's Pajamas - #308, Use an Animal
Crafty Catz - #312, CAS
Eureka Stamps - #180, Feathers & Fur

Tuesday, August 26, 2014

Design Team Call at Anything But A Card Challenges!!


You can find all the details at

IF 
YOU love Creating?
YOU enjoy exploring many types of media and projects.
YOU want to create with NO limits.
YOU enjoy all aspects of blogging. YOU want to grow with us!

THEN
Why not have a look at what we are looking for?

Variety is the spice of LIFE 
That's what there is at 
Anything But A Card

We Want YOU!
 
We have a fabulous team and we'd love to have you join us! 
 
(thanks to Julie Short who I shamelessly copied from)

Sunday, July 20, 2014

Anything But a Card ~ Keys Shadow Box


ARGH! I hate it when my scheduled post doesn't post!! 

The challenge this month at Anything But A Card Challenge is one of my favorite themes, Anything Goes (#37).  I love Anything Goes challenges as they give me free reign to use some of the items I have hoarded over the years, like the shadow box I used in this project.  Well, honestly, most of what I used has been in my stash for years.  It was fairly simple to make and since I had everything on hand, it was free!
Sorry for the glare - glass!!
What I Used to Make This Project:
Shadow Box, mine was about 13” x 10” (the frame was darker, so I sanded it)
Background paper from KaiserCraft, Art of Life Collection, P1399, Always (2 pieces) 12" x 12"
8 Skeleton Keys
Washi Tape from Tim Holtz
Brown Velvet Leaves (I can’t recall where I got them, but if you search you can find plenty of options)
Small Bulb from Tim Holtz
Other Embellishments from stash & around the house
Crafters Pick The Ultimate Glue

I began with the background paper.  Since my shadow box is 13” long, I needed a bit of something to fill in where the 12” x 12” paper fell short. 
 
You can see the sides of the board - this was before I put the scalloped pieces on
The Keys
I happened to turn the paper over and found the scallop border design on the other side, so I just cut those out of the paper and used those to make up the difference.  Once I got the background settled, the placement of the keys was next. I wanted them to be the focus of the piece so in the middle they went.  I honestly am not on to measure and be precise, I always do it by eye when I make cards, but I actually measured the area around the keys so they could be placed as close to the middle as possible (as possible for me anyway).  Once I was happy with the keys, I glued them to the board and put it aside for overnight drying. 

I had already begun gathering some prospective embellishments before I began making the shadow box.  I am always thinking (obsessing?) about upcoming projects and I think a lot before I actually begin one. Of course I have those days where I just want to play, but if I have a theme, I often think for days prior to beginning the piece.  I tried doing the sketchbook thing, can’t do it, can’t draw what I want to and this frustrates me to NO end.  I will occasionally make notes if something strikes me that I fear I might forget.  And, since I started blogging as a part of teams, I do make a list of the items I use to make something so when it comes time to do this part I can be sure of what I used and if I can, I like to supply manufactures (I hate seeing something really cool and not having any idea what people used in making it).  Sorry for the detour into my creative process! I had gathered some stuff that had been hanging around; one item is particularly special for me is the pen nib.  When my Dad passed away, I found this pen nib in a drawer along with some other art materials and have squirreled it away – I think this was the perfect use for it!  Everything is real, except for the bulb and the keyhole – the keyhole was a brad and I just removed the “legs”.  The snippet of letter on the bottom right is from a real letter, the typewriter key (or is it an old adding machine key?) is real, the clock dial is real and the optic piece is from a real optometrist kit.  Flea markets & eBay are wonderful!

Playing with Placement
After I fiddled with the placement of the embellishments, and fiddled some more, I finally felt the piece was done and glued everything down.  After allowing it to dry overnight (and I am SO proud to say I didn’t get spare glue anywhere!) I placed the board in the back of the box.  Now, originally, there was a piece of cardboard as the backing, but I knew that would never work, so I asked if I could get a piece of wood cut to size.  My SO used an old cabinet that was left here when the previous owners moved out.  Love to recycle that kinda stuff! The wood fit the back so perfectly I didn’t even need to glue it to the box – I just folded the little holders and I was done!  The only thing missing is a hanging mechanism, which I will rectify on my next trip to the wonderful Dollar Tree.
The board, before I put it in the frame
I hope you enjoyed my creation, and my detour into my creative process! There is plenty of time to enter the Challenge at Anything But a Card and I do hope you will pop over to the blog and get some inspiration.  Thank you so much for stopping by! Have a marvelous week ~ Christi

PS: If you'd like to see a photo in more detail, please click it. This is true on all of my posts :)
Another view of the final product

I am entering my Keys Shadow Box in the following Challenges:
Crafting at the Weekend - Challenge 3, Anything Goes

Altered Eclectics - Anything Goes
Just for Fun Challenge Blog - #1, Anything Goes
Mixed Media Monthly Challenge - July Challenge (Around the House)
Through The Craft Room Door - Anything Goes
The Sailing Pineapple - #11,  Anything But a Card