Followers

Showing posts with label Hero Arts. Show all posts

Friday, December 3, 2021

Peace & Happiness

I found this card among my blog drafts - I made it long ago, but never published it.  Well, I think this is a good time to publish this card with all the recent events as I wish all my fellow humans & furbabies health, peace & happiness now & forever. 

When I first began card making, Asian design was all the rage.  We used anything Asian {often mixing countries and regions} on our cards; joss papers, hell money, pieces from advertisements, newspapers, book text, and anything even remotely Asian looking.  I've used more than one take out menu on my cards!  Even replicated coins found their way onto our cards.  I still have a fabulous supply of Asian papers, rubber stamps, trinkets, tassels, papers, coins and charms, and most of the items can be found on eBay, Etsy, or in small craft stores.  There are even a few stamp companies who still make beautiful Asian stamps, Hero Arts being one of them, and I'm lucky to still have many of my wood mounted, red rubber, Asian stamps.  When I received this stamp and die set, it brought back so many memories of the gorgeous creations my fellow crafters would make that I just had to play with it.  I hope you like what I've designed!


What I Used to Make my Card:
White Card Base
Blue and Silver Asian Background Paper {stash}
Hero Arts Japanese Wishing Garden Stamp & Die Combo, #SB148 {retired but available}
Watercolor Paper {I use this}
Ranger Archival Ink in Jet Black
Zig Clean Color Brush Markers
Distress Ink in Blue Jean
Alchemy Petal Point Inks from Colorbox {I used the silver ink petal}

Once I had stamped four buildings on watercolor paper and colored them with my Zig markers, I set them aside to dry so I could cut them.  While waiting, I stamped the cloud element and the butterfly a few times on scrap white card
See the sparkle!
using silver ink.  I attached a strip of the decorative paper to the white card base and cut out all my items.  I stamped the sentiment and arranged all the pieces to the card and the card was finished.  I wish you could see the sparkle of the paper; it's raised a bit as if it is embossed {and it may be} and the shine is beautiful!  I have a major collection of this type of decorative papers gathered when I was certain I'd be hand binding books and I'd need them for the covers.  I still do hope to learn to do a hardcover binding but the papers are just waiting to be used, so I snipped a bit for this card.  


This card brings me feelings of peace; it's part of my promise to make more "any occasion" cards that I can just mail out - no birthday or holiday needed.  I
Another Look
am my own worst enemy and will find things wrong with a special occasion card so I tend to let slide on a "just thinking of you" card. I'm getting back to the roots of card making.  I want to have fun with my creations and not worry so much about them being perfect.  As I often say, if it was perfect it would be 'store bought'!  I hope my story has prompted you to drag out some of that old paper, especially that paper you are saving {for what!?!} and some of the stamps you haven't used in a while.  Or maybe purchase a new set in your "old" style; whatever works for you! Just create and have some fun!  Fondly, Christi


I am entering my card in the following challenges:
Classic Design Challenge, #12 - Anything Goes
Cute as a Button,  #75 - Anything Goes option: Vintage Feel
Krafty Chicks, #588 - Stamp Act
Simon Says Stamp Wednesday Challenge - Christmas/Holidays
Addicted to Stamps and More, #419 - Any Occasion
Everybody Art Challenge, #503 - Blue & White
Inspired By Challenge, #198 - Inspired by the Graphic {Blue & White are my FAV colors!}


Sunday, November 21, 2021

Who Knew?

 Hi all! The current challenge at Sisterhood of Snarky Stampers, which is N is for Naughty,  inspired me to actually make this card - I'd had the Santa already put together and I had the sentiment on my desk for ages, but the current challenge was the push I needed!


I covered a white card base with patterned paper from DCWV Red & White Christmas paper {doesn't show on their website, but it is available online if you HAVE to have it}; and then I used Hero Arts Infinity Nesting Circle dies to cut the checkered paper from the same.  I used a circle I had left over from my Joy Ornament I made, so that is what I stamped the sentiment {from Riley & Company Funny Bones; I bought a ton of them recently so they will be showing up a lot!} on.  Like I said, Santa, which is from Frantic Stamper, was already made - I just added some googly eyes. I attached everything and added some beautiful bubble gems from Trinity Stamp.  There ya go! 

I am entering my card in the following challenges:
Sisterhood of Snarky Stampers, #198 - N is for Naughty
Stamping Sensations - Christmas
International Art & Soul, #122 - Winter
Crafty Hazelnut's Christmas, #569 - Christmas
Happy Little Stampers Dies Challenge - Anything Goes w/ Dies


Thursday, November 11, 2021

Shake some Joy

 I saw the November challenge at Hero Arts {Stay Crafty with Hero Arts, #29} is Holiday Tags. I had just gotten the Snowflake Medallion so I was eager to use it.  I hope you like my Shake some Joy take on the challenge. 


I started by cutting out the snowflake medallion from this lovely dark blue shimmer paper {that is really difficult to see in the photos} and set it aside.  I used the Infinity Circle dies to cut out about 8 frames that I made by taping 2 of the circles together, glued those on top of each other.  I used the largest circle to cut out some acetate and the bottom.  I filled my tag with shaker mix Winter Lady from Picket Fence, glued the snowflake medallion onto the acetate, then that onto the little well I had made with the frame. Lastly, I used the word Joy from the Joy Stamp & Cut set and cut that out of silver glitter card.  I inserted some ribbon in between the layers so the tag could be put onto a gift and/or used as an ornament.  Oh and I used a gem from the Picket Fence gem mix Moon Shadow over the dot of the J in Joy. 

It really didn't take that long to make; the hardest part was doing all the figuring so everything would work together, I'm not the best at that sort of stuff. It's very sparkly and I'm very pleased with the final product. Thanks so much for stopping by! Christi

I am entering my tag/ornament into the following challenges:
Stay Crafty with Hero Arts, #29 - Holiday Tags
A Blog Named Hero {On Instagram Only} - Glitz
#abnhnovemberchallenge
Creative Craft Cottage Challenge, #146 - Add Some Sparkle
The Holly & Ivy Christmas Challenge, #105 - Anything Goes
Peace on Earth Christmas Challenge, #3 - Anything Goes
Merry Little Christmas Challenge Blog, #40 - Anything Goes
Craft Rocket Challenges, #87 - Winter/Snow
Sparkles Monthly, #145 - Shaker Card {not a card, but it is a shaker!}


Tuesday, November 2, 2021

Paper Funday with CAS-ual Friday Stamps!

 Hi all! Welcome to my monthly design team post for Paper Funday.  Since I am not skilled at using digi stamps I typically don't use the products that our sponsors give us to play with but this time we are sponsored by CAS-ual Fridays and I got to play with a set I've had for a while.  Remember, our challenge is always anything goes, with an optional twist and this month the option is Thanks/Grateful.  I am thankful and grateful for coffee, so my card fits both using the sponsors products and the optional theme!  

I used a white card base and cut out a brown border using a die from Lawn Fawn.  I stamped the sentiment using the CAS-ual Friday Coffee Talk stamp set using my favorite black ink and the word coffee using Hero Arts Cocoa Ink {I received the ink in a My Monthly Hero kit and it isn't available separately right now} right on the card.  I finished by cutting the coffee cup out of Your Next Stamp's paper pad Crazy for Coffee {if you look close you can see there is a tiny coffee bean with the word coffee circling it that makes the pattern - too cute!} and the coffee out of light brown card.  I popped the cup up with dimensional dots and added some iridescent pearls I had in my stash. 

You still have plenty of time to join in and play with Paper Funday this month - who knows, you just might win some goodies! Thanks so much for stopping by & see you soon! Christi  

I am entering my card in the following challenges:
CAS on Friday, #217 - Coffee
Ellibelle's Corner - Use Die Cuts and/or Punches
Allsorts Challenge, #648 - Add a Sentiment
Creative Fingers Challenge, #218 - Anything Goes
A Bit More Time to Craft Extra - Anything Goes
DL Art - Anything Goes

CAS on Friday's Inspiration Photo


Thursday, October 28, 2021

CLBH Birthday Whiskers {DAY 4}

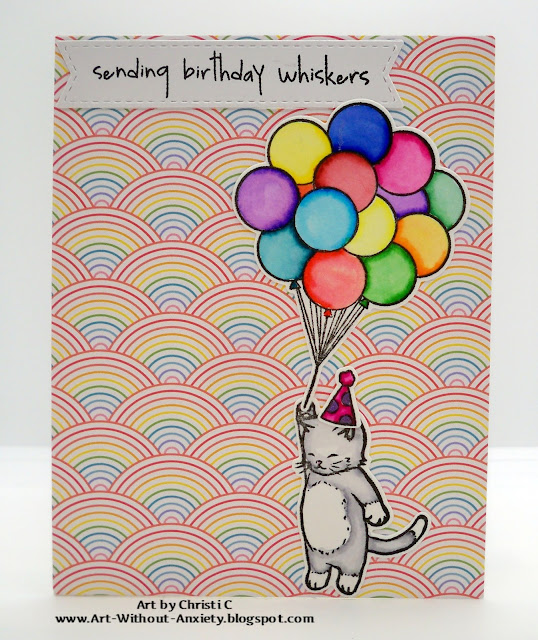
 I have been fortunate enough to be able to subscribe to the Hero Arts Kit of the Month club once again and this card was born from the June 2021 kit.  I made it so I could use it for the Cat Lovers Blog Hop, something a little brighter than all the Halloween makes! 


I started the card, as always, by stamping, coloring and cutting out the cat and the balloons.  I used the Gina K ink pad and Zig Clean Color Markers to stamp & color.  I got the background paper free from a Lawn Fawn order and I felt it matched with the happy vibe of the card so I trimmed it down to size used it to cover the white card. The sentiment was stamped on white card and die cut using the fishtailed banner.  A small bit of gel pen was used to color the dots on the birthday hat, and everything was glued onto the card.

Thanks for stopping by & stay turned for more Cat Lovers Blog Hop cards! Til next time, Christi 

I am entering my card in the following Challenges:
The Cat Lovers Blog Hop - Day 4
Simon Says Stamp Wednesday Challenge - Anything Goes (entry 2)
Crafty Hazelnut's Patterned Paper Challenge - Anything Goes w/ Patterned Paper
NBUS, #31 - First Time Using the Stamp Set (entry 2)
Seize the Birthday, #226 - Always Anything Birthday Goes
Day of the Month Card Club, #32 - It's My Party Day
SUYP Challenge, #71 - Anything Goes w/ a cat :)


Monday, October 25, 2021

CLBH Hero Arts Purrfect Halloween {DAY 1}

Another card for the Cat Lovers Blog Hop!  This card was any easy one and I love that it really does look spooky - at least to me it does!


First step was cutting the grey card {cut to card size} with the Cloudy Moon die.  I then placed the die over the white card base and marked the circle with a few dots.  Removed the paper and used a small bit of Hickory Smoke Distress Oxide Ink for the moon.  I then glued the grey paper to the card base.  Next, I stamped, embossed in black embossing powder and cut out the cats from the Luna the Halloween Cat set. It's difficult to see, but the cats are shiny black. I set them aside, stamped the sentiment with black ink on white card and cut it out using  Scalloped Stitched Nesting Squares from Tutti Designs.  I glued the sentiment onto the card and placed a few cats about.  Easy! I think all of the elements of this card make a very appropriate Halloween card!

Do think about joining the blog hop - your projects don't need to be Halloween, they just need a cat {or 2}! Thanks for looking and I hope you stop by again soon! Christi 

Happily entering my card in the following challenges:
Cat Lovers Blog Hop - Day 1
Sweet Stampin' - All Hallows Eve
Cut it Up, #237 - Boo to you {Halloween Project w/ Die Cut}
Stay Crafty w/ Hero Arts, #28 - Fall Colors
Crafty Animals, #55 - Anything Goes w/ an Animal


Tuesday, June 29, 2021

Altenew Spring Cover Cards {A threefer!}

Hi friends! I hope this post finds you well! Since I have three cards to show you why don't you grab a drink and hurry back! I got seriously carried away with the Altenew Spring Shower Cover Die while making cards for the Dies R Us inspiration page; I guess I was inspired!  I hope these cards inspire you a bit as well.  Here we go:  


What I Used to Make my Cards
White Card Bases
Altenew Spring Shower Cover Die
Pink, light yellow, light blue, light purple, light green and white layering card {thinner card}
Nuvo Deluxe Adhesive
Dimensional Dots

I began my cards only planning on making one but as I cut out all the different colors I wanted to use I realized the negatives were too pretty to throw away so one card became three.  As I mentioned, I cut the die a total of six times using the colors listed above, in a thinner card than I would typically use.  I began working on the "hello" card first as that was the primary card I had in my mind.  I kept some of the white cut outs in the panel I was going to use as the top of my card and filled in other places with the colorful die cuts I'd made.  I also layered some of the die cuts to make different flowers. That's where I got into trouble! I made so many flowers with the leftovers there was no way I could throw them out!  I even used dimensional dots on some of the flowers on the other cards.

I did use a different sentiment for each card as you can see; the "hello" I used is from Hero Arts Stamp & Cut set, #DC151.  The second card, "hello summer" uses a die from Impression Obsession, Hello Summer, #DIE688-B and finally the "miss you" card uses another Altenew die {Dies R Us doesn't have the Hero Arts set or the Altenew word die at the moment, but there are plenty other words dies in stock to choose from}.  I also used a circle of blue paper that I had on my desk for the hello summer card to help me make the wreath.

Here are pictures of each card:

The "Hello" Card


"Hello Summer" Card


"Miss You" Card

Thanks for reading my little tutorial. I hope my cards inspire you to get some die cuts and start creating! If you don't have the dies you want, or need, to make your vision come to life please take a look at what is available to play with at Dies R Us! Thanks SO much and see you soon! Christi

I am entering my card(s) in the following challenges:
Simon Says Stamp Wednesday Challenge - Anything Goes
Unstampabelles, #112 - Seasons
Daring Cardmakers - Into the Garden
Love to Craft - Anything Goes
Creative Moments, #217 - Anything Goes
Sparkles Monthly Challenge Blog, #141 - Floral
World Wide Open Design Team Challenge - Anything Goes
Dream Valley Challenges, #251 - All Occasions

Tuesday, April 6, 2021

Party Like it's 1922!

I have been a fan of Hero Arts since I started stamping and when they came out with their My Monthly Hero kit I HAD to subscribe!! I've been crafting for a long time and the value of these kits amazes me every month!  With moving {again!} and helping my friend pack his home and prepare for his move cross country, plus all the fun things life throws at you {like needing a new car and a kitty with tooth issues!} I haven't been able to play with the kits as much as I'd like to, but I did manage to make a cool retro card with the kit from February {the stencil in this kit is calling my name!} I think this card is especially relevant since we have all been inside all winter and now it's getting warmer; puts me in the mood to PAR TAY! 


What I Used to Make my Card:
White Card Base
Black Cardstock
Gold Card
Hero Arts My Monthly Hero Kit, February 2019
Hero Arts Gold Embossing Powder, #PW100
Wink of Stella Clear
Die-Namics Stitched Fishtail Sentiment Strips
Krylon Gold Leafing Pen
Dimensional Dots

I glued the sized, black card to the base, then attached the background piece which I cut out of gold card.  I kept the largest piece from the background cut and glued that back into the center of the card.  The dancers were embossed with the gold embossing powder, as was the sentiment on the banner.  I cut the banner and dancers and attached them to the card, using dimensional dots for the banner.  It was then I decided to add some sparkle with the Wink of Stella pen in clear.  

I learned something - don't start with an old pen and finish with a new pen! The difference between the sparkle was very evident, so I went over the spaces with the new pen.  Honestly, it would have been easier if I had gone over the black panel before putting the background die cut on, but I rarely do things the easy way!  When inspiration strikes, you need to listen!  I also decided to lightly edge the banner in gold after it was attached to the card - not the brightest move, but it came out better than expected.  Leafing pens used to be all the rage and that is what we used to use to make alcohol ink backgrounds {called Polished Stone back in the day} before companies released all the cool mix ins formulated specially for alcohol inks.  The pens can be costly, I've seen them up to $10 apiece {I've also seen them for under $6}, but they last such a very long time I feel they are worth the price.  Plus, I use them for other things than just art - I've used my silver leafing pen to touch up jewellery {the leafing pen is duller than polished silver, but I've put clear coat on the touched up spots and it blends in fine} and many other uses that escape me at the moment.  

Anyway, this card is so festive and while it is traditionally a birthday card, I think I could send it out to anyone needing a lift.  I hope you like it as much as I do!  Are you on social media?  I am and I would love it of you'd give me a follow.  If you do decide to subscribe to me, please leave me a comment so I can return the favor!  Thanks so much for reading,and have a fabulous day!  Fondly, Christi
 
I am entering my card in the following challenges:
TTCRD - Anything Goes
Pammie's Inky Pinkies, #2114 - Anything Goes
Simon Says Stamp Monday Challenge - Layer It
A Place to Start, #4 - Anything Goes & Make it Elegant
Crazy for Challenges, #578 - Party Themed Card

Thanks for reading all of this and stay safe & healthy!!

Thursday, April 1, 2021

Spring has Sprung at The Paper Funday Challenge!

Hello everyone!

First, sorry this is late!! Moving has got my life all upside down!! For my Paper Funday Design Team card this month I used a card I made a while back, but hadn't decided what sentiment to use. The Paper Funday Challenges are always "Anything Goes" and I used the April Twist of Spring has Sprung! When I made this I hadn't played with stencils in so long that I wasn't even sure how the card was going to turn out, however, I'm happy with it and I hope you like it too! 


 What I Used to Make my Card:
5" x 7" White Card Base
Hero Arts Large Flower Stencil, #SA069
Ranger/Tim Holtz Distress Oxide Inks in Worn Lipstick, Dried Marigold, Squeezed Lemonade, Cracked Pistachio, Tumbled Glass and Seedless Preserves
Neat & Tangled "Hello Spring" Die {retired but available}
White Card
Purple Card

It was so easy to make this card and the background came out so well that I have been ordering more stencils to play with! I hope to be able to show you more cards using stencils and ink blending; it's one of those techniques that looks complicated but is SO easy to do! I began by blending Oxide inks {using the "make up" blending brushes that I am absolutely in love with!} in the middle of the flower and worked my way to the outside of the stencil.  I used Purple Tape to hold the stencil onto the paper and, if I had known how pretty it was going to come out, I would have stenciled directly onto the card base but, being unsure, I used another sheet of regular heavy weight cardstock. Once I removed (and cleaned thoroughly) the stencil, I trimmed the design down a bit and centered it on the 5" x 7" card.  I rarely use other sizes than A2 {5 1/2 x 4 1/4} but lately I've been so inspired by the slimline cards I have made a bunch of larger cards; postage isn't an issue since I plan on hand delivering them.

Once the background was finished, I let it set overnight {honestly, I don't know if this is necessary, but I felt like I could somehow rub the Oxides and ruin the stencil and I didn't want to take any chances. I am happy to say the ink has stayed put with no problem} and then started searching for a sentiment. I recently changed my stamps & dies storage system from sorting "by manufacturer" to "by season", "occasion" etc, and I found so many products I'd never used simply because I had forgotten I had them and this word die was one of the "finds".  I cut the shadow of the die out using white card and the inner piece using light purple, to match the ink colors.  This simple sentiment fits this card perfectly as I didn't want to obscure too much of the design and I have plenty of room to write anything else on the inside of the card.  I hope this inspires you to get some stamps and what not out that you haven't played with for a while {maybe even forgot you had like I did!} and give them some love. I'm glad I did! 

Thank you SO much for stopping by and I hope to see you in the May Paper Funday Challenge

Fondly, Christi

I am entering my card in the following challenges:
A Bit More Time to Craft, #137 - Anything Goes
The Crafters Cafe, #263 - Anything Goes
Creatalicious Challenges, #208 - Anything Goes w/ Option of Flower(s)
MIUCB, #48 - Anything Goes & No Stamping
Simon Says Stamp Wednesday Challenge - Anything Goes
The Sisterhood of Crafters - Easter/Spring
Try it on Tuesday - Hello Spring!
Simon Says Stamp Monday Challenge - Easter/Spring
Make My Monday, #145 - Easter/Spring
Stamps & Fun = Creativity, #386 - Spring and/or Easter
Make the Cards, #10 - Colors


Thanks!!!


Saturday, February 27, 2021

You Make my Heart Happy

This card is another one that was all ready to be published; I had written it up before I had my crafting sabbatical and promptly forgot about it! I love the layering of this stamp set and the color combinations are limitless!  I hope you like this creation as much as I do! 


What I Used to Make my Card:
White Card Base
Altenew Botanical You stamp & die set
Hero Arts ink in *Feather, Moss, Strawberry, Bubble Gum and Butter Bar
Dimensional Dots

* I could not find a listing for the Feather color of ink I used.  I had gotten that ink from the Hero Arts Kit Club, My Monthly Hero, and it is possible the color is no longer available.


Another look
Reading the instructions included with the stamp set, I stamped each portion of the letters using the inks in the same order they are listed above.  I die cut the letters and attached them to the card base with dimension dots.  Once I mounted the word YOU onto the card base I added the hearts using Strawberry and Bubble Gum inks. Finally I added the sentiment on the card using Moss ink.  I need a bit more practice lining everything up but I am happy with how this card came out.  Thanks for stopping by, and I appreciate your continued support more than you know! Hugs, Christi
 
I am entering this card into the following challenges:
Allsorts, #613 - Feminine
Crazy 4 Challenges, #573 - Floral and/or Flowers
Cute Card Thursday, #675 - Feminine
Simon Says Stamp Wednesday Challenge - Anything Goes
The Sisterhood of Crafters - Anything Goes
TTCRD - Anything Goes
Cutie Pie Challenge Blog, #156 - Hearts & Flowers


Hero Arts Love is Love

Hi everyone,

Hero Arts periodically offers items that when they are purchased, a portion, or all of the profits go to different causes.  Both of the sets I used to make this card are an example of such products.  In addition to their own charitable giving, Hero Arts also collaborated with many other stamp companies to put out products such as the We Stand with You stamp set; it is worth a look, especially with so many different styles in one set!  The sets I used for this card are part of the Kindness Campaign {you can read about the various ways Hero Arts gives and supports various charities by clicking that link}.

What I Used to Make my Card:
White Card Base
Tutti Designs Nested Stitched Hearts die, #TUTTI-216
Hero Arts Support Prayers Love stamp set, #CM219 {retired}
Hero Arts You Are Loved stamp set, #CM171
Kaleidacolor Ink Pad in Spectrum,  #KA-000-001
Dimensional Dots

I just have to start with the fact that I have had this Kaleidacolor ink pad for over 20 years and I have never had to re-ink it or ever had any issues with the pad or any other Kaleidacolor pads I have.  I even had one on which the top got cracked during a move and I put the pad in a zipper bag and it STILL works!  When I find a product that I feel is a great value, I just have to share it!  So I stamped the image of the hands holding the heart globe on a scrap piece of white card, cut that out with the stitched heart die, and set it aside.  Then I took the card base and stamped the sentiment on it with the same Kaleidacolor pad as I used to stamp the focal image. I attached the heart with dimensional dots and I was finished. I think the message of this card is so timely and the CAS design catches your eye. What do you think?

Thank you for stopping by and taking the time to look at my card.  I appreciate it SO much! Also, in the near future I will be having a giveaway on my Instagram account so if you are a part of that social media I urge you to begin following me, don't worry, I will happily follow you back!  If you aren't yet on Instagram, well, you don't know what you are missing!  There is more content, crafters, ideas, and things to inspire you than anywhere else I have seen.  And you can use your computer; just go to Instagram.com and make an account!  Hoping you and yours are healthy & happy!   

Fondly, Christi

PS: My editor and dear friend, Nana Connie is in the hospital with pneumonia - maybe you could pop over to her blog and let her know you are thinking of her?? She can read her FB posts in the hospital and I know many of you know her.  I'm sure she'd appreciate so love! She also said, if you have her address, send cards there.  Praying for you Connie!!

I would like to enter my card in the following challenges:
Love to Scrap, #142 - Love is. . .
Love to Craft Challenge Blog (LCCB), #55 - Anything Goes
Krafty Chicks, #548 - Occasions {I think love is an occasion!}
Simon Says Stamp Wednesday Challenge - Anything Goes
Double D Challenges - Anything With a Heart {2nd card}
Happy Little Stampers CAS - Love is in The Air
Day of the Month Card Club, #24 - Valentine's Day/Love
Sweet Stampers, #53 - CAS
Dare to be Artzy - Love


Wednesday, January 27, 2021

You are The Best

I made this little card to send out with a giveaway I had a while back but I had forgotten I never posted it!  Better late than never!  Hope you enjoy it!


What I Used to Make my Card:
White Card Base
Hero Arts Ink in Light Teal, Feather, Mint Julip, Tide Pool, Summer Sky, Deep Ocean and Teal Topaz {all were used in the floral portion and the sentiment was stamped using Teal Topaz. All of these inks came from My Monthly Hero kits and may not be available as stand alone inks}
The Stamping Village Thinking of You Set, #TSV_0420 {I used the Gina K Designs sentiment}, and Spellbinders Nested Fancy Edged Circle Dies, #S4-903 {retired but available.}  

This was a fast and easy card to make.  I cut out the smallest circle from the Spellbinders die and used it as a mask for the floral arrangement.  Once I was done, I stamped the sentiment and cut it out using the same circle, added dimensional dots to the center of the flowers and I was done!  The recipient loved the card as well as her prizes so this was a win win.  I rarely use a mask making my cards and I don't know why.  I think it is because back in the beginning of my stamping, it was much more difficult than it is now with all of the products made especially for masking easily.  Also, I might be a touch too lazy.  :)  

Thank you all for stopping by and all of your comments of encouragement!  I appreciate them so much!  I want to remind you that very soon I will be having a giveaway on my Instagram account so if you are a part of that social media, I urge you to begin following me; don't worry, I will happily follow you back!  If you aren't yet on Instagram, well, you don't know what you are missing!  There is more content, crafters, ideas, and things to inspire you than anywhere else I have seen.  And you can use your computer!  Just go to Instagram.com and make an account. Thanks again!  Fondly, Christi

I am entering my card in the following challenges:
Simon Says Stamp Wednesday Challenge - Anything Goes
Watercooler Challenges, #306 - All About Occasions
CASology, #382 - Unite
Unicorn Challenge, #61 - Clean and Simple
Make my Monday Challenge, #140 - Hello
Stamps + Fun = Creativity - Anything Goes
Allsorts, #608 - Beautiful Blooms


Sunday, January 24, 2021

A Couple of Prickly Animals

I was originally going to make a post for these cards separately but they look so cute together I just couldn't separate them! I made these cards quite a while ago and I was happy to have finally gotten them on the blog so you all could see them.  I had originally made these for a color challenge but they never made it there; but here they are now!


What I Used to Make Both Cards:
Hero Arts Cactus Animals Bundle #SB199 {retired but is available online}
You can also look for the products separately; the animals are #CM267, dies #DI512
Watercolor Paper {I use this}
Ranger Archival Ink in Jet Black

I stamped, colored, and cut both the turtle and cat.  As you can tell from the cards I colored each of the images quite carefully.  I layered greens over browns with a bit of orange and yellow thrown in, as well as the colors for each image, such as the plant container for the cat.  It actually took a few days to complete them as I had to wait for each color to dry completely before I added another layer of color.  If you don't let them dry completely, you end up with a mud puddle of brown! Don't forget if you want to see all the details in the pictures, just tap the image and it should show you a larger one.

It's easier to show each card and the items I used to make them separately at this point, so here we go!
What I Used on the Turtle Card:
Kraft Card Base                                                                                  
Simon Says Stamp Fine Detail White Embossing Powder

I attached the turtle right to the card base and took a leap of faith by stamping the sentiment and embossing it right on the card.  I typically try to do this but end up creating a huge mess and cutting the sentiment out and layering it over the huge mess.  But this time it worked like a charm! 


What I Used on the Cat Card:
White Card Base
Kraft, Green, Light Blue & Blue Cardstock {stash}
To add some interest to the cat card, I started with cutting the chain circles out of blue and green card. Once they were glued on and dry, I added the prickly kitty.  Finished this card off by stamping the sentiment in black on Kraft card, cutting it with the stitched rectangle die, and gluing it on.

These cards were really delightful to make; layering the colors was so much fun!  It isn't something where I have a lot of experience since most of what I color is just one color.  They pushed me out of my comfort zone and I hope they inspire you to get a little crazy! What else is there to do? Might as well make a bunch of cards :) I sincerely hope that you and yours are well during this trying time; to me it makes it even more special that you have popped in as I am sure you have other things on your mind.  I appreciate you taking the time to read my posts :)  Fondly, Christi


I am entering my cards in the following challenges {found on Challenges for Days}:
CAS on Friday, #197 - Animals {hope my faux animals count!}
Krafty Chicks, #543 - CAS
Scrapping for Fun Challenges, #184 - Anything Goes
Little Red Wagon, #585 - Die-Ing to get Crafty!
The Male Room, #146 - Animals {hope my faux animals count!}
Creative Knockouts, #385 - Anything Goes


Thursday, April 23, 2020

Thanks for Everything

I was in a huge bind early last year and I was helped out by a city employee.  She went above and beyond her job description and now that the situation has been resolved I decided to send her a thank you card.  I didn't want it too feminine or too plain; I think I struck a good balance.


What I Used to Make this Card:
Vanilla Card Base
Hero Arts Stamp & Cut Thanks, #DC152
KaiserCraft Fairy Garden 6 1/2 x 6 1/2 Paper Pad, #PP1039 {available online}
Reverse Confetti Striped Frame Cover Panel {not sure if this is retired}
Hero Arts Ink in Robin's Egg Blue {I got mine in the February MMH kit}

I chose a vanilla card base to soften the card a bit.  I cut the Striped Cover Panel out of one of the papers that had "spot varnish" on it; spot varnish is when a shiny coating is added to certain parts of decorative paper.  I die cut
The dimension and that "spot' shine
some plain white paper using the Thanks die, quite a few times, glued them all together and finished with top Thanks cut out of the same paper as the cover panel.  I added the matching blue paper in the center of the panel and stamped for everything using the same stamp set and a matching light blue ink.


I really like how this card came out and I hope she {and her office} like it, too!  I only have a few things from my craft room set up so I am trying to use up some older things I've had.  I'd love it if you'd follow me on social media - I am pretty much everywhere, so just chose one or 2 from the listing on the right hand side of the blog.  Thank you so much for stopping by and if you do end up following me please let me know so I can return the favor ~ hugs, Christi

PS: I actually sent this card out to the person I made it for! Of course, I did it the day before the virus stuff hit so I have no idea if she got it, but I sent it! I get a gold star {finally!} 

I would like to enter my card in the following challenges:
Dies R Us, #143 - Spring Flowers 
Simon Says Stamp Wednesday Challenge - Flower Power
Addicted to Stamps and More, #386 - Anything Goes
Krafty Chicks Challenge, #504 - Any Occasion
Crafty Hazelnut's Patterned Paper Challenge, April - Anything Goes
Allsorts Challenge, #568 - Flowers and/or Showers
Arty Divas, #20 - Anything Goes


Monday, April 20, 2020

We Were Mermaid for Each Other

While this is an older Lawn Fawn set, it's brand new to me and what better time to break out an adorable mermaid couple than when we are all stuck together and maybe not feeling so loving towards those we are stuck with?  I dearly love my family, but things are starting to feel a bit. . . crowded.  I just keep telling myself this too shall pass :) 


What I used to Make my Card:
Navy Blue Card Base
Lawn Fawn Mermaid for You stamps, #LF1167
Lawn Fawn Mermaid for You dies, #LF1168
Pre-made Distress Oxides Ink Background {I always have a bunch of these around}
Various Hero Arts Inks
Watercolor Paper {I use this}
Ranger Archival Ink in Jet Black
Light Blue Card
Sakura Gelly Roll Silver Pen, Stardust
Scrap White Card

I had already made the background of the card; I find it very helpful to have a bunch of these backgrounds in various colors ready to make into a card at any time.  I find it very relaxing to play with the Distress Oxides.  I love the fact that you really can do no wrong with them.  If you don't like the way the colors blended or thought it would look different, you can always add more Oxides to the watercolor paper or use any number of shimmer sprays to liven it up.  I also keep all the scraps from my backgrounds {at least the ones that are 1/4" or bigger.}  You'd be surprised at how many uses come up between stamping a sentiment or weaving bits together.

Since my background was done, I moved on to the elements of the card.  I stamped, colored, and cut all the pieces, some on watercolor paper and some on plain scrap white.  For the images I stamped on the white scrap that didn't need to be colored, I used various Hero Arts inks.  The Oxide Ink background was
Another Look
glued onto a navy blue card, another scrap of white was glued inside so the giver would be able to write inside the card, and then all of the pieces were glued onto the front of the card.  I am by no means a talented color-er but looking back at my earlier creations, say last year and the year before, I'm happy to say I've gotten better, at least with water coloring.  I look at my cards from way back and I just cringe, but I try to look at how I've grown rather than focus on how bad I was.  I'm talking cards so bad they will never see the light of this blog.  I've also lost my irrational fear of alcohol ink markers which is handy since I am watching videos and reading tutorials on how to use them {one of my on going goals.}  How are you doing with your crafty goals?  Do you go back to your older cards and marvel at your progress?  You should!  Maybe I should make a page {or start a challenge!} for "The Cards We Made Way Back Then!"  Hope you enjoyed my post and I hope you come back and visit me soon!  Fondly, Christi


I am entering my card in the following challenges:
Simon Says Stamp Monday Challenge - Make a Scene 
Little Patch of Crafty Friends, #130 - Anything Goes
Three Muses - Something Fishy
Through the Purple Haze, #166 - Anything Goes
Cardz TV, #112 - Anything Goes
Alphabet Challenge Blog - A is for Anything Goes