Followers

Showing posts with label Funny. Show all posts

Monday, October 24, 2022

Sarcastic Kitties - Cat Lovers Blog Hop DAY 1!

I know I haven't been around lately - life has gotten a bit hectic, but I am still creating! Stay tuned for some goodies to be posted very soon! 


I am excited to be able to participate in the Cat Lovers Blog Hop 2022 (the link will take you to the main page that has ALL the info)! I love this event and look forward to it ALL year! Janis, the event owner and coordinator puts on a FANTASTIC hop with TONS of prizes :) I hope you will join us!

I missed this stamp set during Simon Says Stamp's STAMPtember 2021 event & I was heartbroken! I mean the set has everything I love in it - snarkiness and cats! I was lucky enough to find one for about what I would of paid for it if I'd caught the set; I happened to be looking for it on eBay and people are insane - listing these sets for at least $100!! The Tim Holtz one is going for even more than that! But I digress. . .here is my first creation with the Sarcastic Kitties stamp & die set from Simon Says Stamp and Picket Fence (sadly no longer available, but rumor has it if you bug Simon Says Stamp enough, they might re-release it!)


I used DCWV Playful Pets (not on DCWV website, but readily available) paper and Tutti Designs Nesting Stitched Scallop Squares to cut the sentiment out after I stamped it on white card. The cat and the furball heart are stamped in black ink on watercolor paper and colored in with my Zigs. I cut them out with the coordinating dies.  I used a white card base, covered it with the patterned paper, used a strip of the other side of the same paper and made a little square for the furball heart.  I attached everything together and this is what I came up with. I appreciate each and every comment & visit - thank you SO much :) Fondly, Christi

Happy Hopping!! 

I am entering my card in the following challenges:
Cat Lovers Blog Hop
We Love Stamping - Colors of Autumn
4 Season Challenge, #61 - Pets
Crafty Hazelnut's Patterned Paper Challenge - October
NBUS, #43 - Neve Before Used Schtuff, October
Use Your Stuff, #469 - Die Cuts
Addicted to Stamps & More, #440 - Die Cuts and/or Stencils
Crazy for Cats Challenge, #1 - Anything Furrything Goes
SUYP, #82 - October Anything Furrything Goes


Wednesday, May 4, 2022

Mixed Media with The Robin's Nest Creative

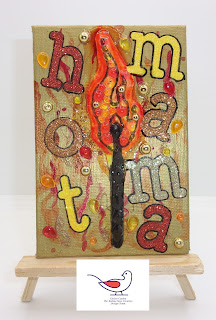
 Hello everyone! For my Design Team project at The Robin's Nest Creatives I decided to go all out and get really messy.  I used to make mixed media items all the time, but have since gotten busier and really haven't had time to play; I made up for lost time!  Let's get to it, here is the project; it's made on a Frederix 4" x 6" panel - this is a long post, I apologize, but I used a lot of different products (some not so successfully) while making this piece.


The first thing I did was use one of the really cool kits they have at The Robin's Nest called Creative Dew Drop Canvas and there are some amazing pictures to choose from, I used the Matchstick Creative Dew Drop Canvas for today's project.  These kits come with everything you need (except glue) to make a masterpiece worthy of framing - AND they come in different sizes! I used Dew Drops that I though would represent the flame best, orange, gold, red and yellow and filled it in completely with both Regular and Mini Sized Dew Drops. Black Diamond Dews were used on the wooden part of the match. I also colored around the flame to sort of give it that halo glow you sometimes get around fire using Copics right on the canvas.  I smothered it with Diamond Glaze and let it sit overnight to dry.  I wanted
Another Look
to use a panel as my substrate so I cut the match out.  I actually did this back in the beginning of being on the Design Team but I put the match somewhere and couldn't find it - shocking, I know - it popped out of where ever those items go when "they were right here" and then they are gone (another dimension with lost socks?? I don't know) but I found it.  Setting the match aside, on my desk so it couldn't escape again, I painted the 4" x 6" panel gold using Lumiere True Gold Paint. I have to swoon for a second because I love Lumiere Paints - if you like rich color, some of the coolest pearlescent colors (some of them are blended with 2 colors and the effects are amazing!) you need to check this paint out.  It is sold for use on fabric, but I have used it on everything and I have never been disappointed with it.  It's a quality product and it may seem pricey (if you shop around you can get a jar for around $6, a 2.25 fl. oz, jar, but they also come in sets with little squeeze bottles, called Exciter packs), but a little goes a long way. Sorry for that little detour! 

So once my panel was dry this is basically where I went crazy.  I used a flame stencil and some sprays to try and make a fire background, well the gold paint did not like the sprays (they are water based and just beaded up and dripped away) but some of the color did take.  At this point I just started to throw products at the panel; and I used so many different colors I couldn't begin to list them all. I used a few different embossing powders from Wow Embossing Powders, some diluted red paint from Golden, and some more embossing powers -which again were an issue because the embossing ink just beaded up on the paint.  No worries I just made the background really, really abstract.  I glued the Matchstick Creative Dew Drop Canvas that I had cut out onto the panel and attached the alphabet letters I had cut out of  6" x 6" DCWV glitter stacks and I then added more Dew Drops using the same colors I used to fill in the flame, but I used the Tear Drop style of Dew Drops instead.  I added a few Mini Dew Drops as well.  I wanted them to sort of look like sparks from the flame.  I glued the sentiment onto the panel and the letters just blended right in with everything else so I used a permanent black marker and traced them all so they'd be easier to read and pop a little.  The final step was to smother the match stick once again with Diamond Glaze and once that dried I was done.

I am actually happy how this panel ended up.  It is very interesting with all the colors, glitter, glaze and, of course, Dew Drops.  I hope you enjoyed my long story- I have been trying to make my posts shorter and I think I am succeeding, but sometimes I just have to tell the whole story!  Thanks for your support ~ Lots of love, Christi

I am entering my Mixed Media Panel in the following challenges:
Crafting Happiness, #123 - Anything Goes
Love to Craft Challenge Blog, #68 - Anything Goes
Mix it Up Challenge, #59 - Anything 3D Goes
Creative Artiste Mixed Media Challenge, #82 - Anything Mixed Media Goes
A Perfect Time to Craft, #5 - Anything Goes
Mixed Media Lovers, #13 - Anything Goes

Tuesday, May 3, 2022

Family Challenge at Paper Funday!

Hello everyone! Today is the start of the May challenge at Paper Funday and our optional theme is FAMILY.  I had a few options in my mind for this challenge, but decided to go with a family of cats; if you follow me on any social media I am always posting pictures of my cats (I have eight which is why I found this sentiment to be particularly fitting)  and talking about their crazy antics! I hope you enjoy my card:

I started with a handmade slimline base in white and covered that with the brick paper (this paper is from a pack I got in a bundle from My Favorite Things & I couldn't find it on their website) for the wall and used dark blue cardstock for the floor; pretending it's carpet, to give the illusion of a room.  Then I used my favorite black ink on watercolor paper and stamped all of the cats as well as all of the other items I used in my scene.  The sentiment was stamped on white card scrap and cut out with a fishtail banner die.  I colored everything with my Zig markers, cut out all the items and glued them to the card.  I had found a wooden heart embellishment with a paw cut out (discontinued product)  which I covered with Foundry gilded wax and being it a flat piece, I added some Diamond Glaze to seal the heart otherwise the wax just flakes off - it needs dimension to stay on something.  I watched the Tim Holtz video on Foundry wax and I had to get ALL the colors after I tried out the gold.  The pictures don't do this product justice - it really is amazing!  The heart was the last thing I attached to the card and it was finished.

I hope you enjoyed my card and maybe it will help you think of different ways family can be interpreted.  And most of all, I hope to see you join in at the Paper Funday challenge for May! Thanks so much, Christi

I am entering my card in the following challenges:
Krafty Chicks, #610 - Stamp Act
DreamValley Challenges, #269 - 4 Legged Friends
Critter Crazy Challenges, #62 - Anything Goes w/ Critters
Crafty Friends, #155 - Animals
The Diva's That Cut - Anything Goes
Country View Challenges - Cats and/or Dogs


Sunday, November 21, 2021

Who Knew?

 Hi all! The current challenge at Sisterhood of Snarky Stampers, which is N is for Naughty,  inspired me to actually make this card - I'd had the Santa already put together and I had the sentiment on my desk for ages, but the current challenge was the push I needed!


I covered a white card base with patterned paper from DCWV Red & White Christmas paper {doesn't show on their website, but it is available online if you HAVE to have it}; and then I used Hero Arts Infinity Nesting Circle dies to cut the checkered paper from the same.  I used a circle I had left over from my Joy Ornament I made, so that is what I stamped the sentiment {from Riley & Company Funny Bones; I bought a ton of them recently so they will be showing up a lot!} on.  Like I said, Santa, which is from Frantic Stamper, was already made - I just added some googly eyes. I attached everything and added some beautiful bubble gems from Trinity Stamp.  There ya go! 

I am entering my card in the following challenges:
Sisterhood of Snarky Stampers, #198 - N is for Naughty
Stamping Sensations - Christmas
International Art & Soul, #122 - Winter
Crafty Hazelnut's Christmas, #569 - Christmas
Happy Little Stampers Dies Challenge - Anything Goes w/ Dies


Wednesday, November 10, 2021

It's Your Own Asphalt

 Yes I think it is time for just a bit of snark - I can only handle so much holiday stuff, especially this early! I think that soon there will never be any time off from families making cookies and wearing matching PJ's while the snow softly falls in the background. . . I don't know about you, but that wasn't my holiday experience!  But I will save that for another time. I made this card to save my sanity. 


It's a very simple, yet effective, card.  I used Ink Road Stamps Roadies V11 to make the card, I stamped the scene on some watercolor paper, colored it with Zig Clean Color Markers and then cut it out with Stitched Nesting Squares from Tutti Designs.  I then attached the scene onto the white card base, stamped the sentiment under the scene with my favorite black ink and I was done.  And I feel a whole lot better.  Hope you get a chuckle from the card ~ fondly, Christi

I am entering my card in the following challenges:
Sisterhood of Snarky Stampers, #197 - R is for Rude
The Corrosive Challenge, #11 - Anything Goes
HLS Watercolor Challenge - Anything Goes
Pammie's Inky Pinkies, #2145 - Anything Goes
NBUS Challenge, #32 - Anything goes with new Stuff (entry 2)


Saturday, December 15, 2018

Always Jingle

I consider myself very blessed to have such a great relationship with my brother; especially because he is twelve years older than I am.  The older we get the more alike we are and we both have a sense of humor that leans on the darker side.  I made this Christmas card for him.


What I Used to Make my Card:
White Card Base
Holiday Patterned Paper {from stash}
Katzelcraft Cats stamp set, #KZT152 {the image was already colored and fussy cut}
The Ink Road Happy Holla Days stamp set
Ranger Archival Ink in Jet Black
Die-Namics Stitched Circle STAX

I put this together in about 10 minutes, of course it helped that the cat was already stamped, colored and fussy cut.  So all I did was cut the circle out of white card. stamp the sentiment, glue the cat on, attached the patterned paper and let the whole thing dry.  Easy as pie!

I always stamp, color and cut out extra of whatever I am working on, it makes putting cards together SO easy {IF I can find the images; I have a horrible filing system that is basically a huge pile in a tray.}  I'm going to work on that.  I hope you like my snarky holiday card; I think this card is perfect for those who see things a wee bit skewed and my brother fits the bill.  Thank you so much for visiting! I'd love for you to let me know you were here so I can visit you back! Happy holidays! Christi

PS: I just have to share with all of you - it is incredibly hard for me to type out Christmas and not just type my name! You have NO idea! LOL

I am entering my Always Jingle Card in the following challenges:
Sisterhood of Snarky Stampers - #125, R is for RUDE Christmas

The Artistic Stamper - M, Christmas
Dies R Us Challenge - #111, Anything Goes Christmas
Animal Friends Challenge - #69, Anything Goes Christmas
Cardz TV - Anything Goes
Creative Friday - M, #220, Christmas Animals, entry #2
Simon Says Stamp Wednesday Challenge - Christmas
Shopping our Stash - #384, 'Tis the Season
SUYP - Meowy Christmas