Followers

Showing posts with label Clean Color Markers. Show all posts

Wednesday, January 5, 2022

Winter's Night Shadow Box Card

I made this card for the Paper Funday January Challenge, which is anything goes or a winter landscape - not surprisingly, I went with the optional theme. I love making these Lawn Fawn shadow cards!  And the fact that they fold flat to make mailing easier {and cheaper!} is so cool.  I actually found the base of the shadow box already cut in a pile of papers on my desk so I took it as a sign and whipped up this card! 
 

What I Used to Make my Card:
White Card
Lawn Fawn Happy Village stamps, #LF1591
Lawn Fawn Happy Village dies, #LF1592
Lawn Fawn Winter Skies stamps, #LF1763
Lawn Fawn Winter Skies dies, #LF1764 
Lawn Fawn Shadow Box Card dies, #LF1486
Lawn Fawn Starry Skies dies, #LF1377
Dark Blue Shimmer Card
White Shimmer Card
Silver Glitter Card
Watercolor Paper {I use this}
Ranger Archival Ink in Jet Black
Red Liner Tape
Zig Clean Color Brush Markers

I wanted this card to have a starry night so I cut a piece of shimmer, dark blue card, cut stars out of the silver glitter card, attached the stars to the
Stars from the top of the card
background, and set aside.  I had cut the middle pieces of the card {where all the components sit} out of white shimmer card.  It's hard to see in the photos but it's very pretty.  I set all the shadow box card pieces aside.  


I stamped all of my houses and trees onto watercolor card and colored them with my Zigs.  Once they had dried I cut them out with the coordinating dies.  I then assembled the card.  I could go through step by step, but Lawn Fawn has a wonderful video that tells you exactly how to make this card so if you are wondering what the exact process is, or want to see the construction, just click HERE.   In the video they use white tape, the type you can tear, but I've found the red liner tape works the best for me.  I guess it is all what you prefer.  However, wet adhesive would really present a problem trying to hold everything together properly so you do need to use some sort of tape.

The bright colors of the houses really pop against my night sky.  I'm very happy with how this card came out especially considering I wasn't even planning on making it! Hopefully this inspires you to join in the challenge at Paper Funday!  I hope you enjoyed my card as well.  Stay warm out there and I will see you soon!  Fondly, Christi
 
I am entering my Winter's Night Card in the following challenges:
Shopping our Stash, #461 - Something beginning with S (Stars!!)
4-Season Challenge Blog, #52 - Cottages
Inspiration Station, #21 - Winter Cityscape
Dies R Us Challenge, #184 - Anything Goes with a Company they Carry
Sparkles Christmas Challenge - A Winter's Scene
Stamping Sensations - Anything Goes with Option of Dies

Friday, December 3, 2021

Peace & Happiness

I found this card among my blog drafts - I made it long ago, but never published it.  Well, I think this is a good time to publish this card with all the recent events as I wish all my fellow humans & furbabies health, peace & happiness now & forever. 

When I first began card making, Asian design was all the rage.  We used anything Asian {often mixing countries and regions} on our cards; joss papers, hell money, pieces from advertisements, newspapers, book text, and anything even remotely Asian looking.  I've used more than one take out menu on my cards!  Even replicated coins found their way onto our cards.  I still have a fabulous supply of Asian papers, rubber stamps, trinkets, tassels, papers, coins and charms, and most of the items can be found on eBay, Etsy, or in small craft stores.  There are even a few stamp companies who still make beautiful Asian stamps, Hero Arts being one of them, and I'm lucky to still have many of my wood mounted, red rubber, Asian stamps.  When I received this stamp and die set, it brought back so many memories of the gorgeous creations my fellow crafters would make that I just had to play with it.  I hope you like what I've designed!


What I Used to Make my Card:
White Card Base
Blue and Silver Asian Background Paper {stash}
Hero Arts Japanese Wishing Garden Stamp & Die Combo, #SB148 {retired but available}
Watercolor Paper {I use this}
Ranger Archival Ink in Jet Black
Zig Clean Color Brush Markers
Distress Ink in Blue Jean
Alchemy Petal Point Inks from Colorbox {I used the silver ink petal}

Once I had stamped four buildings on watercolor paper and colored them with my Zig markers, I set them aside to dry so I could cut them.  While waiting, I stamped the cloud element and the butterfly a few times on scrap white card
See the sparkle!
using silver ink.  I attached a strip of the decorative paper to the white card base and cut out all my items.  I stamped the sentiment and arranged all the pieces to the card and the card was finished.  I wish you could see the sparkle of the paper; it's raised a bit as if it is embossed {and it may be} and the shine is beautiful!  I have a major collection of this type of decorative papers gathered when I was certain I'd be hand binding books and I'd need them for the covers.  I still do hope to learn to do a hardcover binding but the papers are just waiting to be used, so I snipped a bit for this card.  


This card brings me feelings of peace; it's part of my promise to make more "any occasion" cards that I can just mail out - no birthday or holiday needed.  I
Another Look
am my own worst enemy and will find things wrong with a special occasion card so I tend to let slide on a "just thinking of you" card. I'm getting back to the roots of card making.  I want to have fun with my creations and not worry so much about them being perfect.  As I often say, if it was perfect it would be 'store bought'!  I hope my story has prompted you to drag out some of that old paper, especially that paper you are saving {for what!?!} and some of the stamps you haven't used in a while.  Or maybe purchase a new set in your "old" style; whatever works for you! Just create and have some fun!  Fondly, Christi


I am entering my card in the following challenges:
Classic Design Challenge, #12 - Anything Goes
Cute as a Button,  #75 - Anything Goes option: Vintage Feel
Krafty Chicks, #588 - Stamp Act
Simon Says Stamp Wednesday Challenge - Christmas/Holidays
Addicted to Stamps and More, #419 - Any Occasion
Everybody Art Challenge, #503 - Blue & White
Inspired By Challenge, #198 - Inspired by the Graphic {Blue & White are my FAV colors!}


Tuesday, October 5, 2021

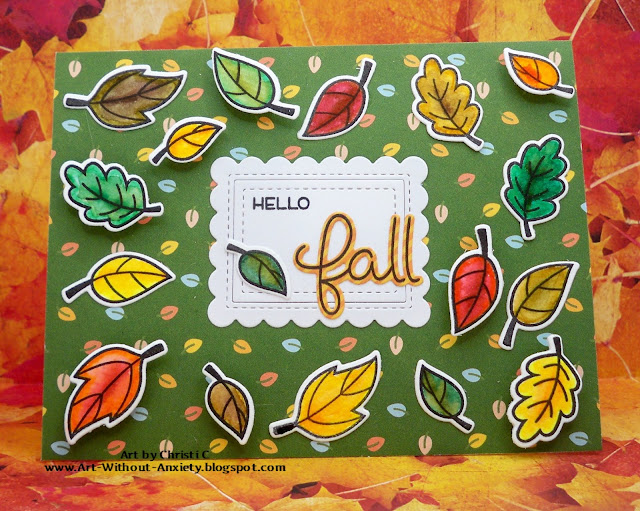
Hello Fall!

 Hi everyone! Well, fall is here, at least once the sun goes down.  The nights have actually gotten so chilly I have had to shut the window and put the heat on! I was inspired to make this card by the background paper that I got as a freebie from my most recent Lawn Fawn order {and where the leaves came from - a first time use from a new release!}; and then when I spied last week's Lawn Fawnatics challenge {it was #109 - Awesome Autumn} this cute card was born! While this isn't exactly a sky, I am entering my card in the most recent Lawn Fawnatics Challenge, #110 - Spectacular Skies - just pretend these leaves are swirling all about in the sky :)


I started with a white card, covered it with Fall Fling paper, then stamped, colored and cut out the leaves and the word fall.  I used the new Scripty Autumn Sentiments stamps and dies for the leaves and sentiment, framing the sentiment with Mini Picture Frame dies.  The frame dies actually cut out in 2 separate pieces, the frame and the middle - I just kept the die cut together {used a bit of tape on the back}, stamped hello and layered on the word fall.    Then I used dimensional dots for some of the leaves and scattered them all around the card without much thought.  Fall colors are one of my favorite themes because I love mixing all the colors; you really can't make a mistake blending with that color palette.  The cute frames are one of my first Lawn Fawn purchases but I don't think I've ever used them before! Well, they are out on my desk now which means I am sure you will be seeing them again soon.  

I am not sure if I like this new format of my blog; it does save me time, but I don't think it flows like my original style did.  I'm sure it will work itself out!  Thanks for taking the time to stop by & I hope you and yours are healthy and safe ~ Christi 

I am entering my card in the following challenges:
Lawn Fawnatics, #110 -Spectacular Skies
Try it on Tuesday - Autumn Blessings
NBUS - Challenge #31 {must use never before used stuff}
Die Cut Diva's - Anything Goes
Dies R Us, #178 - Anything Goes
Country View Challenges - Autumnal Colors
Crafty Hazelnut's Patterned Paper Challenge - Anything Goes using Patterned Paper
The Four Seasons Challenge - Anything Goes Fall
Sunday Stamps #267- Autumn Boldness {graphic below}
Pammie's Inky Pinky Challenges, #2140 - Anything Goes


Friday, June 4, 2021

Happy Father's Day!

Hey everyone!

I am SO glad you are visiting me as it is time to get your flow on and join us in the River of Creativity with any project depicting parent(s) and child(ren). My cats, who, whether they like it or not, are my children, were truly kind to me this Mother's Day and gifted me with some Harry & David dark chocolate truffles, my favorite in the world {so far, feel free to send me your favorite dark chocolate truffles and I will compare them for you.  I'm nice like that!} my roommate does have children but he sees the cats more than his human kids {especially since they live in another state} and Simon Says Stamp made THE perfect set for me to make him a Father's Day Card! So, here is my card!


What I Used to Make my Card:
White Square Card Base
Simon Says Stamp Happy Meowthers Day Stamps, #SSS202293C
Simon Says Stamp Happy Meowthers Day Dies, #SSSD112342C
Watercolor Paper {I use this}
Zig 
Clean Color Brush Markers
Gina K Amalgam Ink Pad in Obsidian Ink
Simon Says Stamp Black Embossing Powder
Red Glitter Card
Simon Says Stamp Chunky Hearts Panel, #SSSD112288
Gel Pens

What I did first for this card was stamp, cut and color all of the kitties.  Between the two of us, my roommate and I,  we have eight {yes, 8!} and I wanted them all on this card.  Granted these eight cats don't exactly look like our eight, I haven't figured out how to color a black cat without making it look like a black blob, but I am working on it! So, consider these cats as stand ins for the real ones. I wasn't planning on making a square card, but I couldn't fit all the cats on any other way. Once I got the placement of the cats down, I embossed the sentiment using black embossing powder. Then, I glued the cats in their positions.  I felt like the card needed a bit of color, so I die cut a heart using glitter red card and popped that, using dimensional dots between the second and third sentiment.  As per usual, I had enough cats left over that I actually made 2 cards, but I will be posting that one later. Now would be a purrfect time to subscribe to the River of Creativity blog so you don't miss a post; we are on Instagram {tag your projects with #riverofcreativity and/or #rocparentandchild02} AND Twitter at River of Creativity (RiverCreativity)!

I hope you consider joining us at the River of Creativity - we encourage any and all crafts and would love to see your interpretation of this months theme, Parent & Child.  There are a million ideas in my head on how to express this theme; maybe I will get crafty and make some more for the challenge! You have until the end of the month to join us so I hope to see you there! 

Fondly, 

Christi

I am entering my card in the following challenges:
SUYP Cat Challenge, #67 - Furrything Goes
CARDZ TV, #142 - Anything Goes
Scrapping 4 Fun, #193 - Male/FathersDay/Masculine
C.R.A.F.T. Challenge, #600 - Masculine
Little Red Wagon, #604 - Make it Masculine
Simon Says Stamp Wednesday Challenge - Masculine
Watercooler Wednesday, #317 - All Things Masculine
The Male Room, #151 - Dads & Granddads
Happy Little Stampers - June Watercolor Challenge


Wednesday, June 2, 2021

You Donut Even Know. . .

Hi Dies R Us Fans!

Today I am sharing a cute birthday card made with darling Mama Elephant products that are available in the Dies R Us store.  Here is my card:

What I Used to Make my Card:
White Card Base
Watercolor Paper {I use this}
Zig 
Clean Color Brush Markers
Gina K Amalgam Ink Pad in Obsidian Ink
Hero Arts Ultra Fine White Embossing Powder
Light Purple Card
Sizzix/Tim Holtz Beaded Garland Embossing Folder, #660041 {retired, but available}
Mama Elephant Donut Treats Stamps
Mama Elephant Donut Treats Dies
Nuvo Deluxe Adhesive
Half Pearls {stash}
Dimensional Dots

I began this card by stamping, coloring and cutting out the mice and the donuts.  Setting them aside, I embossed a piece of light purple card {there are SO many embossing folders available in the Dies R Us store; I have some on order but haven't gotten them yet} using an embossing folder and then embossed the sentiment using ultra fine white embossing powder. 


I used some pastel colored half pearls I had in my stash to add some interest and to act as some sprinkles on the donuts, gluing them down with adhesive. Lastly, I used dimensional dots to attach the elements and then glued the the entire piece onto a white card base.  Between the embossing folder, the half pearls and the dimensional dots this card has a lot of character, but it was difficult to get a good picture of both the front and of the dimension so I have included a view that shows it all off.  Just click on the picture and it should open up in another screen big enough to see.

Thanks so much for stopping by! I hope the world is opening up a bit where you are but please, stay safe! See you soon! Christi

I am entering my card in the following challenges:
Always Fun Challenges, #216 - Food
Three Room Studio, #38 - Birthday
Crafty Animals, #51 - Anything Goes w/ an Animal
Die Cut Divas - Birthday
MIUCB, #50 - Anything Goes w/ Stamping
Friendship Challenge, #66 - Happy Birthday

Tuesday, April 6, 2021

Sending Wishes. . . with Dies R Us

Happy Wednesday! I am thrilled to be back on the Dies R Us Inspiration Blog Design Team; Dies R Us is a fabulous store that has so many other things besides dies, I do hope you will go have a look and don't forget to enter the fortnightly anything goes giveaway!  Spring is FINALLY here in Colorado, sort of.  We have been having 80 degree days, and then 60 degree days - still, it isn't rain or snow, so I'm a happy girl :) If you are a regular reader you know I am in love with Lawn Fawn and I pretty much buy every new thing they come out with {I'm happy, wallet is NOT happy!} because I just have to have it! Here is a new spring card I made with some of their products :) 


What I Used to Make my Card
White Card Base
Lawn Fawn Dandy Day stamps, #LF2217
Lawn Fawn Dandy Day dies, #LF2218
Lawn Fawn Spiffy Speckles Petite Paper Pad, #LF1868
Lawn Fawn Stitched Windy Backdrop, #LF1425
Lawn Fawn Grassy Border die, #LF613
Lawn Fawn Fancy Wavy Banners, #LF1923
Spellbinders Nestabilities Labels 17, #S5-025
White Card {for frame}
Clear Wink of Stella 
Watercolor Paper {I use this}
Zig Clean Color Brush Markers 
Gina K Amalgam Ink Pad in Obsidian Ink
Nuvo Deluxe Adhesive Glue


You can see the sparkle a bit in this photo
I stamped, colored and cut all of the components, ran a pretty piece of Spiffy Speckles through the die machine using the windy backdrop {if you look close, the mice seem to be speckled too; before I cut them out I had used a bleach clean up product on my desk and got the speckled mice, not on purpose, but a fun accident. Kind of different!} I framed the background with white card cut out using Labels 17 and before I glued it down, I pieced the scene together.  I went over all the dandelions with clear sparkles to give the card a bit of pizazz, you can't really see it in the pictures but it's there.  I glued all the pieces onto the background, added the banner with the sentiment and I was done.  This was such fun card to make and I love that the flowers are included with the set as coloring grey {hmmmm, rainbow mice? Sounds like a plan to me! Oh! How about some pastel mice to help usher in spring!?!} mice all day can get really boring!

I hope you enjoyed my mini tutorial {truthfully, I run out of ways to word them and honestly, who is going to read this that needs a how to? But it is my way of blogging, so you are stuck with it! I like to blog like you & I are having a conversation so that's what I do!} and you are getting some signs of spring in your neck of the woods.  I appreciate you guys so much and your comments give me the push I sometimes need to continue with my hobby.  Please continue to be careful as the world slowly begins to open back up! Fondly, Christi
  

Don't forget to come join in the fun at the Dies R Us Challenge Blog. There's a new challenge theme offered on the 1st and 15th of each month and one lucky randomly drawn winner will receive a gift voucher prize to the Dies R Us Store.  


   For your convenience, all the important 
Dies R Us links are provided below.

 click below for:

STORE

CHALLENGE BLOG

FACEBOOK

INSPIRATION BLOG 

FRIENDS OF DIES R US PINTEREST PAGE

I am entering my card into the following challenges:
Moving Along with the Times, #129 - Animals/Birds
Crafty Animals, #49 - Anything Goes w/ an Animal
Crafty Calendar Challenge - Spring and/or Easter
Make my Monday, #145 - Spring and/or Easter
Try it on Tuesday - Hello Spring
Lawn Fawnatics, #98 - Happy Spring


Sunday, January 24, 2021

A Couple of Prickly Animals

I was originally going to make a post for these cards separately but they look so cute together I just couldn't separate them! I made these cards quite a while ago and I was happy to have finally gotten them on the blog so you all could see them.  I had originally made these for a color challenge but they never made it there; but here they are now!


What I Used to Make Both Cards:
Hero Arts Cactus Animals Bundle #SB199 {retired but is available online}
You can also look for the products separately; the animals are #CM267, dies #DI512
Watercolor Paper {I use this}
Ranger Archival Ink in Jet Black

I stamped, colored, and cut both the turtle and cat.  As you can tell from the cards I colored each of the images quite carefully.  I layered greens over browns with a bit of orange and yellow thrown in, as well as the colors for each image, such as the plant container for the cat.  It actually took a few days to complete them as I had to wait for each color to dry completely before I added another layer of color.  If you don't let them dry completely, you end up with a mud puddle of brown! Don't forget if you want to see all the details in the pictures, just tap the image and it should show you a larger one.

It's easier to show each card and the items I used to make them separately at this point, so here we go!
What I Used on the Turtle Card:
Kraft Card Base                                                                                  
Simon Says Stamp Fine Detail White Embossing Powder

I attached the turtle right to the card base and took a leap of faith by stamping the sentiment and embossing it right on the card.  I typically try to do this but end up creating a huge mess and cutting the sentiment out and layering it over the huge mess.  But this time it worked like a charm! 


What I Used on the Cat Card:
White Card Base
Kraft, Green, Light Blue & Blue Cardstock {stash}
To add some interest to the cat card, I started with cutting the chain circles out of blue and green card. Once they were glued on and dry, I added the prickly kitty.  Finished this card off by stamping the sentiment in black on Kraft card, cutting it with the stitched rectangle die, and gluing it on.

These cards were really delightful to make; layering the colors was so much fun!  It isn't something where I have a lot of experience since most of what I color is just one color.  They pushed me out of my comfort zone and I hope they inspire you to get a little crazy! What else is there to do? Might as well make a bunch of cards :) I sincerely hope that you and yours are well during this trying time; to me it makes it even more special that you have popped in as I am sure you have other things on your mind.  I appreciate you taking the time to read my posts :)  Fondly, Christi


I am entering my cards in the following challenges {found on Challenges for Days}:
CAS on Friday, #197 - Animals {hope my faux animals count!}
Krafty Chicks, #543 - CAS
Scrapping for Fun Challenges, #184 - Anything Goes
Little Red Wagon, #585 - Die-Ing to get Crafty!
The Male Room, #146 - Animals {hope my faux animals count!}
Creative Knockouts, #385 - Anything Goes