Followers

Showing posts with label Dollar Tree. Show all posts

Friday, March 4, 2022

Peace Sign decorated with The Robins Nest Dew Drops

 This wasn't the project I was going to share today but I feel it's relevant to what is going on in the world, so it is a perfect time to share it.  


I had purchased the Peace sign at Christmas time at my local Dollar Tree Shop knowing I wanted to make something out of it that would be on my desk year round.   I began by sanding the wood a little bit mostly to just get any slivers that were hanging off and generally smooth the sign out.  I then used gesso, in white, as a base coat.  I knew you'd be able to see the white but since I love the combination of blue and white, I was fine with that.  I started trying to keep all the shapes and colors consistent with each other on the individual letters, but that soon became impossible because some letters took a curve when others didn't and so on, so I just filled in the spaces with Dew Drops that continued the theme and fit; the sign isn't that big, it's only about 6 inches long and about 2 1/2" high.   This sign sits on my desk to remind me to breathe, chill and relax; to find that inner peace, even if it is just a tiny bit.  I didn't want to make something that would need to be put away once the holiday season was over and I feel that the word peace is appropriate any time!

Dew Drops that include colors that I used in my project: Sea Foam Diamond Dew DropsSea Glass Tear Drops, Black/White/Silver Dew Drops, In Love in Italy Mini Dew Drops and Raindrops Dew Drops which is a mixture of all the sizes and shapes of Dew Drops in clear.  Dew Drops come in an array of mixes; so your Diamonds could also have some round Dew Drops in the mix and you may be able to purchase some colors in a single pack while some colors are only in mixes.  The suggestions I provided are just that; I urge you to take a look at the shop and see what strikes your fancy!

I appreciate you taking the time to stop by and take a look at my Peace sign! I hope you & yours are safe and happy. See you soon! Christi

I am entering my project into the following challenges:
Crafting Happiness - Anything Goes
The Funkie Junkie Challenge - Mixed Media
A Perfect Time to Craft, #3-2022 - Anything Goes
Creative Artiste, #80 - Anything Goes


Friday, November 5, 2021

River of Creativity's November Challenge "The Gift"

Hi all!! I took this month's challenge at River of Creativity literally and made a gift :) I don't exchange holiday gifts with my family, my mother is blind so she can no longer appreciate my art {and she has more clothes than she can wear!}, my brother, well, he's my brother and while he will admire what I make he really couldn't care less and my sister has become my biggest cheerleader.  I made this shadow box for her as she decorates for the holiday {I mean it looks like every holiday icon has thrown up in her apartment}.  Since we have so many cats I no longer decorate for the holidays - if I like something it stays up all year long and most of that is not really in the spirit of the winter festivities.  Anyway, I made this little shadow box as a gift, hence it fits the challenge :) I hope you have made something that fits the challenge; we are fairly easy and if you are stuck these prompts might help: the gift of your art, your love or just sharing appreciation for the changing season.


I began the box {that I found in a big box store for, get this, .99!! You can get yours by following this link} by getting a piece of packing foam and cutting it down to the size of the snow drift I
wanted in the box.  The material I used isn't Styrofoam, it has some give to it and it

isn't as dense; plus {BIG PLUS} you don't get all those little pills everywhere from cutting it. Once I had the piece in the right size I literally slathered it with Multi Medium Matte just using my fingers.  I then used "snow" I purchased from the Dollar Tree.  I set that aside to dry and painted the box white, waiting overnight for them both to fully set and dry.  Once the box and the hill were dry, I glued the hill into the box and added the blue sky using a dry brush and Blue Violet Opal Magic Paint.  Next, I added the trees {also a Dollar Tree purchase}, the trees came on little wooden circles but I just unscrewed them so I used just the tree. I made the little house out of cardstock using the dies from this Lawn Fawn set, and the sentiment is also from Lawn Fawn.  I had all the little sparkly and clay snowflakes in my stash as well as the snowflakes on the sides of the sentiment; they were actually buttons and I just snipped off the shanks! 

I hope my sister likes her gift; I am sure she will, and if she doesn't, she won't tell me LOL. I also hope I have inspired you to join us for the Gift challenge at River of Creativity - we happily take ALL crafts! Hope to see you there ~ Fondly, Christi 

I am entering my gift to the following challenges:
TTCRD - Anything Goes
The Holly and Ivy Christmas Challenge - Anything Christmas Goes
Country View Challenges - Christmas Gifting
Moving Along with the Times, #136 - Anything But a Card (entry 2)
Classic Design Team Challenge, #11 - Anything Goes
Pearly Sparkles Challenge, #68 - Merry Christmas
Simon Says Stamp Monday Challenge - Any Holiday Occasion
Lawn Fawnatics, #112 - Make the Sentiment the Star


PS: If you'd like to see my other Shadow Boxes, here is the Fall one {it lights up!}
and here is the Halloween one :)


Tuesday, November 2, 2021

Fall Light Up Shadow Box

This is the 3rd Shadow Box I've made in the last 2 months and I am having SO much fun getting messy and creative! When I first started stamping I was much more involved in mixed media than I am now and it's a blast to get back into some 3D art.  I LOVE this wall hanging and it was really easy to make so let's get started on the details!

I added full sized pictures of both the unlit and lit boxes at the end
of this post if you want to see them full sized.
Plus in this photo they are a bit blurry to me but I can't seem to get them crisper.

The back of the box
I used one of these small {5" x 5"} wooden shadow boxes that I found in a well known large craft store - they also had some other sizes - and the price was so good, I bought a bunch of them {which is why I've made so many in such a short period of time - I am positive there will be many, many more to come}.  This time I broke out the hot glue gun; which I am NOT proficient at, but I rarely use it.  I started by figuring out how the lights would work around the outside of the box and once I had the spacing down, I hot glued them all around the box.  There were two left over but I just snipped them off.  I got the lights at the Dollar Tree store and I think I need to go back and get some more 'cause I think they are just adorable being shaped like little leaves.  I did drop the entire string and cracked the case the batteries go in so that it wouldn't close anymore, but I quickly fixed that with a twist tie.  I like that you can turn the lights on or off with just a switch.

Next I needed something to fill in around the lights so I used Lawn Fawn's Fall Leaves Backdrop;  I just used the leaves that are extras, not the actual frame.  I cut two of each leaf in a bunch of colors I found in my scrap box, and then cut the acorn stems out of dark brown and the acorn bodies out of Kraft.  I also used the hot glue gun to attached the leaves all around and I can now see why everyone loves these guns.  The glue sets SO fast and I had no issues with attaching the leaves to the bumpy wire that I bunched together between the leaves that light up.  Once I was done with the frame, I added berry garland that I also found at the Dollar Tree; I just left it in the circle it came in instead of unwrapping it.  Lastly, I used Kelly Alpha Lower from Pinkfresh for the word fall.  I chose red for the sentiment since I feel it stands out a bit more.  While I try to make most of my 3D art able to either sit on a shelf or hang this one needs to hang on a nail about 1 1/2" away from the wall to accommodate the power box on the back.  I think next time I will try to put it on the frame and hide it.  I probably could of done that here but as usual I didn't know what I was going to use for what.

I hope you like my little shadow box!  Like I said, I had SO much fun making it! As well as the others I've made.  I'm glad I bought a bunch of them!  Now if I can find room to set up my Silhouette machine I just might make some signs next :)  Thanks so much for stopping by & see you soon! Christi

Thanks again!!

I am entering my project in the following challenges:
We Love to Create, #11 - Anything Goes
Mix it Up Challenge Blog, #55 - Anything Goes + 3D project
Simon Says Stamp Monday Challenge - Any Holiday Occasion
Challenge up Your Life, #141 - Interactive
Moving Along with the Times, #136 - Anything but a Card
NBUS, #32 - Everything is new except the Alphabet :)
Creative Friday, #293 - Anything But a Card


Monday, October 25, 2021

Haunted Times Wall Hanging

If you are looking for the Cat Lovers Blog Hop post, click here :)

 As I was scouring the internet for Halloween miniatures I stumbled across these small {5" x 5"} wooden shadow boxes in a well known large craft store - they also had some other sizes - and the price was so good, I bought a bunch of them. I try to make something 3D for Halloween every year {last year I made a spell book that you can see here} and this shadow box is this years' 3D project.  It's the first time I used one of my new shadow boxes and I had a blast making it! 


Haunted Times
First, I primed the wooden box with white gesso, then painted it black.  While the box was drying I shaped the skeleton, which I got at the Dollar Tree {they are sold in a garland with 4 or 5 of the plastic skeletons tied to a piece of jute. Since the skeletons are plastic, I heated up where I wanted with my heat gun and gently bent him; a plus is that their arms and legs move so even though I bent his legs to make knees the left leg is movable still. This way the box can either be hung on the wall and his leg can dangle, or you can gently put his foot onto the bottom of the shadow box and have it sit on a shelf. I shaped him to be sitting down by bending his legs and I bent his arms to create elbows.  I glued googly eyes to him and set him aside.  I also purchased the hay bales, the silver bat sticker and the background ribbon I used in the box from the Dollar Tree. 


I cut the ribbon to fit the back of the box and glued that down, glued a Tim Holtz/Idea-ology drippy candle onto another hay bale and put some googly eyes on the pumpkin which I sat on some paper leaves from my stash.  The metal letters used to spell out spooky are from Memory Makers, which has gone out of business, they were actually buttons, but I trimmed off the shank.  I cut Happy Halloween from DCWV metallic silver glitter paper using an Impression Obsession die and attached that to the back wall of the box, glued the silver bat under that and added the hay bale with the candle on it to the scene. The last thing I made was the "Haunted Times" newspaper; this is the reason that Mr. Skelly Ton has the googly eyes.  See, he is reading about himself in the gossip portion of the newspaper.  I actually typed up the paper and sized it down to fit in his hands which makes it almost too small to read so I thought I'd post the entire newspaper above.  You will need to click on the image to be able to read it.  If he had lips they'd be open in surprise but he doesn't so let's move on.

Lastly, I glued Skelly Ton on the hay bale, attached the newspaper to his hands and I was done!  I Hope you find this as humerus {see what I did there?} as I do and enjoyed the peek into Skelly's life ~ thanks so much for stopping by and above all, reading the entire post! Christi

Entering my Halloween Wall Hanging in the following challenges:
Creative Artiste Mixed Media Challenge Blog, #76 - Anything Mixed Media Goes
My Time to Craft - Halloween or Fall Colors {Halloween}
More Mixed Media Challenge - Anything Goes, Option of Orange
Crafty Catz, #569 - Anything Goes w/ Option of Layers
Mixed Media Palace - Mood Board {inspired by all the Halloween-like pictures}
Mix it Up Challenge - Anything Goes
The Corrosive Challenge - Anything Goes
Use Your Stuff, #434 - Halloween or Pumpkins
Love to Scrap, #150 - Anything But a Card
Mixed Media Academy Challenge Blog - Mood board & compulsory item is BUTTONS {word spooky was buttons, I removed the shank!}


Tuesday, April 13, 2021

Happy Spring!

Hello everyone,

Since moving I have found {and am STILL finding!} a bunch of craft and card making items that I'd forgotten all about.  Some of it needs new homes and some of it needs to be used! I found this package of white flowers I had gotten from the Dollar Tree ages ago and that is how this card started!

What I Used to Make my Card:
5" x 7" white card base
DCWV 180 Floral Fair Cardstock Stack {available but not on the DCWV site}
Tutti Rose Frame Die, #TUTTI-178
Tutti Birdies Trio, #TUTTI-102
Distress Oxide Inks in Peeled Paint, Tumbled Glass, Tattered Rose and Brushed Corduroy
Lawn Fawn Tree Before 'n Afters Stamp Set, #LF2018
Picket Fence Studio Blending Brushes, 6 pack
White Flowers from Dollar Tree {any small white flowers will work}
Die-Namics Stitched Fishtail Banners

Product I Used

As I said, finding these flowers inspired me to actually USE them, so I started going through
my dies and found the two from Tutti Designs that sing "spring" to me.  Instead of deciding on which one to use, I decided to use both; I like how the Birdies Trio fits in the Rose Frame.  Next came the paper I was going to use; I had previously looked through my patterned paper {the cover of the exact stack I used is pictured} and pulled out a few sheets I liked.  Luckily, in the same paper pad, there was a yellow shade of paper that matched my chosen design wonderfully.  I started the card by cutting the frame out of my previously picked paper, then the birds out of the matching yellow.  One thing to remember when using dies from across the pond, they may not
The Dies

fit our standard card sizes, so I moved to a 5" x 7" card base and centered the frame and birds and glued them to the base.  I colored the flowers with the Distress Oxide Inks {I love the fact that you can make these inks as dark or as light as you want to; I inked the flowers with a small blending brush until the color matched the patterned paper!}, cleaned off the center gems so they'd sparkle. Lastly, I finished off the card with the sentiment that I had stamped onto white card, using the Brushed Corduroy ink,  and then cut with a stitched fishtail banner.  

Detail Close Up
These colors are outside of my comfort zone, I typically
struggle with pastel colors. This year I am trying to step out of my comfort zone and experiment with making projects that include colors, techniques, and subjects I am not comfortable with {I am actually going to USE the items I've purchased to make a light up card!} and I would love it if you'd join me on this journey!  Thanks SO much :)

Fondly,
Christi
 

Don't forget to come join in the fun at the Dies R Us Challenge Blog. There's a new challenge
theme offered on the 1st and 15th of each month and one lucky randomly drawn winner will receive a gift voucher prize to the 
Dies R Us Store.  


   For your convenience, all the important 
Dies R Us links are provided below.

 click below for:

STORE

CHALLENGE BLOG

FACEBOOK

INSPIRATION BLOG 

FRIENDS OF DIES R US PINTEREST PAGE

I am entering my card in the following challenges:
Always Fun, #209 - Pastel Colors
Dreamvalley Challenges, #245 - Springtime
Use Your Stuff, #420 - Spring/Easter
Crafty Catz, #546 - Anything Goes
The Flower Challenge, #55 - Pretty Pastels
Moving Along with the Times, #129 - Animals/Birds {I used birds}
Inspiration Station, #3 - Photo Inspiration = Love the beautiful, soft flowers & that inspired me to use soft colors on my card.


Thursday, October 22, 2020

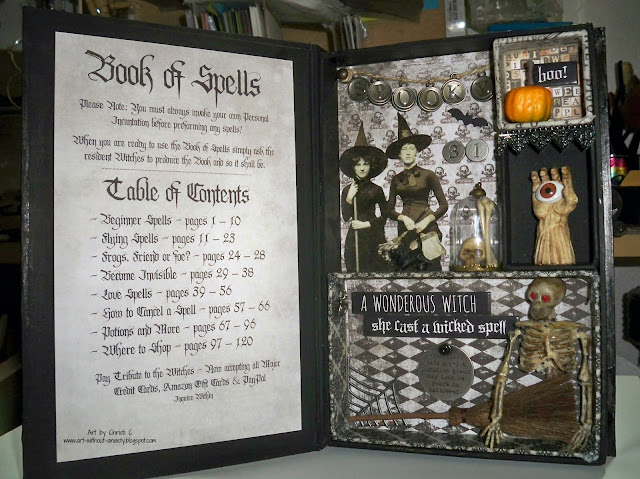
The Spell Book

I can't get through the Halloween season without making at least one project other than cards; this year was a little frustrating because I still have so many things in storage and I am not used to having to go hunt for an item I want {and hopefully I can find it!}   Personally, I think this is one of my favorite creations and I hope you like it, too! 

The Book

I have used mostly Tim Holtz Idea-Ology products in making this; some are discontinued, but you can find most of the items online if you must have them.  If there is no link, I couldn't find the product.  I am in no way endorsing the stores to which I have linked.  They are merely the first link that came up with the item in stock when searching with Google.

What I Used in my Project:
Tim Holtz/Idea-Ology Configurations Book
Tim Holtz Paper {I think I used Materialize but I can't find it anywhere}
Tim Holtz/Idea-Ology Type Charms, #TH92819 
Tim Holtz/Idea-Ology Paper Dolls, Halloween, #TH94057 
Tim Holtz/Idea-Ology Industrious Stickers, Gothic, #TH93236
Tim Holtz/Idea-Ology Pumpkin Pieces, #TH93312 
Tim Holtz/Idea-Ology Quote Chips, Halloween, #TH93728 
Tim Holtz/Idea-Ology Spider Adornments, #TH3717 
Tim Holtz/Idea-Ology Zombie Hands, #TH93737 
Tim Holtz/Idea-Ology Hitch Fasteners, #TH92731 
Tim Holtz/Idea-Ology Quote Tokens, Halloween, #TH93733 
Tim Holtz/Idea-Ology Decorative Domes, #TH93265 
Tim Holtz/Idea-Ology Broomsticks, #TH93598 
Tim Holtz/Idea-Ology Skulls, #TH93606 
Tim Holtz/Idea-Ology Boneyard, #TH93596 
Tim Holtz/Idea-Ology Creepy Eyes, #TH94061 
Metal Letters and Numbers 
Various Other Odds and Ends 
 
The whole book, opened


I am not positive about the paper I used as I only found a few pages in my Halloween stash and couldn't locate the full pad,
but I am pretty certain I used “Materialize” which I cannot find anywhere online.  That's sad as the papers are beautiful black & white patterns.  Anyway, I started the project by painting the book and the boxes with black paint.  Since I never know what I am going to do with the items I chose until I know {heeheehee}, I figured starting out with everything black was a good beginning.  I wrapped some of the boxes with really old washi tape that I have had for so long; I know some of it is Tim's, but can't recall the name. Other washi tape as well was used but again, I'm blank on the name.  I papered some of the boxes, as well as the background of the book.

Added some witches, a black cat, pumpkins, and other spooky items.  The skeleton is from the Dollar Tree and his red eyes are gems from my stash.

I used various Quote Chips and Quote Tokens to fill in some spaces as well as some very, very old metal letters and numbers and I can't even remember getting them.  If you look close you can see the spider climbing up the wall near the Quote Chips. I actually used some of the metal letters when I made the hanging word “SPOOKY.”   I glued them on top of the Type Charms and then put the acrylic bubble on top of that.  I placed my witches and surrounded them with all the boxes and bits since they are really the focal point of my book.  After I finished, I realized I didn't really have a way to tie in the fact that this was a book so I decided to make it a magical Spell Book.  I made a table of contents in fancy font and solved that issue. I hope you can read the table of contents, I had a LOT of fun thinking it up!  I also had to size the pictures down to small so if you'd like to see them bigger, just give them a click.

I am such a craft supply hoarder!  I really must work on that.  I just hate to use something that I love so much!  I am very sure you can relate to that.  I hope you enjoyed my Spell Book and if you have any questions about it, please feel free to let me know in the comments or by email.  Happy Halloween!!  Christi {and can I just say this new version of Blogger is a NIGHTMARE - I can't add admin, people I invite aren't getting the invite emails, the spacing is all wonky. . . UGH!!}


I am happily entering my Spell Book in the following challenges:
The Corrosive Challenge {OCT} - Anything Goes
 
Two Old Bats Halloween Challenge {OCT} - Anything Goes Halloween
Use Your Stuff - Halloween/Fall
Mix it Up Challenge, #42 - Anything Goes
Shopping Our Stash, #431 - Happy Fall Y'all!