Followers

Showing posts with label Distress Ink. Show all posts

Tuesday, October 25, 2022

You're the Cat's Meow - Cat Lovers Blog Hop DAY 2

And for Day 2 for the Cat Lovers Blog Hop - this is one of my favorite events ever and I hope you support the hop and ALL the generous sponsors :)

 I made this card to have on hand if I just wanted to send a cute little note to let someone know I am thinking of them. Honestly, I needed to use these kitties - I got the stamps & dies a bit ago and they have been sitting on my desk, meowing at me. I have a boat load of cards I've made and never sent out, so I don't know who I think I am kidding!


 I stamped the cats, and their toys,  on watercolor paper, using my favorite black ink, then colored and cut them out using Avery Elle's Whiskers Stamps and Dies.  I blended a bit of Distress Ink Spun Sugar  onto the white card base to give a bit of grounding for the kitties.  I stamped the sentiment {from the same stamp set} onto some white card and used Die-Namics Fishtail Sentiment Strips to cut it out.  I glued the cats, their toys and the sentiment onto the card and to add a bit more interest I cut some hearts using Lawn Fawn's Long Distance Hugs die set out of some paper I had made using Distress Oxide inks Spun Sugar

I love the way the kitties came out! Thanks for stopping by! Christi and have fun hopping!!

I am entering my card in the following challenges:
Through the Craft Room Door - Anything Goes
The Cutie Pie Challenge - Think Pink
Creative Fingers Challenge - Anything Goes
Critter Crazy Challenges - Anything Goes w/ a Critter


Saturday, June 4, 2022

Time Project for River of Creativity's June Theme

Hi all!! I am here presenting my design team project for River of Creativity's June Challenge where the theme is Time; I'd advise you to get a nice drink and relax because this is picture heavy and there are a lot of great things to see! Now, I could have done the whole clock thing, or even a birthday thing {after all, when does time bite you in the butt the worst?} but I really wanted to get messy and have fun.  I am a night creature; some people get their second wind at a nice normal time, say 5ish, or even 7ish but me? Nope.  If I am not in bed by 9pm, my second wind comes around at 10 pm.  In fact, I am typing this post at 12:30 a.m.  So, for my June piece I've turned Time into Nighttime.  Clever if I do say so myself.  My mom can tell you stories of a young me fighting my bedtime {no matter when it was} as early as 3 years old when I told my mother I was not yawning because I was tired, I was yawning because my brain needed more air.  I was such a joy, but I digress.  My hope for this project was that you'd see something new each time you looked at the panel; let me know what you think! 

Before you start I wanted to let you know you can click on the photos to make them bigger; I made collages out of what I feel are the important details so you wouldn't have 10 or so pictures to look through.  If there is any problem with getting the pictures bigger, please let me know!


I have been making this panel for the last few months as it has paper clay pieces and I needed to get molds and the actual clay to get the forms I wanted.  I used DAS Paper Clay which is available at any local craft store or online and made the moon and the stars.  I used a panel that is 9" x 12" from Artists Loft, but any panel or canvas would do. I also accumulated a bunch of molds from Amazon because they
have such a selection, and you know that Prime shipping is addicting!  Some of the molds I got were too small, some just didn't fit the look I wanted, and I ended up using a simple Moon and Stars mold to make the paper clay pieces.  I also got some keys, gears and clock metal bits and now I have enough to make a gazillion projects. Other supplies I used included Stickles in Crystal, Tim Holtz Foundry Wax {all the colors, I even layered them}, Picket Fence Gem Mixes, no name gems from my sash,
 Cosmic Shimmer Glitter Jewels in Midnight Snow, Krylon Leafing Pen in Silver, Golden Gel Medium in soft gloss, Lumiere Paint in Silver as well as beads and the like.  I think the most important part is the background and I first painted my panel with Golden Black Acrylic Paint and once that was dry I used some Distress Oxide Ink Pads {I just smooshed them onto the panel} and Sprays in various blue and purple hues, sprayed water here and there, dried with my heat gun, added more ink, more water and so on.  The shimmer was created by using Distress Mica Spray in Crooked Broomstick {it was a Halloween release from Ranger, but you can still find it online} and any Mica Spray would work. 


I fiddled with the background until I liked it and then set it to dry for actually a few days.  Once it was dry, I had painted, inked and waxed the items I wanted to and set about the placement as well as the swoosh of clear glass beads {the tiny kind with no holes} glitter and gem placement.  I wasn't concerned with placing too many gems as I really wanted this to sparkle being the night sky.  I could probably have added many more gems, but I was struggling with glue sticking to the paint and ink on the background.  I initially used hot glue, but after Sylvester knocked it off my desk and most of the gears and metal came off, I switched to E6000.  I'm not a huge fan of either glue but the E6000 worked much better than the hot glue.  Now I know and you know, too, so pry the top off your E6000 if you are gluing onto paints and/or inks.  I've linked to most of the items that were easily found online, and it there is something you want the specifics on please use the email option on the right side; I'll happily supply you with the actual links to the items.  


Another Look at the Entire Panel

 I am happy with my Nighttime art, and I had SO much fun making it.  It's been a long time since I have made such a piece, running with abandon with colors and paints and inks and goodies.  But that is what the River of Creativity challenges are all about! We would love for you to join us, either using Anything Goes or the theme of Time, for our June challenge; the only thing we won't accept is cards. So, get your inks, paints, clay and molds out and have some fun! Hope to see you soon! Christi

 I am entering my piece into the following challenges:
We Love to Create - Anything Goes
Creative Fingers - Anything Goes
Creative Artiste, #83 - Anything Mixed Media Goes
Mixed Media Lovers, #14 - Anything Mixed Media Goes
Country View Challenge, June Challenge - Seeing Stars

Thanks!!

Monday, April 4, 2022

April Showers at The Paper Funday Challenge

 I am really pressed for time right now and I just squeaked this card under the due date for my design team position at Paper Funday - that's right, it's another challenge at Paper Funday!! For the month of April our theme is "April Showers" and I was SO happy I had gotten a bunch of new goodies from Lawn Fawn's latest release as they fit perfectly for this theme, I used the Beary Rainy day stamp and die set - perfect for an April Showers card! Here's my card:


I started with a white slimline base but when I tried to stencil in the raindrops I messed it all up; so I got another slimline base card and set it aside.  I used another piece of paper and stenciled in the raindrops, using Distress Oxide Hickory Smoke, added some Distress Tumbled Glass to give a blue tint to the sky and a bit of Distress Tea Dye at the bottom.  I discovered that when you need to use a stencil more than once to cover a large scene, don't go all the way to the edge; if you do, you will end up with a line, which is what I got the first time I tried to make the card.  I then used a stitched slimline die to cut out the portion of the card I liked best.  I set the card side while I glued that portion to the top of the actual card.  While that was drying, I pulled out the Lawn Fawn stamp and die set {brand new - called Beary Rainy Day}, stamped using my favorite black ink, colored the stamps in with my Zig markers {Oh and I am SO excited - I finally got my hands on the 30 new colors; and I am finally going to do swatches of all 120 markers that I have!} and cut them out.  It took me a bit to figure out the puddles as I really wanted to use holographic paper but you can't stamp on it {well, you can, but then you have to use embossing powder since it is coated and the ink will not dry on it's own} but I figured if I cut the puddles out with a little rain drop it would look as if the puddles were real.  I'm still not sure, what do you think? I cut the clouds out of vanilla paper and then cut a few more clouds using the Butterfly Kisses dies.  I added the clouds to the scene, stamped the sentiment {the first part of the sentiment comes from a set that I think was a freebie called "Here for you Bear" - it isn't available from Lawn Fawn yet, but I am sure it will be soon} and cut it using this banner set and then I was done. 

I hope you like the card as much as I do - we need rain in Colorado badly, so maybe the card will work as a rain dance? We'll see.  I hope to see your "April Showers" creations at Paper Funday - thanks so much for stopping by! Christi

I am entering my card in the following challenges:
Shopping our Stash, #467 - Under the Weather
NBUS, #37 - Never Before Used Stuff
Unicorn Challenge, #75 - Include an Animal
Simon Says Stamp Monday Challenge - Easter/Spring
Make my Monday, #171 - Use a Stencil (Lawn Fawn Rainy Sky Stencil, #LF2816)
Allsorts, #670 - Any "real" Animals
Dies R Us, #190 - Flowers/Spring
The Funkie Junkie Challenge - April Showers Bring May Flowers


Thursday, March 31, 2022

To the Moon with The Robin's Nest Creatives

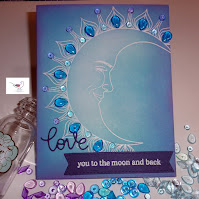
 Hi all! Today I have another 2fer for you! It's so much fun when I get so inspired by a stamp set that I have to make two, or more, cards. I had made these cards a while ago - it was one of those cases where as soon as I saw the stamp set I knew how I wanted to play with it :) I am so pleased with how these cards came out and I hope you like them as much as I do! And I knew just how I wanted to decorate them with my Dew Drops!


  Each card started out with a white blank card.  I stamped the sun on one and the moon on another using  the Simon Says Stamp set To The Moon with embossing ink.  Then both images where embossed with white embossing powder .  I set the moon card aside and worked on the sun card first, blending Distress  Oxide yellow inks in the center and orange inks along the sides.  I LOVE the POP you get when using white embossing powder - I really enjoy watching the image come out; reminds me of watching the picture develop when you use a Polaroid camera.  Once I was happy with the blending, I moved on to the Moon card.  In addition to embossing the moon, I embossed part of the sentiment on a piece of dark blue card, cut it out with a fishtail die and set it aside.  I used shades of blue and purple ink for the moon card and again went lighter in the center and darker toward the outside.  

Before I put the sentiment die cuts on the cards {the hello on the sun cut out of white card and the love on the moon cut out of the same dark blue that the embossed sentiment was on} I started to figure out what type of design I wanted on each card using The Robin's Nest Creatives Mini Dews, Tear Drops and Diamonds {I  have included links to each specific product I've used - just click on the link provided}  I used yellow and orange Mini Dews {you can get both orange & yellow Mini Dews in the Paisley Collection}, as well as Diamond yellow Dews on the sun card and purple and light blue Mini Dews, as well as royal blue Tear Drops on the moon card.  I personally love how these 2 cards came out; ink blending is so much fun and the options are endless! Also, the Dew Drops enhance the designs but don't distract from them - perfect if you ask me! Pinterest is fantastic if you are looking for color combinations but beware, you will get lost in the lovely colors so let everyone know you are busy, get a cup of whatever and prepare to be there a while; happens to me every time!  Thanks SO much for dropping by! Christi  

I am entering my cards in the following challenges:
Simon Says Stamp Wednesday Challenge - Anything Goes
Classic Design Challenge, #6 - Anything Goes
Crafts Galore Encore #98 - Anything Goes
Creative Knockouts, #446 - Anything Goes
Creative Fingers, #228 - Anything Goes
Simon Says Stamp Flikr Challenge, #198 - Anything Goes