Followers

Showing posts with label Paper Punch. Show all posts

Friday, July 27, 2018

Rose Panel Bookmark

Hello fellow crafters! I hope you are having a marvelous summer! For the July theme at Die Cut Diva's we have chosen Anything But a Card, sponsored by
Dies R Us - enter so you have a chance to win a $10 voucher to the store!  One of my past Design Teams was on a blog dedicated {and aptly named} to Anything But a Card.  Unfortunately, the challenge closed and I haven't been creating as many projects other than cards.  However, this challenge has gotten my muse going again!


What I Used to Make my Project
White Card Base
Tattered Lace Rose Panel, #D307 {any of these would work as well}
STAMPlorations Literary Caffeine-ations, #STMP1155
Black Card
White Brads {stash}
Handheld Circle Hole Punch {1/8" and standard size}
Asian Inspired Tassel {stash}

I began this bookmark by cutting the Rose Panel out of black card, mounted the cut out onto a piece of white card which I then trimmed.  I punched small holes, using the handheld 1/8" circle punch, and attached white brads just to add some embellishment.  The sentiment was stamped onto white card, then trimmed and attached to the upper portion of the bookmark.  Lastly, I used a very old, Asian inspired, tassel to finish off the project.  Since I was making this for The Man, I didn't want it to be too feminine but I really wanted to use the Rose Panel die since it is the perfect size for a bookmark. I also attached a strip of cardboard to the back of the bookmark to give it a bit more stability. 

Thank you SO much for stopping by! I hope you and yours are having a wonderful summer - today was the first day that we here in Colorado have had a break from the heat!  Maybe you have had to stay indoors because of the weather where you are; this is a perfect time to get out some of your dies and make Anything But a Card to enter it in the Die Cut Diva's July Challenge! I hope to see you there!  Fondly, Christi

I am entering my Bookmark in the Following ANYTHING GOES Challenges:
Cardz TV - #58
Crafting with Friends - #72
Creative Fingers - #150
Crafting with an Attitude - #41
Crafting by Designs - July
Simon Says Stamp Wednesday Challenge
A Bit More Time to Craft - #72
The Creative Crafters - #6
Crafty Creations Challenge - #371
Through the Craft Room Door - Wk of July 24, 2018
Word Art Wednesday - #344/345

Tuesday, July 24, 2018

You Are Loved

Hello fellow crafters! I hope you are having a marvelous summer! For the July theme at Die Cut Diva's we have chosen Anything But a Card, sponsored by
Dies R Us - all you have to do is enter for a chance to win a $10 voucher to the Dies R Us store {and if you haven't been to the store lately, you need to go take a look! Dies R Us now carries paper, bows, inks, and basically everything you could need to craft}! It's been a while since I have made something other than a card.  One of my past Design Teams was on a blog dedicated to {and aptly named} Anything But a Card but, unfortunately, the challenge closed and I haven't been creating as many projects other than cards.  A friend was having a tough time and I made this banner for them; my intent is that no matter what is going on, they will remember that they are loved.


What I Used to Make my Banner:
White Card
Black Card
Grey Card
Lawn Fawn Louie's ABC's, #LF688 {any of these would work}
Sue Wilson Australian Collection, Melbourne #CED8105
Sue Wilson Atlantic Ocean Collection, Azores, #CED13005
Ribbon {I used a .99 cent roll called Nicole in Black Nylon}
Black Bows {stash}
Handheld Rectangle Punch, 1/4"

Since the alphabet I chose to use is fairly large, the first thing I did was cut out all the letters I needed to spell out my sentiment using white card.  Then I made
sure they fit onto the shape I used as my first layer.  It was then I realized that "loved" was a wee bit longer than I had thought, but I smooshed the letters together anyway - the charm of handmade, right? I then chose one of the dies in the Sue Wilson Melbourne set that I felt fit the letters and cut out 3 of them in black card.  For the back of the banner pieces, I used grey card and cut out three pieces using the Sue Wilson Azores set.  

Once all my pieces were cut, I began to assemble each word of the banner.   I glued all the letters onto the black die cut, then
attached the black card onto the grey card.  It was then I decided, while I was pleased with the way the banner looked, to add black bows onto the bottom of each section.  While I chose the black and grey colors to make the banner gender neutral, the bows gave it a bit of femininity. 

Lastly, I punched out two rectangles at the top of each piece and threaded the ribbon through.  The ribbon actually "attached" itself to the card, so I didn't need to knot each side, or put any sort of stopper.  Now the recipient can adjust the banner to suit their needs.

The banner was received wonderfully! They loved the banner and hung it right up in their bedroom so they could see it first thing every morning.  I had lots of fun making it and I'm so happy that my friend also liked it. Everyone should know that they are loved!  I hope you have gotten some time to make an Anything But a Card project to join in the July Die Cut Diva's Anything But a Card challenge!  A huge thanks to Dies R Us for the July sponsorship. Thanks for stopping by.  Christi 

PS: Challenges for Days is celebrating our 5 year anniversary - all kinds of goodies and prizes available for you to win! Check it out here!

I'm entering my You are Loved Banner in the following challenges:
Simon Says Stamp Wednesday Challenge - Anything Goes
Scrapy Land - #94, Anything Goes with Products they Sell
Not Just Cards - July Challenge Anything Goes
Happy Little Stampers - Anything Goes with Dies
Crafty Catz - #426, Anything Goes OPTION: Dies or Punches
The Corrosive Challenge - #7, Anything Goes
Unstampabelles Challenge - How Edgy Can You Be?
Use Your Stuff - #322, Anything Goes with a Title or Sentiment


Saturday, April 21, 2018

Have a Wonderful Time

One of my best friends is taking a trip for a few days {literally 4 days} and I, along with the Man, will be house/dog/cat sitting while he is gone.  It's going to be a hectic week, {made 100% more hectic because I took a tumble off one of those invisible curbs on Monday & cracked a rib!} but he'll be back sooner than later.  However, this is the first time he is leaving his home and his animals, and he's losing his mind with worry {he's a worrier anyway, one of those people who worries about Christmas in July.  I don't get it.}  I thought a little card for him to open on the plane would ease his mind. UPDATE - he's home, had a blast, Lily {the cat} & Bear {the dog} missed him terribly :)

What I Used to Make my Card:
White Card Base
Unbranded Frame, Cat & Dog Die
Cat Punch {over 15 years old!}
Hero Arts Stamp & Cut, Wonderful, #DC214
Ranger Archival Ink in Jet Black
Gelly Roll White Ink Pen, #10
Scrap Paper

Now, I know there are some of you who detest unbranded dies.  Personally, I've nothing against them until they start to try copying copyrighted material.  I say "try" because I see lots of mistakes in the pirated dies.  I won't buy them, but that's just a personal choice.  I only buy the unbranded dies in designs I've never seen available in branded dies.  If I've posted something created with an unbranded die and you know of an exact branded match, please let me know!  Now that the yucky stuff is out of the way, let's get on with the card.

I started with cutting the paws and bone frame out of dark brown card, and one of three dogs that came with the frame.  I colored the front leg/paw of the dog
Another Look
white because Bear, his dog, has a white leg.  His cat, Lily, is a beautiful little gray kitty and I used an ancient punch for her.  I attached the frame and the animals to the white card base and when it was dry, I stamped the sentiment on the very top of the card.  Then I stamped the "wonderful" on white card, cut it out, and attached it to the card.  I didn't have very much time, but I think I did a nice job.


Thank you for visiting, I appreciate every one who does.  I also read every comment.  Hope you are having a wonderful day! ~Christi

I am entering my Have a Wonderful Time card in the following challenges:
Cardz 4 Guyz - #192, Travel or Transport {hope this counts!!}
Back to Basics and Beyond - #1, Matting and Layering {also, DT tryout}
Double D Challenges - M, Friendship
2 Crafty Critter Crazies - M, Anything Goes w/ a Critter {or 2}
A Perfect Time to Craft - M, Always Anything Goes
Creatalicious Challenge - #137, Anything Goes, Option: Use Dies and/or Punches
Cut it Up - #146, Bugs and/or Critters
TGIF Challenges - #156, Because Kindness Matters {this is actually a RAK, since it's from his cat & dog, not from me}
Creative Friday - #203, For a Boy/Man

Challenge Graphics
TGIF Challenges

Double D Challenges


Sunday, March 18, 2018

A Thank You

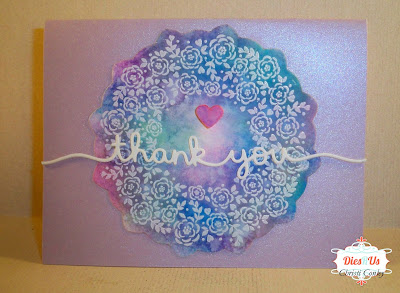
This is my last post for the Dies R Us Design Team - it's been a fabulous experience and I will miss working with their wonderful products {especially since the store has expanded to carry papers, washi tape, adhesives, and SO much more}.  This card was made as a Thank You to all my teamies at Dies R Us, especially the wonderfully understanding Darlene, who is the fantastic Design Team Coordinator.  I struggled with publishing my posts due to internet gremlins and Darlene sorted each one for me.  It's with many warm memories, and some laughter, that I say goodbye, and thank you, to this exceptional team.


What I Used to Make this Card:
Sparkle Lilac Card Base
Creative Expressions/Sue Wilson Floret Circle Stamp, #UMS689
Creative Expressions/Sue Wilson Melbourne Dies, #CED8105
Lawn Fawn Thank You Border Die, #LF1055
Watercolor Paper
Simon Says Stamp White Detail Embossing Powder
Embossing Ink
Oxide Inks {various from sets 1 & 2}
Distress Sprayer
Small Heart Punch
White Card
Oxide Ink Left Over Paper {stash}
Dimensional Dots

The first step to making this card was stamping the floret stamp by Sue Wilson.  I used embossing ink and embossed the design with detailed white embossing powder on watercolor paper.  I actually made two of these floral circles; the first one I used Clean Color markers but I just didn't like the way it came out and decided I wanted to use muted colors instead of the bright markers.  No problem, the creation is in my stash waiting to adorn the perfect card.  I was fortunate to catch a special order of the Sue Wilson "To Die For" stamps and I urge you to sign up for the Dies R Us news so you can catch the next time they get in a special order {they get cool stuff in a limited amount all the time!}

Once the circle was embossed, I used Oxide inks to get the coloring I wanted.  I worked on the colors for about two days; spritzing, then drying, mopping with paper towel {a great way to mute the colors, and at times you can almost erase them.  I also use the paper towel to absorb the excess ink that flows to the bottom of project, just touch the towel to the ink puddle and it's gone!}, reinking, and starting the whole process over again.  I had a very clear picture in my mind of how I wanted this card to look; needless to say, I didn't write down the Oxide colors I used, as I basically just kept throwing more ink on, taking ink off, and generally fooling with the colors until I got the look I wanted.  Once the image was thoroughly dry, I cut it out using the matching dies.  I had originally cut the center of the circle out, back on that "first draft" I did but, as you can see, this time I left the middle intact. 

The next step was to cut the sentiment out of white card three times.  I had also experimented with this; cutting and stacking the sentiment about twelve times but eventually the cuts didn't line up straight {absolutely nothing to do with me} and I decided that three was enough.  I stacked and glued them together, letting them dry overnight.
Picking out the pink for the heart

The lilac card base has a slight sheen to it and I know I got it in one of the My Monthly Hero kits from Hero Arts.  I'm almost certain it was the kit from January and the paper is the Stardream Kunzite Cardstock.  It is luscious in real life and I like how the Stardream stock is heavy enough for a card base yet it is still fine to use as a layering paper.  I adhered my floral circle, then the sentiment to the card.  It was then I decided it need a bit more of something so I looked through my scraps from previous Oxide projects and found a lovely pink, on which I used a small heart punch.  I used dimensional dots to adhere the little heart to the middle of the card and I was done.
Another look - The base card shows its shimmer!

It's been a pleasure to bring you my creations using Dies R Us products and I hope you have enjoyed the journey as much as I have.  Thanks so much for stopping by! Christi

Don't forget to join in on all the fun at the Dies R Us Challenge Blog.  
There's  a new challenge theme offered on the 1st and 15th of each month
 and one lucky randomly drawn winner will receive a gift voucher prize to 
the Dies R Us Store.  For your convenience, all the important Dies R Us 
links are provided below.


click below for:

I am entering my "Thank You" Card in the following challenges:
Simon Says Stamp Wednesday Challenge - Easter Inspired {mood board below}
atoz Scrapbooking - M - Anything Goes 
Simon Says Stamp Monday Challenge - Easter/Spring Inspiration {mood board below}
Lawn Fawnatics - #24, Fun With Dies (entry #2)
The Flower Challenge - M - #18, Anything Goes
Papercraft Challenges - M - #18, Sentiment as Focus
Simon Says Stamp Wednesday Challenge

Simon Says Stamp Monday Challenge

Friday, March 2, 2018

Final ATCs for Janis' Birthday {And Then. . .Chocolate}

All good celebrations must come to an end, and so here we are, the last week for Janis' Birthday Celebration.  For this last challenge, Janis chose the theme "And Then. . .Chocolate" - yummy little party we've had!

What are ATC's? ATC stands for Artist Trading Cards.  There are no requirements to make them {unless you are participating in a swap or, in this case, Janis' fourth and last, theme And Then. . . Chocolate} EXCEPT they must be 2 1/2" x 3 1/2", the same size as a standard playing card or trading card.

Here are all the links for where you can still enter, but be quick! It's a good thing you can make an ATC in no time! {ends March 3, 2018}
Be sure to enter Janis' Blog Badge giveaway HERE!!!
WEEK 1 Theme - "All Those Cats!!"  You can still enter HERE
WEEK 2 Theme - "And The Chickens." You can still enter HERE
WEEK 3 Theme - "Adorable Teapot Collection"  You can still enter HERE
WEEK 4 (FINAL) Theme - "And Then.....Chocolate!"  Enter HERE
I've called my ATCs "Chocolate 1" and "Chocolate 2" and since I am really under the gun here, I'm going to be quick & just tell you what I used to make them.

Chocolate ATC #1
Heavy Weight White Card cut into ATC Size
Background made from Oxide Ink {scrap}
Sentiment from Riley & Co., Funny Bones, #RWD-564 Six Million Dollars
Tiny Money {stash}
Brown Card for Sentiment
Black Detail Embossing Powder, Hero Arts, PW-119
Embossing Ink
Shrink Plastic
Sharpie Markers
Gold Sparkle Gel Pen


The best part of this ATC was making the little candy bars out of Shrink Plastic. You can't really read them, but the candy bars say Hershey, Bite Me, YUM and Candy. I thought for SURE I had something with chocolate on it and I literally searched my entire stash {I did find the paper I used on Chocolate #2, as well as some other cool stuff I pulled out}, but I have nothing regarding chocolate except that sentiment.  Oh, well.  On to #2.

Chocolate ATC #2
Heavy Weight White Card cut into ATC Size
Image cut from Collage Sheet {out of business}
Words punched from a VERY old paper from SU!
Two Scalloped Oval Punches from My Family Treasure {out of business}
Beautiful Background Paper {stash}

I love this background paper and I have a small bit left, so you'll be seeing the end of it very soon.  I got it, along with the collage sheet, from a kit club I used to belong to that has since sold their business {about 9 years ago!}.  So this is a sort of vintage chocolate ATC.

That's it kids.  You only have about 24 hours to join in the fun, but I do hope you find some time - at the very least go and check out everyone's creations.  You can see each week by clicking on the above links.  And you can still join each week; but the whole shebang ends 11:55 pm on March 3, 2018.  Thanks for stopping by and checking out my ATCs - I appreciate your visit! Christi

I am entering my And Then... Chocolate ATCs in the following challenges:
Janis' Birthday Celebration 
Word Art Wednesday - #325, Anything goes
Simon Says Stamp Wednesday Challenge - Anything Goes
Crafting with Friends - #62, Anything Goes

Saturday, February 17, 2018

Celebrating Janis' 60th Birthday! {week 1 - All Those Cats}

Janis, from Her Peaceful Garden, and I met back when she had her first Cat Lovers Blog Hop {here is the link for the 2017 hop} - she is a cat lover, as I am, and she is owned by about 13 cats; both feral and house cats.  We've become friends over the years and I adore her.  When she began talking about her birthday and how she wanted to do ATC's for her online celebration, I was so happy! I LOVE ATC's and used to participate in many swaps online.  I hope this little party of Janis' encourages ATC's to make a comeback.  

What are ATC's? ATC stands for Artist Trading Cards.  There are no requirements to make them {unless you are participating in a swap, or, in this case, Janis' first theme: All Those Cats} EXCEPT they must be 2 1/2" x 3 1/2", the same size as a standard playing card or trading card.


I'm not going to go into detail about how I made each one; it's fairly self explanatory but, if you have any questions, just ask! 

I try to use scrap papers to make my ATCs - here is a picture of my scrap bin {I only put small snippets in it} just to give you an idea of how small the pieces for your ATC can be. There is a picture of the side of my little bin, and then the bottom.  I save more than I can ever use, but it comes in VERY handy!


Here are my four ATCs for week one of Janis' birthday party:

Paw Prints


What I Used to Make my Paw Prints ATC:
Heavy White Card, cut into ATC size
Snips & scraps of various pink & purple papers 

Penny Black, Nine Lives Set, #30-050
Stampendous, Cat Sayings, #SSC1222
Small Heart Punch
Hero Arts Ink in Pink Tourmaline, Ruby & Amethyst                       

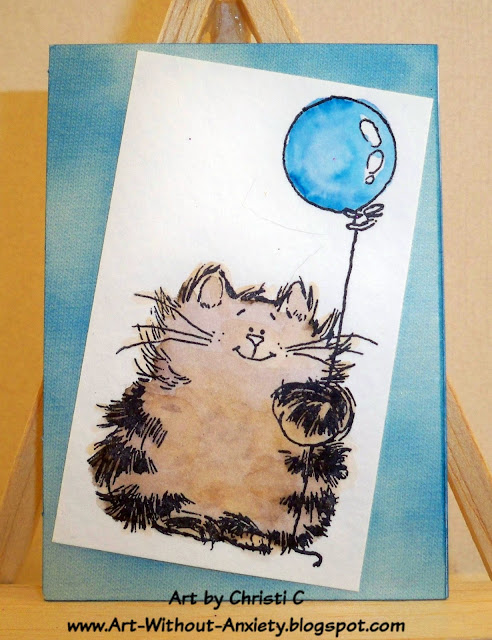
 Balloon Kitty


What I Used to Make my Balloon Cat ATC:
Heavy White Card, cut into ATC size
Ranger Archival Ink in Jet Black
Penny Black, Purrfect Day, #30-027 {discontinued but available}
Unknown Coloring {colored this image AGES ago}
DCWV, Tie Dye Stack {discontinued but available}
Distress Marker in Broken China

Sneaky Kitties

The Mama Elephant "The Cat's Meow" stamp and die are MUCH longer than an
ATC.  In fact, it's called "Crowd of Cats" and according to the ME website, it measures 5 3/4" x 2".  In order to make this ATC and the Meow ATC, I cut the image down into two separate groups of cats, then added single cats in places. Also, I colored the kitties with whimsical colors - I figured why not and I need a break from trying to color them realistically.  This goes for both of the Mama Elephant ATCs.  

What I Used to Make my Sneaky Cats ATC:
Heavy White Card, cut into ATC size
Mama Elephant, The Cat's Meow, stamps
Mama Elephant, The Cat's Meow, Creative Cuts Dies
Detail Water Brush
Ranger Archival Ink in Jet Black
Clean Color Markers
Watercolor Paper
Palm Frond Punch
Various Green Paper

Meow
I needed a break from using realistic cat colors, so these kitties are colored fancifully.  I cut down some dimensional dots and dotted the birthday hat, the blue balloon, and the meow sign but you can't really tell in this picture. I also added some single cats to round out the group.

What I Used to Make my Meow ATC:
Heavy White Card, cut into ATC size
Mama ElephantThe Cat's Meow, stamps
Mama ElephantThe Cat's Meow, Creative Cuts Dies
Detail Water Brush
Ranger Archival Ink in Jet Black
Clean Color Markers
Watercolor Paper
Dimensional Dots
Washi Tape in Glitter Purple

Finally, here is a picture of all four together.


I hope you enjoyed my ATCs.  I really have a great time making them and going through my snippet box to see what inspires me.  My favorite is the meow ATC - which one is yours? Thanks SO much for your visit and I hope you come back soon! ~Christi

I would like to enter all four of my creations in the following challenges -
Her Peaceful Garden Birthday Celebration - Wk 1, All Those Cats
Addicted to CAS - #130, Cat {At least 2 of my ATCs are CAS}
Crafting with Friends - M, #61, Anything Goes
The Outlaws - Twisted Thursday - Twist: Fur {lots of virtual fur here!}
2 Crafty Critter Crazies - M, Anything Goes w/ a Critter
Fairy-Tale Challenge - Use Mini Stamps {The 2 ATCs using ME are Mini Stamps}
SUYP - M, Anything Goes and/or LOVE

Wednesday, October 25, 2017

All You Need is Love & a Cat

and a cat. Or six.  I think this stamp is SO cut with the the kitty's glasses and bow tie! I've had it for a
while but {gulp} I actually forgot about it! I'm ashamed! So when I did recall I had him, I had to make it up to him! In order to do that, I put him on a card just in time for the Cat Lovers' Hop!   

What I Used to Make my Card:
White Card Base
KasierCraft Pawfect Cat Collection, PK555 
Meow, Meow, Meow Stamp Set from Unity Stamps, #UK-926A
Watercolor Paper
Derwent  Inktense Pencils
Heart Punch
Red Glitter Paper
Darice Nested Craft Dies, Classic Circles, 2014-74
Ranger Archival Ink in Jet Black

I started by stamping the kitty on water color paper, then coloring him in with Derwent Inktense Pencils.  I didn't like the heart in the language bubble, so I took a very. very old heart shaped punch and made a new heart out of red glitter paper.  I then stamped the sentiment onto white card and cut it out with circle dies.  I fussy cut {argh, I hate it - wish I could sent it all off to someone
who finds joy in fussy cutting!} the main image out and adhered that as well as the sentiment to the background paper.  Lastly, the background paper was glued to the card base, left overnight under my drying tile and we have a card!

Thanks so much for supporting me and the Cat Lovers' Blog Hop!  I have one more tidbit to share with you - I am having a small giveaway on my blog and I would love for you to enter and share:


presents
HAPPY HALLOWEEN!
Im having a small drawing on my blog.  All you need to do is click onto this post, chose the costume you like best & when I get 75 costume comments, Ill draw a random winner.  Open Internationally! Please feel free to share!
EXPIRES Nov, 1. 2017

Thanks for stopping by! Hugs, Christi
In addition to the Cat Lovers' Hop, I am entering my card in the following challenges:
2 Crafty Critter Crazies - M, Anything Goes w/ a Critter
Inky Chicks - #90, Animals

Saturday, September 16, 2017

It's Getting Close to Halloween!

Close enough for me to begin decorating and creating!  I got these really cool "salad grabbers" at the Dollar Tree - they are made from a skeleton arm and hand, and you get 2 of them! I just HAD to grab them and I have been painting them with glow in the dark paint; my goal is to stick them on the lawn so they appear to be coming up from the dirt, BWAHAHHAHHH!! 

As soon as I spied the Lawn Fawn Shadow Box Card die set I knew I had to have it.  Once I had the set, I watched the Lawn Fawn Video on how to assemble the card and saw fabulous ideas from their design team.  I can see holiday ornaments in my recipients futures!  Anyway, since the video tells you how to assemble the card I won't be going into that detail, however, please be aware that sticky tape DOES go bad.  Apparently, you cannot keep it for 20 years, find it, and try to use it to make something.  Also, mono-adhesive leaves a strip wider than where you want the adhesive to go, lastly, wet glue doesn't work AT ALL.  Yes, I made a HUGE mess, swore like a sailor and scared the fur babies (in my defense, they are SO cute when they puff up!) and finally got my adhesive nightmare under control.  Needless to say there is an order for more 1/8" wide tape on it's way to my door.  So, back to the card:


This is What I Used to Make my Card:
Black Card (for shadow box)
Light Brown Card (for hills)
Orange Card (for pumpkins)
Watercolor Card 
Lawn Fawn Shadow Box Card, LF1486
Lawn Fawn Costume Party Stamps, LF1458
Hero Arts Intense Black Ink
Paper Smooches Wise Dies Streamers, KFBD029 (here is a nice substitute)
Stampin' Up! Blender Pens
Circle Punch
Yellow Card
Pop Dot

I made the Shadow Box and attached the hills as instructed on the video.  Then came the fun part.  As some of you may know, I get on these coloring kicks where I color & color & cut and then, days,

View From the Top
sometimes months later, I use the items I colored.  Well, I did the same with all the cute costumed folks in the Costume Party set.  I colored and cut like a madwoman.  I even have candy corn, chocolate bars and adorable individually wrapped candies ready to use.  I picked out a witch and a mummy to you in this card.  I gave the mummy a cute little pumpkin candy catcher and set a plain pumpkin near my witch.  Once I was happy with the placement, I stuck all the elements down.  I also used a nice bright yellow card, punched a moon out and pop dotted that to the upper right corner.  For the grand finale, I made a Happy Halloween banner as a sentiment. 
A2 Envie - ooops!


This scrumptious little shadow box will close to fit into a standard A2 envelope so it requires NO EXTRA POSTAGE! That is a huge selling point to me!  As you can see from my pictures below, mine did not fit in an A2 envie, due to the placement of the banner.  However, it fit like a charm in an A7 envelope, and assuming you haven't stuffed the envelope full of rocks, it should also be able to go out to the USA with one "forever" stamp. 


Thanks so much for stopping by and I hope you'll get inspired to make some screamingly cool Halloween goodies! Christi

Don't forget to play along at the Dies R Us Challenge Blog for your chance to win a gift voucher to the Dies R Us Store.  A new challenge begins on the first and fifteenth of every month.  
Be sure to Follow Us on FACEBOOK too. 

click below for:

Another Look :)

I would like to enter my Halloween Shadow Card in the following challenges, found at Challenges for Days (shameless plug): 
Cuttlebug Mania - M,  Anything Goes w/ Dies and/or Embossing
Happy Little Stampers - Sept. Anything Goes with Dies Challenge 
One Crazy Stamper - M, Seasons of Celebration
Crafty Catz - Halloween
Crafty Friends Challenge - #66, To Use Dies and/or Punches
Allsorts - #433, Feels Like Autumn 
Lawn Fawnatics - #13, Inspiration Board (see below)

Thank you & hope to see you at Dies R Us