Followers

Showing posts with label Thank You. Show all posts

Sunday, August 22, 2021

A World of Thanks for River of Creativity Challenge One Earth

 Hi everyone! Now, I have to admit, this months theme at River of Creativity had me stumped.  I wanted to make some sort of ecological statement with my card, the subject being One Earth; I could not think of a good way to convey my message.  I literally lost sleep over it! But once I started looking through my stamps and dies I realized card making is supposed to be fun and I ended up making a few cards for this challenge! I see a definite correlation between struggling with the challenges and then once I get started, making cards like crazy! Here is my second card:


What I Used to Make my Card:
Square Card Base
Trinity Stamps Hopeful Flower Stamps and Dies (retired - this set would work as well)
Tim Holtz/Sizzix Globe, Mini, #661598
Watercolor Paper {I use 
this}
Zig 
Clean Color Brush Markers
Gina K Amalgam Ink Pad in Obsidian Ink

Distress Ink in Blueprint Sketch
KaiserCraft 6.5" x 6.5" Wandering Ivy Paper Pad (retired but available)
WOW! Embossing Powder, Hologram Sparkle
Concord & 9th Globe Greetings Stamp Set (retired but available)
Vellum
Simon Says Stamp Embossing Ink

I started this card by stamping, coloring and die cutting the flowers.  I wasn't really sure at this point how I was going to use them, but I recently found them again {from 2018 - it pays to do a little cleaning out of your art supplies every once in a while!} and really wanted to use them.  I knew I also wanted to include the globe die; so I went through my paper stash and picked out a paper that is lightly embossed with green leaves and cut the globe out of that.  I attached the globe to the center of the square card and arranged the flowers around it.  The sentiment is embossed on vellum, carefully attached so there is no visible adhesive and the card was done! All that worry and concern about the subject of the challenge for nothing as every challenge at River of Creativity is YOUR interpretation of the challenge.  And since we welcome all type of crafts it really isn't as nearly complicated as I had made it.  Sometimes we are our own worst enemies!   

I hope you stop by to see my other creations as well as my very talented teammates. And if one of the examples sparks your creativity, we'd love to see you enter! We are on Twitter, Instagram and of course, here on Blogger.  In order to make it easier for us to find you please tag your entry with this tag #ROConeearth04.  Thanks so much for stopping by! Hugs, Christi

I am entering my World of Thanks card in the following challenges:
Crafting Happiness, #110 - Anything Goes
Pammie's Inky Pinkies, #2134 - Anything Goes
Allsorts, #637/8 - Add Some Sparkle
Cut it Up, #232 - Space
Cardz for Galz - Texture
Mod Squad Challenge - Thanks
Simon Says Stamp Wednesday Challenge - Add a Sentiment
Die Cut Divas - Watercoloring & Die Cut


Tuesday, May 11, 2021

Simple Slimline Thank You Card

Hi everyone! 

While I do love to get out my markers and a bunch of stamp and dies, there are times when I just need to make something a bit easier.  I love using paper packs and Birch Press Designs dies when I need to make a quick card; I especially love that the intricate nature of the dies make it look like I worked for ages to make the card, yet all it typically takes is a few turns of my die cutting machine.  This week for my Dies R Us design team post I am showing you this simple, yet elegant, thank you card:


What I Used to Make my Card:
Slimline White Card Base
DCWV Paper Stack, 12" x 12", Peri & Peach
Birch Press Designs Flora Heart Layer Set, 56120 {This is a NBUS set of Dies for me!}
(you could also use Caprice Heart Layer SetDahlia Heart Layer Set or Petal Heart Layer Set)
Birch Press Designs Big Thanks Sugar Script, 57142 
Nuvo Delux Adhesive
Sequins from Stash

Once I had made my slimline card base, I set that aside and cut out a bunch of the hearts using all of the beautiful papers in the paper stack.  I recommend keeping each layer separate while you are doing this as it is easier to assemble them, I have a tendency to mix up some of the layers and don't realize it until I begin to put the layers together.  I use a toothpick to dot the adhesive onto thin die cuts like these but have found the tip of the Nuvo glue works so well with dispensing a tiny dot that I have been able to cut down on using  tooth picks! In the past I've tried the needle precision tips {and a bunch of others} but they always clog on me, not so with this glue! Putting these hearts together was a breeze! I had cut enough layers to make 5 complete hearts so I saved the other two to be used later.  I chose to use the "thanks" sentiment rather than a more formal sentiment to keep the card playful and not too elegant.  Dies R Us carries an amazing selection of Birch Press Designs Dies at the best prices I have found online - my collection is growing quite fast now!  I hope this little tutorial finds you and yours healthy and happy! 

Fondly, 

Christi


I am entering my card in the following challenges:
Addicted to Stamps & More, #405 - Use Dies and/or Stencils
Pammie's Inky Pinkies, #2119 - Anything Goes
Dragonfly Dreams - Add Some Sparkle {paper I used & sequins}
Just Us Girls, #583 - Trend Week, Layers
Carlin's Cards, #34 - Flowers & Hearts {Flowers = patterned paper}
Craftyhazelnut's Patterned Paper Challenge - Anything Goes w/ Patterned Paper
Mix it Up, #49 - Anything Goes w/ 3 or More Layers {each heart is 3 layers}
NBUS Challenge, #26 - Anything Goes with Never Before Used Schtuff


Wednesday, May 27, 2020

Floral Thank You Cards

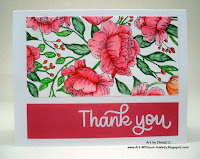
I can't seem to stop making more than one card and these cards are no exception!  The floral panel is SO pretty {and I just got the stamp, first time using it!} I had to cut it in two to make double the cards.  Plus, super easy cards are fantastic and I can never have too many thank you cards {the trick is actually sending them out!}


What I Used to Make my Card:
White Card Bases
Gina K. Amalgam Ink in Obsidian 
Watercolor Paper {I use this}
Zig Clean Color Brush Markers 
Water Brush
Simon Says Stamp Pretty Peonies Background Stamp, #SSS101961
Simon Says Stamp Thanks & Leaves Stamp Set, #SSS101894 
Simon Says Stamp Fine Detail White Embossing Powder
VersaMark Ink 
Matching Dark Pink Cardstock

I stamped the peonies onto a piece of water color paper, using the Obsidian ink and used my Zigs to water color the image in.  I cut the paper in half, attached
One of the cards

each piece onto white card bases. Then, I was lucky enough to find some dark pink card that I think matched the peonies very well, so I used that to emboss the sentiment on.  I attached the sentiment and now I have 2 more pretty Thank You cards to add to my stash.

And the other card

As I am trying to use up the cards I make I think I will fill this out with just a Thank You saying on the
inside and put it in my purse so that the next time I go to the grocery store, or to get gas, or anything where I depend on others to work so I can get what I need and give them the card.  Maybe it will bring a smile to someone's face.  Thanks so much for visiting and I'd love to visit you back - leave me a comment so I can pop over to your crafty space and leave you some love ~ Fondly, Christi

I am entering my cards in the following challenges:
NBUS - Challenge 14
TTCRD - Anything Goes
Addicted to Stamps and More, #391 - Anything Goes
Arty Divas, #22 - Anything Goes
Stamping Sensations - Say it with Flowers


Thursday, April 23, 2020

Thanks for Everything

I was in a huge bind early last year and I was helped out by a city employee.  She went above and beyond her job description and now that the situation has been resolved I decided to send her a thank you card.  I didn't want it too feminine or too plain; I think I struck a good balance.


What I Used to Make this Card:
Vanilla Card Base
Hero Arts Stamp & Cut Thanks, #DC152
KaiserCraft Fairy Garden 6 1/2 x 6 1/2 Paper Pad, #PP1039 {available online}
Reverse Confetti Striped Frame Cover Panel {not sure if this is retired}
Hero Arts Ink in Robin's Egg Blue {I got mine in the February MMH kit}

I chose a vanilla card base to soften the card a bit.  I cut the Striped Cover Panel out of one of the papers that had "spot varnish" on it; spot varnish is when a shiny coating is added to certain parts of decorative paper.  I die cut
The dimension and that "spot' shine
some plain white paper using the Thanks die, quite a few times, glued them all together and finished with top Thanks cut out of the same paper as the cover panel.  I added the matching blue paper in the center of the panel and stamped for everything using the same stamp set and a matching light blue ink.


I really like how this card came out and I hope she {and her office} like it, too!  I only have a few things from my craft room set up so I am trying to use up some older things I've had.  I'd love it if you'd follow me on social media - I am pretty much everywhere, so just chose one or 2 from the listing on the right hand side of the blog.  Thank you so much for stopping by and if you do end up following me please let me know so I can return the favor ~ hugs, Christi

PS: I actually sent this card out to the person I made it for! Of course, I did it the day before the virus stuff hit so I have no idea if she got it, but I sent it! I get a gold star {finally!} 

I would like to enter my card in the following challenges:
Dies R Us, #143 - Spring Flowers 
Simon Says Stamp Wednesday Challenge - Flower Power
Addicted to Stamps and More, #386 - Anything Goes
Krafty Chicks Challenge, #504 - Any Occasion
Crafty Hazelnut's Patterned Paper Challenge, April - Anything Goes
Allsorts Challenge, #568 - Flowers and/or Showers
Arty Divas, #20 - Anything Goes


Thursday, November 29, 2018

Hero Arts You Are Appreciated

You still have a bit of time to enter the a2z Scrapbooking November challenge.  The theme this month is "Thanks" and you can use any brand products you wish.  But if you use Hero Arts or Sugar Tree Digital stamps and are chosen as the monthly winner, you will get a gift certificate from the a2z Scrapbooking store.  That's an awesome prize!
I went a smidge out of the box with my card.  I have a plethora of old Somerset Studio, Take Ten, and Stampers Sampler Catch Up issues and I've been looking at all the beautiful creations from years ago.  Seeing all the beautiful cards with fibers used as embellishments inspired me! Here is my card:


What I  Used to Make my Card:
White Square {5 1/4" x 5 1/4"} Base
White, Blue, Light Blue, Aqua and Yellow Card
Hero Arts Ink in Summer Sky, Tide Pool, Deep Blue, Fiesta Yellow, Teal Topaz and Intense Black
Unbranded Long Round Stitch Die {it's a long single die}
Fibers from my HUGE Stash

I started by stamping the peacock on a piece of white card.  When a stamp is as detailed as the head and body of this peacock, and it is a layering stamp, instead of stamping the solid image first I'll stamp the detailed image and then the solid image on top of the detail.  It's backwards from the directions that you get with the stamp, as well as backwards from what we used to do with the old 2 Step stamps from SU!, but it seems to work better for me.  Trying to use a layering stamp for the first time is the hardest; it gets easier {in my opinion} once the stamps are stained a bit so you can see the clear stamps better.  I followed the directions for the rest of the peacock per the directions; solid stamp, detailed stamp, even more detail stamp for the feathers of the bird.  It isn't lined up perfectly, but I like imperfect creations {good thing because I'd never get finished with anything if I didn't!}

I finished the peacock by stamping its legs.  I wasn't sure if I was going to use the accompanying die cuts and cut out the bird, and I decided against it.  That was mostly due to the fact that since my peacock wasn't layered that well, cutting it out would have been a problem.  The bird was then cut out with a square stitched die.  Then I realized that I had a feather die - and a peacock has feathers!  I dug out the feather die and cut it from three coordinating card stock colors, glued them together at the top, then pulled on that inspiration I'd
Another Look
gathered from all those older magazines and added some fibers.  Yes, I wrapped the fibers around the top of the feathers and adhered them.  Do you recall when fibers were the rage?!?  I have an entire drawer full of them.  Occasionally I go through it and get rid of some I doubt I'd ever use, but it always seems as if there are more to take the place of the ones I tossed.  I think they multiply by themselves.  Anyway, while the feathers were drying, I stamped the sentiment for the card.  I also made my own round stitching pattern on the large blue square since I had no die large enough.  I mounted the peacock onto the blue square, added the feathers, mounted the whole thing onto a white square card, and I was done.  I am tickled about how the card came out and I'm so proud that I used something from my stash; especially because these holiday sales are so hard to resist {yes, I confess, I bought more paper.  It was SUCH a good deal!}

I hope you have time to craft a bit before the serious holiday rush begins.  This card is going into my newly formed "Thank You Card" stack.  I've made it a mission to make more thank you and thinking of you cards because it seems I never have the right one on hand.  Maybe you'll join me and use some of your older craft supplies to make your stack of cards a bit taller?  If you do, be sure to enter it in the November "Thanks" a2z Scrapbooking challenge, but hurry! Time is running out! 

Thank you for stopping by today; I hope your season is going smoothly and you are finding joy in the process!  Fondly, Christi

I am entering my You Are Appreciated Card in the following challenges:
A Blog Named Hero - M, Thankful {challenge graphic below}
Creative with Stamps - #32, Feather {challenge graphic below}
The Artistic Stamper - M, Square It
Brown Sugar Challenge - M, #284, Thankfulness
Stamps & Fun - #335, White & Blue
Incy Wincy - Square Cards


Monday, November 19, 2018

Hero Arts Leafy Vines Thanks

Hello! I hope this post finds you and yours doing well! Being a card maker, you'd think I would have thank you cards lying all around my house.  Not so.  I am one of those people that can't seem to keep cards in stock {I have PLENTY of cards, they are just never the "right" card!} which causes me to make each one as needed.  The good news is each card is created for a specific event and/or person. The bad news is I am always running around like crazy with 307,513 cards in the works.  Anyway, I created this Thanks card for this month's theme at a2z Scrapbooking which is "Give Thanks" 


What I Used to Make my Card:
Olive Green Card Base
White Card
Copper Glitter Card
Kaleidacolor Ink Pad in Autumn Leaves, #KA-000-008
Hero Arts Stamp & Cut Thanks Set, #DC152 {you can special order on the site}
Hero Arts Leafy Vines Stamp, #CG509 {you can special order on the site}
Clear Embossing Powder, #PW106
Delicata Ink in Gold and Copper


I love this background stamp, Leafy Vines.  One look on Pinterest and you can find hundreds of ways crafters have made cards with this stamp.  I love it because it's so versatile - you can change the feeling of the card using different  colors.  You can basically make this stamp work for any occasion or time of year!  It's also one of the first stamps I bought when I finally got to unpack my crafting stuff from my last move.  I began this card by inking the Kaleidacolor pad onto the stamp and stamping on a panel of white card.  Just a quick little story about this pad - I had originally purchased it about 18 years ago when I was demonstrator; I purchased it from the company I represented and it was branded with their name.  The case has been cracked {I keep it in a zipper bag} but the pad has never been re-inked, never failed me.  Just consider how old this stamp pad is next time you want to buy one but the price seems a tad high.  It could vote, drink in some states, and join the armed forces!  So I
Another Look
stamped the Leafy Vines on the white card, then added a bit of bling with copper and gold inks, just randomly inked on the stamp.  I finally covered the image with clear embossing powder, trimmed the card panel, attached it to the card base, and set it aside.


I wanted the sentiment to be visible, but not be the focus of the card.  I used the die with several different papers and each one just didn't give enough oomph.  I settled on the copper glitter card and I think it achieves the look toward which I was working.  I considered some gems but I think the card is pretty enough without them.  You can't see the little touches of gold and copper ink, but when you have the card in hand and move it just so, it's beautiful.  Fall colors are my favorite for creating; I can almost smell the smoke from the fireplace just seeing the rich rusts, reds, and browns.  

I hope my little post gets your creative juices flowing and you enter the November 2018 "Give Thanks" challenge at a2z Scrapbooking.  You just might win a Gift Certificate to the store!  However, while you are waiting to see if you've won, you can get 15% off your purchase by using my code, CHRISTI15.  I hope you are having a wonderful fall. ~ Christi

I'm entering my Leafy Vines card in the following challenges:
Dragonfly Journey - #129, Thanks & Thanksgiving
DL ART - Thankful Thursday
Simon Says Stamp Work it Wednesday - Give Thanks
Dies R Us - #109, Giving Thanks
Crafty Gals Corner - Thankful


Tuesday, September 11, 2018

A Thank You Card

Remember when I made a card for Layton's Legacy?  Well, I made a few other cards as well, packaged them up, and mailed them off to Lea.  I also included this "Thank You" card to thank her for having this card/donation drive for the NICU parents at U of M Masonic Children's Hospital.  This is the card I made and sent to her.


What I Used to Make my Card:
White Card Base
Birch Press Fiori Plate Layer Set
Hero Arts Thank You Pair Fancy Die, #DI192
3 Co-ordinating Colors of Card Stock {I used yellow, dark blue and light blue}
Scrap White Card for Sentiment

As you can see, this was a VERY easy card! It was the first time I had cut the Fiori plates and I really just wanted to see what they looked like in person.  But I felt the die cuts were so pretty it would have been a waste not to use it, so I turned it into a Thank You card!  I think I would have put more thought into my color choices had I known I was going to use the background but I was (and am!) so happy with the way it came out, I used it anyway.  Plus, I think the colors are sort of summery and fresh. 

All I did was attach the layered plates onto a white card base, cut the Thank You out of white card, and attach it.  I like this card so much I am going to use it for my Design Team project at Not Just Cards September Challenge! It's such a fun place to play, as the theme is always Anything Goes!  And, as the name states, you can submit ANY type of art - not just cards!  

So easy and so elegant.  These dies are pricey but I feel the versatility makes them worth it.  I've recently purchased a few other sets and I'll be sharing them soon!  Thanks SO much for stopping by and I hope to see you soon ~ Christi

PS: Hope to see you at the challenge! Remember, Not Just Cards!

I am entering my Thank You card in the following challenges:
The Crafter's Cafe - M, #203, Three of Something (I used 4 different dies)
Mix It Up Challenge - M, #17, Anything Goes w/ Option of Layering
DL Art Thankful Thursday - #235, Always a Thank You
Papercraft Business Challenge - M, Anything Goes w/ Optional Thank You
Happy Little Stampers - M, Anything Goes with Dies
Crafty Gal's Challenge - #174, Anything Goes plus 3+ Layers
Stamp, Ink, Paper - #167, Large Sentiment


Wednesday, March 21, 2018

Pansy Petals

I am so glad spring is on the way; we had a relatively mild winter here in Colorado but there is nothing more relaxing to me than to watch the birds at the feeder doing their thing.  Not so much watching the cats watch the birds but I digress.  This card is inspired by the pansy die {actually, this set is Pansy 2} from Elizabeth Craft Dies.  Be gentle as it is one of my first tries at these 3D flowers; mine don't look quite as good as most, but it was fun to try!

What I Used to Make my Card:
White Card Base

Yellow Card
Watercolor Paper
Distress Oxides
Distress Markers in Picked Raspberry, Seedless Preserves and Blueprint Sketch
Die-Versions Whispers, Fence Background, #DVW-314
Elizabeth Craft Designs, Garden Notes - Pansy 2, #1488
Hero Art Fancy Word Dies, Thank You, from My Monthly Hero Kit for March 2018
Shimmery Dark Pink Card
Light Green Card
Distress Sprayer

I know I should have written down what Distress Oxide Inks I used but I've got
so many now I just grab and go.  I wanted the flowers to be a bit whimsical, color wise {and mostly since I know there is no way I could color my pansies to look like real ones!} so I just smooshed all the pink, blue and purple Oxides I had onto a piece of watercolor paper, spritzed them with the sprayer, and kept it fairly easy.  I did color certain parts of the paper with certain colors but, as you can see, some of the colors blended together.  All the colors are pretty and I used all of the paper I'd made.  After all, when you're the designer, your flowers can be any color {or shape} you want them to be!

Once the colored paper was dry and all the pieces were cut, I began assembling the flowers.  I did find a video on YouTube that shows the first pansy set being
made, so I did try to emulate the true style of the flower a little bit.  I put the flowers together by what colors worked together and then used Distress Markers to add little "veins" on the petals.  Honestly, I'm wasn't overly thrilled with them and I almost scrapped the whole thing, but I muted the lines down with a few washes of water and that helped me to like them more.  I cut the leaves out of a pretty, light green, card and then proceeded to fuss and fool with them and the flowers.  I think watercolor card is a bit too thick to properly shape but, if you look closely, you can see where I did bend the flowers.  I only had one stylus {and I've promptly bought a "flower kit" and made my own rubber pad out of two mouse pads glued together, so watch out - I'm ready now!} and actually did most of the shaping with my hands.  

Meanwhile, I cut out the background and attached that to a white card.  After a few days of fussing with the flowers and leaves, I decided they were the best
they were going to be and glued them around the perimeter of the card.  This led me to the dilemma of what to put into the middle.  I had chosen the dark pink shimmer card from my stash already but had no idea what I wanted the card to say.  Then I remembered that Hero Arts My Monthly Hero was sending out some fancy dies, so I rushed to the website, caught a glimpse of the word dies and decided this card would be a thank you card.  The kit didn't arrive until a few days ago and, as soon as I got a chance, I cut the dark pink shimmer card with the pretty Hero Arts dies.  I attached the 'thank you' to the middle of the card and I had my finished card!

I'm not thrilled with the flowers but, for a first time effort {I'm sure I've tried to shape flowers before, but who knows when!}, I think I did OK.  I've since talked to an Instagram friend who has basically told me practice makes perfect; I hate that!  I want to be an expert at shaping flowers, at coloring, at coloring with Copics, and at any other crafty thing I try!  I'm sure you feel the same way.  I want everything to come out like it looks in my head! I think the key is not to expect anything, that way you will like whatever you create.  Thanks for visiting, Christi

I am entering my Pansy Petals card in the following challenges:
ModSquad Challenge - Ready for Spring
Simon Says Stamp Wednesday Challenge - Floral Frenzy
Create a Smile - Springtime
a2z Scrapbooking -M, Anything Goes
Happy Little Stampers Dies Challenge - M, Anything Goes
Inspiration Destination - #146, Anything Goes, Twist: Use Pastel Colors
Die Cuttin' Divas - #361, Flowers
Cuttlebug Mania - Springtime
My Time to Craft - Easter/Spring

Die Cuttin Divas


Sunday, March 18, 2018

A Thank You

This is my last post for the Dies R Us Design Team - it's been a fabulous experience and I will miss working with their wonderful products {especially since the store has expanded to carry papers, washi tape, adhesives, and SO much more}.  This card was made as a Thank You to all my teamies at Dies R Us, especially the wonderfully understanding Darlene, who is the fantastic Design Team Coordinator.  I struggled with publishing my posts due to internet gremlins and Darlene sorted each one for me.  It's with many warm memories, and some laughter, that I say goodbye, and thank you, to this exceptional team.


What I Used to Make this Card:
Sparkle Lilac Card Base
Creative Expressions/Sue Wilson Floret Circle Stamp, #UMS689
Creative Expressions/Sue Wilson Melbourne Dies, #CED8105
Lawn Fawn Thank You Border Die, #LF1055
Watercolor Paper
Simon Says Stamp White Detail Embossing Powder
Embossing Ink
Oxide Inks {various from sets 1 & 2}
Distress Sprayer
Small Heart Punch
White Card
Oxide Ink Left Over Paper {stash}
Dimensional Dots

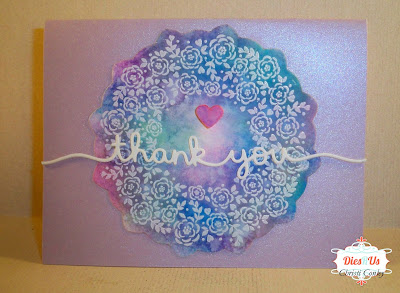
The first step to making this card was stamping the floret stamp by Sue Wilson.  I used embossing ink and embossed the design with detailed white embossing powder on watercolor paper.  I actually made two of these floral circles; the first one I used Clean Color markers but I just didn't like the way it came out and decided I wanted to use muted colors instead of the bright markers.  No problem, the creation is in my stash waiting to adorn the perfect card.  I was fortunate to catch a special order of the Sue Wilson "To Die For" stamps and I urge you to sign up for the Dies R Us news so you can catch the next time they get in a special order {they get cool stuff in a limited amount all the time!}

Once the circle was embossed, I used Oxide inks to get the coloring I wanted.  I worked on the colors for about two days; spritzing, then drying, mopping with paper towel {a great way to mute the colors, and at times you can almost erase them.  I also use the paper towel to absorb the excess ink that flows to the bottom of project, just touch the towel to the ink puddle and it's gone!}, reinking, and starting the whole process over again.  I had a very clear picture in my mind of how I wanted this card to look; needless to say, I didn't write down the Oxide colors I used, as I basically just kept throwing more ink on, taking ink off, and generally fooling with the colors until I got the look I wanted.  Once the image was thoroughly dry, I cut it out using the matching dies.  I had originally cut the center of the circle out, back on that "first draft" I did but, as you can see, this time I left the middle intact. 

The next step was to cut the sentiment out of white card three times.  I had also experimented with this; cutting and stacking the sentiment about twelve times but eventually the cuts didn't line up straight {absolutely nothing to do with me} and I decided that three was enough.  I stacked and glued them together, letting them dry overnight.
Picking out the pink for the heart

The lilac card base has a slight sheen to it and I know I got it in one of the My Monthly Hero kits from Hero Arts.  I'm almost certain it was the kit from January and the paper is the Stardream Kunzite Cardstock.  It is luscious in real life and I like how the Stardream stock is heavy enough for a card base yet it is still fine to use as a layering paper.  I adhered my floral circle, then the sentiment to the card.  It was then I decided it need a bit more of something so I looked through my scraps from previous Oxide projects and found a lovely pink, on which I used a small heart punch.  I used dimensional dots to adhere the little heart to the middle of the card and I was done.
Another look - The base card shows its shimmer!

It's been a pleasure to bring you my creations using Dies R Us products and I hope you have enjoyed the journey as much as I have.  Thanks so much for stopping by! Christi

Don't forget to join in on all the fun at the Dies R Us Challenge Blog.  
There's  a new challenge theme offered on the 1st and 15th of each month
 and one lucky randomly drawn winner will receive a gift voucher prize to 
the Dies R Us Store.  For your convenience, all the important Dies R Us 
links are provided below.


click below for:

I am entering my "Thank You" Card in the following challenges:
Simon Says Stamp Wednesday Challenge - Easter Inspired {mood board below}
atoz Scrapbooking - M - Anything Goes 
Simon Says Stamp Monday Challenge - Easter/Spring Inspiration {mood board below}
Lawn Fawnatics - #24, Fun With Dies (entry #2)
The Flower Challenge - M - #18, Anything Goes
Papercraft Challenges - M - #18, Sentiment as Focus
Simon Says Stamp Wednesday Challenge

Simon Says Stamp Monday Challenge

Friday, January 12, 2018

A Few Thank You cards. . .

It is one of my New Year's Resolutions to make {AND send} more thank you cards.  This Christmas I got some totally unexpected cards from a couple of my Blogger friends and, since I sort of coasted through the holiday, I decided to make them some thank you cards.
Both of the cards.  They look better in person, trust me :)
What I Used to Make my Cards:
White Card Base
Basic Grey Patterned Paper, Sultry Vogue*
Pink Cardstock {Core'dinations Pastels}
Hero Arts Stamp & Cut, Thanks, #DC152
Homemade Dots {see below}
Wink of Stella, Clear

*Basic Grey closed its scrapbooking section in 2016 so I highly doubt you'll find the paper I used to make the cards, but there are plenty of beautiful florals out there - bet you have some in your stash!  

I had a blast making these cards and they were super easy!  I just trimmed the patterned paper, attached it to my white card base and then embellished.

Since there are two cards, I'm calling this one "Pop Out" and the second card "Dots."

This is the second "pop out sentiment" card I've made.  If you'd like more information on making this type of card check out this post I made in October.  It's got detailed directions and a link to Jennifer McGuire's blog post on how to make these beauties. I used clear Wink of Stella to give the "thanks" a bit of sparkle; you can't see it in the card above, so here is a close up:

On to the "Dots" card.  As I stated above, I made these dots myself.  I hope you like the card and find a chuckle in the saga explained below.

I used Perler Beads to make my dots.  I bought a huge package of them from Amazon {I ended up giving a bunch away because I had SO many} and being I had never used them before, I had fun experimenting with them.  I also learned a few things; make absolutely sure you use parchment paper on your cookie sheet, you can literally bake these things for hours {yes, I forgot about them, but you'll see why in a second} and they won't burn.  I had the oven set at 350 degrees and they baked for hours!  I had originally timed them at taking about 45 minutes to bake; well, no worries about forgetting them! Lastly, you can cut the beads in half to make smaller dots, which is what I was doing when I got a nasty gash in my finger, hence forgetting about the beads baking.  I'm healing up though and no trip to the ER was needed.  I was nervous when I cut myself
Another look
because I am due for an ER visit; I seem to average one every six months or so and it's time. All in all, I'm glad I used the dots, I'm glad I made them smaller and I'm really glad that my finger is healing just fine.  Come to find out that Perler actually sells mini beads {and there are other companies who make the same type of beads}, so all that could have been easily avoided. 
 Eh, story of my life! {hehehehe}  

I am very happy with how the cards came out, even the dots.  I just bought some new dies {and have even more on their way!} and I intentionally purchased some larger word dies so hopefully I'll find some time, most likely once Valentine's Day is over, and get to making some more of the "pop out" cards.  They are really fun to make.  I hope you have a wonderful day and thank you for stopping by! Fondly, Christi

I am entering my Thank You cards in the following challenges:
Craftaholics R Us - Patterned Paper, #2
Simon Says Stamp Wednesday Challenge - Use Patterned Paper
Through the Craft Room Door - Always Anything Goes
Cuttlebug Mania -Flowers
Crafty Hazelnut's Patterned Paper Challenge - M, Anything Goes
Scrap From Your Heart - M, Flowers, #17