Followers

Showing posts with label panel. Show all posts

Saturday, June 4, 2022

Time Project for River of Creativity's June Theme

Hi all!! I am here presenting my design team project for River of Creativity's June Challenge where the theme is Time; I'd advise you to get a nice drink and relax because this is picture heavy and there are a lot of great things to see! Now, I could have done the whole clock thing, or even a birthday thing {after all, when does time bite you in the butt the worst?} but I really wanted to get messy and have fun.  I am a night creature; some people get their second wind at a nice normal time, say 5ish, or even 7ish but me? Nope.  If I am not in bed by 9pm, my second wind comes around at 10 pm.  In fact, I am typing this post at 12:30 a.m.  So, for my June piece I've turned Time into Nighttime.  Clever if I do say so myself.  My mom can tell you stories of a young me fighting my bedtime {no matter when it was} as early as 3 years old when I told my mother I was not yawning because I was tired, I was yawning because my brain needed more air.  I was such a joy, but I digress.  My hope for this project was that you'd see something new each time you looked at the panel; let me know what you think! 

Before you start I wanted to let you know you can click on the photos to make them bigger; I made collages out of what I feel are the important details so you wouldn't have 10 or so pictures to look through.  If there is any problem with getting the pictures bigger, please let me know!


I have been making this panel for the last few months as it has paper clay pieces and I needed to get molds and the actual clay to get the forms I wanted.  I used DAS Paper Clay which is available at any local craft store or online and made the moon and the stars.  I used a panel that is 9" x 12" from Artists Loft, but any panel or canvas would do. I also accumulated a bunch of molds from Amazon because they
have such a selection, and you know that Prime shipping is addicting!  Some of the molds I got were too small, some just didn't fit the look I wanted, and I ended up using a simple Moon and Stars mold to make the paper clay pieces.  I also got some keys, gears and clock metal bits and now I have enough to make a gazillion projects. Other supplies I used included Stickles in Crystal, Tim Holtz Foundry Wax {all the colors, I even layered them}, Picket Fence Gem Mixes, no name gems from my sash,
 Cosmic Shimmer Glitter Jewels in Midnight Snow, Krylon Leafing Pen in Silver, Golden Gel Medium in soft gloss, Lumiere Paint in Silver as well as beads and the like.  I think the most important part is the background and I first painted my panel with Golden Black Acrylic Paint and once that was dry I used some Distress Oxide Ink Pads {I just smooshed them onto the panel} and Sprays in various blue and purple hues, sprayed water here and there, dried with my heat gun, added more ink, more water and so on.  The shimmer was created by using Distress Mica Spray in Crooked Broomstick {it was a Halloween release from Ranger, but you can still find it online} and any Mica Spray would work. 


I fiddled with the background until I liked it and then set it to dry for actually a few days.  Once it was dry, I had painted, inked and waxed the items I wanted to and set about the placement as well as the swoosh of clear glass beads {the tiny kind with no holes} glitter and gem placement.  I wasn't concerned with placing too many gems as I really wanted this to sparkle being the night sky.  I could probably have added many more gems, but I was struggling with glue sticking to the paint and ink on the background.  I initially used hot glue, but after Sylvester knocked it off my desk and most of the gears and metal came off, I switched to E6000.  I'm not a huge fan of either glue but the E6000 worked much better than the hot glue.  Now I know and you know, too, so pry the top off your E6000 if you are gluing onto paints and/or inks.  I've linked to most of the items that were easily found online, and it there is something you want the specifics on please use the email option on the right side; I'll happily supply you with the actual links to the items.  


Another Look at the Entire Panel

 I am happy with my Nighttime art, and I had SO much fun making it.  It's been a long time since I have made such a piece, running with abandon with colors and paints and inks and goodies.  But that is what the River of Creativity challenges are all about! We would love for you to join us, either using Anything Goes or the theme of Time, for our June challenge; the only thing we won't accept is cards. So, get your inks, paints, clay and molds out and have some fun! Hope to see you soon! Christi

 I am entering my piece into the following challenges:
We Love to Create - Anything Goes
Creative Fingers - Anything Goes
Creative Artiste, #83 - Anything Mixed Media Goes
Mixed Media Lovers, #14 - Anything Mixed Media Goes
Country View Challenge, June Challenge - Seeing Stars

Thanks!!

Wednesday, May 4, 2022

Mixed Media with The Robin's Nest Creative

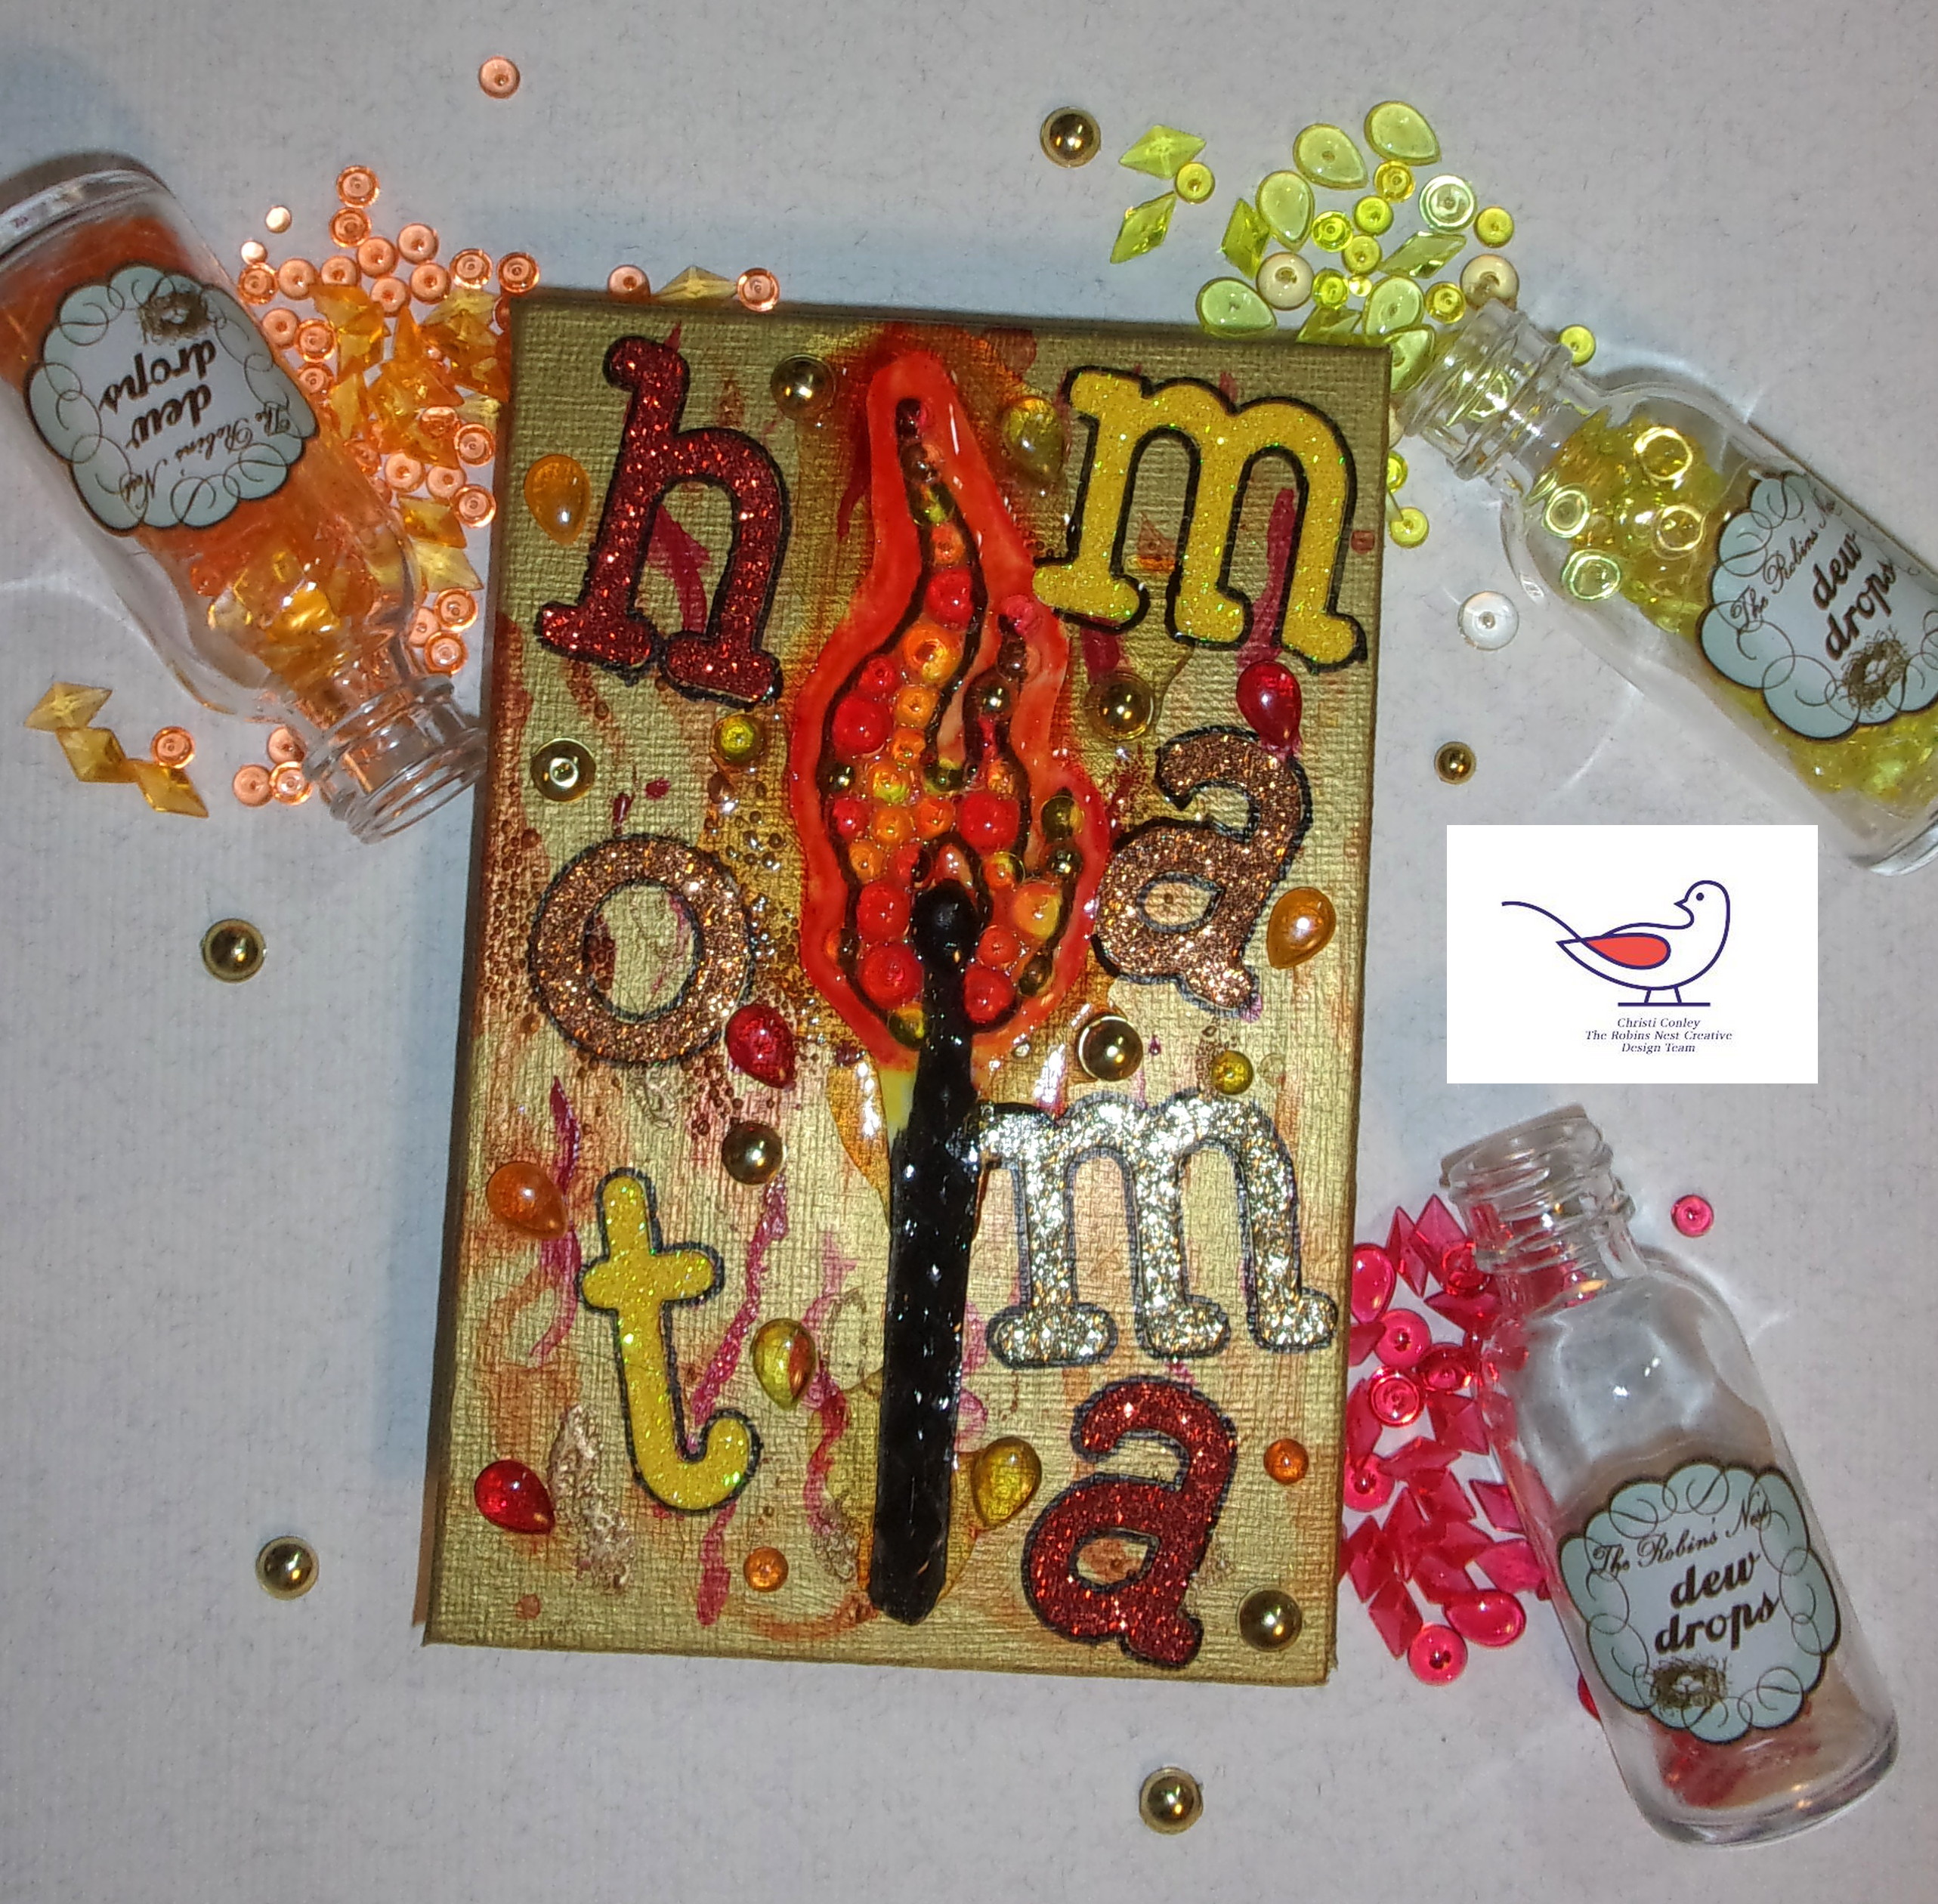
 Hello everyone! For my Design Team project at The Robin's Nest Creatives I decided to go all out and get really messy.  I used to make mixed media items all the time, but have since gotten busier and really haven't had time to play; I made up for lost time!  Let's get to it, here is the project; it's made on a Frederix 4" x 6" panel - this is a long post, I apologize, but I used a lot of different products (some not so successfully) while making this piece.


The first thing I did was use one of the really cool kits they have at The Robin's Nest called Creative Dew Drop Canvas and there are some amazing pictures to choose from, I used the Matchstick Creative Dew Drop Canvas for today's project.  These kits come with everything you need (except glue) to make a masterpiece worthy of framing - AND they come in different sizes! I used Dew Drops that I though would represent the flame best, orange, gold, red and yellow and filled it in completely with both Regular and Mini Sized Dew Drops. Black Diamond Dews were used on the wooden part of the match. I also colored around the flame to sort of give it that halo glow you sometimes get around fire using Copics right on the canvas.  I smothered it with Diamond Glaze and let it sit overnight to dry.  I wanted

Another Look
to use a panel as my substrate so I cut the match out.  I actually did this back in the beginning of being on the Design Team but I put the match somewhere and couldn't find it - shocking, I know - it popped out of where ever those items go when "they were right here" and then they are gone (another dimension with lost socks?? I don't know) but I found it.  Setting the match aside, on my desk so it couldn't escape again, I painted the 4" x 6" panel gold using Lumiere True Gold Paint. I have to swoon for a second because I love Lumiere Paints - if you like rich color, some of the coolest pearlescent colors (some of them are blended with 2 colors and the effects are amazing!) you need to check this paint out.  It is sold for use on fabric, but I have used it on everything and I have never been disappointed with it.  It's a quality product and it may seem pricey (if you shop around you can get a jar for around $6, a 2.25 fl. oz, jar, but they also come in sets with little squeeze bottles, called Exciter packs), but a little goes a long way. Sorry for that little detour! 

So once my panel was dry this is basically where I went crazy.  I used a flame stencil and some sprays to try and make a fire background, well the gold paint did not like the sprays (they are water based and just beaded up and dripped away) but some of the color did take.  At this point I just started to throw products at the panel; and I used so many different colors I couldn't begin to list them all. I used a few different embossing powders from Wow Embossing Powders, some diluted red paint from Golden, and some more embossing powers -which again were an issue because the embossing ink just beaded up on the paint.  No worries I just made the background really, really abstract.  I glued the Matchstick Creative Dew Drop Canvas that I had cut out onto the panel and attached the alphabet letters I had cut out of  6" x 6" DCWV glitter stacks and I then added more Dew Drops using the same colors I used to fill in the flame, but I used the Tear Drop style of Dew Drops instead.  I added a few Mini Dew Drops as well.  I wanted them to sort of look like sparks from the flame.  I glued the sentiment onto the panel and the letters just blended right in with everything else so I used a permanent black marker and traced them all so they'd be easier to read and pop a little.  The final step was to smother the match stick once again with Diamond Glaze and once that dried I was done.

I am actually happy how this panel ended up.  It is very interesting with all the colors, glitter, glaze and, of course, Dew Drops.  I hope you enjoyed my long story- I have been trying to make my posts shorter and I think I am succeeding, but sometimes I just have to tell the whole story!  Thanks for your support ~ Lots of love, Christi

I am entering my Mixed Media Panel in the following challenges:
Crafting Happiness, #123 - Anything Goes
Love to Craft Challenge Blog, #68 - Anything Goes
Mix it Up Challenge, #59 - Anything 3D Goes
Creative Artiste Mixed Media Challenge, #82 - Anything Mixed Media Goes
A Perfect Time to Craft, #5 - Anything Goes
Mixed Media Lovers, #13 - Anything Goes

Saturday, April 11, 2015

We Are All Mad Here . . .

I knew that.  I have been seeing so many really cool quotes and as I was watching one of my TV shows, I saw one of the characters had this tattooed on her arm.  It's from Alice in Wonderland and after the saying popped up in a few more places, I decided the universe was telling me something. . . or maybe that was just the cat. . .Anyway, I chose to use this chipboard bubble frame from JittoBear to make my quote pop out and express how really mad we all are. . .

What I Used to make My Project:
JittoBear Chipboard "bubble" frame
5 x 7 panel
Gesso
Twinkling H20's in Mystic Blue, Meridian Blue, Dragon Fire, Purple Sage, Mulberry and Blue Flame
White Cardstock
Twinkling H20's in Periwinkle
Various Embellishments


Cool huh??
I first gessoed the bubble frame and the panel - I lightly gessoed the frame since I knew I'd be using the H20's, and they are water activated.  I had painted the frame and also just sort of swished the H20's on the panel, not sure exactly what I wanted for a background.  I decided I didn't like the darkness of some of the H20's on the panel, so my intention was to gesso over it and start again.  Well, a happy accident occurred when I put the gesso on the H20's it reactivated the colors but only just enough for them to appear almost pastel!  I liked that so I kept it.

I felt that white cardstock was a bit too bright for the printed words, so I first
printed them on a piece of colored cardstock.  Well, the print faded immediately and I wanted the words - needed the words - to be darker.  So I switched to plain old white card, printed my saying on that, and used Mulberry H20's to soften the starkness of the white.  So now everything blended well.
Look how sparkly the H20's made the bubbles

Nothing is glued down yet...
Then the fun part! I started going through all my bits and bobs, pulling out gems, brads, stickers, anything that I felt would add to the piece.  I had pulled a bunch of embellishments out that I thought may fit the theme and/or the
Testing. . .
color scheme, and then put the panel up where I thought my cats couldn't reach it - well, I wasn't so lucky.  I'm not entirely sure which cat did it (I am 95% sure it was Sylvester), but when I walked into my studio the next day I saw that the panel, and everything else, was no longer where I left it. And of course it is the worst part of the room, with all boxes, paper packs and general disarray, so I can't find all the original pieces, and probably never will.  So I took a deep (really, really deep) breath and started again, pulling out goodies to put on the panel.  I made a few nods to Alice and then just filled in some of the spaces with gems, beads, buttons and anything else I felt worked.  So, there you have it! 


Be sure to check out the JittoBear "Custom Orders" area on the website - you can get whatever you want designed and cut out!! Love this option! And be sure to look at the "Products" tab, there are always new designs being added in pre-cut shapes, the bubble frame was pre-cut and I already have an idea on how I want to use it again.  I am going to attach a wall hanger to the back and put this up in my studio.  I love giving myself gifts & I hope you find some time to make yourself something fun! Fondly, Christi
One last look
I am entering my wall hanging"We Are All Mad Here" into the following challenges:
Simply Create, Too - (2w) #83, No Digi's or Stamped Images
Crafting with an Attitude - (2w) #2, Freestyle/Fantasy
Stamps & Stencils - Anything Goes - April Challenge
2 Creative Chicks - Anything Goes (no cards) April Challenge
Ladybug Crafts - Anything Goes, April Challenge
Virginia's View Challenge - (m,5/18) #14, Layers and Dimension
Dazzling Diva - #70, Mood Board or Anything Goes
Creative Moments - #65,  Anything Goes/Anything But a Card
Decorate to Celebrate - #97, Anything Goes

Saturday, July 13, 2013

Home May You Find Comfort. . .


I found a bunch of samples of different art boards I had sent away for eons ago.  They were all held together with a long plastic screw (it was similar to a book binding or scrapbooking post – of course, I saved it).  After trimming the parts of the board that were either dented or had writing on it I had this piece left that is about 6 ¼” tall and about 4 ¼” wide. I wanted to make something folksy and colorful – I am having a BLAST using bright colors, which is something I am totally new at.  My décor and clothes consist of basic neutrals – lots of olive green, black, white; pretty boring pallet but after all this experimenting with color who knows what it will inspire me to do! I just got my order of Sizzix dies that I scored during their huge 4rth of July sale and also wanted to play with my new dies so I figured out how I could incorporate it all together. I am fighting a yucky head cold so I hope this tutorial makes sense - LOL.  Here are the products I used:


  • Piece of Foam Board
  • Golden Fluid Acrylic paint in Ultramarine Blue, Cobalt Teal & Titanium White
  • Distress Paints in Wild Honey & Mowed Grass
  • Home May You Find Comfort & Rest sentiment from Wendy Vecchi Homemade Art set
  • A piece of scrap cardboard (I used flimsy all white cardboard – one step thicker than cardstock)
  • Distress Ink in Frayed Burlap
  • Tim Holtz Movers & Shakers Die – Mini Openings
  • Sharpies – Dark Brown and Magenta
  • Ranger Archival Ink in Jet Black
  • Heart Corner Punch from All Night Media (it has a total of 5 little hearts and they bracket your corner)
  • Scrap of Text Paper (I used packaging from a 7 Gypsies product)
  • Piece of Clear Plastic (I used packaging from one of the dies I bought)
  • Scrap of Brown Paper (for the “frame” under the sentiment)
  • Scrap of Red Card Stock (for the Heart Corner Punch)


First, I mixed the ultramarine blue and titanium white together and painted the background to look like the sky.  I painted the board about ¾ of the way down, then used some cobalt teal diluted with titanium white to sort of end the sky; then used my Distress Paint in mowed grass at the very bottom.  I just used the dauber and swiped it across the edge of the board.  For the clouds, I loaded a small paint brush with titanium white only and just kinda dabbed it around to give the clouds some fluffiness.

I then cut out my openings using the Mini Openings die – I knew I wanted the half moon window over the door so I positioned the dies accordingly.  I cut out the square opening on another piece of cardboard to use as the roof and used the window pane die cut separately since I wanted to mount the window onto the “house”.  I cut out the square “house” with the 2 openings in it (it’s about 2 3/8” wide and 2 ¼” tall) and then angled the piece of cardboard with the square cut out for the roof (I just used a ruler – on the other side of the cardstock – and made a triangle so I could be sure the square opening was were I wanted it and that the roof was big enough to fit over the house the way I wanted it).  I painted the house with wild honey Distress Paint and used the direct to paper technique for the roof- just pouncing the frayed burlap on the triangle until I got a pattern I liked.  I heat set both the house and the roof.  I colored the window pane with a magenta Sharpie.
Taking a piece of clear plastic from my stash of packaging I cut out little squares to fit behind the square window in the roof, the half moon window in the house and the window pane die cut.  I stamped the Wendy Vecchi “Home may you find comfort & rest” in Jet Black ink on the back of a piece of 7 Gypsies cardboard that was used in packaging product because I liked the illusion of text under the stamp. I then mounted it on a small piece of brown card stock to frame the sentiment.  I also cut out little squares to fit behind the square window and the window pane.  I took the die cut of the door and colored it with a Sharpie in dark brown. 


Next, I took the clear plastic I had cut out and adhered it to the half moon window, the window pane & the square window.  Using a scrap of white card stock I glued one of the little hearts from the heart corner punch on it, and then glued that onto the plastic I had cut for that window.  Subsequently I took the text background and glued it to the specific clear plastic for the square window and the window pane then glued that to the back of the windows.  I glued the window pane, roof and door to the house.  I set my roof “over” the house, so it sat on the house like a hat.  Adhered the sentiment mounted on the brown card stock to the board. Finally, I took the remaining little hearts from the corner punch on the board where ever I felt they added some splash.

Since this project only uses one stamp I am going to enter it the Simon Says Stamp Challenge “A Little Stamping”.  Thanks for looking and I hope you like my project!

It's kinda quirky, but I like it :)