Followers

Showing posts with label Rubber Stamps. Show all posts

Tuesday, April 4, 2017

Showers of Flowers for Stinkin' Inkers!

Thank you all for stopping by.  This is my first Design Team Post for the new challenge blog, Stinkin' Inkers! Welcome!!  The theme that our fabulous owner, Terri,  has chosen for April is "Showers of Flowers."  


What I Used to Make my Card:
Mint Green Card Base
White Scrap Panel
Pink Scrap 
Rubber Stamp Tapestry Set "Brambly Rose"
Corner Punch, Deco Photo or Notch, from All Night Media (discontinued)
Die-Namics MFT Stitched Oval Stax, MFT521
Hero Arts Ink in Soft Pink, Bubble Gum and Mint Julep
Stampin' Up Set "Sincere Salutations" (discontinued)
Art C Embellishments - pink flower pack, #24087
Simon Says Stamp Fine Detail White Embossing Powder
Embossing Ink
White Flower from Stash

I have a bin full of flowers (like Prima and such) that I love but never use. Some of them are too big to use on a card, some I like too much to use (I'm sure you can relate to that!) and honestly, I forget I have them.  Out of sight, out of mind.  But, for this challenge, I wanted to use a few of the various flowers I have.  Then I couldn't find them.  I looked everywhere for the baggie I have filled with fabric roses (you know the kind made of ribbon); I was certain I had ribbon roses that would match the colors on this card perfectly.  I looked where they should be, but weren't (believe it or not I am a fairly organized crafter.  I put everything away after I use it, back in it's proper place; all my bins and storage have labels on them and I can typically find what I am looking for quickly.) I looked where they shouldn't be, and they still weren't there.  Finally, I decided to give the searching a rest, 'cause you know sometimes if you just stop looking for whatever you need, it suddenly appears.  That wasn't exactly true here but I did find that I had put all of the flowers that were in shades of pink in a little shoebox-sized bin with intentions of using them for Valentine's Day. I'm happy I found them and I picked out some roses; they happen to be paper, not ribbon.  I cut the wire stems off and put them aside to add onto the card later.
Step 1

After wasting entirely too much time searching, I set about making the flower panel for the card.  I used the Hero Arts Ink colors that I had gotten in the My Monthly Hero Kit for January 2017 and stamped the roses and leaves, using the Rubber Tapestry Set (all of their sets have directions, plus recommendations for ink colors! I thought you might want to see the
Step 2
different steps used to create the panel.)  I stamped on a piece of cardstock that was 5 1/2" x 
4 1/4" since I knew I'd need to cut the panel down to place on the card base.  Once the panel was fully stamped, I used the DieNamics die to cut the oval out of the middle, then cut the panel down and punched the corners.  
Step 3

Next I chose a piece of pink scrap for my sentiment.  I stamped "Thinking of you" in embossing ink and embossed it using fine detail white embossing powder.  I am so tickled that I found this white embossing powder; I used to struggle mightily when using white, it seemed no matter what I did I always got little specks everywhere; even using one of those pouches filled with whatever the magic ingredient is (I think it's cornstarch.)  I attached the sentiment panel onto the back of the stamped card so that it showed in the oval cut out.  Once I glued the panel onto the card
Flowers Close Up
base, I used 3 paper roses as accents on the side. This card would have taken me about 30 minutes if I hadn't spent hours looking for those flowers! At least I actually did use a few; many times I've searched for something and, once found, never actually used the item in my projects.  

Another Look

I'm feeling spring and, as some of the country is getting pounded with a serious snow storm, it's 70 degrees here and the good weather makes me feel creative.  I'm thinking something 3D is in the wings. Thanks for stopping by and reading about my crafty trials and tribulations! Hunting around my craft room is NOT fun, but, coming into the room and seeing 3 drawers of stamps on the ground and the trash basket tipped over is even LESS fun.  That's what my wonderful furbabies had left for me this morning!  I swear they think up ways to annoy me! LOL Anyway, I hope you'll drag out some of YOUR flowers and join me at Stinkin' Inkers! And be sure to check out the rules HERE. Have fun and get crafty! Fondly, Christi

I would like to enter my Showers of Flowers card in the following challenges:
Stamps, Ink, Paper Challenge - #93, Coming Up Flowers
Ike's World - #85, Anything Goes with optional twist In the Garden
Try it on Tuesday - Botanical
Unicorn Challenge - M, #20, Petal Power
Pin{spirational} - #187, see picture below
Addicted to Stamps - M, #145, Stamped Image & Stamped Sentiment
Card Mania - M, #91, April Showers Bring May Flowers
Naughty or Nice Challenges - M, #38, Three of Something with optional Easter Twist

Monday, December 26, 2016

Noel

Happy Day After Christmas!!
I hope you all had a fabulous day 
and that your holiday
season continues to be joyous!
~~~~~~~~~~~~~~~~~~~~~~~~~~~~~~~~~
I remember seeing these peg stamps years ago.  Like decades ago.  I was always fascinated with them and amazed at the lovely creations that were made with them.  Honestly, it seemed too simple and I thought that I would never be able to create such beauty even if I bought myself a set.  Well, Rubber Stamp Tapestry had a sale and I could resist no more. I purchased two sets for myself and below is a card I made with one of the sets:

What I Used to Make this Card:
White Card Base
Oval Die Cut (I used Die-Namics Stitched Oval Stax, MFT-521)
Rubber Stamp Tapestry Noel Set, SWD-3801
Adirondack Dye Ink in Lettuce & Cranberry (discontinued but available)
Wendy Vecchi Archival Ink in Geranium, Potting Soil & Fern Green
White Cardstock to Stamp On
KaiserCraft Decorative Paper from Yuletide, PK484

Now, some of the really cool things about these stamps is:

  1. You can purchase every stamp they make separately.  You don't need to buy the set if you are in love with one stamp.
  2. They include a "How To" sheet with each set that explains how to achieve the look on the front of the package.  They even include ink colors! And, if you lose the sheet, you can download it from the site! Click HERE, then choose Download Card Insert  to see the "How To" sheet for the Noel Set.
  3. There is ALL sorts of information about peg stamps, tutorials, reviews and more - you really cannot fail using the tips and tricks that they share with you.
OK, back to my card.  I stamped the NOEL with the Fern Green ink, then tried to put the oval die cut over the NOEL so that it would be centered.  I didn't accomplish that, my NOEL is a tad too close to the top of the card, but, (say it with me) that adds to the charm of handmade <grin>.  I then proceeded to stamp the pine cones in Potting Soil ink, the little poinsettia flowers in Geranium ink and the squiggle in the Lettuce ink.  After I went around and around, turning the card as I went, I decided I needed a bit more color and stamped the flowers a few times using Cranberry ink.  I am pleased with the final results, off center NOEL and all, and proceeded to stamp around the "O" with the same images and inks.  I then matted the stamped cardstock onto some KaiserCraft decorative paper and mounted that on the white card blank. 
Another Look
I am SO glad I purchased this set and I am looking forward to using the other set very soon.  Rubber Stamp Tapestry is having a sale right now and you can get yourself a few sets at a great price - just click HERE to go to the specials page (I am not affiliated with any of the above mentioned companies, but I love to pass on a great deal when I see one). There is no end date for the sale, but it is called December Deals so I wouldn't wait too long to scoop up some goodies. I hope my NOEL card inspired you to stretch your limits and see what you can create!  Thank you for stopping by my blog - I'd love it if you'd leave me a comment and follow me ~ Hugs, Christi

I am entering my Noel Card in the following challenges:
Kraftin' Kimmie - #362, Winter
Perfectly Created Chaos - #7, Christmas Anything Goes (December)
Cards in Envy - Celebrate the Season
Sisterhood of Snarky Stampers - #74, X is for XXX-mas
Christmas Card Challenge - #2 (second entry)


Friday, December 23, 2016

Light up the Holidays

Wishing You and Yours a
Very Happy Holiday Season!
~~~~~~~~~~~~~~~~~~~~~~
Thank you all SO much for your continued support of my little blog!
XO Christi
and the Fabulous Feline Four


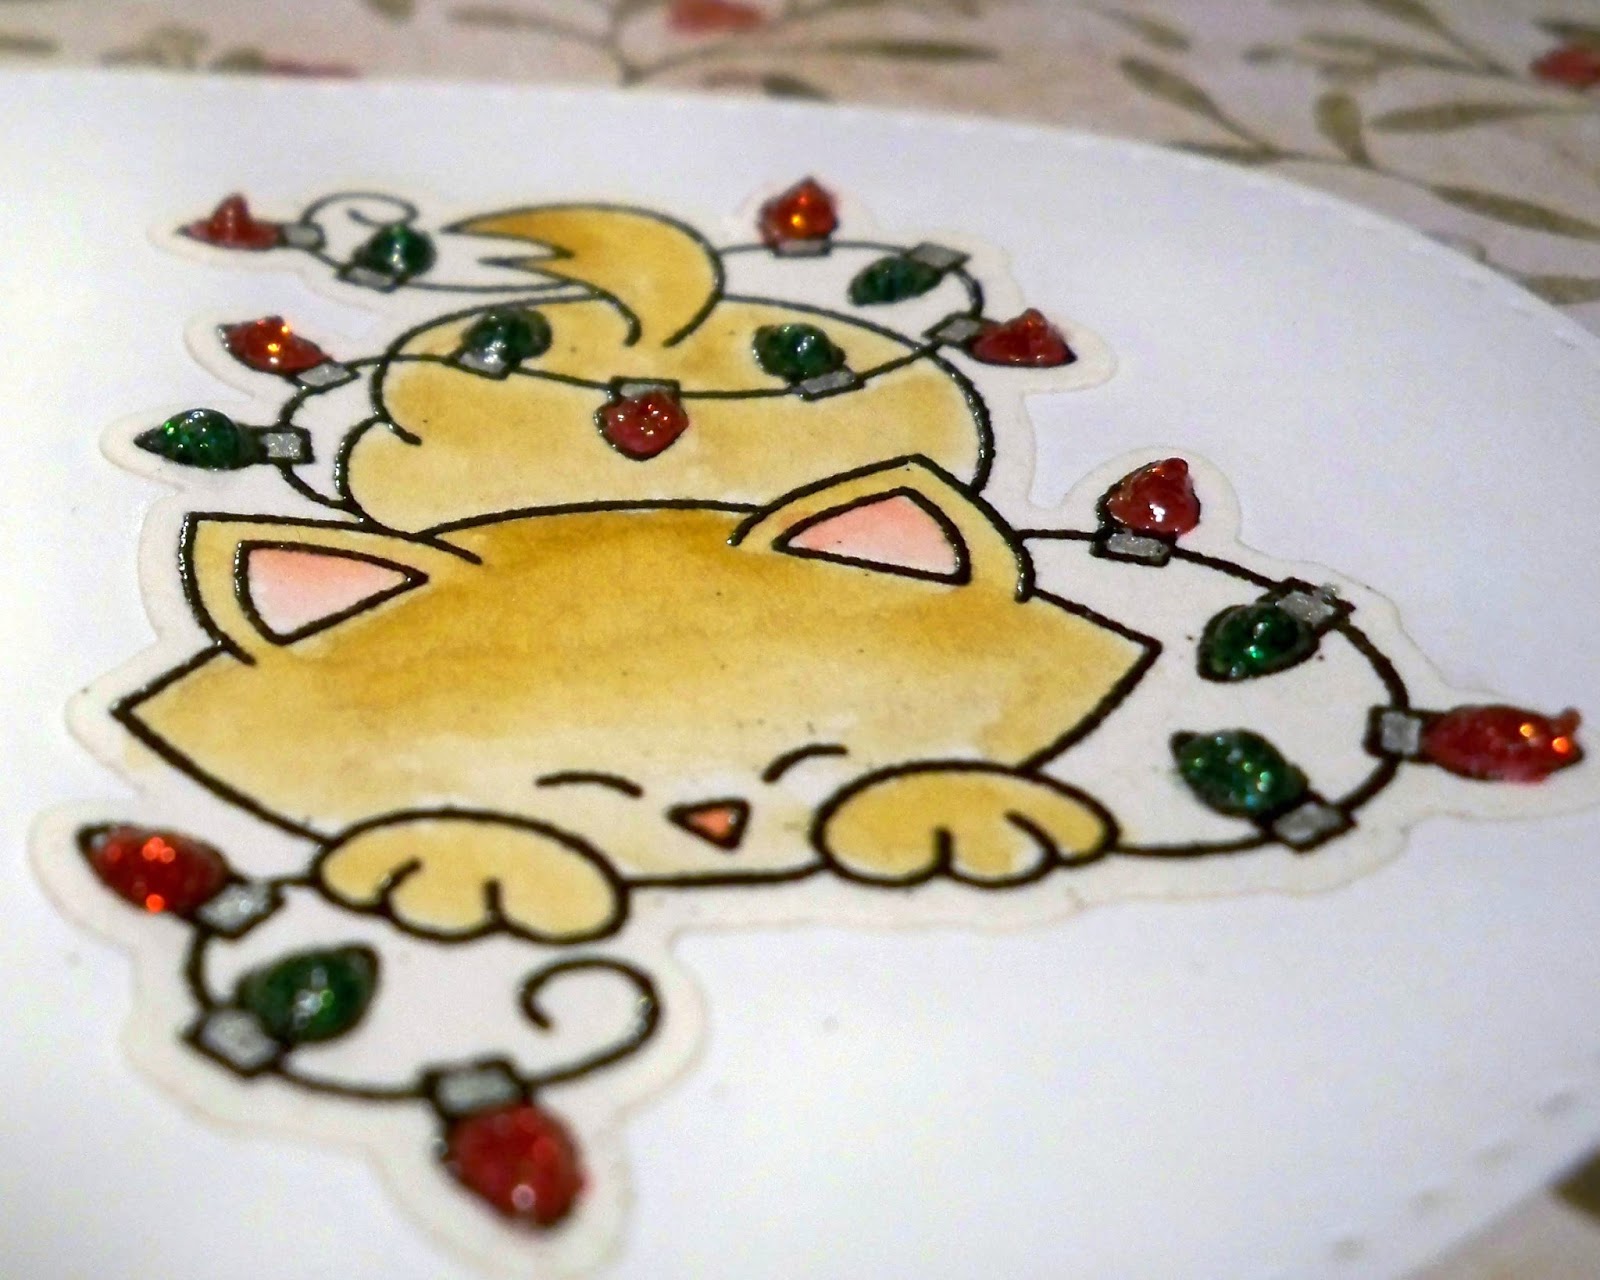
I bought myself a bunch of holiday goodies since there were so many fantastic sales.  I admit it, I'm weak when I can get a good deal.  If you are a regular reader of my blog you know I adore cats (especially my Fabulous Feline Four, in fact, Sylvester now has a bed right beside my computer monitor so he can feel a part of and keep quiet while I attempt to write these witty posts) and I am in love with the kitties at Newton's Nook.  I think Newton is adorable and I swear that Jen (the owner) is watching all the craziness that my cats create and bases the stamp sets (and the coordinating dies!) on them! But, if you have ever been owned by a cat, you probably can't look at any set of cat stamps and not chuckle, or cry.  Enough of me going on and on, here is one of my newest creations:


What I Used to Make my Card:
White Card Base
Newton's Nook Newton's Holiday Mischief Stamp Set
Newton's Nook Newton's Holiday Mischief Die Set
Watercolor Paper
Ranger Archival Ink in Jet Black
Derwent Inktense Water Color Pencils
Nuvo Glitter Drops in Emerald City, 760N, and Ruby Slippers, 752N
DieNamics Stitched Oval Stax, MFT-521
Tim Holtz Paper Stash, Tidings, #TH93325
Blender Pen
Silver Gel Pen
Embossing Powder in Detail Black
Embossing Fluid

The first step in making this card was to emboss the image of Newton, all tied up in the lights, on watercolor paper.  I found out how difficult it is to do that, and, in hindsight, it makes sense.  The watercolor paper just absorbs the embossing ink so you have to be fast! I did manage to get a few of the images
Close Up of the Glitter Drops
embossed, so once that was done I used the coordinating dies to cut them out. I colored in the bulbs with Nuvo Glitter Drops, alternating green and red.  Once they were dry (I let them sit overnight) I colored in the kitty with Derwent Inktense water color pencils and a blender pen.  I used a silver gel pen to color in the ends of the bulbs where they screw into the socket.  I stamped the sentiment onto the oval die cut using Jet Black ink and then attached the cat image next to it.


I used some designer paper from Tim Holtz, specifically the Tidings stash, trimmed it down and glued it onto the white card base.  Lastly, I adhered the oval die cut with the sentiment and the kitty onto the card.  The pictures I took of the card don't do it justice (I really should learn how to take better pictures), the little bulbs sparkle and shine when you move the card around.  I am so happy I purchased this set and there are more cards to come!  I hope your holiday season has been full of love and laughter ~ Christi

I'd like to enter my Light Up the Holidays card in the following challenges:
Crimbo Crackers - #122, Animals
Not Just Cards (December) - #39, Anything Goes
Simon Says Stamp Wednesday's Challenge - Make it Sparkle (entry #2)
Work it Wednesday - Use Your Dies (entry #3)
Show Us Your Pussies - #13, Krimbo Cats
Lost Coast Portal (December) - Christmas or Winter
Holly Jolly Christmas Challenge (December) - #86, Christmas Card or Anything But a Card
Jingle Belles - Christmas Card

Saturday, October 3, 2015

1950's Housewife ~ Vintage/Retro Challenge #5 at Twofers!

This challenge gave me a chance to use some never before used stamps that I bought when Rubber Baby Buggy Bumpers went out of business (the good news is ALL the stamps I used from RBBB are still available at StampFrancisco) and that was ages ago.  I love it when I can finally use a stamp - one I have been saving for ages for just the right challenge and TWOFERS challenge #5, Vintage/Retro certainly fit the bill! Here is my 1950's housewife, with a twist:


How I Made my Card:
White Square Card Base (5 1/4" x 5 1/4")
Vanilla Cardstock
Weekly Checklist stamp, StampFrancisco #106-1176
Time Schedule, StampFrancisco #106-1175
Hand on Head Woman, Large, StampFrancisco #106-1716
Sentiment from Stampers Anonymous, Wendy Vecchi, #G4-1857
Collage Papers, Green Cardstock, Buttons & Gem from my stash
Distress Markers in Weathered Wood, Wilted Violet, Ground Espresso & Shaded Lilac
Die from Sizzix Framelits Tree Blueprint from Tim Holtz, #659379
Ranger Archival Ink in Jet Black
Ranger Mini Blending Tool 

I knew I wanted to use both the woman and the sentiment stamp for this card, but I wasn't exactly positive how I wanted to incorporate them. I went ahead and stamped the woman, colored her with some Distress Markers and fussy cut
her out.  I am X-Acto knife challenged, so I was quite proud that I cut the little spaces where her arm crooks successfully (truthfully, most people don't allow me to be around sharp objects for a number of reasons).  I added the buttons and gem and set her aside.

Rifling through my stash I came upon some old collage papers I have had since the beginning of time and chose a few I thought would work as a background.  I then stamped the checklist and schedule stamps on vanilla cardstock and edged them with the ground espresso marker - I scribbled it on my craft sheet, spritzed some water and used the Ink Blender tool to edge the stamped images and then, after I cut and ripped my collage papers to my liking, swiped a bit of it onto the collage papers as well.  Helped them dry with my heat gun.

Once all the papers were set, I placed them onto my square card and glued
them down.  Then I set about looking for a die that would fit the sentiment as I wanted that to stand out and not get lost in the background.  The die from the tree blueprint (you will be seeing holiday cards made with this set - it's too cute not to use!) fit perfectly, so I stamped and then die cut the saying, then layered it on a small scrap of green card to further enhance it.  Lastly, I placed my woman and the sentiment on the card and I was done.  

I just love using my stash stuff! Not only does it justify me keeping all this stuff but then I don't feel so guilty when I buy more stuff. It's a win win! Thank you so much for stopping by and I encourage you to check out TWOFERS, as some rules have changed and we now have a sponsor! Yup, you could win a $20 gift certificate to Alleystamp! So get creating! Fondly, Christi
Another Look :)

I am entering my 50's Housewife Card into the following challenges:
Simon Says Stamp Wednesday Challenge - Anything Goes (entry 2)
The House That Stamps Built  - Anything Goes
Creative Knockouts - Anything Goes (I did not use the optional sketch)
That's Crafty! - Girls will be Girls
Crafty Hazelnut's Patterned Paper Challenge - (October) Anything Goes
Sisters of Craft - (October) Anything Goes

Monday, February 23, 2015

A Hidden Heart

I have had this stamp for years and never really knew what to do with it, but it's so pretty I had to keep it.  Then, I realized while I was looking at it one day, there was a heart right in the center of the design! This is actually the second version of this card as I messed the first one up terribly!  I am missing my sister, who lives in Florida, so this card is going to her.
You can see the texture in that pretty paper

What I Used to Make my Card:
White Card Base
gg designs rubber stamp, Stained Glass Window/Door
Gold Embossing Powder
Embossing Fluid
Heat Gun
White Cardstock
Red Specialty Paper
Miss You - Die-Versions "Everyday" Complements, DVS-4x6-104
Distress Marker in Festive Berries
Krylon Leafing Pen in 18K Gold

This rubber stamp is at least 13 years old and I have seen so many of my favorite stamp companies close since the "invention" of digital stamping, I was happy to see that gg designs is still in business.  This image is called Stained Glass Door/Window and is cataloged under Christmas Images - I love it when I can find use for an image beyond it's intended purpose! If you want to see this particular stamp, click HERE, they also have a  bunch of tutorials and other info on their main catalog site, click HERE to go there. Now, back to the card - after stamping the image with embossing fluid on some white cardstock, I embossed it with gold embossing powder, then fussy cut the design out.  I was SO tempted to cut the little "notches" off on the sides, they were really hard to
Specialty Paper
cut.  I edged the cut out piece with the Krylon Leafing Pen to help cover up the white and anywhere that I may not have cut as close as I should have (fussy cutting is NOT a strong point of mine).  I then colored the center heart in with the Festive Berries marker.  It matched the specialty paper the best - I wish I
The Stamp
knew where this paper came from, it's so pretty, I'd love to get more!


Lastly, I trimmed the specialty paper, attached that, then I put the main image on the card.  The image is about 4 1/4" x 2 1/4", so I had limited space that didn't really allow for any stamping, so I turned to my "new" Di-Versions Everyday die - as I explained in a recent post, I got this die and "misplaced" it, and I looked everywhere!! So I ordered a new one and it came the other day. I am sure the "old" one is lurking somewhere, laughing that I spent the money to get the die again. I had to get it again, it's just so perfect for so many things!  I decided I'd use the sentiment "miss you", cut from white cardstock.  I love this image and I think I can actually see a few more shapes in the design - I hope to be able to use it some more (maybe a triptych?), along with my other neglected stamps.  This card is on it's way to sunny Florida, since I woke up to snow today, I'm wishing I could fit in the envelope, too!  Thanks for stopping by today, and please consider subscribing and help me reach my goal of 100 subscribers (if you do subscribe, please leave me your blog address in the comments so I can subscribe to your blog).  Have a great day ~ Christi
Another look
I would like to enter my Hidden Heart card in the following challenges:
One Crazy Stamper - February, Red, White and a Die Cut
Unruly Art Quest - February,
Simon Says Stamp Monday Challenge - Anything Goes!
Craft Hoarders Anonymous Challenge - February, How Do I Love Thee? (I love my sister!!)
The Diva's That Cut...Paper - February, Words, Quotes, Sentiments - Just for You!

Sunday, January 18, 2015

New Beginnings at Anything But a Card

The finished product.

The blank journal I used.
So it's another New Year and I have decided to keep my resolutions easy - at least I think they are easy now, we will see how well I do (but nothing hard like exercise or no chocolate!!).  Since the current theme at Anything But a Card, challenge #43, is New Beginnings I decided to fulfill one of my resolutions, and something I hope will help me creatively, which is to have an art journal and actually journal in it. My plan is to write, and make art, in the journal at least 2 times a month. I'm afraid if I make my goal too ambitious I'll rebel (I can be my own worst enemy) and I don't want this to become a chore.  I have a few many  blank books hanging around, but I decided to use the Strathmore Mixed Media Journal. The size I chose is the 9' x 12" so I would have lots of room to get messy.


LOVE these inks!!
I wanted to jazz up the cover and I knew I wanted to stamp on it - so I dragged out ALL my Adirondack Inks from Ranger (the first inks I fell in love with ages ago) and all my word stamps. I have been collecting word stamps for years and what a perfect way to cover a journal? Also, I had to use my art stamps, another collection, since I wouldn't only be writing in my journal, I'd be making art as well. Since the cover was a glossy brown I thought I'd cover it with gesso and then stamp away.  Nope.  Well, I suppose I could have, but I didn't like the look of the ink on the gesso - it sorta just sucked the ink in and the vibrancy was gone.  So, plan two - I cut a piece of white cardstock to fit over the cover and stamped on that.  I also stippled some color around in some of the emptier spots.
Even the stippling smudged

When I finally got the cover done (and it took me a few nights as I would work on it and then leave it. I like the perspective I get on my work after I leave it for a while) I wanted to protect the cover it so it wouldn't be susceptible to my mess and tea spills.  I first tried Glue 'n Seal from Ranger but it smeared the Adirondack ink horribly (thank goodness I learned my lesson long ago to test things out before you go full tilt).  So after that dried, I broke out good old Modge Podge, in matte.  That, too smeared some colors of the ink, but I actually think it looks cool and since I can still read the words, the smearing is fine. Adds character. Funny that only certain colors of the Adirondack inks bled.
Smudged but in a cool way.
The part of this entire process that took the longest for me was deciding on what letters I wanted to use for the "My Journal" title.  I have tons of alphabet stickers and an entire drawer full of alphabet stamps sets - I went back and forth for days, but finally settled on the very first alphabet I ever bought and a continued favorite by Stampers Anonymous.  I went to their website, but it looks like it has been discontinued.  In case you want to see if you can find one, this is what it looks like:
It didn't come in this case, and it has no real name, but I use this set more than any other. I had so much fun stamping like the "old" says - I forgot how much fun just getting down to basics can be. Scroll down for one more look at the finished journal if you'd like.


So now I am all ready to start my New Beginnings with my "new" journal - how about you? You still have loads of time to enter at Anything But a Card.  Come and show us what New Beginnings means to you. 

Thanks for stopping by ~ Christi.

PS: If you comment on a post and would like me to take a look at your blog, please note your blog address in the comment. When I click on your picture it only brings me to your Google plus page, not your blog. 
Shiny!
I would like to enter my brand new Journal into the following challenges:

Artist Trading Post - New Beginnings
djkardkreations - NBUS challenge #3 - Anything Goes
Crafty Catz - #262, New Beginnings
Country View Challenges - Use Something New to You
Mixed Media Monthly Challenge - #8 New to You

Tuesday, December 23, 2014

Gltzy Gold Merry Christmas Card

My name is Christi and I am a paper hoarder.  I love beautiful papers.  I have some papers that are so lovely, I can't cut them - but, I have made a pledge to start to use some of my more beautiful papers, so this card was born.  The paper I used is Italian, I think it is supposed to be used used as gift wrap.  I can't recall where I purchased it from (it's at least 12 years old) but the detail is amazing! I tried to capture the richness of the paper the best I could.  I hope you get inspired to dig out some of your favorite papers & play a bit!  


What I Used to Make my Card:
Italian Paper
Vanilla Base Card
Ornamental Script Stamp from Penny Black, 3995F
Piece of Vellum
Piece of Mirror Gold Paper
Embossing Fluid
Vintage Gold Embossing Enamel from Globecraft & Piccolo
Krylon Gold Leafing Pen
2 Gold Brads
Sparkle Gold Tape from the Dollar Tree

You really need to click this!

While there are a lot of ingredients, this card was easy to make. First thing I did was match the gold in the Italian paper since that was my focal point.  I had also found this scrap of mirror gold cardstock (it was ALL the rage years ago) so I tossed that into the mix. The mirror gold caught the gold in the paper.    I took the vanilla base and outlined it with the Krylon Gold Leafing Pen and set it aside.  I then took the piece of vellum and stamped the Ornamental Script stamp on it in embossing fluid and embossed the saying in Vintage Gold Embossing Enamel. 
The embossed sentiment, attached to mirror gold card
I trimmed the sentiment to sit on the mirror gold cardstock and I used 2 gold brads to hold it in place.  Nice, but it needed a bit more pizazz.  So I used a piece of the Sparkle Gold tape at the very top.  Easy!!

Another view - complete with cat hair!
I have a few more cards to share with you so I'll be back soon.  I also want to wish you and yours a FANTASTIC Holiday Season! Thank you for taking the time out of your schedule to pop by and read my blog - without all of your comments & encouragement this blog wouldn't exist! Blessings ~ Christi

I would like to enter my card in the following challenges:
Simon Says Stamp - Wednesday Challenge - Winter Inspiration 
Crafty Card Maker - #129, Christmas
Cute Card Thursday - #352, Add Some Sparkle
Red Rubber Inspirational - #151, Christmas Cheer
Creative Inspirations - #294, Christmas/New Year
Penny Black & More - December Challenge, Special Occasions

Monday, September 29, 2014

Autumn or Spring Seasonal Colors at Craft-Room Challenges!

For this fortnight the challenge at Craft-Room Challenges is to use the seasonal colors of Autumn or Spring.  Zoe has provided us with some beautiful inspirational color pallets to use: 
Spring Colors

Autumn Colors
Autumn Card on the left, Spring on the right

In response to this challenge I made 2 cards because I could not decide what colors to use.   First I am going to show you my spring watercolor card.


This is what I used to Make my Spring Watercolor Card:
White Card Base
Penny Black wood mounted rubber stamp, "Rhyme", #2959K
Distress Markers in Dusty Concord,  Faded Jeans and Seedless Preserves
Distress Ink in Milled Lavender
Watercolor paper
Spritzer filled with Water
Remnant Rub, Life Quotes, "hello friend"
Blue & Purple Cardstock
Stipple Brush

No pictures of the process today because it is SO easy.  First you want to pick out a rubber stamp that isn't intricate - the more "block style" the design is the better this will work.  Scribble your markers directly onto the stamp (have your watercolor paper ready and have enough to make at least 2 prints) then lightly spritz the colored stamp with water.  Flip the stamp over quickly (try not to muddy the colors) and stamp and stamp again.  The beauty of this technique is you get a different result each time you use it and it's fun!  I took one of the images I made and trimmed it down, trimmer the blue & purple cardstock to layer the image and then used a Tim Holtz Remnant Rub that says "hello friend" down on the lower corner.  After the card was assembled I felt the white watercolor paper was a bit stark, so I stippled it with Milled Lavender - I think it warmed the card up a bit.


For my Autumn Colors card this is what I used:
Tim Holtz Dried Flower Stamp from Flights of Fancy Set, 
Cream (vanilla) Cardstock
Ranger Adirondack Ink in Caramel, Currant, Terra Cotta & Pesto
Clear fine (detail) Embossing Powder
Ranger Archival Ink in Jet Black
Small Alphabet (sorry I don't who made it)
Distress Ink in Brushed Corduroy 

Embossing Close up
I used a piece of cream cardstock, stamped the Dried Flower in Caramel first and embossed it with the clear powder, the ink is wet so you don't need embossing fluid. Completed the same steps using the Currant, Terra Cotta & Pesto inks.  I stamped thankful, not really worrying about if they were straight. as long as I could tell all the letters were in the same word it worked for me, on a scrap of cream using the Jet Black ink.  I edged the saying with Brushed Corduroy to make it pop a bit.  Glued the Dried Flower quartet onto a moss green card I had then glued the sentiment onto the corner. 

I have to share a short story with you.  I moved a few years back and ended up living in a one room apartment once I got to Colorado.  There was absolutely NO room for any craft stuff.  So my stuff sat in storage for almost 9 months.  Lots of it dried out, but the Adirondack pads stayed juicy.  I did not have to reink a single one!  I find that amazing! Keep in mind, these ink pads are about 13 years old - I got them when I first began stamping - so it wasn't as if they'd never been opened. 


I am trying to get a little clean and simple - I hope you think these cards fit the criteria!  Hope you enjoyed checking out my latest post and you still have 2 weeks to enter the Craft-Room Challenge!  Thank you ~ Christi

I would like to enter my Autumn Colors card in the following challenges:
Again, here is my Autumn Colors Card - the challenges I am entering with my Spring Watercolor Card will follow:
Little Red Wagon - #256, Anything Fall Themed
Red Rubber Inspirationals -  #139, Stay Focused on Stamping, Anything Goes
Addicted to Stamps & More - #114, CAS
Wednesday's Creative Inspirations - #282, Autumn Colors
The House That Stamps Built -  Repeat Impressions DCC924 ~ Fall

Now I would like to enter my Spring Watercolor card in the following challenges:
Treasured Times Rubber Stamp Challenge - #25, Anything Goes
Sister Act Card Challenge - #76, Anything Goes
 Addicted to Stamps & More - #114, CAS

~ Thank you for stopping by!! ~

Sunday, September 21, 2014

Steampunk Sweetheart for Anything But A Card #39


** This post is full of photos so it may take a bit to load - you should be able to click a photo to see it larger if you'd like, please let me know if you have trouble with this ~ thank you :) 

The whole set
I have had the stamp set I used as a base for this project for years and it turned into one of those sets that you adore, but can't bring yourself to actually use, until that one project comes along and BAM! This entire project was literally built around one stamp from a set called French Laundry #11.  I remember seeing an ad for the sets in a stamping publication and I immediately went to the web site called Character Constructions, made by the talented Catherine Moore, and drooled at them all (and now she even has custom dies to coordinate with some of the sets!).  I don’t remember why I chose this particular set but I have been wanting to use her for the longest time and this seemed like the perfect opportunity to get her inked. I introduce my Steampunk Sweetheart for challenge #39 at Anything But A Card:
My Steampunk Sweetheart
What I Used in My Project:
9 x 12 piece of frame board
Tea Dyed Coffee Filters (I dyed about 8, I think I used 5 or 6)
Tim Holtz Idea-ology File Tabs w/ gear sticker (on her hat)
Tim Holtz Grungeboard Wings (mine are embossed with the Harlequin design)
Tim Holtz Grungeboard Letters Mixed Minis
Darice Gears Embossing Folder
Brown “velvet” Paper
Brown Cardstock Scrap
Corset Card Cutfile
Silhouette Cameo
White Cardstock
Ranger Archival Ink in Jet Black
Distress Ink in Brushed Corduroy
Distress Paint in Gathered Twigs
Krylon Leafing Pen in Red Shimmer
Butterfly Sticker (stash)
Gesso
Stampin’ Up! Paper for Background (discontinued)
Star Punches (various sizes)
Scraps of Metallic Papers
Stickles in Star Dust
Miscellaneous Embellishments
Crafters’ Pick The Ultimate Glue

First thing I did was dye the coffee filters (the round ones) in tea for 2 full days and dried them.  I have wanted to make a frilly something out of coffee filters ever since I saw some demos online about coffee filter flowers and I felt they’d make a wonderful skirt.  I stamped the woman from the French Laundry #11 set using the Jet Black ink and fussy cut her out, leaving her arms separate.
  I set her and the skirt aside and gessoed the wings.  I was hoping to obscure some of the Harlequin pattern that was embossed in them already; it worked a bit and set the stage for using the gears embossing folder.  A tip: I have a Sizzix Big Shot and I found that the wings (and I figure all Grungeboard) is too thick to run through the machine the way you are supposed to when using an embossing folder, but I found that when I used the 2 clear cutting plates with the thick platform (I think it is called the Universal Platform?), but without the shim, it worked fine.  Took a bit of muscle, but nothing broke. So I ran the wings through and then lightly swept the Distress Ink Pad in Brushed Corduroy on the top and sides just to pop out the gear embossing a bit more.  I covered my board with the decorative paper from Stampin’ Up! like I was wrapping a gift so I wouldn’t have to fuss with trying to cut the paper and then glue it perfectly. 

I knew I wanted my Steampunk Sweetheart to have a corset.  I have a few corset stamps, but none of them fit her the way I wanted, so I went to my Silhouette Cameo and found a corset card.  I choose what pieces of the card I wanted to use and I cut the outer layer using some old brown “velvet” paper I had as well as some brown fiber as the lace up. I also cut out one under layer using white cardstock and that just peeks out the very top of her corset.  The corset it a bit big for her but I think it flows nicely with the skirt.  Her boots are just hand cut. 

I tackled the lettering next.  I used Grungeboard Mixed Mini letters and I painted them all using Distress Paint in Gathered Twigs, I painted all the letters twice to ensure really good coverage.  I liked the matte color of the paint, but I also wanted to jazz the letters up just a bit so I took my seldom used Krylon Leaf Pen in Red Simmer and outlined the letters with that.  Now previous experience has taught me that Grungeboard is flexible, so I knew I’d make some “mistakes” while outlining the letters but that is precisely what I wanted.  I wanted some of the shimmer to show on the top of the letters but I didn’t want it to be overwhelming.  It was nice not having to be careful when doing the outline, especially since I had to make the pen really juicy so the ink would flow into parts of the letters the nib couldn’t reach.


Finally she was ready to be put together.  I wasn’t exactly positive how I was going to pose her, so I attached her arms with 2 small black brads I had.  The arm holding the clock is stationary, but her right arm does move. I hand cut her top hat and attached the Idea-ology File Tab with the gear in it onto her hat.  I colored the cat eye glasses silver with another Krylon Leafing Pen, took some loose gears and attached them to her wings.  I crumpled up the tea dyed coffee filters and arranged them to appear like a layered skirt. 

I attached the body to the skirt, the corset over the skirt and body, glued the wings to the back of that and finished up with all the embellishments, which included stars punched out of various metallic papers and coated with Stickles placed randomly about (oh and I glued her boots to her skirt).  I held her in place with temporary tape and glued all the letters in place, attaching her last. 

Head Shot
And there you have it – my Steampunk Sweetheart wall hanging.  I worked on her for quite a while, once
my initial idea started to become a reality, in between other projects and it was SO much fun! I have admired Steampunk at since it burst on the scene and it was a pleasure to create something I feel is worthy of being called Steampunk.  I hope you enjoyed my long tutorial and perhaps gained a bit of inspiration to get your own Steampunk creation and enter at Anything But A Card ~ Christi

Another View

I would like to enter my Steampunk Sweetheart in the following challenges:
Divas By Design - Anything But a Card
Stamping Sensations - September Challenge, Things with Wings
Inky Chicks - #38, Anything Goes
Ruby's Rainbow - #88, Anything Goes
Papertake Weekly  - Punch it Out (used star punches)