Followers

Showing posts with label Tim Holtz. Show all posts

Saturday, October 29, 2022

Cat Lovers Blog Hop Day 6 - Last day to enter!

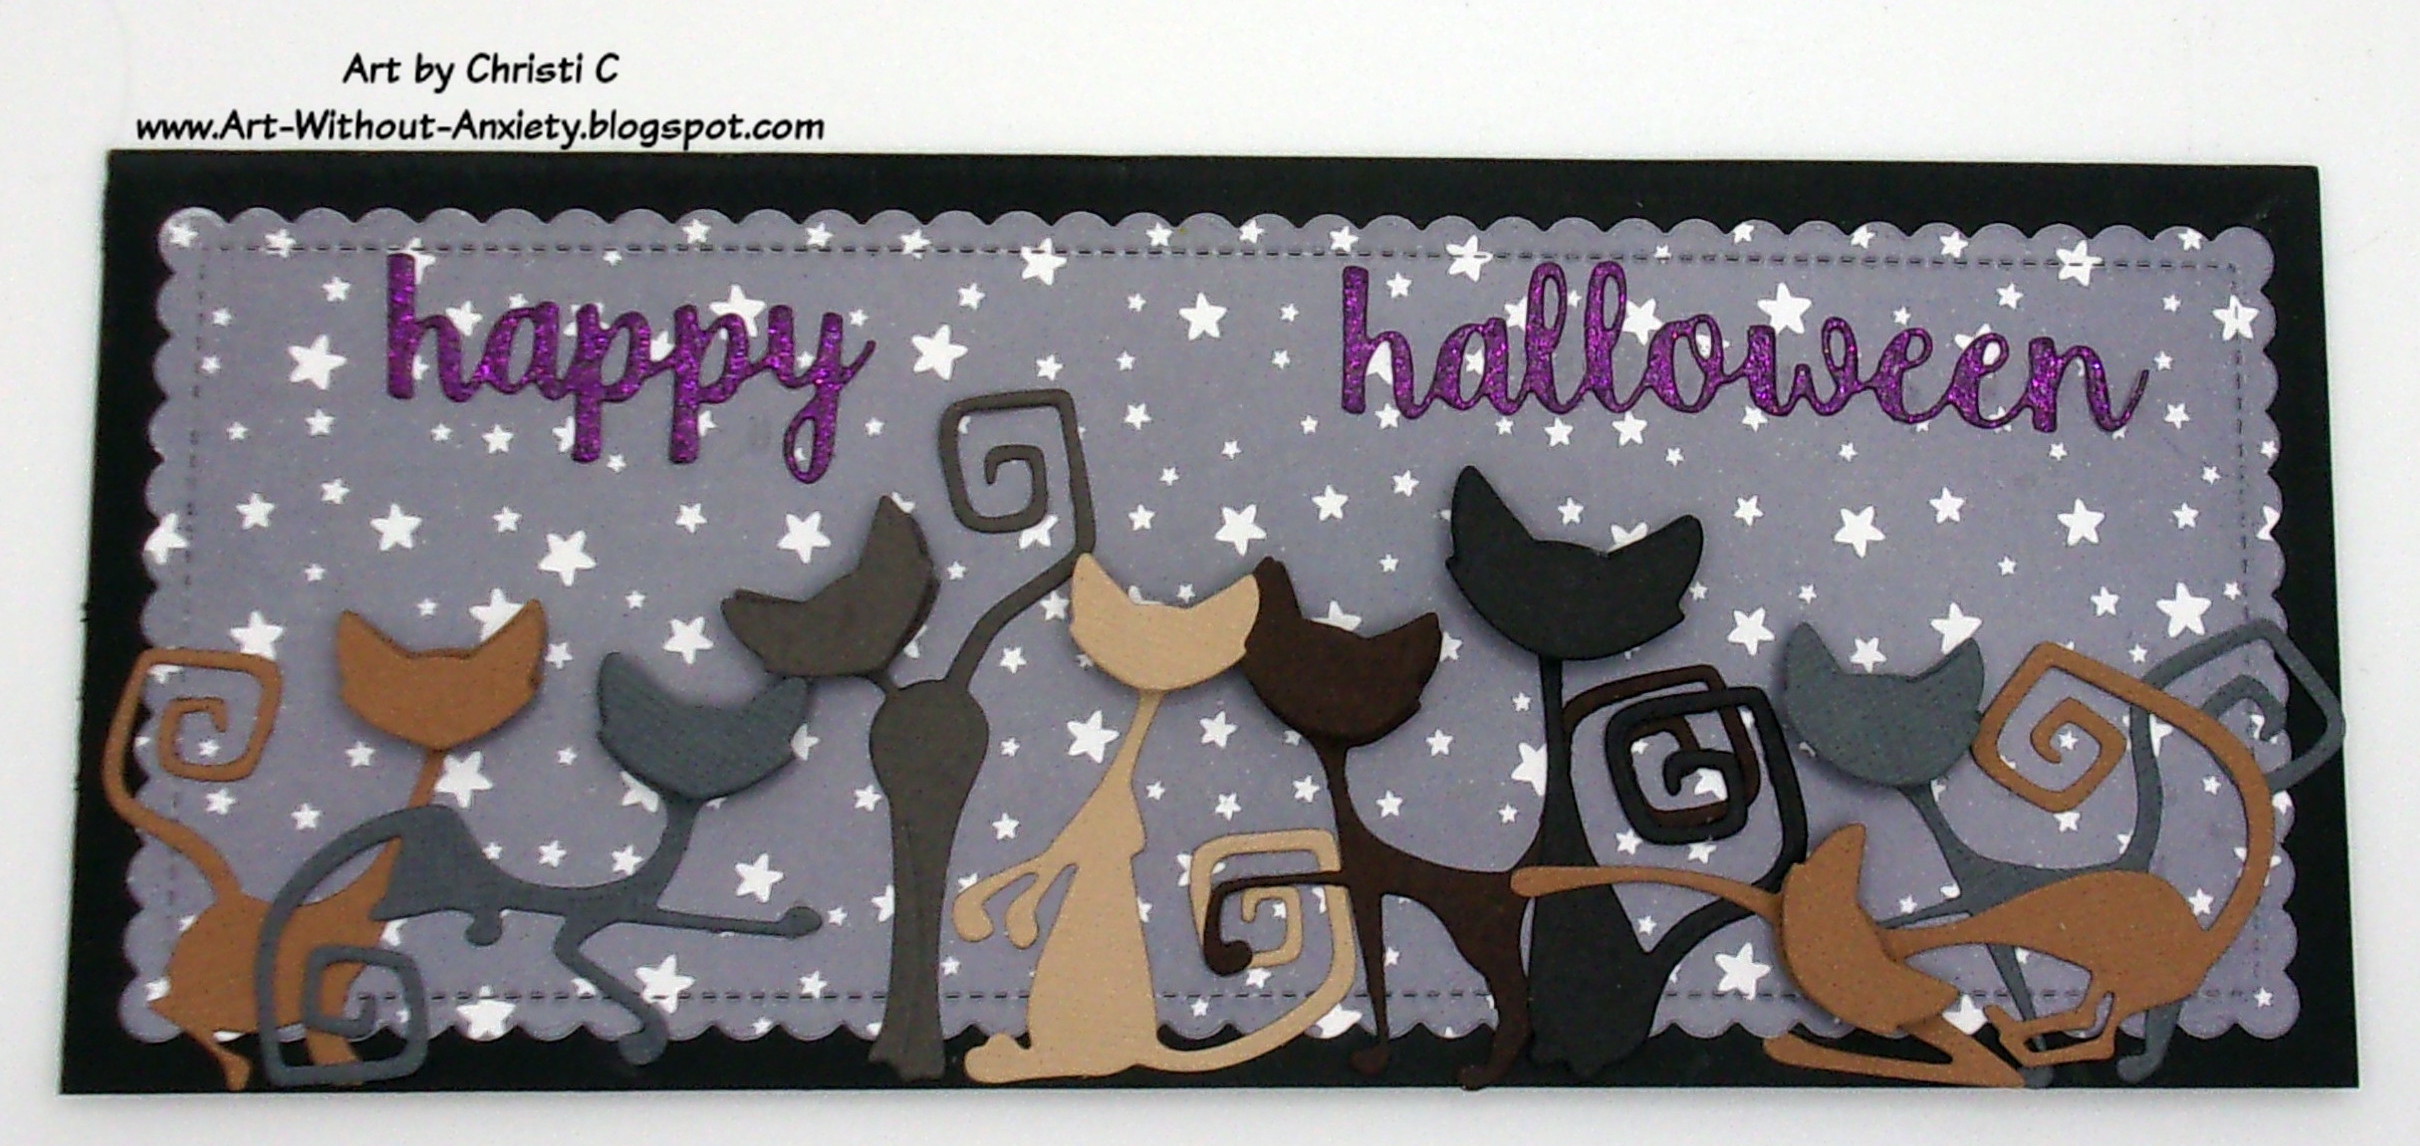
 Yes, another Happy Halloween cat card for the Cat Lovers Blog Hop, Day 6!!

This is going to be a quick post as I am VERY late getting my card up for this last day to enter (I'm shocked! No, not really) and I need to get cracking on the comments! So I used a white slimline card base, covered it with black card and cut out the grey star paper with the scalloped frame die from this Lawn Fawn set.  The kitties are all from the newest Tim Holtz Mischievous Die set, I cut them all out and then popped on the extra faces so all of their heads are on black foam tape.  The colors don't match my cats, but there are eight die cut cats, one for each of my own (yes, I have 8 cats).  Then to add a bit of color I used dark purple glitter card for the sentiment which is from Elizabeth Designs Words 3 (sadly, discontinued, but it is available on Amazon).  I used nothing but scrap card to make the kitties, it is a great way to use it up!


Thank you so much for visiting and hopping - I appreciate any followers on any of my social media (I've got them all linked on the sidebar) and if you do decide to follow me, please let me know! Fondly, Christi 

I am entering my card in the following challenges:
Cat Lovers Blog Hop ~ Day 6
Allsorts, #700 - Any Celebration
Sisterhood of Snarky Stampers, #221 - H is for Halloween
Sweet Stampin' - Colors of Halloween
Happy Little Stampers - Anything Goes with Dies
Lost Coast, #154 - Cats and/or Dogs
CRAFT Challenge, #656 - Halloween
Through the Purple Haze, #197 - Halloween and/or Color Palette


Tuesday, October 25, 2022

You're the Cat's Meow - Cat Lovers Blog Hop DAY 2

And for Day 2 for the Cat Lovers Blog Hop - this is one of my favorite events ever and I hope you support the hop and ALL the generous sponsors :)

 I made this card to have on hand if I just wanted to send a cute little note to let someone know I am thinking of them. Honestly, I needed to use these kitties - I got the stamps & dies a bit ago and they have been sitting on my desk, meowing at me. I have a boat load of cards I've made and never sent out, so I don't know who I think I am kidding!


 I stamped the cats, and their toys,  on watercolor paper, using my favorite black ink, then colored and cut them out using Avery Elle's Whiskers Stamps and Dies.  I blended a bit of Distress Ink Spun Sugar  onto the white card base to give a bit of grounding for the kitties.  I stamped the sentiment {from the same stamp set} onto some white card and used Die-Namics Fishtail Sentiment Strips to cut it out.  I glued the cats, their toys and the sentiment onto the card and to add a bit more interest I cut some hearts using Lawn Fawn's Long Distance Hugs die set out of some paper I had made using Distress Oxide inks Spun Sugar

I love the way the kitties came out! Thanks for stopping by! Christi and have fun hopping!!

I am entering my card in the following challenges:
Through the Craft Room Door - Anything Goes
The Cutie Pie Challenge - Think Pink
Creative Fingers Challenge - Anything Goes
Critter Crazy Challenges - Anything Goes w/ a Critter


Saturday, June 4, 2022

Time Project for River of Creativity's June Theme

Hi all!! I am here presenting my design team project for River of Creativity's June Challenge where the theme is Time; I'd advise you to get a nice drink and relax because this is picture heavy and there are a lot of great things to see! Now, I could have done the whole clock thing, or even a birthday thing {after all, when does time bite you in the butt the worst?} but I really wanted to get messy and have fun.  I am a night creature; some people get their second wind at a nice normal time, say 5ish, or even 7ish but me? Nope.  If I am not in bed by 9pm, my second wind comes around at 10 pm.  In fact, I am typing this post at 12:30 a.m.  So, for my June piece I've turned Time into Nighttime.  Clever if I do say so myself.  My mom can tell you stories of a young me fighting my bedtime {no matter when it was} as early as 3 years old when I told my mother I was not yawning because I was tired, I was yawning because my brain needed more air.  I was such a joy, but I digress.  My hope for this project was that you'd see something new each time you looked at the panel; let me know what you think! 

Before you start I wanted to let you know you can click on the photos to make them bigger; I made collages out of what I feel are the important details so you wouldn't have 10 or so pictures to look through.  If there is any problem with getting the pictures bigger, please let me know!


I have been making this panel for the last few months as it has paper clay pieces and I needed to get molds and the actual clay to get the forms I wanted.  I used DAS Paper Clay which is available at any local craft store or online and made the moon and the stars.  I used a panel that is 9" x 12" from Artists Loft, but any panel or canvas would do. I also accumulated a bunch of molds from Amazon because they
have such a selection, and you know that Prime shipping is addicting!  Some of the molds I got were too small, some just didn't fit the look I wanted, and I ended up using a simple Moon and Stars mold to make the paper clay pieces.  I also got some keys, gears and clock metal bits and now I have enough to make a gazillion projects. Other supplies I used included Stickles in Crystal, Tim Holtz Foundry Wax {all the colors, I even layered them}, Picket Fence Gem Mixes, no name gems from my sash,
 Cosmic Shimmer Glitter Jewels in Midnight Snow, Krylon Leafing Pen in Silver, Golden Gel Medium in soft gloss, Lumiere Paint in Silver as well as beads and the like.  I think the most important part is the background and I first painted my panel with Golden Black Acrylic Paint and once that was dry I used some Distress Oxide Ink Pads {I just smooshed them onto the panel} and Sprays in various blue and purple hues, sprayed water here and there, dried with my heat gun, added more ink, more water and so on.  The shimmer was created by using Distress Mica Spray in Crooked Broomstick {it was a Halloween release from Ranger, but you can still find it online} and any Mica Spray would work. 


I fiddled with the background until I liked it and then set it to dry for actually a few days.  Once it was dry, I had painted, inked and waxed the items I wanted to and set about the placement as well as the swoosh of clear glass beads {the tiny kind with no holes} glitter and gem placement.  I wasn't concerned with placing too many gems as I really wanted this to sparkle being the night sky.  I could probably have added many more gems, but I was struggling with glue sticking to the paint and ink on the background.  I initially used hot glue, but after Sylvester knocked it off my desk and most of the gears and metal came off, I switched to E6000.  I'm not a huge fan of either glue but the E6000 worked much better than the hot glue.  Now I know and you know, too, so pry the top off your E6000 if you are gluing onto paints and/or inks.  I've linked to most of the items that were easily found online, and it there is something you want the specifics on please use the email option on the right side; I'll happily supply you with the actual links to the items.  


Another Look at the Entire Panel

 I am happy with my Nighttime art, and I had SO much fun making it.  It's been a long time since I have made such a piece, running with abandon with colors and paints and inks and goodies.  But that is what the River of Creativity challenges are all about! We would love for you to join us, either using Anything Goes or the theme of Time, for our June challenge; the only thing we won't accept is cards. So, get your inks, paints, clay and molds out and have some fun! Hope to see you soon! Christi

 I am entering my piece into the following challenges:
We Love to Create - Anything Goes
Creative Fingers - Anything Goes
Creative Artiste, #83 - Anything Mixed Media Goes
Mixed Media Lovers, #14 - Anything Mixed Media Goes
Country View Challenge, June Challenge - Seeing Stars

Thanks!!
Saturday, October 30, 2021

Have a Spooktacular Day!

** Looking for the Cat Lovers Blog Hop Day 6 post?? Where I have a GIVEAWAY going on?? Well, it's right here :)

I have colored and cut out so many sets of these adorable little houses, ghosts, and bats from this Lawn Fawn set I wouldn't be surprised if they end up popping up on all sorts of cards.  I think I colored and cut out an entire town! I love having extra pieces ready to go in case I get an idea to make a card, or have to make one quickly.  Do you stamp, color & cut out more than you need for a project? Please let me know I am not the only one!  Please enjoy my spooky little scene:


What I Used to Make my Card:
Brown Card Base 
Watercolor Paper {I use this} 
Embossing Ink
Tim Holtz/Ranger Oxide Inks Pre-made Sky Background
 
Like I said, I must have stamped, colored, and cut at least 6 neighborhoods of these adorable houses! I chose this group as they are kind of spooky to me since I used grey and brown to color the houses.  I also stamped and cut some ghosts, bats, a few trick or treaters, and that adorable little pumpkin patch.  The sky had been done and was in my stash; I have been working for a while now to get a really spooky sky and I love this one!  I cut the hillside out of a brown slightly darker than the card base to offer some interest, then attached everything you see.  Since I gained some confidence with stamping directly on the cards I am making, I did it again with this sentiment.

This was the first card I'd made with this set {yes, I have had it since it's release} and it was so fun! I'm not sure how I missed posting this last year but I found it in my drafts {yes, from LAST year - hiding out in my drafts!!}, so here it is. I hope you are finding some crafty time, I know for me if it wasn't for this hobby I would of gone mad ages ago! I have to admit, the last year or so hasn't been that much different for me except I don't have to make an excuse to stay home and craft :) Thanks so much for stopping by and please stay safe!  Christi

I am entering my card in the following challenges:
Global Design Project, #315 - Theme Challenge {Pumpkins/Halloween}
Make My Monday, #160 - (e)scape it {landscape}
CCEE Stampers, #2143 - Create a Scene
Little Red Wagon, #625 - Outside
Crafty Gals Corner, #224 - Halloween Colors
Inspired By, #193 - Friends "fall" Together {actually inspired by the title of the challenge!}
Alphabet Challenge - O is for Outdoors
The Card Concept, #162 - Fall Fun {inspired by the cozy closeness - like a bunch of neighborhood kids getting back from trick or treating and hanging out drinking hot cocoa while the adults have some cider!

Inspiration Station, #16 - Inspired by the photo as it looks like a community pumpkin patch, and my scene card is a neighborhood - so I can imagine all the neighbors going to that patch and buying pumpkins all together :)

Inspiration Station's Photo:


CLBH A Nervous Halloween Kitty {DAY 6} and a GIVEAWAY

UPDATE: Winner chosen!!!

Another fun Halloween card for the Cat Lovers Blog Hop!!! Today is the LAST day to enter, but you still have a few days to show all the entrants & sponsors some love! I love the holiday SO much I truly think we should make it last longer. . .  How about 2 months of Halloween? Maybe 6? Too much? 


I have to admit I have been longing for all the sets of snarky cats that Tim Holtz put out, but I wanted the matching dies. Now I can't find the dies for any of the sets and it seems he may be getting ready to discontinue the lot of them so I gave up.  I was happy to have found this little combo which includes these stamps and a stencil which was much more inexpensive than the set so I scooped it up.  I also found one for birthdays and I am sure that will be making it's debut soon.  On a piece of water color paper I stamped the cat, the bat and the two sentiments.  I colored in the cat and pumpkin with my Zigs then layered the panel onto the patterned paper that I had already attached to the white card base.  I love the look on the cat's face!

Now the Cat Lovers Blog Hop has a HUGE amount of prizes to be won; and a bunch of ways you can win them - so I urge you to go and check it out :)  Thanks SO much for stopping by ~ hugs! Christi 


PS: I have a little prize to give away to all the Cat Lovers Blog Hop folks who comment on this post & follow me {to be eligible PLEASE put CLBH in your comment, as well as what social media platform you follow me on}  You can find all my social media links here, so please choose one or all of them : ) So sorry but due to outrageous postal costs, USA entrants only for the prize, but I will have a $10 GC for folks out of the USA. Closes November 2 and I will choose the winner November 5, 2012.  Feel free to share!!! 

Entering my card in the following challenges:
Cat Lovers Blog Hop ~ DAY 6
The House that Stamps Built, #2721 - LOL, Funny, Snarky
Simon Says Stamp Wednesday Challenge - Anything Goes (entry 3)
Modsquad Challenge - Halloween
Cardz TV, #152 - Anything Goes
Art Impressions - Feline Crazy (entry 2)
Daring Cardmakers - Halloween Inspired (entry 2)
Allsorts Challenge, #648 - Add a Sentiment


Tuesday, October 26, 2021

CLBH Hot Flash {DAY 2}

Hello!! Welcome to my blog and one of the cards I have made for the Cat Lovers Blog Hop! I've had this stamp since Rabbit Hole Designs was a brand new company; at the time they didn't have the matching die so I filed it away and actually forgot about it until I reorganized all my stamps & dies and found it! I promptly went and bought the matching die because I HATE fussy cutting. This is the first card I've made a card with the set and I think the card came out nicely {and the sentiment - well, let's just say I can relate}!


I stamped my image on watercolor paper, using the Caffeinated Cat stamp, colored it in with Zigs, then cut it out using the coordinating die.  I made a background using the Sizzix/Tim Holtz On the Go embossing folder {#660248 - retired} and brown paper and attached that to the white card base.  For the sentiment I used one from Funny Bones {Riley & Company}, then cut it out with a stitched square die.  I adhered the sentiment to the embossed background, then used dimensional dots to attach the cat.  

Thanks for stopping by :) Christi

I am entering my Coffee Loving Cat Card in the following challenges:

Cat Lovers Blog Hop - Day 2
NBUS - Anything New Goes {entry #2}
Friendship Challenge, #70 - Pets
Happy Little Stampers - Anything Goes w/ Die Cuts
Die Cut Divas - Anything Goes w/Die Cuts {entry 2}
SUYP, #71 - Anything Goes


Sunday, August 22, 2021

A World of Thanks for River of Creativity Challenge One Earth

 Hi everyone! Now, I have to admit, this months theme at River of Creativity had me stumped.  I wanted to make some sort of ecological statement with my card, the subject being One Earth; I could not think of a good way to convey my message.  I literally lost sleep over it! But once I started looking through my stamps and dies I realized card making is supposed to be fun and I ended up making a few cards for this challenge! I see a definite correlation between struggling with the challenges and then once I get started, making cards like crazy! Here is my second card:


What I Used to Make my Card:
Square Card Base
Trinity Stamps Hopeful Flower Stamps and Dies (retired - this set would work as well)
Tim Holtz/Sizzix Globe, Mini, #661598
Watercolor Paper {I use 
this}
Zig 
Clean Color Brush Markers
Gina K Amalgam Ink Pad in Obsidian Ink

Distress Ink in Blueprint Sketch
KaiserCraft 6.5" x 6.5" Wandering Ivy Paper Pad (retired but available)
WOW! Embossing Powder, Hologram Sparkle
Concord & 9th Globe Greetings Stamp Set (retired but available)
Vellum
Simon Says Stamp Embossing Ink

I started this card by stamping, coloring and die cutting the flowers.  I wasn't really sure at this point how I was going to use them, but I recently found them again {from 2018 - it pays to do a little cleaning out of your art supplies every once in a while!} and really wanted to use them.  I knew I also wanted to include the globe die; so I went through my paper stash and picked out a paper that is lightly embossed with green leaves and cut the globe out of that.  I attached the globe to the center of the square card and arranged the flowers around it.  The sentiment is embossed on vellum, carefully attached so there is no visible adhesive and the card was done! All that worry and concern about the subject of the challenge for nothing as every challenge at River of Creativity is YOUR interpretation of the challenge.  And since we welcome all type of crafts it really isn't as nearly complicated as I had made it.  Sometimes we are our own worst enemies!   

I hope you stop by to see my other creations as well as my very talented teammates. And if one of the examples sparks your creativity, we'd love to see you enter! We are on Twitter, Instagram and of course, here on Blogger.  In order to make it easier for us to find you please tag your entry with this tag #ROConeearth04.  Thanks so much for stopping by! Hugs, Christi

I am entering my World of Thanks card in the following challenges:
Crafting Happiness, #110 - Anything Goes
Pammie's Inky Pinkies, #2134 - Anything Goes
Allsorts, #637/8 - Add Some Sparkle
Cut it Up, #232 - Space
Cardz for Galz - Texture
Mod Squad Challenge - Thanks
Simon Says Stamp Wednesday Challenge - Add a Sentiment
Die Cut Divas - Watercoloring & Die Cut