Followers

Showing posts with label Patterned Paper. Show all posts

Wednesday, May 25, 2022

You're My Kind of Peep

 My friend Tom absolutely loves Peeps.  He's never met a Peep he didn't like; in fact, the more sugary and weird the flavor was, the more he loves them.  One year we found fruit punch flavored Peeps but have not been able to find them again.  I hate it when that happens; you find something you love and they either discontinue it or stop carrying it.  That happens to me ALL the time.  Anyway, I thought this slimline card with some pastel Peeps might brighten his day a bit.


I used a homemade white slimline card and covered it in rainbow spotted paper.  I stamped the sentiment using my favorite black ink on watercolor paper and colored it in with Zigs and used a black marker for the shadow.  I then cut the sentiment out using a stitched nesting square die.  Cutting out all the bunnies in shades of pastels really isn't manly, but I wanted to keep the spring feel.  Their tails were just die cut out of white card.  Lastly, I then used dimensional dots to attach the rabbits to the card and glued the sentiment onto the top of the card.  Unfortunately, the stamps & dies {Simon Says Stamp, You're My Kind of Peep} are discontinued, but you might be able to find them online somewhere. I was lucky enough to find them in one of the Facebook Groups I belong to and it's the first time I am using them :)

I love these cute peeps and I feel the card is so charming! I hope this card brings Tom some joy and the very cool part is I am going to visit him {I am leaving on 5/29/22} so I will be hand delivering this card; I am SO excited! I thank you for visiting and appreciate you! Fondly, Christi

I am entering my card in the following challenges:
Simon Says Stamp Wednesday Challenge - Anything Goes
Shopping our Stash, #471 - Make Mine a Tall One {slimline or mini slimline}
Alphabet Challenge Blog - D is for Die Cuts
Crafty Hazelnut's Patterned Paper Challenge - Anything Goes/Use Patterned Paper
The Diva's That Cut - Anything Goes
NBUS, #38 - Anything NEW Goes


Wednesday, February 16, 2022

Hearts and Kitties

 Hi all!! I've made this cute Valentine's {even though you could give it any time of year; I was careful not to add any specific Valentines sentiments} card using Lawn Fawn stamps and dies; some older and newer sets.  I hope you like it!


I started the card by cutting out the slimline panel using the Scalloped Slimline with Hearts, landscape out of dark pink paper, then I used the larger die and cut it out of lighter pink paper.  I also covered a white slimline card using a page from the Watercolor Wishes Rainbow paper pack.  Next, I stamped the curved hearts, from the Scent with Love stamps on watercolor paper, colored the with my Zigs and cut them with their coordinating dies.  I put them around the heart openings.  The kitties, from the Meow You Doin' stamps & dies, were already colored, cut and in my stash {I always have extra cats in my stash}.  I tucked the cats into the heart openings and put a few paper hearts cut from small hearts that are included with many of the Lawn Fawn sets {I can't recall what set I used, honestly, I have a bunch of them on my desk}.  I attached the hearts panel onto the pink scalloped paper, then used dimensional foam tape to pop it up onto the slimline card.  Lastly, I had stamped a few of the small sentiments from the Special Delivery set as well as the Scent with Love set.  I trimmed them down and added them inside the hearts.  Finally a few sequins were added and I was done.  

I had all these sets on my desk as I was to take a class {Love Letters} with the fantastic Jenn Shurkus; the class was originally on for he 5th of February, but they were getting a huge snow storm on the cape, so it was postponed to February 12. I decided to bite the bullet and order the copics she used in class, figuring I'd have them for the February 12th class, but the copics I had ordered never made it to my house, a case of "we delivered them" but *I* don't have them.  So, I am waiting for their delivery and hopefully I will be able to make the cards from the class and share them; thankfully Jenn allows you to access the class tape online along with your class fee so I can go back and take the class when the markers get here.  Ever notice that the more you want something the harder it is to get?  SO TRUE.  Also, the carriers have begun to take SO long to deliver items, not just one of them, all of them, things are taking 2 to 3 weeks that used to take a few days.  I am the type who wants their stuff before I order it and it's frustrating to no end.  But, it is what it is!  I hope you enjoyed my card, and I appreciate you listening to my little saga, and I thank you for stopping by!! Fondly, Christi

I am entering my card in the following challenges:
Simon Says Stamp Wednesday Challenge - Slimline Cards
The Funkie Junkie - Funkie Frilly Valentines
Sweet Stampers, #65 - Furry Friends
Dies R Us, #187 - Love & Hearts
A Place to Start, #202202 - Anything Goes, Twist: Include a Critter
SUYP, #75 - Anything Goes w/ Cats
Happy Little Stampers - Anything Goes With Dies


Double D - Shades of Pink


Sunday, October 31, 2021

Lawn Fawn Trick or Treat HAPPY HALLOWEEN!!!

~*~* HAPPY HALLOWEEN~*~   


Hey! Thanks for stopping by! I made this card out of some old and new Lawn fawn stamp and die sets; it's so much easier to justify purchasing something when you can mix and match it with items you already have {or, plan on buying!}.  


I have so much Halloween paper {well, truth be told I have so much paper, period} and I wanted to give these cute little guys a background so I used an older paper pad by American Crafts called Bootiful {retired but available}.  I stamped, colored and die cut the main images from the Spooktacular stamp & die set, cut the grid from the Peekaboo Backdrop die set out of Textured Dot Neutrals card stock and embellished using the cute little spider, ghost and bats from the Tiny Halloween Stamps and Dies that I had left over from another project. 
 

Again, this card is a bit cuter than my usual style, but I am finding it fun to use some colors in my work lately.  I've tried to figure out exactly what my "style" of creating is and I don't know.  Some artists I can recognize purely by looking at their work but I don't think that will ever be the case for me! I hope you and yours are doing well & hope to see you soon - Hugs! Christi

I am entering my Trick or Treat card in the following challenges:
Stamping Sensations - Animals, Birds & Bugs
Send a Smile 4 Kids - Holiday/Celebration for Kids
The Corrosive Challenge, #10 - Anything Goes
A Bit More Time to Craft, #146 - Anything Goes
Beyond the Blue, #39 - Happy Halloween


Friday, October 29, 2021

CLBH Life will be Purr-fect!! {DAY 5}

And yet another card for the Cat Lovers Blog Hop! As most of you know I adore cats and I seem to collect cat stamps almost as easily as I collect actual cats (truthfully, if I had as many real cats as I do cat themed stamp sets I'd go out of my mind - I honestly don't know how people with children get anything done! Between feeding, scooping, loving, breaking up spats, brushing and attempting to cut nails I can barely get anything done. Parents you have my utmost respect!) Anyway, I think these little cats from My Favorite Things are so cute and this card allows me to show them all off properly!


What I Used to Make my Card:
White Card Base
Blue Star Paper, Lucky Prints from MFT {retired}
MFT Mini Meows Stamps, #CS-533
MFT/Die-Namics Mini Meows Dies Set, #MFT-1905

Watercolor Paper {I use this}
Zig 
Clean Color Brush Markers
Gina K Amalgam Ink Pad in Obsidian Ink
Uniquely Creative 10 Window Frame Die, #UCD1764

I began this card by stamping, coloring and cutting out the cats.  I wanted the colors to be a bit muted, nothing that caused your eye to go to one particular cat so coloring them was quite easy and fast.  I set them aside to dry and cut out the 10 window frame using a retired patterned paper.  Positioning the sentiment in the very bottom of the card, in the largest window of the die, I stamped it directly onto the card base.  I attached the frame onto the card and filled in the other nine windows with the cats.

With all the nastiness floating around this card is perfect to send to someone you literally haven't seen and it shows you miss them.  At the same time, it's cute and hopefully will bring a smile to the face of the recipient.  I hope it brought a smile to your face, too!  Thanks for spending some of your time with me, stay safe and see you soon! Christi

I am entering my card into the following challenges:
Cat Lovers Blog Hop - Day 5
Art Impressions, #315 - Feline Crazy
Simon Says Stamp Wednesday Challenge - Anything Goes (entry 2)
Simon Says Stamp Monday Challenge - Thinking of You
Happy Little Stampers Dies Challenge - Anything Goes w/ Dies (entry 2)
Penny's Paper Crafty Challenge, #508 - Anything Goes


Monday, October 18, 2021

Oh Look! {WARNING Adult Humor}

 If you a regular reader of my blog, or a Facebook friend, you know I like some snarky stuff.  Well, a friend of mine knows how much I adore a bit of sass and she sent me a picture of this stamp set.  I loved it so much I HAD to buy it - I hope you get a laugh out of it; I sure did!


 WARNING: Adult Language to Follow - please do not continue if you are offended by naughty words!

 OK - if you haven't moved on by now you should be prepared for adult humor!

What I Used to Make my Card:
White Card Base
Whimsy Stamps, Meme Oh Look, #CWSD366
Patterned Paper from Authentique, DAME, 6" x 6" pad, #CDA011 {available}
Die-Namics Wonky Stitched Rectangle STAX

Watercolor Paper {I use this}
Zig 
Clean Color Brush Markers
Gina K Amalgam Ink Pad in Obsidian Ink

This was an easy card; what I did first was stamp the image directly onto some watercolor card, colored it with my Zigs then die cut it with the wonky rectangle die.  I wanted to make the card seem old fashioned so I picked a patterned paper that reminded me of the 1950's, trimmed it and attached that to the card base.  Finally I glued the image onto the card base and I was done! Judging from the number of people who commented on the stamp, and the others in Whimsy Stamps "Meme" collection I am not the only one who found the humor in this image!

I hope you like the card and got a chuckle out of it.  My biggest issue now is who do I send it to; and that's because I can think of SO many people who need this card! LOL Thanks for stopping by! Fondly, Christi 

I am entering my "Oh Look" card in the following challenges:
Sisterhood of Snarky Stampers, #196 - E is for Everything Pink {my cupcakes}
Crafty Hazelnut's Patterned Paper, - October Challenge
HLS Watercolor Challenge - October Challenge
Dragonfly Dreams - In the Pink {my cupcakes}
NBUS Challenge, #31 - October Challenge {3rd entry}


Tuesday, October 5, 2021

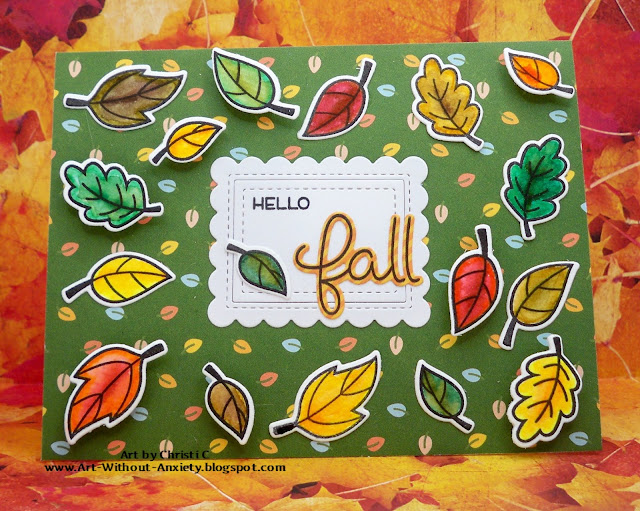
Hello Fall!

 Hi everyone! Well, fall is here, at least once the sun goes down.  The nights have actually gotten so chilly I have had to shut the window and put the heat on! I was inspired to make this card by the background paper that I got as a freebie from my most recent Lawn Fawn order {and where the leaves came from - a first time use from a new release!}; and then when I spied last week's Lawn Fawnatics challenge {it was #109 - Awesome Autumn} this cute card was born! While this isn't exactly a sky, I am entering my card in the most recent Lawn Fawnatics Challenge, #110 - Spectacular Skies - just pretend these leaves are swirling all about in the sky :)


I started with a white card, covered it with Fall Fling paper, then stamped, colored and cut out the leaves and the word fall.  I used the new Scripty Autumn Sentiments stamps and dies for the leaves and sentiment, framing the sentiment with Mini Picture Frame dies.  The frame dies actually cut out in 2 separate pieces, the frame and the middle - I just kept the die cut together {used a bit of tape on the back}, stamped hello and layered on the word fall.    Then I used dimensional dots for some of the leaves and scattered them all around the card without much thought.  Fall colors are one of my favorite themes because I love mixing all the colors; you really can't make a mistake blending with that color palette.  The cute frames are one of my first Lawn Fawn purchases but I don't think I've ever used them before! Well, they are out on my desk now which means I am sure you will be seeing them again soon.  

I am not sure if I like this new format of my blog; it does save me time, but I don't think it flows like my original style did.  I'm sure it will work itself out!  Thanks for taking the time to stop by & I hope you and yours are healthy and safe ~ Christi 

I am entering my card in the following challenges:
Lawn Fawnatics, #110 -Spectacular Skies
Try it on Tuesday - Autumn Blessings
NBUS - Challenge #31 {must use never before used stuff}
Die Cut Diva's - Anything Goes
Dies R Us, #178 - Anything Goes
Country View Challenges - Autumnal Colors
Crafty Hazelnut's Patterned Paper Challenge - Anything Goes using Patterned Paper
The Four Seasons Challenge - Anything Goes Fall
Sunday Stamps #267- Autumn Boldness {graphic below}
Pammie's Inky Pinky Challenges, #2140 - Anything Goes


Tuesday, August 3, 2021

Colorful Love Card

 I have SO many patterned paper pads; I buy them with good intention, but then they end up sitting in my stash, forgotten.  It was actually the background paper that inspired me to get a bit tropical for this card, I hope you like it!

What I Used to Make my Card:
White Card Base
Sue Wilson Caribbean Island Collection, St. Kitts, #CED5204
Impression Obsession Love Die, #DIE385B
KaiserCraft Fly Free 6.5" x 6.5" Paper Pad #PP975
Teal Blue Card

One of the best things about Sue Wilson dies is that you get so many options in one package! Using the St. Kitts die I started this card by cutting out the background in the patterned paper, then the outline in the teal blue, I continued with the patterned paper and then layered the teal blue onto that.  There is also

a pink paper in the paper pad that has epoxy detail and it since it's from the same pack, it matched the patterned paper so that is what I cut the sentiment out of.

You may not know that the Dies R Us challenge is always Anything Goes with a die that they carry - and they carry LOTS of dies so it should be easy to enter! All of the links are below so you can easily find the store and then the challenge! Thanks so much for stopping by! Christi


 For your convenience, all the important Dies R Us links are provided below.

 click below for:

STORE

CHALLENGE BLOG

FACEBOOK

INSPIRATION BLOG 

FRIENDS OF DIES R US PINTEREST PAGE

I am entering my card in the following challenges:
Crafting Happiness, #107 - Anything Goes
Pammie's Inky Pinkies, #2131 - Anything Goes
Get Creative Challenges, #104 - Anything Goes
Cardz for Gals, #152 - Use Dies and/or Punches
Little Red Wagon, #613 - Just Because!
Word Art Wednesday, #503-504 - Anything Goes


Sunday, May 9, 2021

Hugs and Houseplants

 Hi everyone!

If you read my other post about the card kit I purchased from My Favorite Things then feel free to jump right on to the main card making part of this post; if you haven't, go ahead, I'll wait here. Stamping was the first craft I felt I could actually do, meaning I could make things that I felt were good enough to share with other people. Since I started stamping I have branched out into so many other crafts, stamping is my gateway craft! So, to make a card with NO stamping at all is something I am trying. Of course, it is much easier with the amazing selection of dies that are available; including these cute stand alone houseplant dies!


What I Used to Make my Card:
Cream Card Base

Die-Namics Houseplants Die Set

Die-Namics Cats & Plant Perches Die Set

Die-Namics Sending You Hugs Die

My Favorite Things Wallpaper Patterns Paper Pad

Gold Shimmer Card

Various Colors of Brown Card

Various Colors of Green Card

Scraps of Card 

After I made my first card I was a houseplant making fool. I made so many of them I even had leftovers after using them to make two cards!  But it was SO fun to just cut everything out of greens and browns and then add a pop of color using nothing but scraps!  The only thing I
used a new piece of paper for was the "hugs" sentiment and that was due to the fact that the color I liked just hadn't been used yet!.

So this card is fairly easy to figure out but I can't do a blog post without telling you how I made it, so here goes!  I started with a cream card base, trimmed down a piece of patterned paper from the pad and adhered that to the card.  Then, once I found the color I liked for the sentiment, I cut that and a small perch from it. I saved the scrap from the sentiment and used it in my next card. I placed the sentiment onto the card, (yes, the G is a tad off but, like I always say because it is handmade it isn't supposed to be perfect) and glued it down.  I then proceeded to pick and choose from the plants I already had made which ones to include on this card.  Easy peasy! I wanted to make this card feel a little more masculine while still using a heart felt sentiment and I think I made that happen!

I hope you like the card as much as I do! It reminds me that I truly don't have a style that I stick to when I am creating; I just go where the muse takes me!  

Thanks!
Christi

I am entering my Hugs and Houseplants card in the following challenges:
Creative Fingers Challenge Blog, #207 - Anything Goes
Cardz TV, #140 - Anything Goes
Just Us Girls, #583 - Layers
LTSCB, #145 - Anything Goes
LTCCB, #58 - Anything Goes
Through the Craft Room Door - Anything Goes
Happy Little Stampers - Anything Goes with Dies
Classic Design Challenge Blog - Anything Goes
Word Art Wednesday - Anything Goes

Monday, April 19, 2021

Cats & Houseplants!!

Hey everyone!

Finally had some time to sit down and make something! I'll tell you, I always knew that crafting had a calming effect on me but until I couldn't do any of it did I realize how much more it does for my mental health! Boy am I crabby when I can't play with some paper, stamps, dies and markers! I tried to keep it inside since I had a house guest and I didn't want him to feel uncomfortable, but it was not pretty.  But, take a breath, because all is calm and I have my room to myself again.  I am still no where near settled in, but I see the light at the end of the tunnel.  I was lucky enough to get my taxes and stimulus money in the same week and I went shopping! One of the items I bought was the My Favorite Things Cats and Houseplants kit {sold out now, but available separately} and I have had SO much fun playing with this kit! The card I am posting today is the first card I made with the kit:


What I Used to Make my Card:
White Card Base
MFT Wallpaper Patterns Paper Pad
MFT Housecats Stamp Set
Die-Namics Housecats Die Set
Die-Namics Window Dressing Die Set
Die-Namics Cats & Plant Perches Die Set
VersaMark Ink

Super Fine Black Embossing Powder
White Card {curtains}

Various Colors of Brown Card {plant stems, curtain holder and border on top & bottom of card}
Various Colors of Green Card {leaves}
Scraps of Card {plant holders}
Watercolor Paper {I use this}
Zig 
Clean Color Brush Markers
Gina K Amalgam Ink Pad in Obsidian Ink 

If you follow me on any social media then you will know that I am a serious cat lover; I do love every animal {except spiders, but they aren't really an animal are they?} but cats have a huge place in my heart.  I grew up in a house with 5 cats and 3 dogs and my mom was an avid gardener both inside and outside, so when I saw this set, and especially the cat in the plant hanging from the ceiling, I knew I had to have it.  As usual, I began by stamping, coloring and cutting all the needed items and I also covered the front of my card with the brick patterned paper found in the paper pad.  I added a strip of dark brown card to the top & the bottom of the card to ground it a bit. I also cut out the window dressing items {I used a scrap of pre-made sky that I had made using oxide inks and a splatter of metallic watercolor paint - I figured it could be snowing outside, or raining or it could even be the stars you see through the window, your choice!} and I trimmed the curtains some. I then cut out the two perches and started placing the items I had to ensure they'd all fit on the card where I wanted them to.  Next I stamped and embossed the sentiment and glued everything down.  

I enjoyed making this card so much that I made a whole bunch of houseplants using nothing but the dies; stay tuned as those cards will be on the blog soon.  I hope this post finds you all happy and healthy! Thanks so much for reading my little tutorial.

Fondly,
Christi

I am entering my card in the following challenges:
The Cutie Pie Challenge Blog, #158 - It's Raining Cats & Dogs!
Happy Little Stampers - April
Anything Goes with  Watercolor Challenge
Happy Little Stampers - April Anything Goes with Dies Challenge
Shopping Our Stash, #433 - Plant Life
SUYP, #65 - Furrything Goes
Unicorn Challenge, #64 - Include an Animal
Crafty Animals, #49 - Anything Goes w/ an Animal
Moving Along with the Times, #129 - Animals/Birds
NBUS Challenge, #25 - Anything Goes as Long as it is Never Used Before