I made this card because I
am really lacking in the area of masculine cards; I don’t have any extras made, I'm not that confident at making them and you know practice makes perfect
(at this rate I should be up to speed in, let’s say, 500 more years <grin>). I wanted a card that could be used for any
occasion and I chose Tim Holtz Stampers’ Anonymous Playful Journey & The
Journey stamp sets. I love the backwards
“e” in the Enjoy the Journey sentiment (Playful Journey set) and that really
was the main reason I had bought the set – I completely forgot I had The
Journey set and noticed that a few of the images appeared to be the same but I
discovered while making this project that while the images may be the same
design they are different sizes (yippee!), I am already thinking about how I
can use the 2 car images together; maybe a shadow? OK, anyway. . . This is what I used to make
my “Journey Card”:
- Tim Holtz Stampers’ Anonymous Playful Journey (enjoy the journey sentiment)
- Tim Holtz Stampers’ Anonymous The Journey (I used both of the cars)
- Tim Holtz Idea-ology Kraft Glassine Paper, 1 piece
- Matte white card stock cut to card size
- Darice Gears Embossing Folder
- My Minds Eye Celebration Tracker Paper Stack (cut out Trip Information – of course you can always stamp it)
- Black circle scrap (from a MME punch out alphabet – told you I save everything!)
- Kraft Card Stock (any shade will do)
- Ranger Archival Ink in Jet Black
- Distress Ink in Brushed Corduroy
- Distress Ink in Frayed Burlap
- Sharpie Black Marker
- Scrap piece of text book paper (I saved this from my Altered “Shell Book” Niche project & gessoed a bunch of the pages that I cut out)
- Dimensional Adhesive, 2 "dots"
- Stipple Brush
I started out with running
the Kraft Glassine paper through my Big Shot using the gears embossing folder
then I trimmed it up a bit – it still looked kind of distressed on the edges
and maybe not quite even but it worked for me.
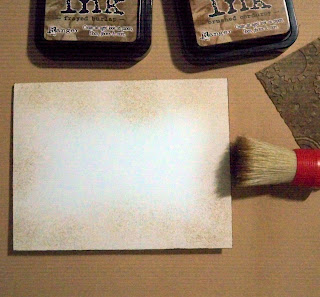
After deciding where I
wanted to soften the white of the card stock so I stippled Frayed Burlap along
the edges of the card & then edged the card with Brushed Corduroy. I also edged the Trip Information paper and
crumpled it up to add some texture.
 |
| I love stipple brushes - I have had my brushes for over 10 years! |
I stamped the 2 cars in
the jet black ink on Kraft card stock and then sort of fussy cut them out – I
purposely left a little border around the cars.
I took my black circle
scrap, cut the piece I needed and edged the whole thing, including inside the
circles with my black Sharpie. This also
helped to get rid of the little bitty “tabs” that sometimes stay on a punch out
– you know those annoying little bumps of paper where the punch out was held in
place.
I then stamped the
sentiment “Enjoy the Journey” onto the piece of scrap book text that had
already been gessoed. I crumpled that up
as well and used a pair of decorative scissors in deckle to cut around the
square. I edged that with Brushed Corduroy
but not precisely – just a little bit here and there.
I hope you enjoyed my tutorial and I’d LOVE to hear your thoughts on this card and all of my posted projects – I am going through a dry spell with comments so please leave me some love, tips, suggestions, money, whatever – I’m not that picky <grin>.
I really like this card;
it was fun and easy to make. I also like
to make projects that allow substitutions or omissions and they will still look
good & I think this card allows that.
Remember, save everything, use everything & substitute with what you
have on hand (especially if you are like me and find that the creative juices
really get flowing after all the stores are closed & you really should be
in bed).
I am entering this project in the Simon Says Stamp &Show Kraft Challenge.
 |
| I tried to show some of the texture & dimension of the card - you can see a little bit in this picture |
 | ||
| My wonderful assistant, Monster, showing off one of her many talents |
 |
| Finally the finished card |


Great card Christi
ReplyDeleteFun card! I love using the few embossing folders I have. I have a gears one too. Love Steampunk and it is so male!
ReplyDeletehugs Karen
Great card! Love the images you chose and the gears! Very cool masculine look! (Your assistant is adorable too!)
ReplyDeleteLovely card! And your assistant looks like a very hard worker - lol. Thanks so much for joining us at Simon Says Stamp and Show this week! - Ashli :)
ReplyDeleteNice masculine card!
ReplyDelete